
In-App
In-app campaigns are created directly within Campaign flows, using the In-App action node. Instead of setting up a separate targeting campaign, you add an In-App node to your campaign workflow and configure its content and display settings there.
To deliver an in-app message within a campaign flow, follow these steps:
- Create or open a campaign:
Click the Create New (+) button and select Campaign, or open an existing campaign from the Campaign section. Any campaign flow that includes a workflow step can deliver in-app messages. - Complete the Settings step:
Provide the campaign information and continue to the Campaign Workflow step. - Add and configure the In-App node:
In the workflow canvas, configure your audience, then drag the In-App node from the Actions palette into your flow and configure it.
Before you begin, it's worth knowing how Flow In-App messages are delivered and what your app needs to support them, see Flow In-App vs. Targeting In-App.
1: Campaign Settings
In this step, you provide the essential details of your campaign:
- Name: Enter a unique name for your campaign. This name will help you easily identify the campaign in your folders and reports.
- Folder: Choose the folder where the campaign will be stored. You can change it with the Change Folder option.
- Description (optional): Add a short description of the campaign.
- Tags: Add tags to make the campaign easier to find and report on.
- Schedule Options: Choose when the campaign starts — immediately (Now) or at a time you define (Scheduled).
Click Next to continue to the Campaign Workflow step.
2: Audience
In the workflow canvas, double-click the Audience node to configure the campaign audience. In the Select Target Audience panel you can choose your audience from the following tabs:
- Segment
- Predefined Segments
- Table
- Remote Segment
- Tag
You can also enable Exclude to leave certain audiences out of the campaign, and Control Group to hold back a percentage of the audience for measurement. Use Insights > Calculate to see the estimated audience size before saving.
After you save the audience, the Audience node displays two output branches: Contacts and Anonymous. The action node palette on the left becomes active once the audience is configured.
3: Add the In-App Node
Drag the In-App node from the Actions palette onto the canvas, and connect the Contacts and/or Anonymous branch of the Audience node (or any other point of your flow) to it. Then double-click the node to configure it.
The In-App node is configured in two steps: Content and Settings.
4: Content
In the Content step:
- Node Name (optional): Give the node a name to identify it on the canvas.
- Content: Select an existing in-app content from your content folders. You can use the search bar and filters to find content. After selection, the content is previewed on the right-hand side of the screen.
- Application: Click Select Application and choose one or more applications on which the campaign will appear.
Note: The audience count may decrease according to the chosen applications.
Click Next to continue to the Settings step.
5: Settings (Delivery Controls)
This step provides the configurations for how and when the in-app message is displayed.
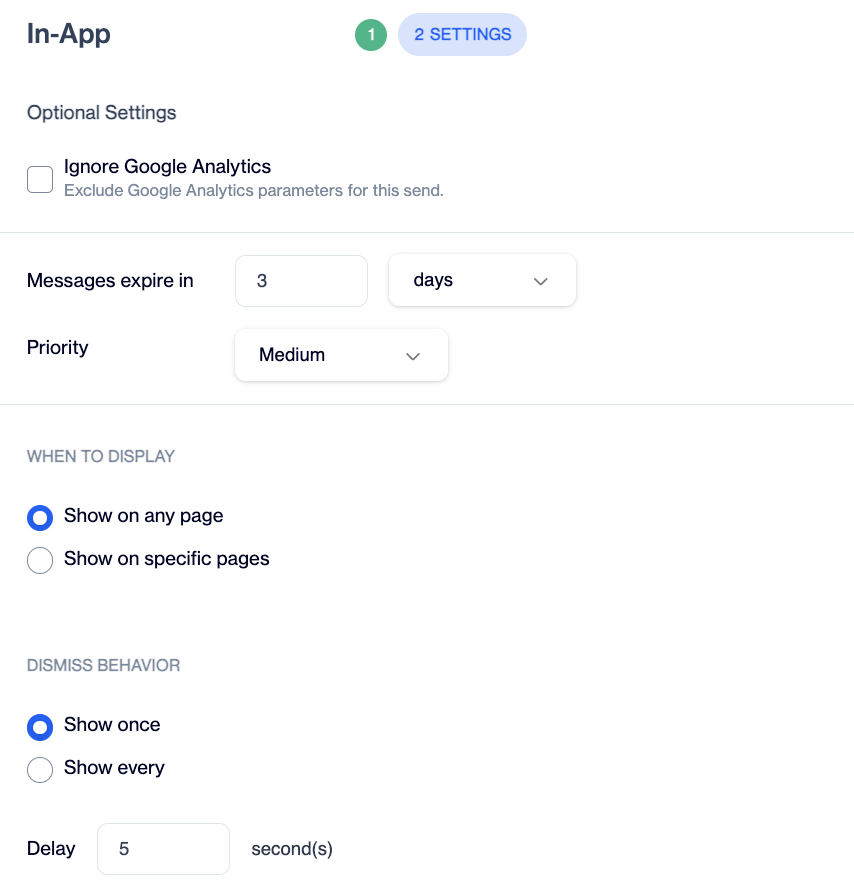
Settings - Delivery Control
Optional Settings
- Ignore Google Analytics: Excludes Google Analytics parameters for this send.
- Messages expire in: Defines how long the message remains valid to be displayed. You can set it in hours, in days, or until a specific date.
- Priority: Sets the priority of the in-app message. There are 3 priority options: High, Medium, Low. When conditions are met for a visitor to view more than one in-app message, the message with the higher priority is displayed.
When to Display
This section controls where the in-app message is shown inside the application:
- Show on any page: The message can be displayed on any screen of the application.
- Show on specific pages: The message is only displayed on the screens you define. Add one or more Screen Name filters by choosing an operator (equals, not equals, contains, does not contain, starts with, and more) and entering a value. Use + Add Filters to define multiple screens.
Dismiss Behavior
This section controls how often a visitor sees the message:
- Show once: The visitor sees this in-app message only once.
- Show every: The message is shown repeatedly at the interval you define (for example, every 1 hour). With Max dismiss count, you set the maximum number of times the message can be dismissed by the visitor; after this count is reached, the message is not displayed again. This value must be 1 or more.
Delay
Delay: The number of seconds to wait before the message is displayed after the visitor opens a matching screen.
Click Save to complete the node configuration. The node on the canvas now displays the selected content name.
6: Complete and Launch the Campaign
Complete the rest of your flow as needed and use the buttons on the upper right side of the page to Save As Draft, Send for Approval, or Publish the campaign.
Campaign-level Delivery Settings (Google Analytics/UTM parameters, Hourly Capping, Conversion Tracking, Drop Condition) are also available from the top bar and apply to the whole campaign.
Updated about 1 month ago