
New Filters for Onsite Targeting Campaigns
You can now apply more precise targeting in Onsite campaigns using newly added filters. These filters allow you to segment visitors based on their current page information, last visited category, last viewed product, and more.
By using these filters in Targeting Campaigns, you can deliver messages to the right users at the right time, improving personalization, engagement, and overall campaign effectiveness.
How to Access
- Navigate to Campaign > Targeting.
- Select Onsite.
- Click New and choose Type = Targeting.
- On the Settings page, locate the Whom to Show section.
- Select the option Visitors that satisfy the filter.
- The Add Filter section will appear, where you can define your targeting conditions.

Add Filter
How to Use New Filters
When adding a filter, you can now choose from the following new filters:
Current Page Type: Captures the type of page a visitor is viewing
- Data Type: Text.
- Source: Pageview event.
Current Page URL: Targets users based on the exact URL of the current page
- Data Type: Text.
- Source: Pageview event.
Current Page Title: Uses the page's title for targeting
- Data Type: Text.
- Source: Pageview event.
Last/Current Category Path: Tracks the last or current product category a visitor viewed
- Data Type: Text.
- Source: Local storage (updated from pageview event).
Last/Current Product ID: Identifies the specific product a visitor is currently viewing or last viewed
- Data Type: Text.
- Source: Local storage (updated from pageview event).
Last/Current Product Price: Targets based on the price of the last or current product viewed
- Data Type: Decimal.
- Source: Local storage (updated from pageview event).
Note
Current Page Title and Current Page URL filters are only available for on-site usage. They are not supported for in-app filtering.
These parameters allow you to create highly relevant rules, such as showing an onsite message only when a user is browsing a product in a specific category or within a certain price range.
Event History and Cart Items
In addition to page-based filters, you can also use:
Event History
The Event History filter allows you to define conditions based on how many times a user performed a specific event (such as viewed a product or added an item to the cart) within a defined time period.
Event data is stored client-side, so to use this filter, the corresponding events must first be defined in the platform.
Step 1: Define Events
To create and store events on the client side:
- Go to Settings > Campaign Configurations > Analytics Event Definition.
- Click New to create a new event.
- Fill in the following fields:
- Event Name: Enter a descriptive name for your event (e.g., Page View).
- Event Code: This field is automatically generated based on the event name.

Event Information
Event Settings
Configure the following options under Event Settings:
- Store on the client: Toggle On to ensure the event is stored client-side. (This must be enabled for the Event History filter to function.)
- Maximum Event Count: Set the maximum number of events to be stored. (minimum 1, maximum 10,000).
- Event Time Window: Define how far back the event data will be stored (minimum 1 hour, maximum 30 days).

Event Settings
Event Attributes
Each event can have multiple attributes that provide additional details about the event.
For example, an event named Page View can include various attributes such as Page Title, Product ID, Category Path, or UTM Source. These attributes can be used to refine your event-based filters and build more precise targeting conditions.

Event Attributes
To view or customize attributes:
- Under Event Attributes, click Show Default Attributes to see available options.
- To add a custom one, click Add Attribute, and fill in the following fields:
- Attribute Display Name: The visible name of the attribute (e.g., Page Type). Choose from the dropdown menu.
- Attribute Data Type: The format of the data (e.g., Text, Number, Decimal). This field is automatically filled based on the selected attribute.
- Attribute Name: The internal name used in event tracking. This field is automatically filled based on the selected attribute.

Add Attribute
Click Save when you've completed the event and attribute setup.
Step 2: Use Event History in Filters
Once your events and attributes are defined, you can use them to create detailed targeting conditions.
- Navigate to Campaign > Targeting.
- Select On-Site.
- Click New and set Type as Targeting.
- On the Settings page, locate the Whom to Show section.
- Select Visitors that satisfy the filter.
- In the Add Filter section, choose Event History as the filter type.

Event History
Configure Event History Filter
- Under Event Type, select the event you previously created in Settings > Campaign Configurations > Analytics Event Definition(for example, Page View).

Configuration of Event History Filter
- Choose Count Type: From the Count Type dropdown, select how the system should evaluate event occurrences:
-
number of: Counts every occurrence of the selected event.
Example: Use this when you want to target users who performed an event multiple times, even for the same item. -
distinct number of: Counts unique occurrences based on distinct attribute values.
Example: Use this when you want to target users who performed the event for different items.

Count Type
- Define the main event condition:
- Choose a comparison operator from the dropdown menu: exactly, greater than, or less than depending on how you want to count event occurrences.
- Specify the number of times the event must have occurred.
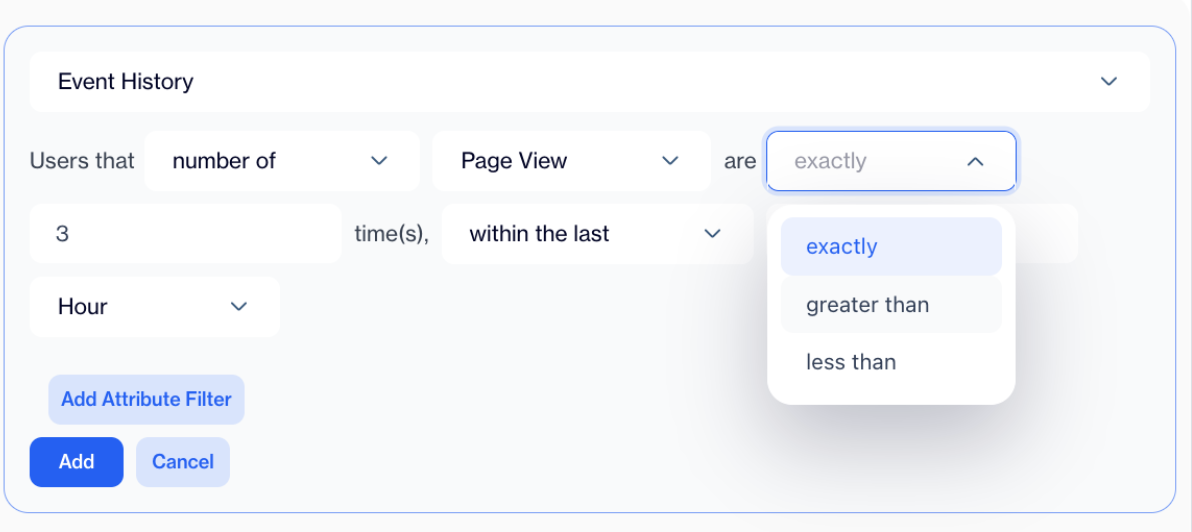
Comparison Operators
- Define Time Range: Select how far back the event data should be evaluated. There are two options:
- within the current session: Filters users based on actions that occurred during their current browsing session.
Example: Target users who added a product to their cart during their current visit. - within the last X hours/days: Filters users based on events that occurred within a custom time window (for example, the last 12 hours or 7 days).
Example: Target users who viewed 3 or more product pages in the last 24 hours.

Time Range
Add Attribute Conditions
You can refine your event-based filter by adding attribute-level conditions that belong to the selected event type.
- Click Add Attribute within the Event History filter.
- From the dropdown menu, choose the relevant attribute (for example, Page Type or Page Title).
- Select an operator to define the condition logic. Available operators include:
- equals / not equals
- contains / not contains
- starts with / ends with / not ends with
- is one of / is not one of
- contains any of / contains all of
- Enter or select the attribute value (for example, page title).

You can add multiple attributes or event conditions to narrow down your audience even further by clicking + Refine More.
If you add more than one attribute, the conditions will be connected with AND by default.
You can switch the logic between AND and OR by clicking on the connector, allowing flexible combinations.

AND and OR
Cart Items
The Cart Items filter allows you to target visitors based on the products currently in their shopping cart. You can create conditions using the total number of items, specific attributes (like price or discount), or aggregated values such as the total or average price of items in the cart.
Configure Cart Items Filter
In the Add Filter section, select Cart Items.
Step 1: Choose Count or Calculation Type
From the dropdown menu, select how the system should evaluate the cart data:
- number of: Counts all items in the cart.
- distinct number of: Counts unique items based on a distinct attribute.
- sum of: Calculates the total value of a numeric attribute.
- minimum of: Uses the lowest value of a selected numeric attribute.
- maximum of: Uses the highest value of a selected numeric attribute.
- average of: Calculates the average value of a numeric attribute.

Count Type
Step 2: Define the Main Condition
- Select a comparison operator such as equals, greater than, less than, greater than or equal to, or less than or equal to.
- Enter the comparison value (for example, 4 or 500).
Step 3: Add Attribute Conditions (Optional)
You can refine the filter using item attributes.
- Choose an attribute from the dropdown (for example, Price, Has Discount, Category, Product ID).
- Select an operator such as equals, not equals, greater than, less than, contains, not contains, starts with, ends with, is one of, is not one of, contains any of, or contains all of.
- Enter or select the target value (for example, Has Discount equals No or Category contains Shoes).
Step 4: Combine Multiple Conditions
- Add more filters using + Refine More.
- Conditions are connected with AND by default.
- Click the connector to switch between AND and OR logic, allowing flexible rule combinations.
These advanced conditions enable you to target users based on their recent actions and shopping behavior.
With these new targeting filters, you can create campaigns that respond dynamically to visitor activity and context. Whether it's the page a visitor is viewing, the last product they looked at, or the items in their cart, these filters give you greater control over who sees your Onsite campaigns. This leads to more personalized experiences and higher campaign effectiveness.
Updated 8 months ago