
Contact Extension Types
The Contact Extension feature enables you to store and manage multiple email addresses or phone numbers for a single contact.
By default, the master contact table holds only one email address and one phone number per contact, along with their related permissions and subscription statuses (such as email and GSM consent).
In some cases, however, you may need to manage more than one email address or phone number for the same user-for example, when a customer has both personal and work contact details.
The Contact Extension feature solves this need by allowing you to add and manage alternative contact details for each user. This flexibility allows you to decide which contact information to use in your campaigns, ensuring more precise targeting and better campaign performance.
Step 1: Define Contact Extension Types
- Navigate to Settings > Campaign Configurations > Contact Extension Types.
- Click Add.
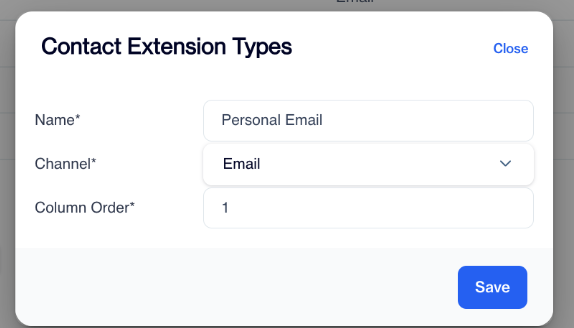
- Fill in the following fields:
- Name: Enter a name for the extension type.
Example: Personal Email - Channel: Select whether this extension type applies to Email or SMS/MMS campaigns.
- Column Order: Define the order in which this extension type will appear.
- The Column Order value is important when multiple contact extensions exist, it ensures that the system knows which one to use first in campaign delivery.
- This determines its priority order during campaign delivery.
- Smaller numbers (e.g., 1) have higher priority, followed by 2, 3, and so on.
- Name: Enter a name for the extension type.
Contact Extension Types
- Click Save to confirm your settings.
Step 2: Import the Contact Extension Data
After defining your extension types, you need to add the corresponding contact details (emails or phone numbers) into the system.
To correctly link each extension to its contact, data must be imported into the master_contact_extension table using the correct contact_key.
This ensures every contact extension is properly associated with the right record in the master_contact table.
How to Import Data
You can populate the master_contact_extension table using:
- REST API integration (recommended and most common method), or
- Data Import Automation Flow
Data Import Requirements
The master_contact_extension table must be populated with the correct data.
You can feed this table using:
- REST API integration (most common method)
- Data Import Automation Flow

Master_contact_extension Table
Each record in the master_contact_extension table includes several key fields that determine how contact extensions are stored and managed.
The first four fields, contact_key, name, channel, and address, are mandatory and must always be provided. The contact_key uniquely identifies each contact and links the extension record to the corresponding entry in the master contact table. The name field specifies the defined Contact Extension Type, such as Personal Email or Work Phone. The channel field indicates the communication channel this extension belongs to, either Email or SMS/MMS. The address field holds the actual contact details, such as the email address or phone number, depending on the selected channel.
In addition to these required fields, the table can also include several optional ones that provide permission and status information.The permission field indicates whether the contact has granted consent for communication and permission_reason can be used for adding additional information about that consent. Status and status_reason fields updated by the system but if you want you can override it.
Step 3: Use Contact Extensions in Campaigns
Once the Contact Extension Types are defined and the related data has been imported, you can start using these extensions in your campaign flows.
When creating a campaign in the Flow screen, select an Email or SMS/MMS node. In the node's Settings tab, you will find a field named Contact Extension. This field determines whether the campaign message will be sent to the default contact information or to the defined extensions.
Contact Extension Options
Send to default If this option is selected, the campaign works as usual and sends the message to the default address stored in the master contact table. The default address must always exist in the master contact record and correspond to the contact's primary email address or phone number depending on the selected channel.
Use contact extension If this option is selected, the system uses the extensions defined earlier under Settings > Campaign Configurations > Contact Extension Types for the selected channel.
When you select Use contact extension, two additional options become available:
- Send to first available: Sends the message to the first available address based on the Column Order priority defined in the Contact Extension Types configuration. The system starts from the highest priority (for example, order 1) and continues until it finds an available address.
- Send to all: Sends the message to all available contact extensions defined for that channel.

Contact Extension
These options allow you to control exactly how messages are delivered when multiple contact extensions exist, ensuring more flexible and accurate campaign delivery.
Updated 5 months ago