
Recurring Flow Campaigns
A recurring campaign runs repeatedly. Instead of sending once, it is triggered again and again — on a schedule you define (for example every Monday at 09:00), or by another flow. Use it for weekly newsletters, win-back reminders, birthday messages, and any send that repeats.
If you only need to send once, use a One-Time Flow Campaign instead.
Recurring campaigns are built on the Flow canvas and work the same way for every channel: Email, SMS/MMS/RCS, Push, Inbox, In-App, Onsite, and WhatsApp. This page covers the steps common to all channels; channel-specific options are documented on each channel's Action Node page.
How Recurring Campaigns Work
A recurring campaign stays active and runs many times. Here is what happens after you publish:
- The campaign becomes active on its start date. It stays active until the end date you set — or forever, if you chose Never.
- Each run is triggered by the schedule or by another flow. With Trigger Periodically, the campaign runs at the times you defined (for example daily at 09:00). With Trigger Externally, it runs each time another flow fires it with the Fire Campaign action.
- The audience is checked fresh at every run. Each time the campaign runs, the platform looks at your segment, table, or tag again. Contacts who newly match are included; contacts who no longer match are not. This is what makes recurring campaigns automatic — you set the audience rule once, and each run picks up whoever matches that day.
- Entry Capping controls repeat messages. Because the campaign runs many times, the same contact can qualify again and again. Turn on Entry Capping to limit how often a contact can re-enter — for example, at most once per day or once per month.
- Each run works like a one-time send. Contacts move through the flow node by node, and every send is checked against permission, frequency capping, and blackout hours — exactly as described in How One-Time Campaigns Work.
- The campaign keeps running until it ends. It stops at the end date, or when you stop it manually from the Flow Campaigns list.
Prerequisites
The same as for one-time campaigns: your channel is set up, your content exists, your audience exists as a segment, table, or tag, and your role can create and publish campaigns. See Prerequisites.
Step 1 — Create the campaign
- In the panel, go to Campaigns → Flow Campaigns.
- Click New.
- Select Recurring Campaign.
Step 2 — Enter campaign info
| Field | Description |
|---|---|
| Name | Enter a unique name. It helps you find the campaign in folders and reports. |
| Folder | Click Change Folder to store the campaign in the right folder. |
| Description (optional) | A short summary of the campaign's purpose and goal. |
| Tags | Add tags to make the campaign easier to filter and search. |
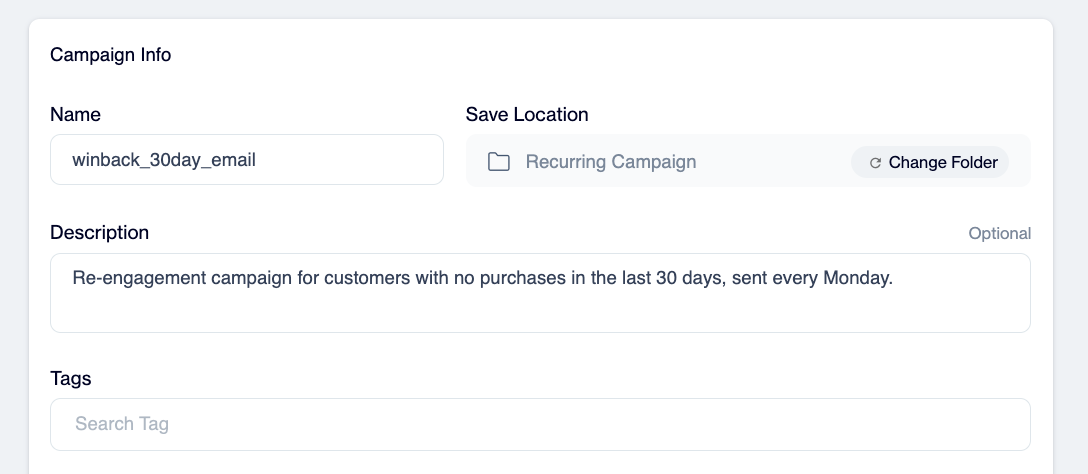
Recurring Campaign Info
Step 3 — Choose how the campaign is triggered
Under Select how this campaign will be triggered, choose one:
- Trigger Periodically — the campaign runs on a regular schedule that you define in Step 4.
- Trigger Externally — the campaign runs when another flow fires it, using the Fire Campaign action. Use this when a different automation decides the timing. If you choose this option, skip Step 4.
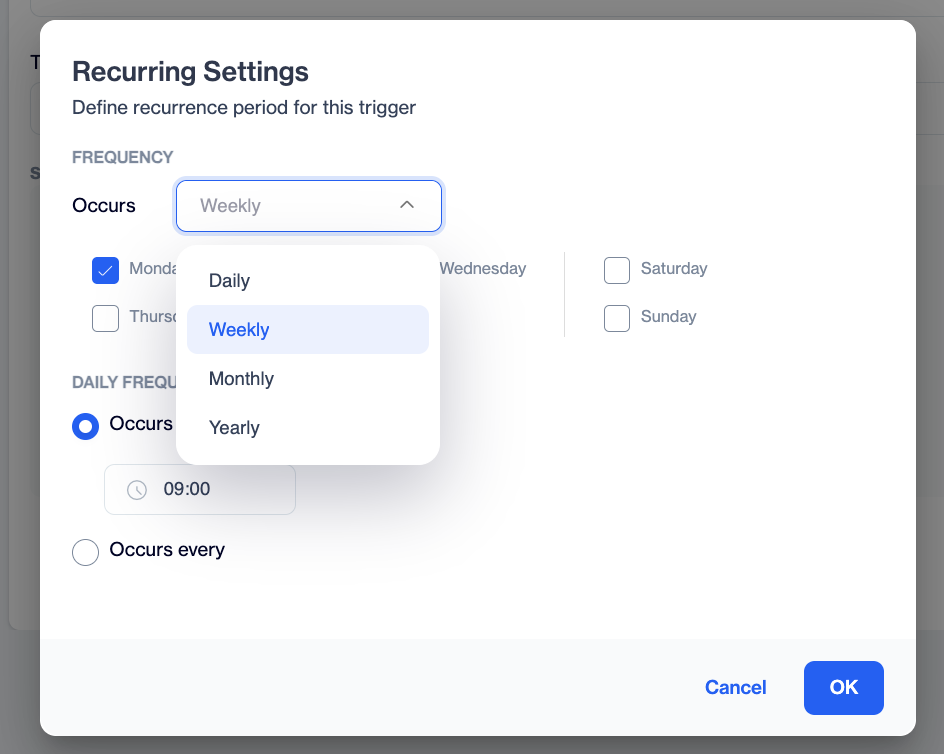
Recurring Settings
Step 4 — Set the schedule (periodic campaigns)
| Setting | Options |
|---|---|
| Start Date | Now — the campaign becomes active immediately. Select — pick a custom start date and time. |
| End Date | Never — the campaign runs until you stop it. Select — pick a custom end date and time. |
| Recurring Periods | Click Add to define when the campaign runs. Choose a frequency — Daily, Weekly, Monthly, or Yearly — then set the details. For example, Daily can run once at a set time, or every few hours. |
Example: a weekly newsletter runs with Start Date Now, End Date Never, and a Weekly period every Monday at 09:00.
For Time Zone-Based Delivery, the date, time, and repeat options are set in the trigger section — see Time Zone Based Delivery.
Step 5 — Select the audience
Double-click the Audience node and choose your source — Segment, Predefined Segment, Table, Remote Segment, or Tag. The sources work the same as in one-time campaigns.
Remember: the audience is re-checked at every run, so define it as a rule ("customers with no purchase in 30 days"), not as a fixed list.
Two tools matter especially for recurring campaigns:
- Exclude — remove specific groups from every run.
- Entry Capping — limit how often the same contact can re-enter the campaign. Turn on the toggle and set a limit per hour, day, or month. Without a cap, a contact who keeps matching your audience rule receives the message on every run.
Step 6 — Add the channel node and select content
Drag your channel's node onto the canvas, connect it after the Audience node, and select the content — the same as in one-time campaigns. Channel-specific options are on each channel's page.
Step 7 — Configure optional settings
Each channel node has its own optional settings — duplicate removal, tracking, frequency capping override, contact extension. Which settings are available depends on the channel. See your channel's page for the full list.
Step 8 — Close the flow
Every path must finish with an End node — including branches for contacts that don't meet a condition.
Step 9 — Test and publish
- Review the flow — every node connected, every path closed.
- Always send a test using your test list.
- Click Save, then publish. The campaign becomes active on its start date and runs on its schedule (or waits to be fired externally).
To stop a recurring campaign before its end date, stop it from the Flow Campaigns list. Results for each run appear in Flow Analytics and the channel's detailed report.
Example: a weekly win-back campaign
An e-commerce team wants to email customers who haven't purchased in 30 days — automatically, every week:
- Create a Recurring Campaign named
winback_30day_email. - Trigger: Trigger Periodically. Schedule: Start Now, End Never, Weekly — every Monday at 09:00.
- Audience: Segment No purchase in 30 days. Entry Capping: once per month, so the same customer isn't emailed four Mondays in a row.
- Drag the Email node and select the We miss you content with a personalized discount code.
- Add an End node, send a test, click Save, and publish.
Every Monday the campaign checks the segment again. New inactive customers get the email; customers who already received it this month are skipped by the entry cap; customers who made a purchase leave the segment and get nothing.
Updated 3 months ago