
Delivery Settings
Delivery Settings allows users to fine tune the campaign flow by the delivery options . Available delivery settings are listed below and on this page you will find how to configure those settings.
- Google Analytics
- Hourly Capping
- Conversion Tracking
- Drop Condition
- Skip Permission
Google Analytics
Enhance your campaign insights by enabling Google Analytics tracking for each campaign flow. This integration allows you to attribute web traffic and conversions to your specific marketing efforts by utilizing UTM parameters.
Google Analytics
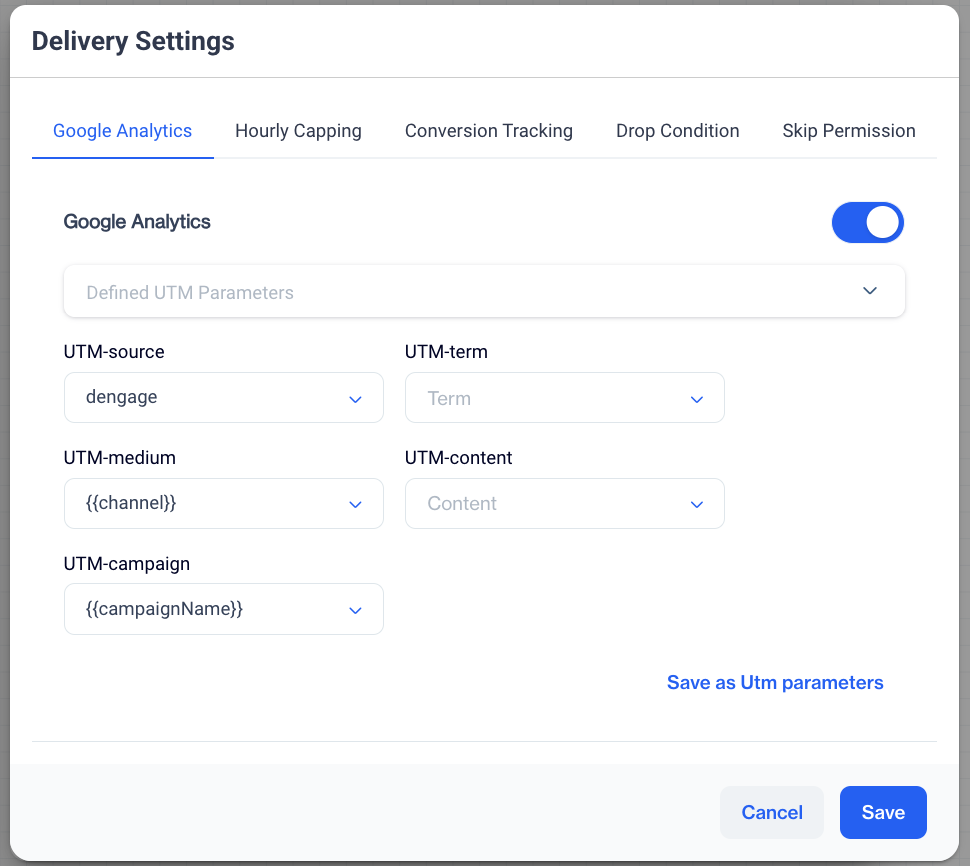
1.Enable Google Analytics
- Activate Google Analytics tracking by toggling the switch on.
2.Apply UTM Parameters
- Defined UTM Parameters: If you have predefined UTM settings, select them from the 'Defined UTM Parameters' dropdown to apply them to your current campaign.
- UTM-source: Identify the source of your traffic. 'dengage' is commonly selected, but you may choose or input another source that accurately reflects your traffic origin.
- UTM-medium: The medium parameter captures the method of delivery, such as 'email' or 'SMS'. Use {{channel}} to automatically populate this field based on the campaign channel.
- UTM-campaign: For campaign identification, insert {{campaignName}} to dynamically include your campaign's name.
- UTM-term (Optional): Define a specific term related to your campaign for targeted keyword tracking.
- UTM-content (Optional): Distinguish between similar content within the same campaign by customizing this field.
3. Save UTM Settings
- After defining your UTM parameters, click Save as Utm parameters to apply these settings to be used on later campaigns.
Final Step: Confirm and Save
- Double-check your UTM settings for accuracy and consistency with your tracking objectives.
- Click 'Save' to complete the Google Analytics configuration for your campaign.
TipProperly defined UTM parameters are crucial for accurate campaign tracking and attribution in Google Analytics. Ensure that each parameter is consistent across your campaigns for reliable data analysis.
With Google Analytics tracking enabled and UTM parameters set, you will have detailed insights into the performance of your campaigns directly within your Google Analytics dashboard.
Hourly Capping
Hourly Capping is a crucial feature that helps manage the rate at which messages are sent from your campaigns, preventing any sudden surges in traffic that could potentially overwhelm your system or annoy your recipients. This setting is essential for maintaining a steady flow of communication and ensuring a positive user experience.
Hourly Capping
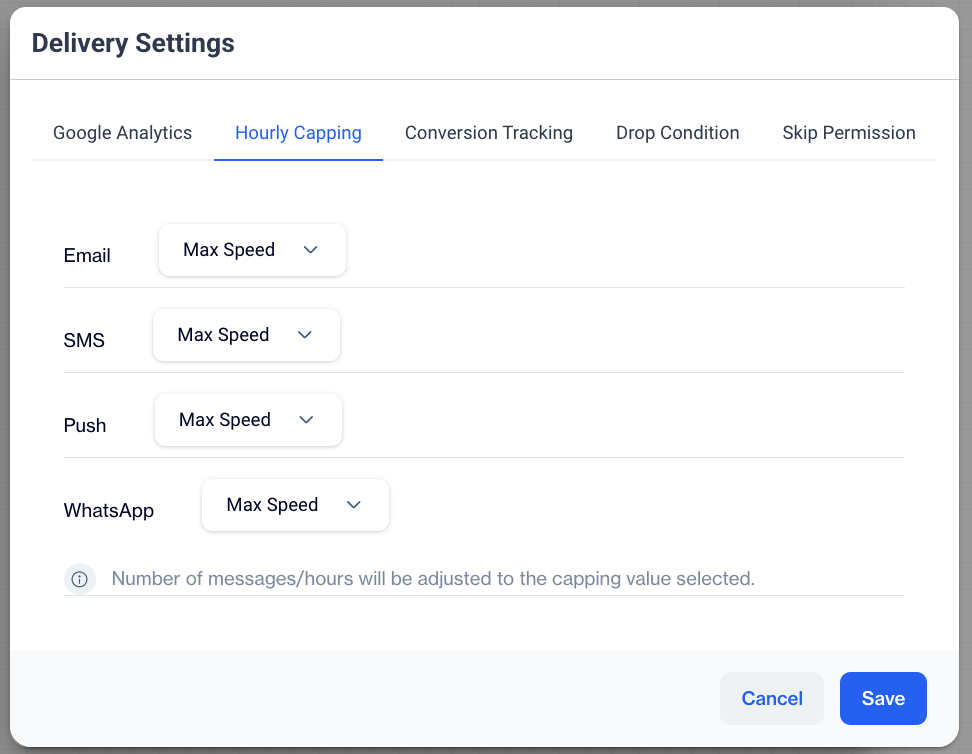
Setting Hourly Capping Limits
- Email: Select the desired send rate from the dropdown menu. You can choose 'Max Speed' to send emails as quickly as possible, or select a specific limit to pace the delivery.
- SMS: Choose an appropriate send rate for SMS, such as '5,000 sms / hour', or another predefined limit that suits your campaign needs.
- Push Notifications: Like Email, you can opt for 'Max Speed' or set a specific limit for push notifications to manage the delivery pace.
- WhatsApp: Set a specific threshold like '10,000,000 WhatsApp messages / hour' to control how many messages are sent within an hour for your WhatsApp campaigns.
Saving Your Configuration
- After setting the hourly limits for each channel, review the configurations to ensure they align with your campaign strategy and expected traffic volume.
- Click Save to apply the Hourly Capping settings to your campaign.
Note: The number of messages per hour will be adjusted according to the capping value selected. It's essential to configure these settings carefully to balance the need for timely delivery with the risk of overwhelming your recipients or systems.
TipWhen setting up Hourly Capping, consider the peak times for user engagement and the capacity of your systems. This ensures that your messages are delivered effectively without causing any disruptions or diluting the impact of your campaign.
By following these instructions, you can effectively manage the rate of your campaign's message delivery, ensuring a consistent and measured approach that enhances customer experience and engagement.
Conversion Tracking
Conversion Tracking is an indispensable feature that allows you to measure the success of your campaign by tracking specific user actions, known as conversion events. By monitoring these events, you can gauge the effectiveness of your campaign and make data-driven decisions for future marketing strategies.
Configuring Conversion Tracking
Conversion Tracking
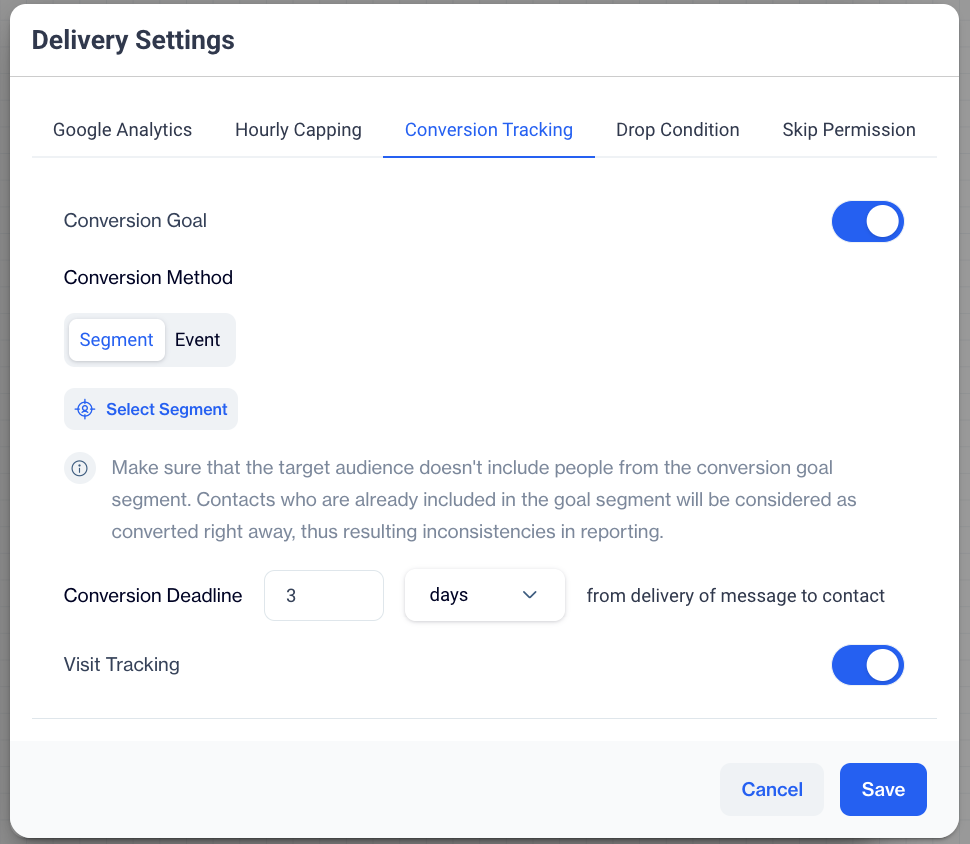
- Conversion Goal: Toggle this option on to activate conversion tracking for the campaign.
- Conversion Event: To accurately track conversions, it's essential to define what constitutes a conversion event within your campaign. There are three types of conversion events you can track:
- Default Events: These are built-in events that commonly signify a conversion, such as 'Add To Cart', 'Order', or 'Page View'. To use a default event, simply select it from the 'Conversion Event' dropdown menu.
- Custom Events: Custom events are user-defined actions that are specific to your campaign goals. If you've set up custom events in the system, select these from the 'Conversion Event' dropdown menu.
- Predefined Segments: These segments are created beforehand and can be set as conversion events. To select a predefined segment, choose the 'Enter a segment' option from the 'Conversion Event' dropdown, then select the segment you wish to track as a conversion from your list of predefined segments.
- Conversion Deadline: Define the time frame within which a conversion must occur to be counted. Set this by choosing the number of days from the delivery of the message to the contact.
- Conversion Event: To accurately track conversions, it's essential to define what constitutes a conversion event within your campaign. There are three types of conversion events you can track:
- Visit Tracking (if available): Configure this option to track visits or other engagement metrics as part of your conversion tracking strategy.
Tip for Custom EventsFor a deeper understanding of how to configure custom events that can be used as conversion goals, please visit the Event Definition page in our documentation. Here you will find guidelines on setting up and utilizing both default and custom events to align with your campaign objectives.
Saving Your Conversion Tracking Configuration
- After setting the conversion event and deadline, click 'Save' to apply these settings to your campaign.
Note: Ensure that your target audience does not include contacts already in the conversion goal segment, as this may lead to inconsistencies in reporting.
By following these steps, you'll be able to implement a robust conversion tracking system within your campaign flow, empowering you to understand and improve the ROI of your marketing efforts.
Drop Condition
Drop Conditions enable you to dynamically exclude contacts from a campaign based on specific behaviors or attributes. This feature ensures that your campaign targets only the most relevant audience segments at any point in the campaign's lifecycle.
Drop Condition
Configuring Drop Conditions
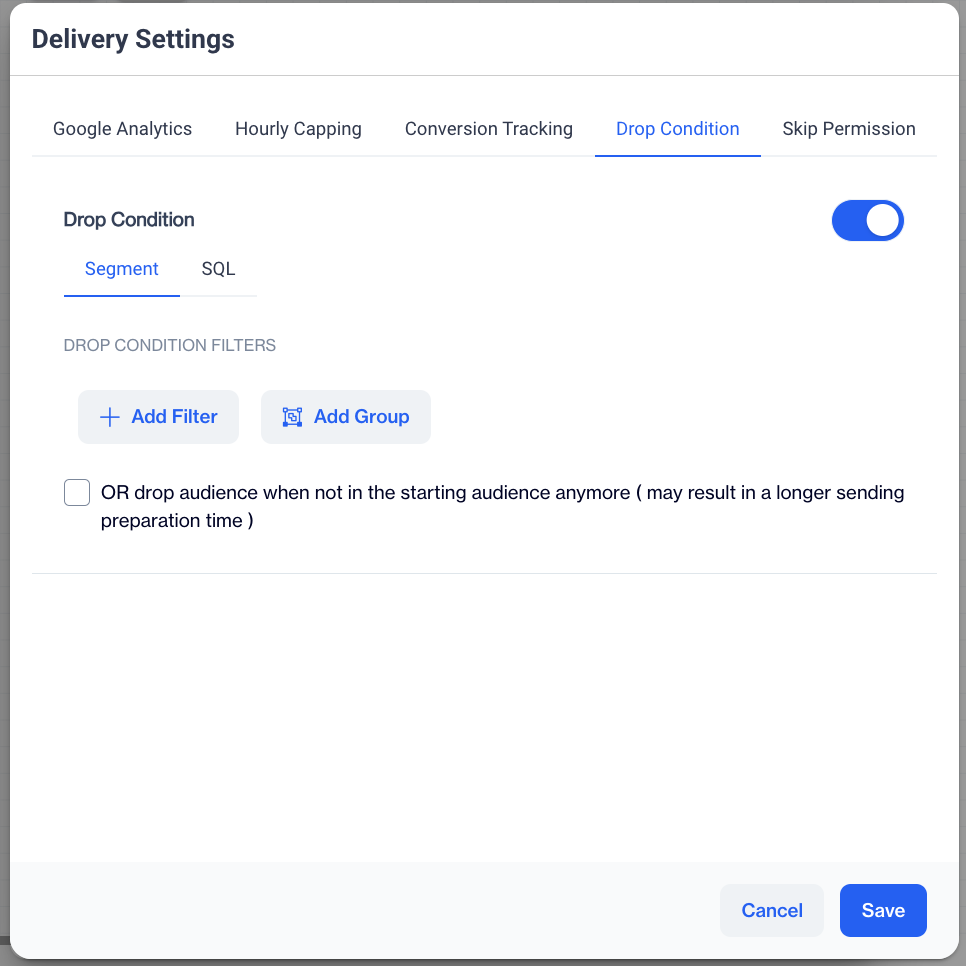
- Choose Condition Type: You have two types of conditions to choose from: Segment or SQL.
- Segment allows you to use predefined audience segments.
- SQL allows for more complex, custom query conditions.
Set Drop Condition Filters
- Click on Add Filter to create a new condition based on user actions or attributes. For example, you can add a filter to exclude users who have made a purchase ('Order event') in the last 30 days.
- Use Add Group to combine multiple conditions if necessary, specifying how they relate (e.g., all conditions must be met, or any condition must be met).
Toggle Audience Dropping
- Check the optionOR drop audience when not in the starting audience anymore if you want to remove contacts who no longer meet the starting conditions of the campaign during its execution. ⚠️ Note that enabling this might result in longer sending preparation time.
Saving Your Drop Condition Configuration
- After setting your conditions, review them to ensure they align with your campaign strategy. Click Save to apply the Drop Conditions to your campaign.
It's crucial to consider the timing of applying Drop Conditions. They should be set in a way that reflects the most current and accurate state of your audience without excluding potential converters prematurely.
Skip Permission
This feature in your campaign delivery settings allows you to bypass the normal permission checks for contacts during a campaign send. This setting should be used with caution, as it can impact your campaign's compliance with email marketing regulations and affect deliverability.
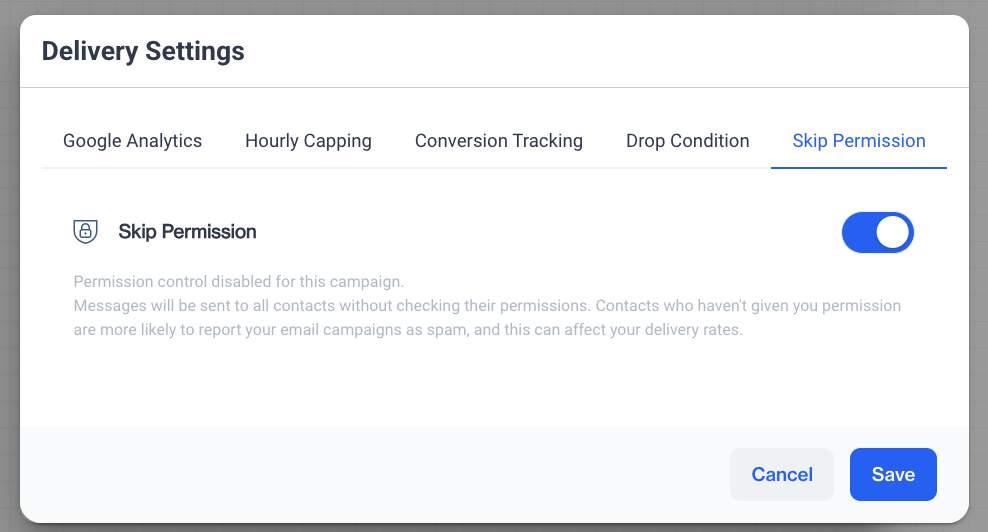
Skip Permission
Configuring Skip Permission
- Toggle Skip Permission: By enabling this option, the campaign will send messages to all contacts without checking their subscription or permission status.
- Understand the Implications: Be aware that using this feature might increase the likelihood of contacts reporting your email as spam. This can adversely affect your email deliverability rates and potentially damage your sender reputation.
- Consider the necessity of using 'Skip Permission' carefully. Review your campaign audience and ensure that you have the legal basis to contact them without explicit permission if necessary.
- After adjusting the setting, click Save to apply this configuration to your campaign flow.
Cautionary NoteThis feature should only be used when absolutely necessary, and in accordance with applicable laws and regulations, such as GDPR or CAN-SPAM Act, which require explicit consent from contacts before sending them marketing communications.
Pro TipAlways prioritize obtaining and respecting the permissions of your contacts. This not only ensures compliance with email marketing laws but also fosters trust and maintains the quality of your contact list.
By responsibly configuring the Skip Permission setting, you ensure that your campaign operates within legal boundaries while reaching your intended audience effectively.
Blackout
Blackout settings provide control over when your audience receives messages, allowing you to respect their time zones and preferred contact times. This feature is particularly useful for recurring campaigns where consistent engagement is key.
Blackout Only Available for Recurring CampaignsBlackout settings are ideal for recurring campaigns where you want to maintain a consistent and considerate messaging schedule, avoiding sending messages during times that may be inconvenient or intrusive for the audience.

Blackout
Configuring Blackout Intervals
- Toggle Blackout: Switch on the toggle to enable the Blackout feature. This will prevent messages from being sent during certain hours, based on the audience's time zone.
- Set Blackout Interval: You can set specific time intervals when messages should not be sent by configuring the Blackout Interval through the Settings page. This interval ensures that messages are only delivered during appropriate times for your audience.
- Please navigate to Settings > Campaign Information > Blackout Interval Here, you can define the earliest and latest permissible times for your campaign's message delivery, ensuring they align with your audience's preferred hours.
- Exclude Channels: You have the option to exclude specific channels from the Blackout setting. If a channel's toggle is ON, that channel will be exempt from Blackout restrictions. For example, you may choose to exclude In-App or On-Site channels because these channels are based on user activity and may not require adherence to time-based restrictions.
- After configuring the Blackout intervals and excluding any channels as necessary, review your settings to ensure they're aligned with your campaign objectives and audience preferences. Click Save to apply the Blackout settings to your recurring campaign
Pro TipWhen setting up Blackout intervals, consider the global distribution of your audience and their typical active hours. This will help ensure that your messages are received well and can improve engagement rates.
Updated 1 day ago