
Export
This section explains the export part of CDP. It seamlessly extract and distribute data from any table, segment, or SQL query directly to FTP sites, key advertising platforms including Google Customer Match and Facebook Custom Audiences, and cloud storage solutions like Amazon S3. Enhance compliance and strategic execution by integrating permission change logs and other crucial data across your preferred platforms.
Dengage CDP offers a sophisticated and versatile data export facility that empowers marketers and data analysts with comprehensive data handling capabilities. This facility allows users to effortlessly export:
- Any Table or Segment: Users can extract detailed data for deep analyses or targeted marketing campaigns.
- SQL Query Outputs: Leveraging standard SQL, users can customize data extractions to suit specific needs.
- Permission Change Logs: This includes detailed records of any changes in email and SMS permissions, vital for compliance and auditing purposes.
The variety of export destinations further enhances Dengage's usability, catering to diverse operational requirements and marketing strategies. Users can choose to:
- Download Directly: Easily save data as files on local systems for quick access and offline analysis.
- FTP Site Integration: Automatically send data to a designated FTP site for centralized data management.
- Ad Platform Integration: Seamlessly transfer data to major advertising platforms such as Google Customer Match, Facebook Custom Audience, and TikTok Custom Audiences for optimized ad targeting.
- Web API Export: Directly push data to various web APIs, facilitating real-time data sharing and application integration.
- Amazon S3: Securely store exported data in Amazon S3, ensuring scalability and availability across distributed environments.
Dengage CDP's export facility is designed to streamline workflows, ensure data accuracy, and enhance marketing effectiveness by providing timely and flexible data integration options across all preferred platforms. Whether for analytical purposes, compliance adherence, or marketing execution, Dengage delivers reliable and efficient data export solutions tailored to modern business needs.
How to Export Data
When you navigate to DataSpace > Export, you'll arrive at the page shown below. This page displays a comprehensive list of all export logs in the system.
1.Listing Overview: This section offers a detailed summary of exported files, showcasing essential attributes such as:
- Type: Specifies the nature of the export file, such as FTP, Google Customer Match, etc.
- Name: Names the exported file for easy identification.
- Created On: Records the date and time the export file was generated.
- Created By: Identifies the user who initiated the export.
- Status: Reflects the current phase of the export, such as New, Processing, Completed, or Error.
- Counts: Lists the number of records contained within the exported file.
2.Search Bar: This feature allows users to quickly locate specific items within the overview of export files.
Filtering by Exported File NameThe search bar helps to filter and display items based on the name of the exported file, making it easier to quickly locate specific exports.
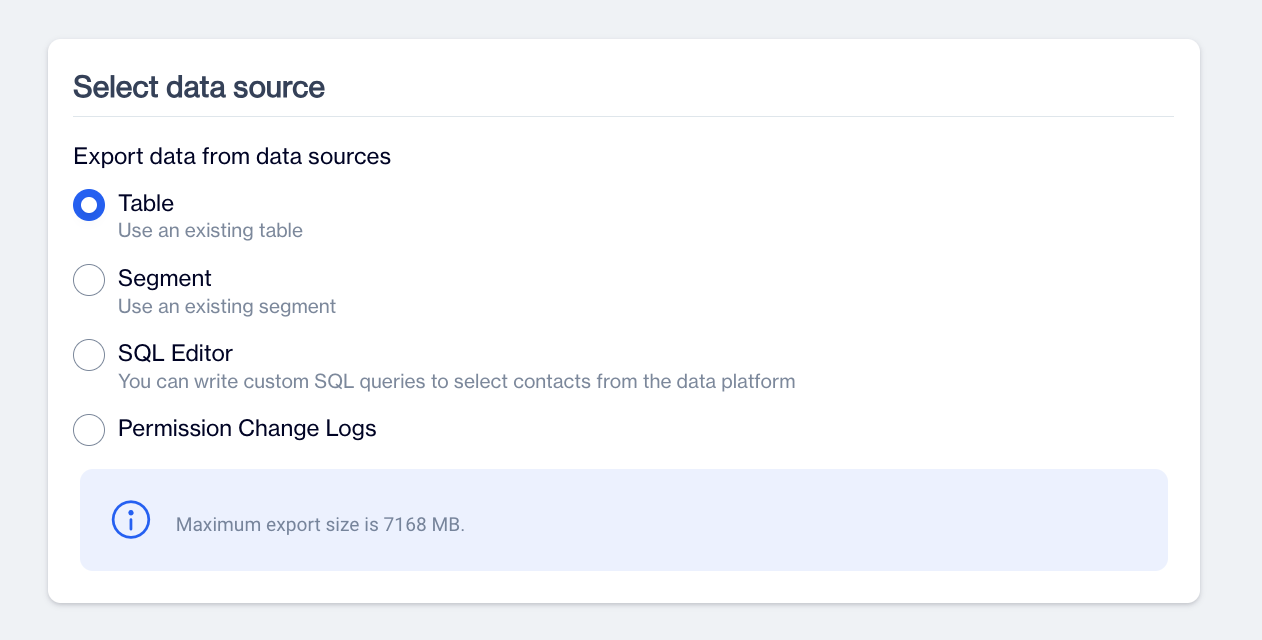
3.**+ New:**Provides options for initiating a new export process, including:
Select Data Source: Provides users with options to select the specific data source for exporting data, enhancing flexibility and precision in data handling.
- Table: Allows for the export of data directly from any existing table within the system.
- Segment: Enables the export of data from predefined segments, tailored to specific criteria or user groups.
- SQL Editor: Offers the capability to craft custom SQL queries for extracting precise data sets directly from the data platform.
- Permission Change Logs: Facilitates access to logs documenting changes in permissions associated with the data export process, essential for compliance and auditing.
Data Sources
4.Filter Option: Enables users to refine the displayed list of exported files based on several key criteria, improving search efficiency and relevance. Users can filter by:
- Source: Enables filtering of files based on origin, such as all files or only those created by users.
- Table Type: Allows for sorting files by the type of destination, such as FTP or Google Customer Match.
- Status: Filters files according to their status within the export process, such as New or Completed.
- Date Range: Users can define a specific date range to filter files based on when they were updated or created.
- Filter by Update Date or Creation Date: Provides the option to filter files based either on their update date or creation date.
- Apply: Clicking "Apply" enacts the selected filters on the overview section.
Selecting a Table or Segment as a Source
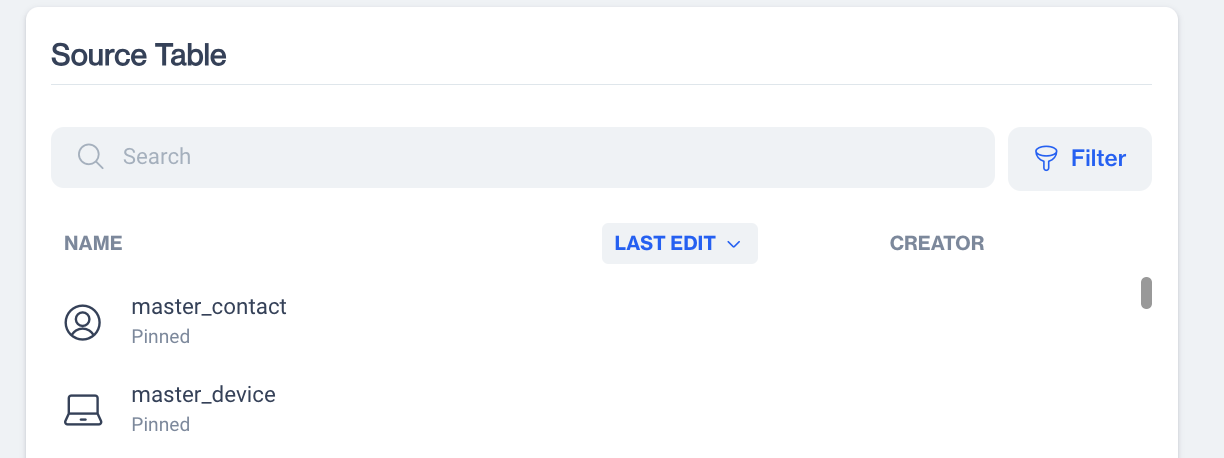
Select Table as Audience Source
1.Overviewing the Tables: Users can view and overview of all available tables in this section and select one to export.
Select Segment as Audience Source
When users choose "Segment" as the data source, they are taken to the Source Segment section, which allows for efficient management of their segments.
2.Overviewing the Source Segment: Users can view an overview of all available segments in this section.
- Segment: Users can see the list of segments available for selection.
- Predefined Segment: Displays any predefined segments that may be available.
You can select a segment to export.
3.Search Bar: A search bar is available to help users quickly locate the specific table they need. By entering the name of the table, the system will automatically filter and display the corresponding results.
4.Filter Option:
- Date Range: Users can specify a date range to filter the tables based on their update or creation dates.
- Filter by Update Date or Creation Date: Users can choose whether to filter the tables based on their update date or creation date.
- **Apply:**Clicking on "Apply" applies the selected filters to the overview section.
Source Table
Filtering and Excluding Options
After selecting a table or segment, the same page includes a section where you can filter records from the table and an exclude section to remove certain audiences from the export.
Important NoteThe Manage Filters option is available only when you select a table for export. Conversely, if you choose a segment, this option is not accessible. However, the "Exclude" option is available in both cases!
For example, if you select a table that includes a gender column, you can specifically export the Female audience by applying a filter such as 'gender'='Female' using the Manage Filters option.
1.**Manage Filters:**Users can apply filters to define specific conditions for retrieving data from the table like gender='Female' and age>45
- Column: Users can select the column they want to filter.
- Operator: Users can choose the operator to define the condition for the filter.
- Value: Users can input the value to compare with the column data.
- +Add Filter: This option allows users to add another filter by specifying the Column, Operator, and Value.
- **Save:**Click on Save button to finally apply the filter.
Applying more than One FilterYou can apply multiple filters to the same source table. The system uses the AND logical operator between the filters.
2.Exclude: Users have the option to exclude specific audiences from the data retrieval process, allowing for more targeted and refined data exports.
Exclude Segment: Allows for the exclusion of a particular segment from the export audience, tailoring the data more precisely.
Exclude Remote Segment: Offers the ability to omit a remote segment from the data export process, enhancing control over the data included.
Exclude Campaign: Enables the exclusion of specific campaigns from the data retrieval, ensuring that only relevant campaign data is included.
Exclude Send List: Permits the exclusion of a send list from the data retrieval, helping to refine the audience and data being analyzed.
Using SQL Editor as Audience Source
Using the SQL Editor as a source audience in Dengage allows for highly customizable and precise data selection. This feature enables users to write and execute custom SQL queries directly within the platform, granting them the flexibility to define specific criteria and extract exactly the data they need from their database. Whether it's filtering for particular user behaviors, demographics, or engagement metrics, the SQL Editor provides a powerful tool for marketers and analysts to tailor their audience selection to suit intricate campaign requirements or detailed data analysis tasks.
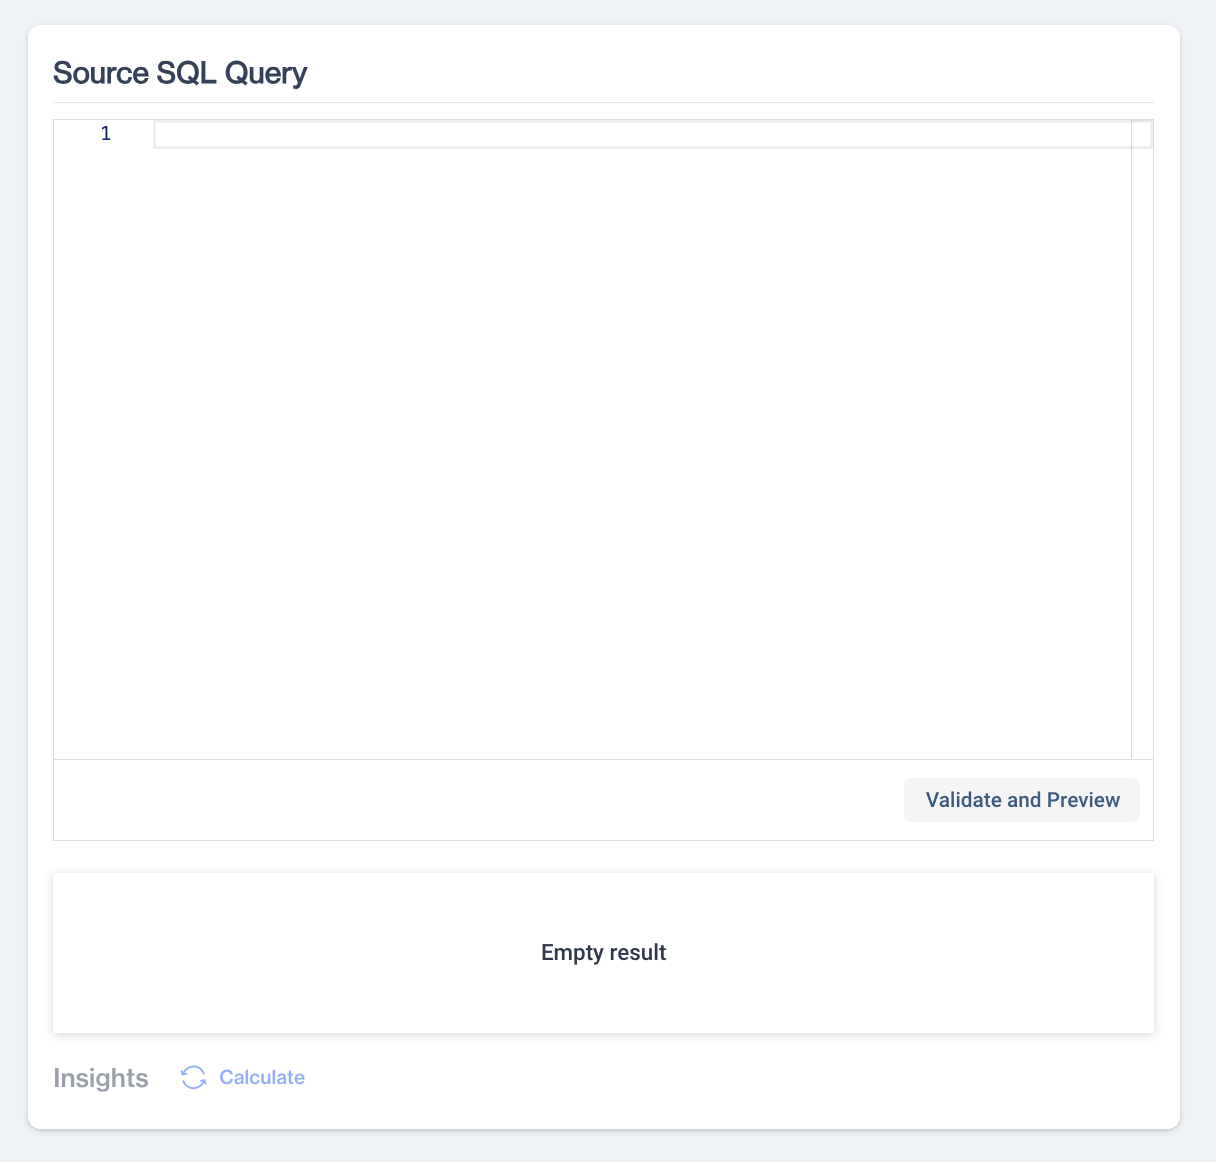
Write your query in the provided field and click "Next." This action will process your query and export the data to a result window.
1.Work Space to Write SQL Query: A dedicated workspace is provided for users to craft SQL queries tailored to their data retrieval needs. This space allows for the writing of custom SQL queries to precisely select contacts from the data platform, utilizing SQL syntax to define specific retrieval criteria.
2.Validate and Preview the Result of That Query: After formulating the SQL query, users can validate and preview the results. This crucial step checks the syntax for correctness and confirms that the data will be retrieved as expected. It helps identify any errors or inconsistencies, ensuring the query is ready for execution.
3.Calculate and Get Insights from the Preview Result: With the query validated and the results previewed, users can analyze the data to extract valuable insights. This phase allows for calculations, filtering, and data manipulation based on the previewed results, enabling users to derive meaningful conclusions and make data-driven decisions.
4.Next: After completing the necessary steps, users can move on to the next phase of the data export process by clicking "Next." This step forwards users to the section for selecting a remote target or continuing with additional export settings.
Source SQL Query
Selecting "Permission Change Log" as Audience Source
Selecting the "Permission Change Log" as a source provides a crucial tool for tracking and managing changes in email, sms and push token permissions within your system. This feature is invaluable for compliance and monitoring, as it offers a transparent view of when and by whom permissions were altered. By using the Permission Change Log as a data source, organizations can ensure adherence to data protection regulations and internal policies, and quickly address any issues or inconsistencies in permission settings. Additionally, this log helps in auditing communication preferences of users, enhancing trust and improving the effectiveness of targeted marketing campaigns by ensuring that messages reach only those who have opted to receive them.
When using Permission Logs as a data source, users gain detailed access to permission-related data, enabling precise configuration of the export process:
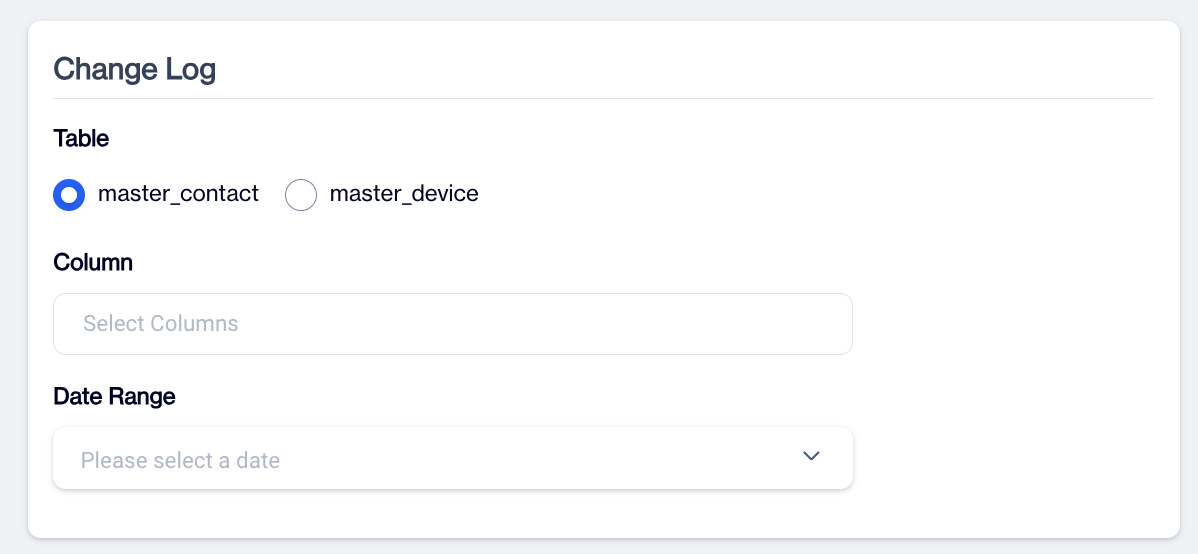
1.Allow Selecting Two Tables: Users have the option to select from two specific tables:
- Master Contact: This table stores individual contact permissions, such as email addresses and GSM numbers.
- Master Device: This table holds permissions specific to push tokens.
2.Columns: Users can choose specific columns from the selected table(s) to access detailed permission-related data. These columns may include information about permissions that have been granted or denied to specific contacts or devices.
3.Select Date Range: Users can define a date range to retrieve permission data, filtering the export to only include permissions that were granted or modified within the specified timeframe. This allows for a more focused approach to data extraction, based on time-sensitive parameters.
4.Next: After setting the necessary parameters, users can click "Next" to move forward in the data export process, progressing to additional configuration settings or finalizing the export setup.
Change Log
Select an Export Target
After selecting the data source in the export process, choosing the right Export Target is essential for effective data distribution. The Export Target determines where the exported data will be sent, offering various options to suit different needs and strategies. Users can select from a range of destinations such as FTP sites, for direct data transfer to a server; cloud storage solutions like Amazon S3, for scalable and secure data storage; or direct integration with digital marketing platforms including Google Customer Match, Facebook Custom Audiences, and TikTok Custom Audiences, facilitating seamless data use in targeted advertising campaigns. Additionally, data can be sent to specific web APIs for real-time integration with other systems, or simply downloaded directly to a local machine for immediate use. Choosing the appropriate Export Target ensures that the data not only reaches the right place but is also formatted and ready for subsequent analysis or marketing use.
1.Select Remote Target: The Remote Target section provides various options for exporting the result data to different destinations. Here's a detailed explanation of each option:
- FTP Export: Enables you to send your exported data directly to an FTP location of your choice. This option is ideal for automated, secure transfers of large datasets to your servers.
Example:dengage_ftp(ftp.sirv.com) - File Download: Allows you to download the result data as a CSV file directly to your computer. This is a simple, quick method for users needing immediate access to data for analysis or reporting.
- Google Customer Match: Facilitates the export of contact information directly to the Google Customer Match platform, enabling personalized ad campaigns by matching contact data with users on Google's services.
- Facebook Custom Audience: Exports contact information to the Facebook Custom Audience platform, helping you target ads to specific groups of existing customers or prospects on Facebook.
- Kafka Topic: Sends your result data to a specified Kafka topic, integrating with your real-time data streaming pipeline for efficient data processing and analysis.
Additional Remote Targets for Segment and SQL EditorWhen you select a segment or SQL Editor, other export target options are also available.
TikTok Custom Audience Connection: This option allows you to export contact information directly to the TikTok Custom Audience platform, enabling you to tailor your advertising strategies by reaching specific audiences on TikTok.
Web API: Export result data seamlessly to a specified web API. This facilitates integration with various online services and applications, enhancing your operational efficiency by automating data transfers.
Amazon S3: Use this option to export report templates directly to AWS S3, providing a secure and scalable cloud storage solution for managing and accessing your data efficiently.
Target LimitationsSubscription Restrictions: Be aware that some export options may be disabled due to the current subscription level of the user. Access to certain advanced export features could require a higher subscription tier or specific permissions not included in the user's current plan.
Table Type: The availability of export options can also depend on the type of table selected. For instance, some export destinations may only be compatible with particular table types or data sources, which could restrict the available remote targets for a specific selection.
2.Next: After making the necessary selections and configurations in the Remote Target section, click the Next button to proceed to the next section of the process.
Export Audience to a FTP Site or Amazon S3 or Download a File
These file export options on the platform follow a few basic steps:
1.Choose an Export Option: Select from FTP Export, Amazon S3, or File Download.
2.Define Remote Target: For FTP Export and Amazon S3, specify the Remote Target where the file will be sent. Set up these targets beforehand via the Settings > Remote Targets interface.
3.Proceed: Click "Next" to continue.
4.Configure File Settings: Depending on your chosen export option, you will need to configure specific settings.
Export Audiences to Google, Facebook and Tiktok
Exporting an audience to a DSP network has some common steps:
1.Select an Export option:" Google Customer Match or Facebook Custom Audience or Tiktok Custom Audience.
2.You may define more than one Google/Facebook and Tiktok Account by using Remote Targets. Please select Remote Target by simply clicking the radio button.
3.Click "Next" to move forward. You'll arrive at a page whose specific details may vary based on the remote audience type you've chosen. Despite these variations, the overall layout and functionality remain consistent across all DSP-type remote segments.
Below is an example for a Facebook Audience type. The platform will automatically retrieve all existing lists from the associated platform, allowing you to:
Select an existing list: Choose from existing lists on Facebook, Google, and TikTok to add or remove the audience you have selected as your source. These columns are specific to Facebook and please check the listing columns for Google and Tiktok below.
-
Name: Name of the dsp audience list.
-
Description: Description of the dsp audience list.
-
Estimated Match Count: For existing list, it is the number of audience in that list.
Create a new audience: Add a new audience list to Facebook, Google, and TikTok and include your selected source audience in this new list.
List Columns for Google Customer MatchUSER LIST TYPE: Indicates the type of user list (e.g., contacts, mobile numbers, etc.) associated with the audience.
List Columns for Tiktok Custom AudienceEXPIRE TIME: The expiration date and time for the custom audience, which specifies when the audience will no longer be valid.
COVERAGE: Indicates the coverage or range of the custom audience, such as the target demographic or other relevant factors.
Selecting Contacts(email/sms) or Advertising Ids for Facebook Custom Audience
- Export Contacts from Selected Segment: This option allows the user to export contact information from the chosen segment. It includes personal details (Email and Sms) and other relevant data from the specified segment.
- Export Devices from Selected Segment: This option lets the user export information about devices associated with the chosen segment. It may include advertising_ids from registered devices.
3.**+New Audience:**If you wish to create a new audience, you can utilize the New Audience option available across all DSPs. Below, we provide an example of creating a new audience specifically for Facebook:
- Name: Specify the name for the new audience.
- Description: Provide a brief description for the new audience to give context or additional information.
Additional Options for new Google Custom Audience
- Type: Choose the type of audience you want to create:
- Contact: This option is for creating a contact-based audience using email/gsm numbers
- Mobile: This option is for creating a mobile-based audience using Advertising ids.
Option for new Tiktok Custom Audience+New Topic: Use this option to create a new topic on TikTok.
Name: Specify the name for the new audience.
- Add: Click on Add to add the audience created. Then you can send your selected audience to that new list.
4.Next: Click on "Next" to proceed to next section.
Export Audience to Custom Web API
To export the selected audience to your own Web API, you must first define this Web API using the Remote Targets interface found under Settings.
Developing your own WEB APIThe Dengage WEB API call export feature enables the platform to invoke your WEB API and transmit the audience data. Your WEB API must be developed in accordance with the Dengage WEB API Call standards to ensure compatibility.
There are 3 important steps to export the selected audience from Dengage platform to your WEB API.
1.You can create multiple WEB APIs. To begin, select the specific WEB API to which you want the selected audience to be exported.Select next.
2.The system will ask you for an export name. Give a name to your export.
3.Hit next. You will be navigated to a page you can select either master_contact columns or master_device columns to your WEB API. Hit Next.
4.Schedule your export by Saving button.
Export Audience to Kafka
To export the selected audience to a Kafka queue, you must first define Kafka queue using Remote Targets interface under Settings.
Exporting audience to a Kafka queue, there are 4 basic steps.
1.Select Kafka remote target and hit next.
2.The system will list all available topic names of queues on selected Kafka. You can also create new Topic using +New Topic function.
3.Select topic to export data. Hit next. You can create a new Kafka topic if your user (which is used in connection in Remote Targets) is allowed to create a new Kafka topic and select that topic as well.
4.Select which columns to export from the segment.
5.Schedule your export by hitting Save.
Understanding the data format on Kafka TopicDengage Platform will generate a specific JSON format tailored to your selected topic on Kafka. For instance, lets assume we have selected columns contact_key, email and birth_date columns in Step 4️⃣ above. Dengage Platform will insert as many items as in the segment to the topic you have selected and each of them will have the format below.
{
	"contact_key": "contacy_key_1",
	"email": "[email protected]"
	"birth_date": "1993-10-31 00:00:00"
}
WhatsApp Unsubscribe Logs
WhatsApp Unsubscribe Logs allow you to retrieve, and report users who have opted out of WhatsApp communications. Since users can unsubscribe (opt-out) directly through the WhatsApp channel, these permission updates must be traceable within the system to ensure compliant and accurate communication management.
With this feature, unsubscribe records from the WhatsApp Business API channel can be listed and exported through the Permission Change Log structure. This gives your team full visibility into WhatsApp permission changes and ensures that opt-out data can be shared with external systems.
This feature is available only for WhatsApp Business API integrations.
How to Access
To access WhatsApp unsubscribe logs, go to Data Space > Data Management > Export. From the Export screen, create a new export and select Export data from data sources. Then choose Permission Change Logs and proceed to the Change Log configuration screen.
How to Use
On the Change Log screen, you need to select the relevant table, either master_contact or master_device, depending on where your WhatsApp permission data is stored. After selecting the table, include the WhatsApp-related columns such as whatsapp_status and whatsapp_permission to capture unsubscribe and permission updates.
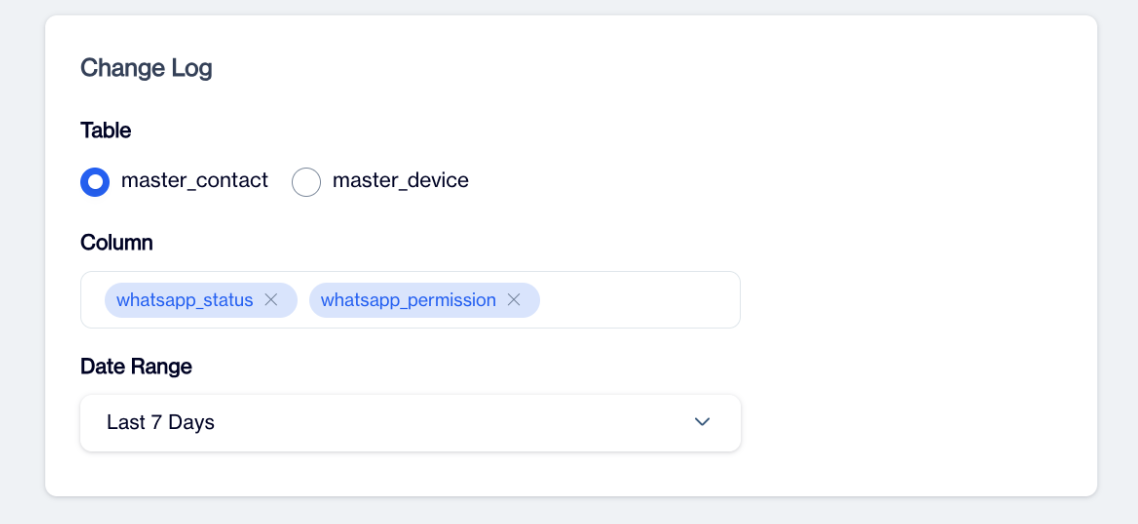
Whatsapp Change Logs
Next, define the date range from the dropdown menu to determine which permission changes should be included in the export, for example the last 7 days. Once you continue, select the remote target where the export file will be delivered.
In the file configuration step, define the file settings.Complete the configuration by setting the encoding to UTF-8, the delimiter to a comma, and the preferred date column format such as yyyy-MM-dd HH:mm. After reviewing the summary screen, save the export to activate it.
Use Case
A common use case is synchronizing WhatsApp opt-out users with external CRM systems or suppression databases. For example, if a customer unsubscribes from WhatsApp messaging, this change can be exported regularly and shared with other platforms to ensure that no further WhatsApp communication is triggered from external systems.
Another use case is compliance reporting. Teams can export WhatsApp permission changes within a selected date range to monitor consent updates and maintain proper audit records.
WhatsApp Unsubscribe Logs ensure that opt-out data is not only captured but also operationally manageable. By making WhatsApp permission changes exportable and traceable, the system helps you maintain compliant, accurate, and consistent communication across all connected systems.
Updated 4 months ago