
Export to Google BigQuery
This feature allows users to export data from a selected Segment or Table to Google BigQuery using the Automated Flow structure. The flow's trigger starts the export, for example once a day, and the Data Export node writes the data into a BigQuery table that you choose.
Key Terms
- Segment: a group of contacts defined in Dengage. See Segments.
- Table: a data table in Data Space, for example master_contact. See Tables.
- Automated Flow: a flow in Data Space that combines triggers and actions to run data operations automatically. See Automated Flows.
- Data Export node: the action node of an Automated Flow that sends data to a remote target.
- Remote Target: an external destination, defined in Settings, that Dengage exports data to. See Remote Targets.
- Schema: a named group of tables in your database.
Prerequisites
- A Google BigQuery remote target defined under Settings > Integrations > Remote Targets. The definition requires your Google BigQuery credentials as JSON text. See Remote Targets. To define it, click Add, enter a Name, select Google BigQuery in Type, paste the JSON text into Google BigQuery Credentials and click Save.
- A table in BigQuery to export into. The Data Export node lists the schemas and tables of the BigQuery remote target, and you map your data to the columns of that table.
- The segment or table that you want to export.
Note: The maximum export size is 7168 MB.
How to Access
Navigation Path: Data Space > Data Flow > Automated Flows
To access the export setup, go to Data Space, then click Data Flow, and select Automated Flows. This is where you can create new export flows and configure actions such as sending data to remote targets like Google BigQuery.
How to Use
1: Create a New Automated Flow
To begin, navigate to the Automated Flows section and click the New button. From the options presented, select Automated Flow. Name your flow, define its Start Date and End Date, and then click Next to proceed to the configuration screen.
Start Date can be Now or Scheduled, and End Date can be Never or Scheduled. You can also add a Description and change the Folder.
2: Add the Trigger
The flow editor shows a canvas for building your automation. Start by dragging and dropping the trigger node onto the canvas. Click Configure on the node and set the frequency based on how often you want the export to occur (e.g., daily etc.).
The available triggers are Recurring, File Drop and API Trigger. For a scheduled export, use Recurring. In Recurring Settings, set Occurs to Daily, Weekly, Monthly or Yearly. With Daily, choose Occurs once at and a time, or Occurs every with an interval, a Starting at time and an Ending at time. The start time is required.
3: Add the Data Export Node
Next, drag the Data Export node into the Actions section of the canvas. This node lets you configure where and how Dengage exports the data. Click Configure on the Data Export node to open its configuration screen and begin setup.
The configuration screen has an Action Name field and a step bar with four steps: Target, Settings, Columns and Summary.
4: Choose the Data Source
The configuration opens on the Select data source screen. Choose whether you want to export a Segment or a Table, and click Next.
The Select data source screen also lists SQL Editor, Permission Change Logs and Incremental Logs. This guide covers Table and Segment. Incremental Logs also offers Google BigQuery as a remote target. See Exporting Incremental Logs to Databases via Remote Target. SQL Editor does not offer Google BigQuery as a remote target.
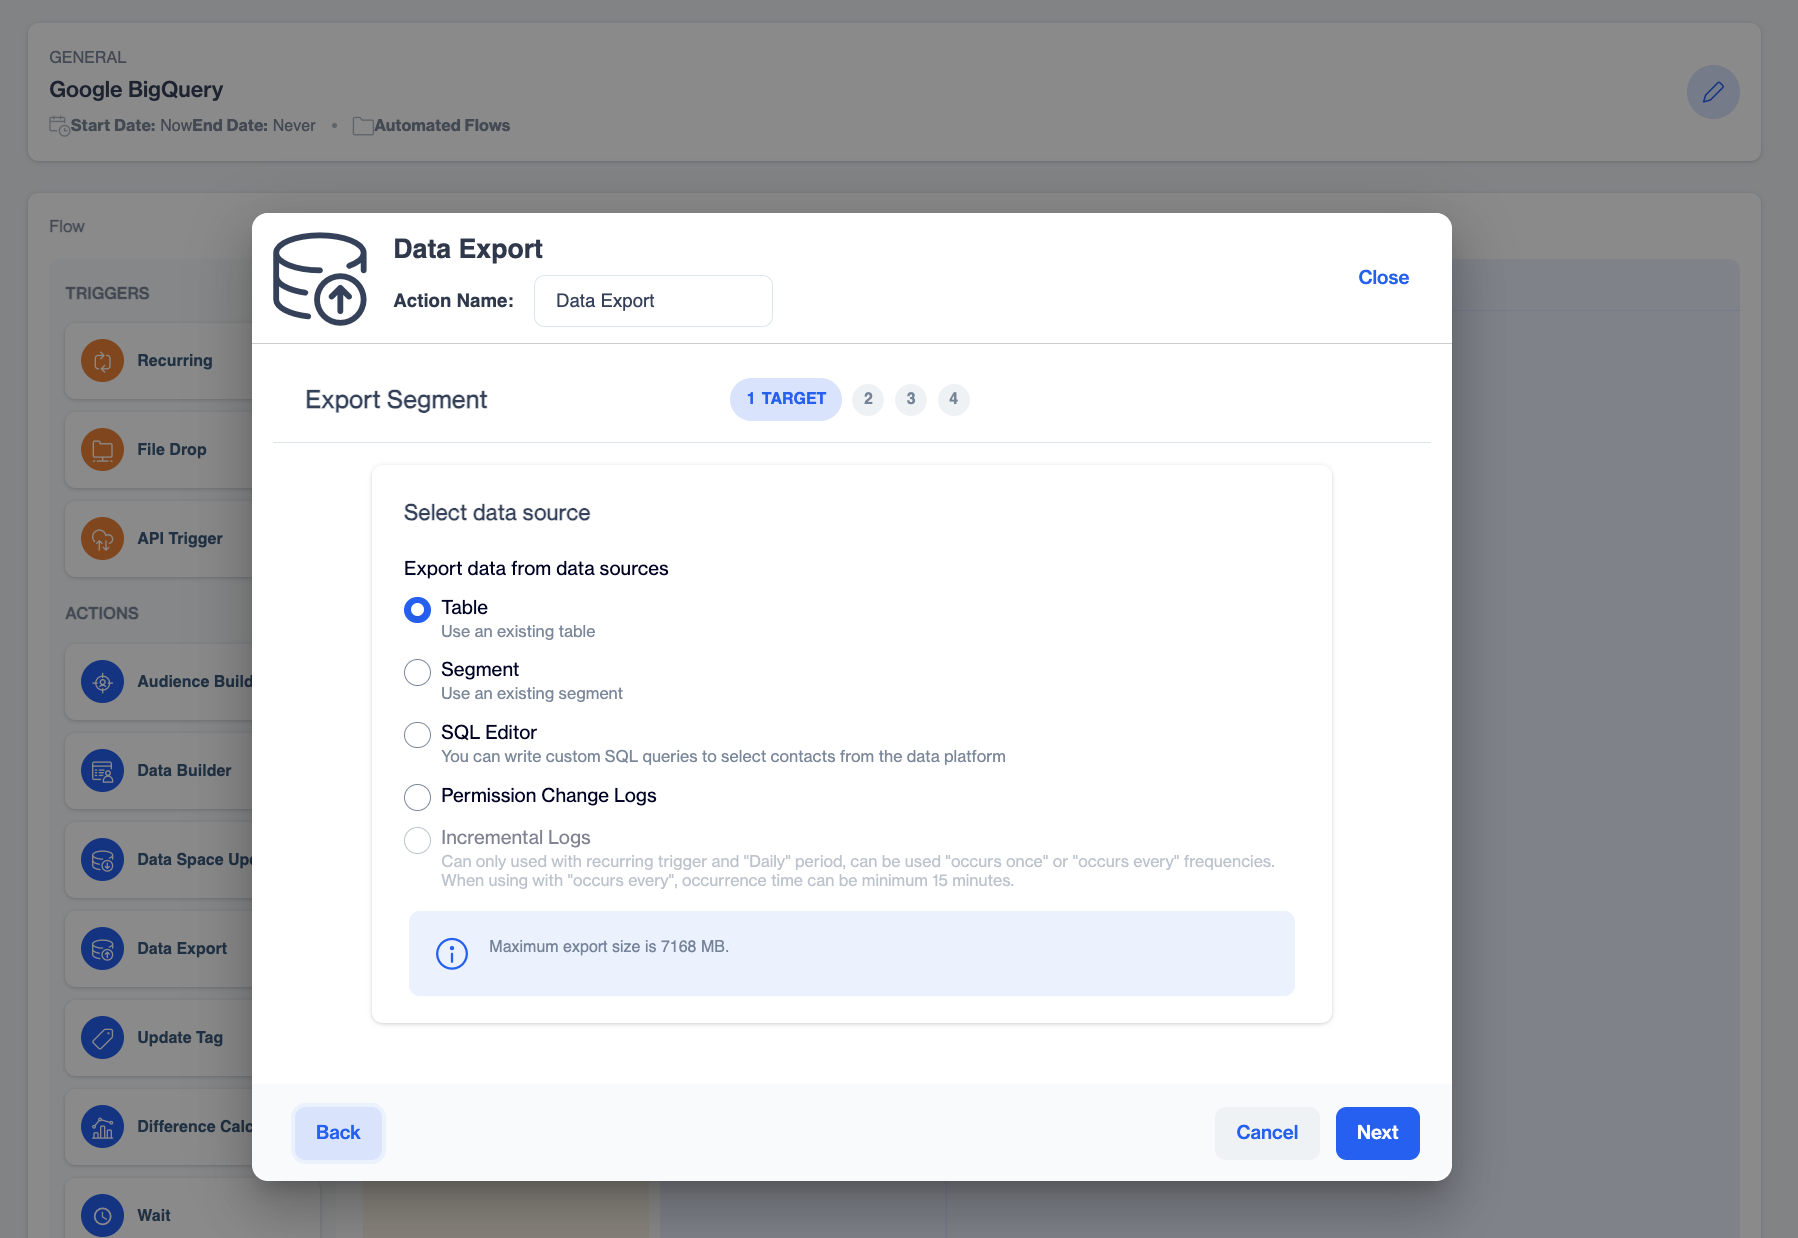
Choose Table or Segment as the data source
5: Select the Source Segment or Table
In the following step, select the specific Segment or Table you wish to export. Once your source is selected, click Next again to move forward in the configuration process.
- Segment: pick a segment from the Segment tab or the Predefined Segments tab of the Source Segment screen.
- Table: pick a table from the Source Table screen. After you select a table, Manage Filters opens the Table Filter dialog, where you can add filters and filter groups for the table.
Both screens have Search and Filter to find the source by name.
6: Choose Google BigQuery as Remote Target
On the Select Remote Target screen, Google BigQuery appears as an available Remote Target.
Select Google BigQuery, choose one of your BigQuery remote targets listed under it, and click Next. If a target type has no definition yet, the screen shows a message that points you to Settings > Remote Targets.
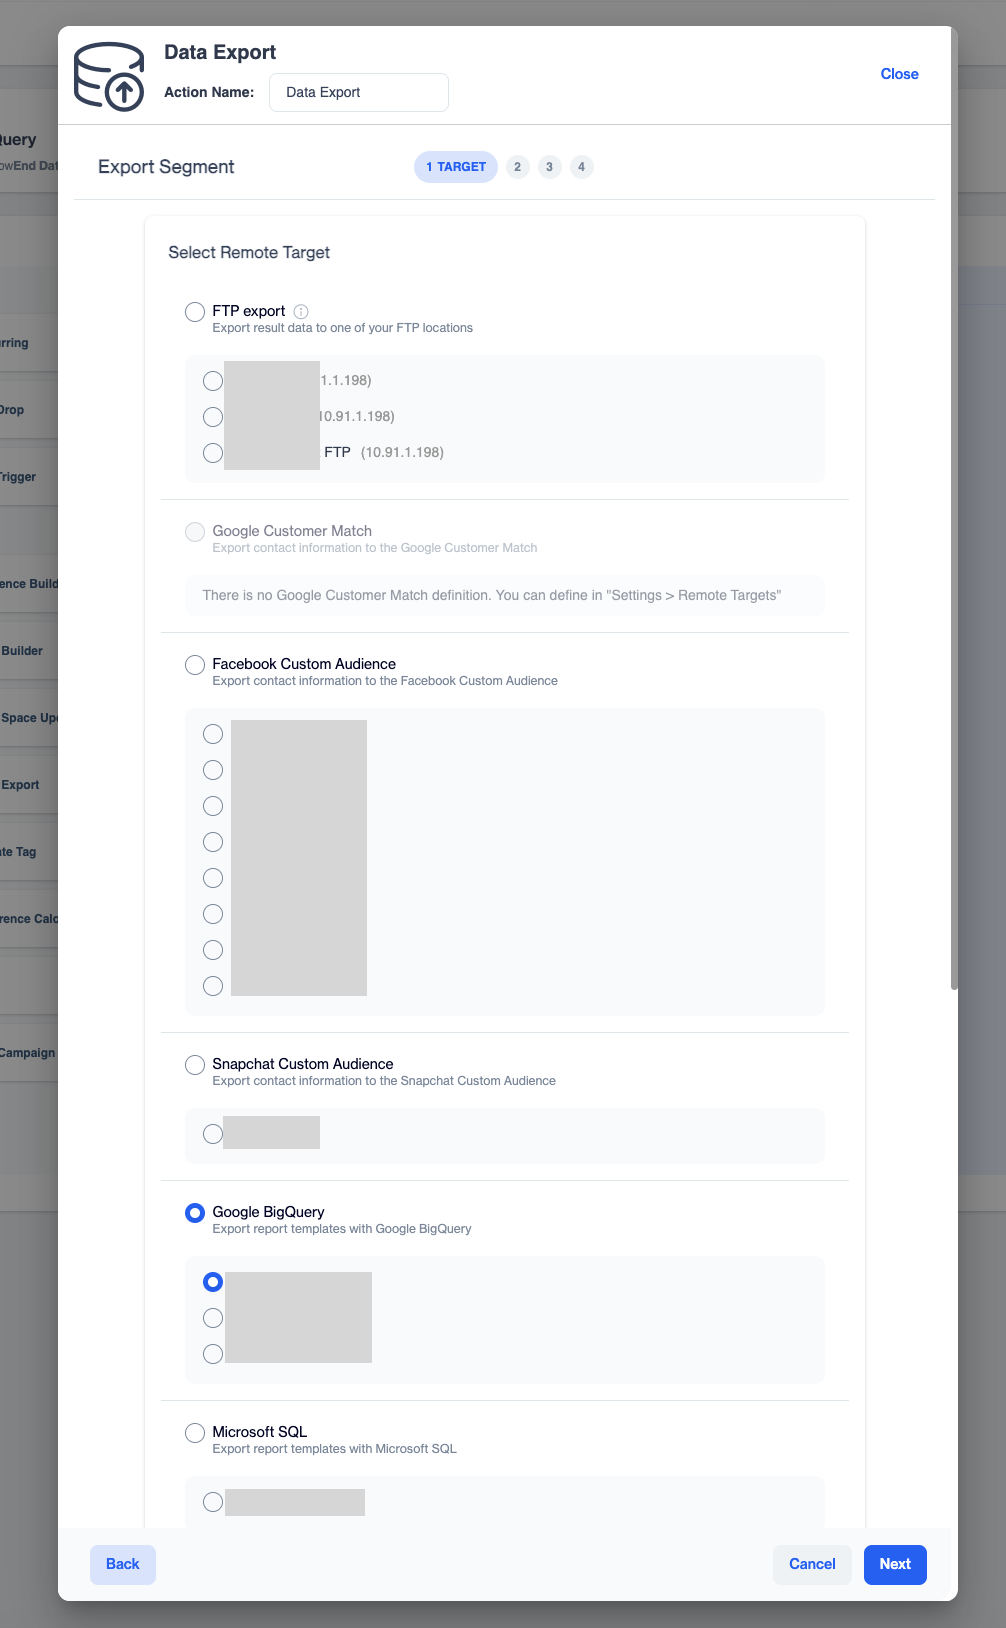
Select Google BigQuery and one of your defined remote targets.
7: Select the Schema and Table
In the Settings step, the Export Wizard screen asks where the data goes in BigQuery. Choose a schema in Select Schema, then choose a table in Table Name. The Table Name list shows the tables of the selected schema. If the schema has no tables, the list shows No Data. Click Next.
Both fields are required. If you leave them empty, each field shows "The field is required" and a "Please select schema" message appears.
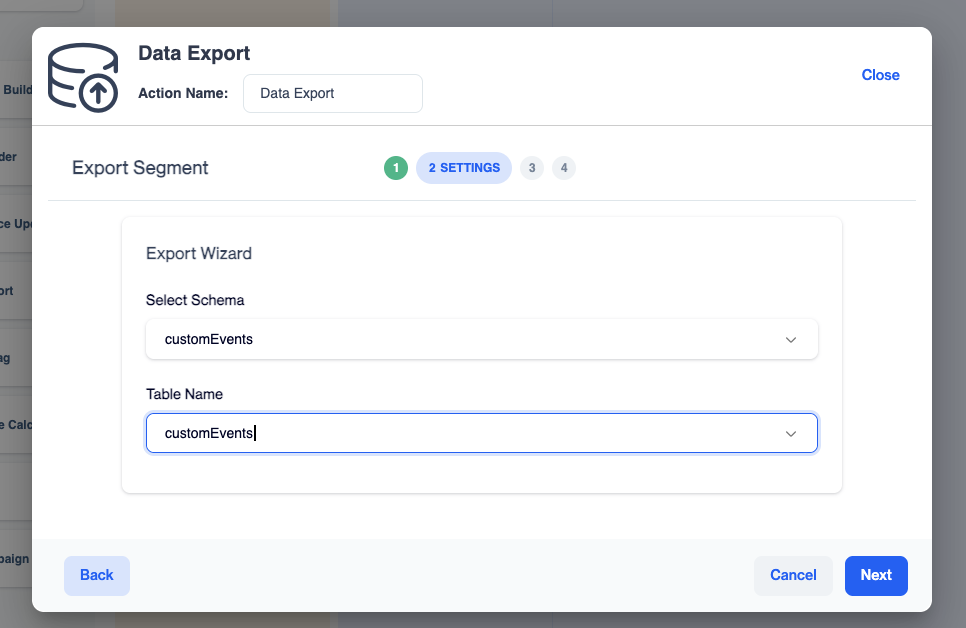
Choose the BigQuery schema and table that receive the data
8: Map the Columns
On the Column Mapping screen, define how Dengage writes the data into the BigQuery table.
First, choose the Data Table Action:
- Append: appends all records from the source. This is the default.
- Truncate and Insert: truncates the table and inserts all the records from the source.
Then map the columns. Each row of the Columns table is a column of the BigQuery table, shown with its data type. In Target Column, choose what Dengage writes into it:
- --Ignore--: the default. The column is not mapped.
- -- Constant Value --: opens an extra field under the dropdown for a fixed value.
- A source column: for a Table source, the list contains the columns of the table, for example contact_key, contact_status and email for master_contact. For a Segment source, the list contains contact_key.
Click Next.
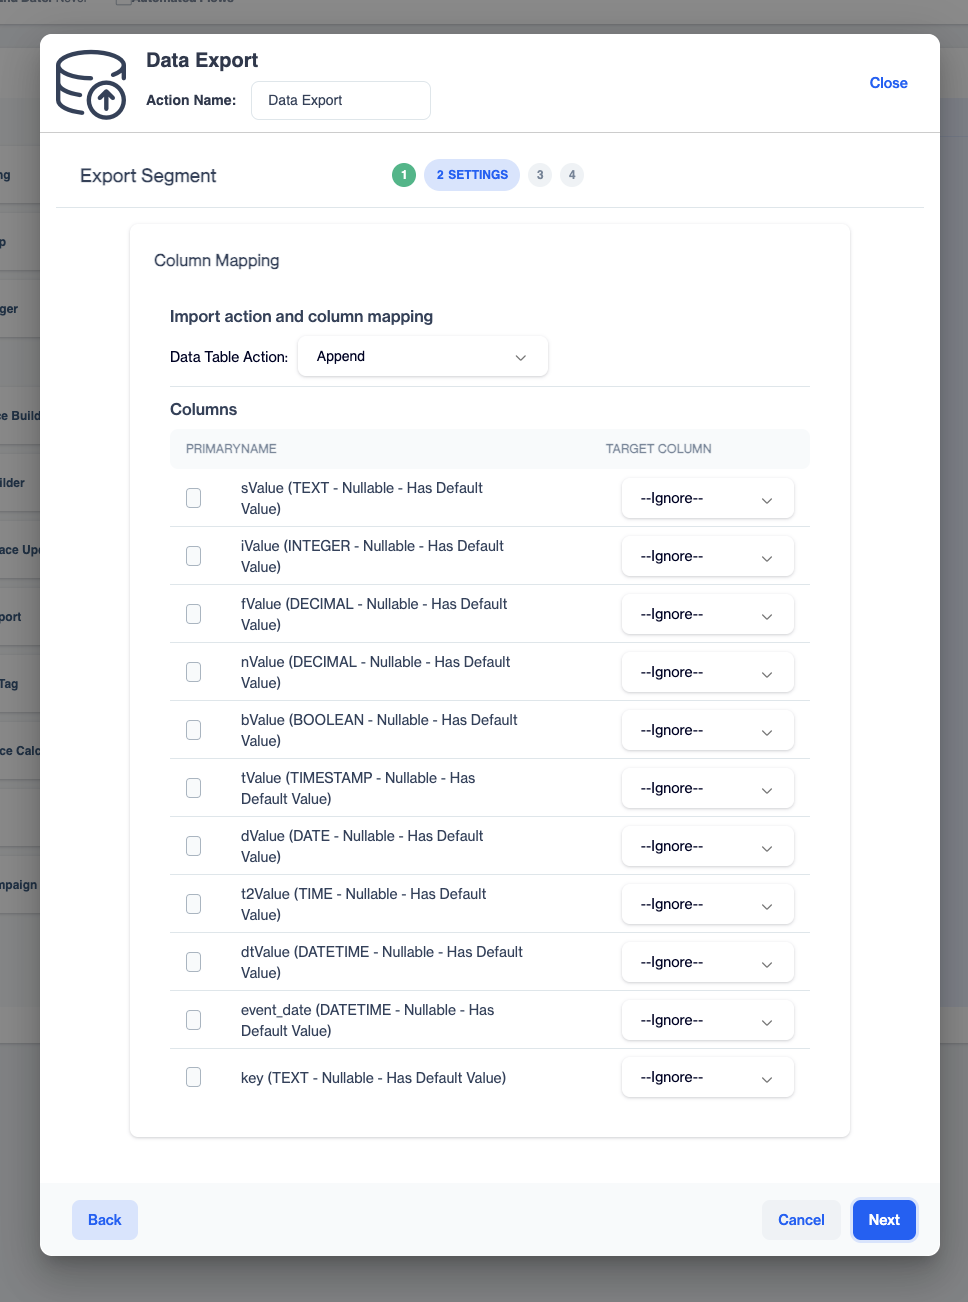
Map your Dengage columns to the columns of the BigQuery table.
9: Review the Summary and Export
The Summary step shows the Source (the data source), the Target (Target type and Target Name) and the Columns to be exported. Check the details, and use Back to change a setting. Click Export to confirm your setup, and then save the flow.
Check the Export Runs
Go back to Data Space > Data Flow > Automated Flows to follow your flow:
- The Automated Flows tab lists each flow with its Last Run Time, Next Run Time and Update Date.
- The Running Flows tab lists the runs with Started On, Completed On and a status, for example Completed.
- The menu at the end of a row offers View Details, Move, Copy Public ID and Duplicate. Use Duplicate to create a similar export without starting from scratch.
For older runs, see Automated Flows History.
Use Cases
- Keep a BigQuery table up to date: export a Dengage table to BigQuery every night with a Recurring trigger and the Truncate and Insert action, so that dashboards read the latest data.
- Analyse a segment in BigQuery: export the contacts of a segment to a BigQuery table and join them with your other data.
FAQ
The Table Name list shows No Data. Why?
The schema you selected has no tables. Choose another schema, or create the table in BigQuery first.
Is there a size limit?
Yes. The maximum export size is 7168 MB.
Where do I see whether the export ran?
In Data Space > Data Flow > Automated Flows. The Automated Flows tab shows the last and next run time of each flow, and the Running Flows tab shows the runs with their status.
Updated 1 day ago