
Rich Text Editor
The Rich Text Editor is the fastest way to create simple, text-focused email content in Dengage. It works like a familiar word processor: you type your message, style it with the toolbar, and enrich it with images, links, personalization tags, and dynamic content, with no HTML knowledge required.
Create an Email with the Rich Text Editor
- Navigate to Content > Marketing > Email.
- Click the New button.
- In the Select a Type window, choose Rich Text Editor.
- In the General step, fill in:
- Name (required): An internal name to find this content later. Recipients never see it.
- Folder: Where the content is stored. Click Change Folder to pick a different one.
- Description (optional): A short internal note about the content's purpose.
- Click Next to open the Content step.
You can return to the General step at any time by clicking the pencil icon on the General card.
Get to Know the Screen
The Content step gathers everything your email needs on a single page:
| Area | What it does |
|---|---|
| Content Size | Live indicator of your email's size in KB. |
| Add Languages | Creates additional language versions of the same content. |
| Sender & envelope fields | Sender profile, from name, reply-to, subject, and pre-header. |
| Rich Text Editor | The editing canvas and its formatting toolbar. |
| Action buttons (top right) | Cancel, Preview & Test, Save Draft, and Publish. |
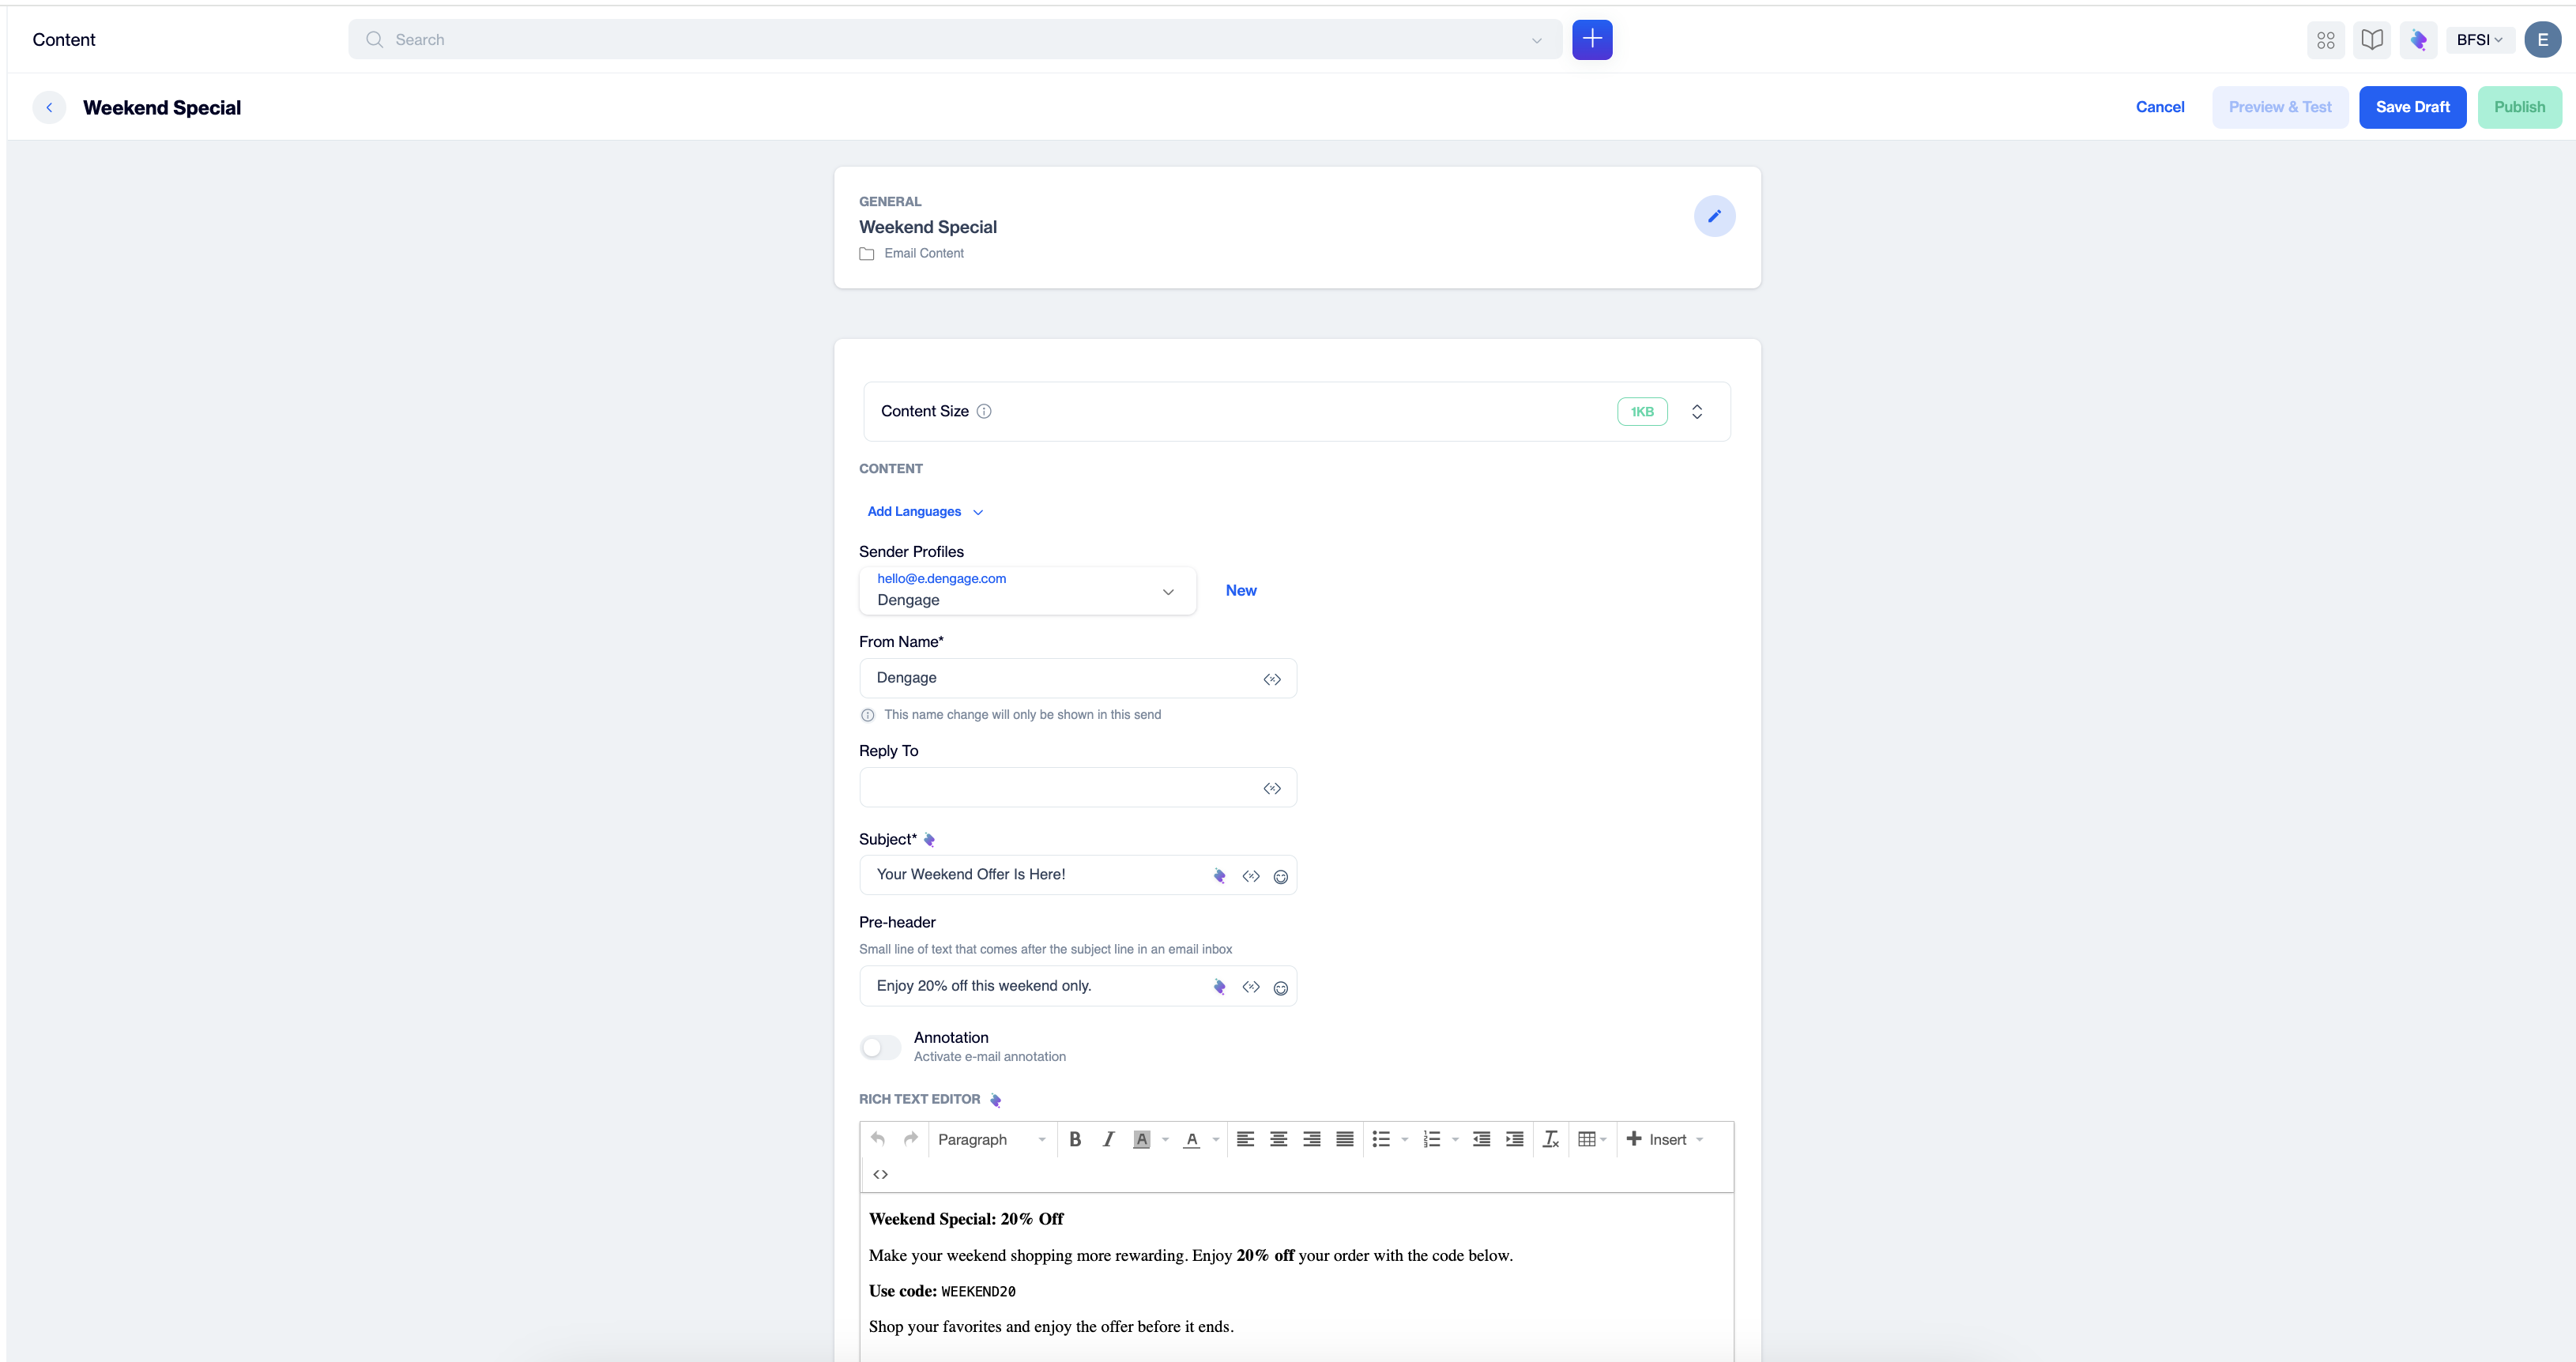
Content step with the editor
Set Up the Sender and Subject
Sender Profiles: Select which verified sender address the email goes out from. Click New to create a new sender profile.
From Name (required): The display name recipients see in their inbox. It is pre-filled from the sender profile. If you change it here, the new name is only shown in sends of this content, and the sender profile itself is not changed.
Reply To: An optional address that receives replies, if it should differ from the sender address.
Subject (required): The subject line of your email.
Pre-header: The short preview line shown after the subject in most inboxes. A good pre-header complements the subject and increases open rates.
Next to the Subject and Pre-header fields you'll find three helper icons:
- Zeki AI (wand icon): Get AI-generated suggestions from Zeki, Dengage's AI assistant.
- Customization (
</>icon): Opens the Customization Selector so you can personalize the field with contact data, for example the recipient's name in the subject. The same icon is also available on From Name and Reply To. - Emoji (smiley icon): Insert emojis without leaving the app.
Annotation: Toggle on to activate e-mail annotations, which can enhance how the email appears in Gmail's Promotions tab. See Gmail Annotation Setup for details.
Personalize more than the bodyAny field with the
</>icon (From Name, Reply To, Subject, Pre-header) accepts customization tags, so you can personalize the entire envelope, not just the message body.
Format Your Text
The toolbar gives you everything you need for clean, readable email copy:
| Tool | What it does |
|---|---|
| Undo / Redo | Steps backward or forward through your changes. |
| Paragraph (format menu) | Applies text styles: Paragraph, Heading 1-6, or Preformatted. |
| Bold / Italic | Emphasizes the selected text. |
| Background color | Highlights text with a background color. |
| Text color | Changes the font color. |
| Align left / center / right / Justify | Sets paragraph alignment. |
| Bullet list / Numbered list | Creates lists. The arrow next to each button offers different marker styles. |
| Decrease / Increase indent | Adjusts paragraph indentation. |
| Clear formatting | Removes all styling from the selected text. |
| Table | Inserts and manages tables (see below). |
| + Insert | Opens the Insert menu (see below). |
Source code (<>) | Opens the HTML behind your content. |
Work with Tables
Use tables to lay out structured information such as order summaries or price lists.
- Click the Table button in the toolbar.
- Hover over Table and select the number of rows and columns in the grid.
- Click inside the table to refine it with the same menu:
- Table properties: adjusts spacing, borders, and dimensions.
- Cell / Row / Column: inserts, deletes, merges, or configures individual parts.
- Delete table: removes the entire table.
Insert Menu
Click + Insert in the toolbar to add richer elements at the cursor position.
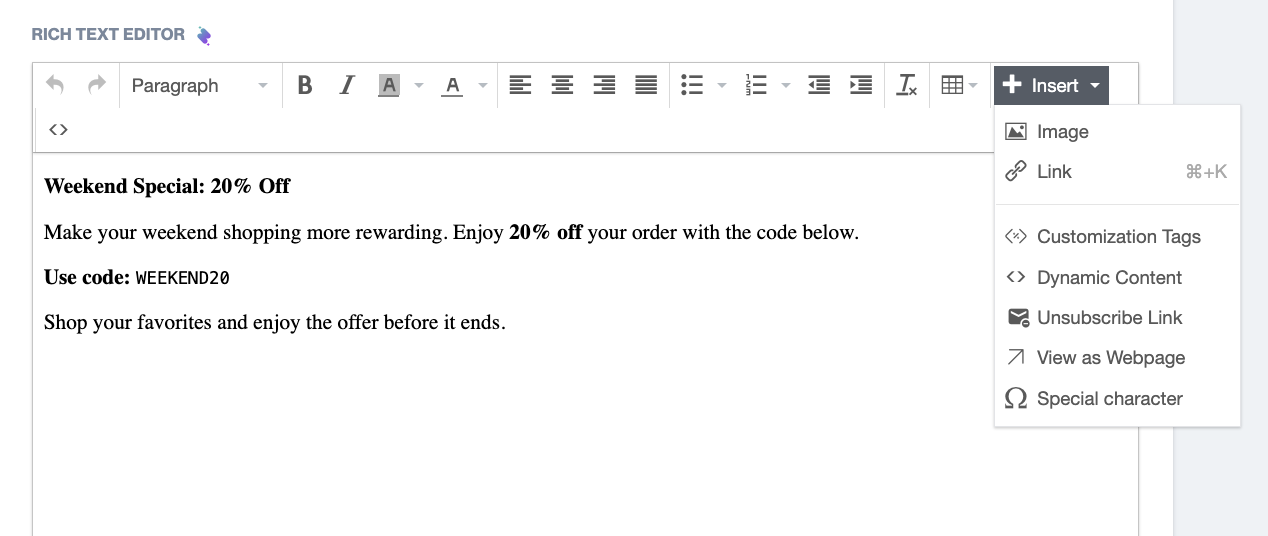
Insert Menu
Insert an Image
Choose Insert > Image to open the Insert/edit image dialog:
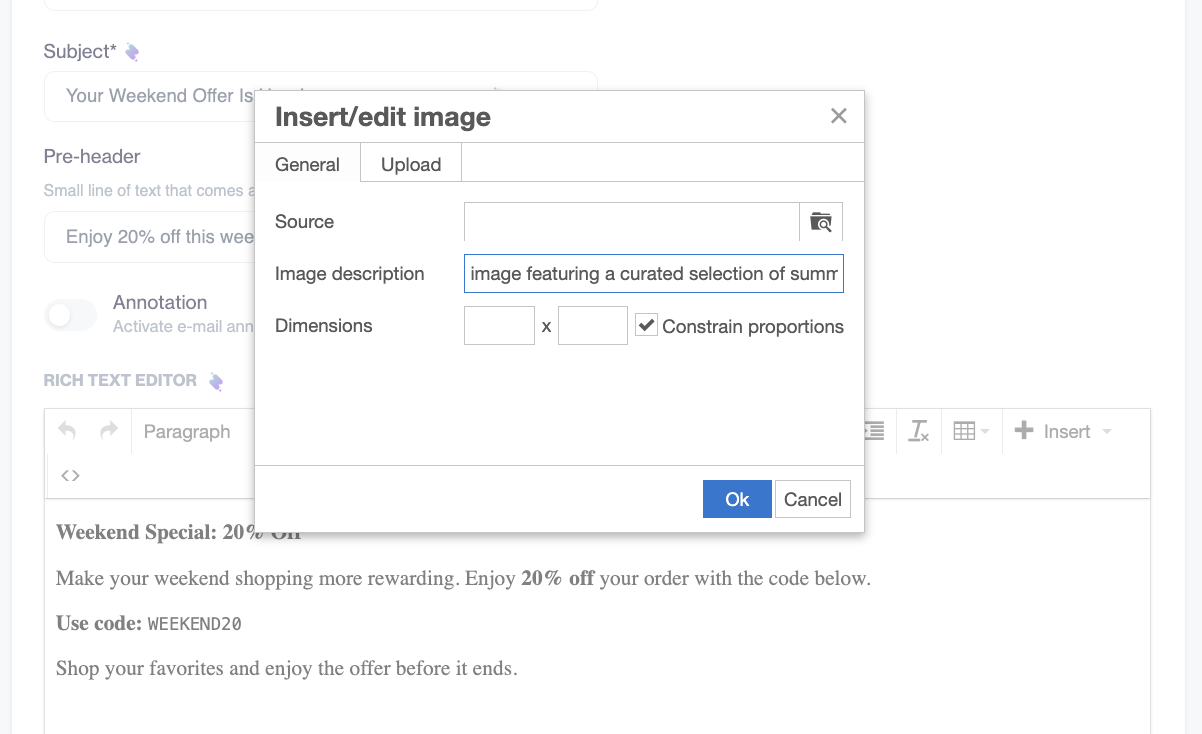
Insert > Image
- General tab
- Paste an image URL into Source, or click the browse icon to open the Image Selector and pick an image from your media library folders.
- Add an Image description (alt text). It is shown when images are blocked and is important for accessibility.
- Set Dimensions if needed, and keep Constrain proportions checked to avoid distortion.
- Upload tab: Click Browse for an image or drag and drop a file to upload it directly.
Click Ok to place the image.
Insert a Link
Select the text you want to make clickable and choose Insert > Link (or press ⌘+K / Ctrl+K):
- Url: The destination web address.
- Text to display: The clickable text shown in the email.
- Title: Optional text shown when hovering over the link.
- Target: New window opens the link in a new tab or window; None opens it in the same window.
Click Ok to insert the link.
Customization Tags
Choose Insert > Customization Tags to open the Customization Selector, search for a field, and click it to insert a personalization tag at the cursor.
| Tab | What it inserts |
|---|---|
| Contact Columns | Contact data such as name, email, or birth_date. |
| Device Columns | Device data such as device_type or token. |
| Dynamic Contents (Plain Text) | Saved plain-text dynamic content snippets. |
| Columns From Segment | Data from your segments, for targeted-group personalization. |
| Columns From Remote Segment | Data from remote segments. |
| Columns From Table | Data from your custom big data tables. |
| System Parameters | Send-related values: Unsubscribe Link, Brand Unsubscribe Link, Campaign Name, Campaign Id, and Send Id. |
| Coupons | A coupon code from one of your coupon lists, allocated per recipient at send time. |
Flow and Targeting customizations don't mixIf the content already contains Flow customizations, you can only add more Flow customizations. To switch to Targeting customizations, remove the existing Flow customizations first.
For deeper personalization scenarios, see Advanced Personalization in Email.
Dynamic Content
Choose Insert > Dynamic Content to open the Select a Dynamic Content window with three tabs:
- Product Box: Displays product information (images, names, prices) dynamically, tailored to each recipient's behavior or preferences.
- HTML: Inserts a saved custom HTML snippet for visually rich or interactive elements.
- Plain Text: Inserts dynamic text that adapts to recipient data or context.
Click an item to insert it, or click the + button to create a new dynamic content. Inserted dynamic content appears as a labeled chip in the editor and is resolved into real content at send time.
Unsubscribe Link
Choose Insert > Unsubscribe Link to insert the {{unsubscribe-link}} tag at the cursor. At send time it becomes a working opt-out link.
Compliance reminderMarketing emails must contain an unsubscribe link to comply with email regulations.
View as Webpage
Choose Insert > View as Webpage to insert the {{view-as-webpage-link}} tag. At send time it becomes a link that opens the email in a browser, useful for recipients whose email clients block images or break the layout.
Special Characters
Choose Insert > Special character to open a symbol grid with currency signs, mathematical symbols, accented letters, and more. Click a character to insert it.
Edit the HTML Source
Click the Source code (<>) button on the second toolbar row to view or edit the HTML behind your content. Adjust the markup as needed and click Ok to apply the changes to the editor.
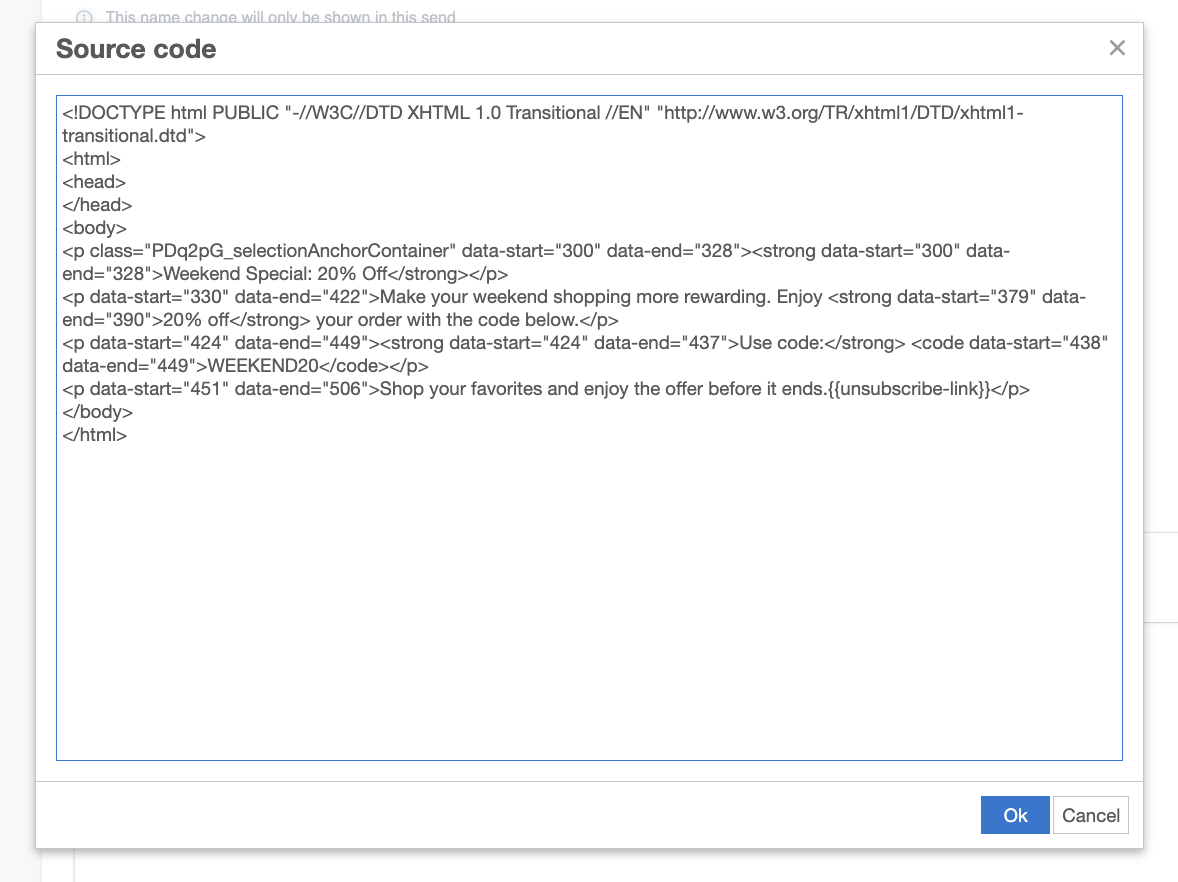
Source code (<>) button
Need full HTML control?If you find yourself editing the source often, consider building the content with the Code Editor instead.
Create Multi-Language Versions
Click Add Languages at the top of the Content step to prepare the same email in multiple languages:
- Copy from Content: starts the new language version from an existing content.
- Create Blank Email Content: starts the new language version from scratch.
Each language version has its own subject, pre-header, and body, so you can deliver the version matching each recipient's language.
Keep an Eye on Content Size
The Content Size indicator at the top of the page shows the current weight of your email in KB.
Large emails get clippedSome inbox providers (most notably Gmail) clip messages that are too large, hiding part of the content, including your unsubscribe link. Keep the size indicator low by trimming unused styling and hosting images in the media library instead of embedding them.
Save, Preview, and Publish
- Save Draft: Saves your work without making it available for campaigns.
- Preview & Test: Opens the preview and test options so you can check the result before sending.
- Publish: Makes the content ready to use in campaigns and flows.
- Cancel: Leaves the page without saving.
Unsaved changes are lost when you leaveIf you navigate away with unsaved changes, the editor asks: "Any unsaved changes will be lost. Sure to leave the page?" Click Cancel to stay and save your work first.
Tips for Better Emails
- Write the subject and pre-header as a pair. The pre-header should add information, not repeat the subject.
- Always send a test to yourself and check the email on mobile; most recipients read on a phone.
- Use customization tags to make even simple emails feel personal, starting with the recipient's name in the subject.
- Prefer the media library over external image URLs so images stay available for the lifetime of the email.
- Keep paragraphs short and use headings and lists. Recipients scan, they don't read.
Frequently Asked Questions
Why is the Preview & Test button disabled?
The button stays disabled while the content is still empty. Fill in the required fields, starting with the subject and body, then save draft and it becomes available.
Why can't I add a Targeting customization?
The content already contains Flow customizations. Remove them first to switch to Targeting customizations. The two types cannot be mixed in one content.
Where do I add an unsubscribe link?
Use Insert > Unsubscribe Link for the standard link, or Insert > Customization Tags > System Parameters to choose between Unsubscribe Link and Brand Unsubscribe Link.
Can I edit the HTML of my email?
Yes. Click the Source code (<>) button in the toolbar. For fully hand-coded emails, the Code Editor is the better tool.
How do I send the same email in several languages?
Click Add Languages at the top of the Content step and create a version per language, either from scratch or by copying an existing content.
Updated about 2 months ago