
Email lets you design, test, and store the email content you send to your audience: newsletters, promotions, onboarding journeys, and more. You build the content once here, in Content > Marketing > Email, and then use it in your campaigns.
How Email works
- Create your content on this screen, using one of four tools: the Rich Text Editor, Code Editor, Email Builder, or Upload File.
- Set up the message details (sender, subject, pre-header) and design the body.
- Test and publish it so it is ready for use.
- Add it to a campaign: a Targeting campaign or a Flow (as an Email action node). This is what actually delivers the email to your audience.
Content is not sent until you use it in a campaignThis screen only creates and stores your email content. Creating or publishing content here does not send anything. The email reaches your audience once you use the content in a Targeting campaign or a Flow. Sending also requires a verified sending domain on your account (see Step 3).
Step 1: Create new email content
- Go to Content > Marketing > Email.
- Click the New button in the top-right corner.
- Choose the tool you want to build the email with.
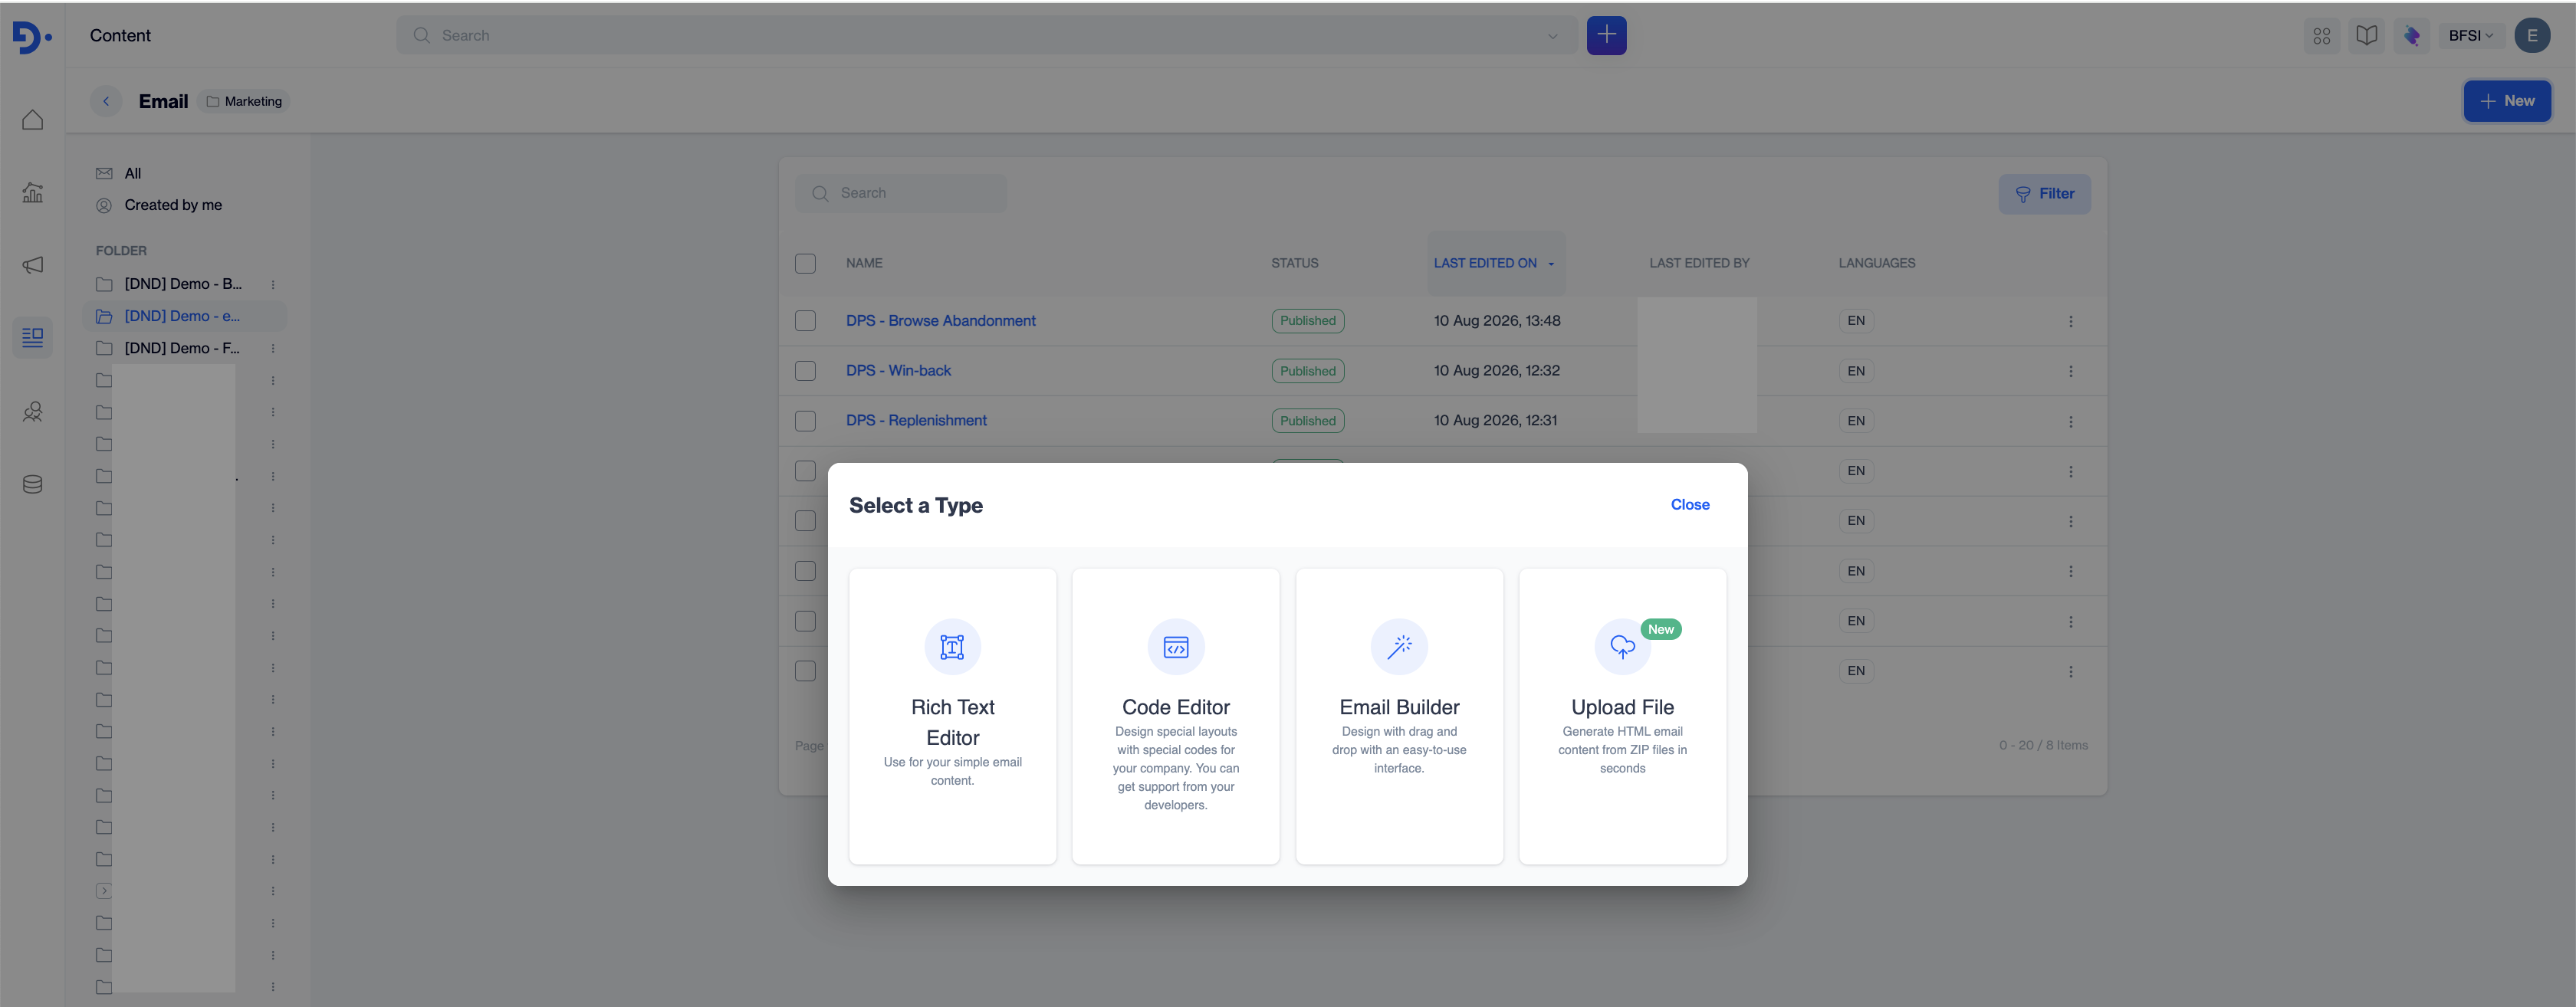
New menu open, showing the four tools and their descriptions
Which tool should I choose?
| Rich Text Editor | Code Editor | Email Builder | Upload File | |
|---|---|---|---|---|
| Best for | Simple, mostly-text emails written directly in the browser | Layouts your team has already coded, or designs that need pixel-level control | Building a designed email from scratch or from a template, without code | Bringing in an email that was designed outside Dengage |
| What you get | A word-processor-style editor with formatting, links, images, and personalization | An HTML editor with a live preview, so you can design special layouts for your company | A drag-and-drop canvas with an easy-to-use interface, a large template gallery, and your Saved Templates | An importer that generates HTML email content from a ZIP file in seconds |
| Skills needed | None | HTML/CSS. You can get support from your developers | None | The exported files from your design tool |
Detailed walkthroughs are in the Rich Text Editor, Code Editor, Email Builder, and Upload File subsections.
The tool cannot be changed laterEach tool creates a different content type, so an existing email cannot be switched from one tool to another. If you need a different tool, create a new content item and rebuild the email there.
Step 2: Name and file your content
Fill in the General section:
| Field | Required | What it does |
|---|---|---|
| Name | Yes | The name you and your team see in the listing and when picking content for a campaign. Recipients never see it. Use a name your colleagues will recognize later, e.g. 2026-09 Back to School. |
| Folder | No | Where the content is stored. Defaults to Email Content. Click Change Folder to pick another one, or create a folder from the folder pane first. |
| Description | No | A free-text note for your team, for example the campaign it belongs to or what changed in this version. |
Click Next. The Content section then becomes available for editing.
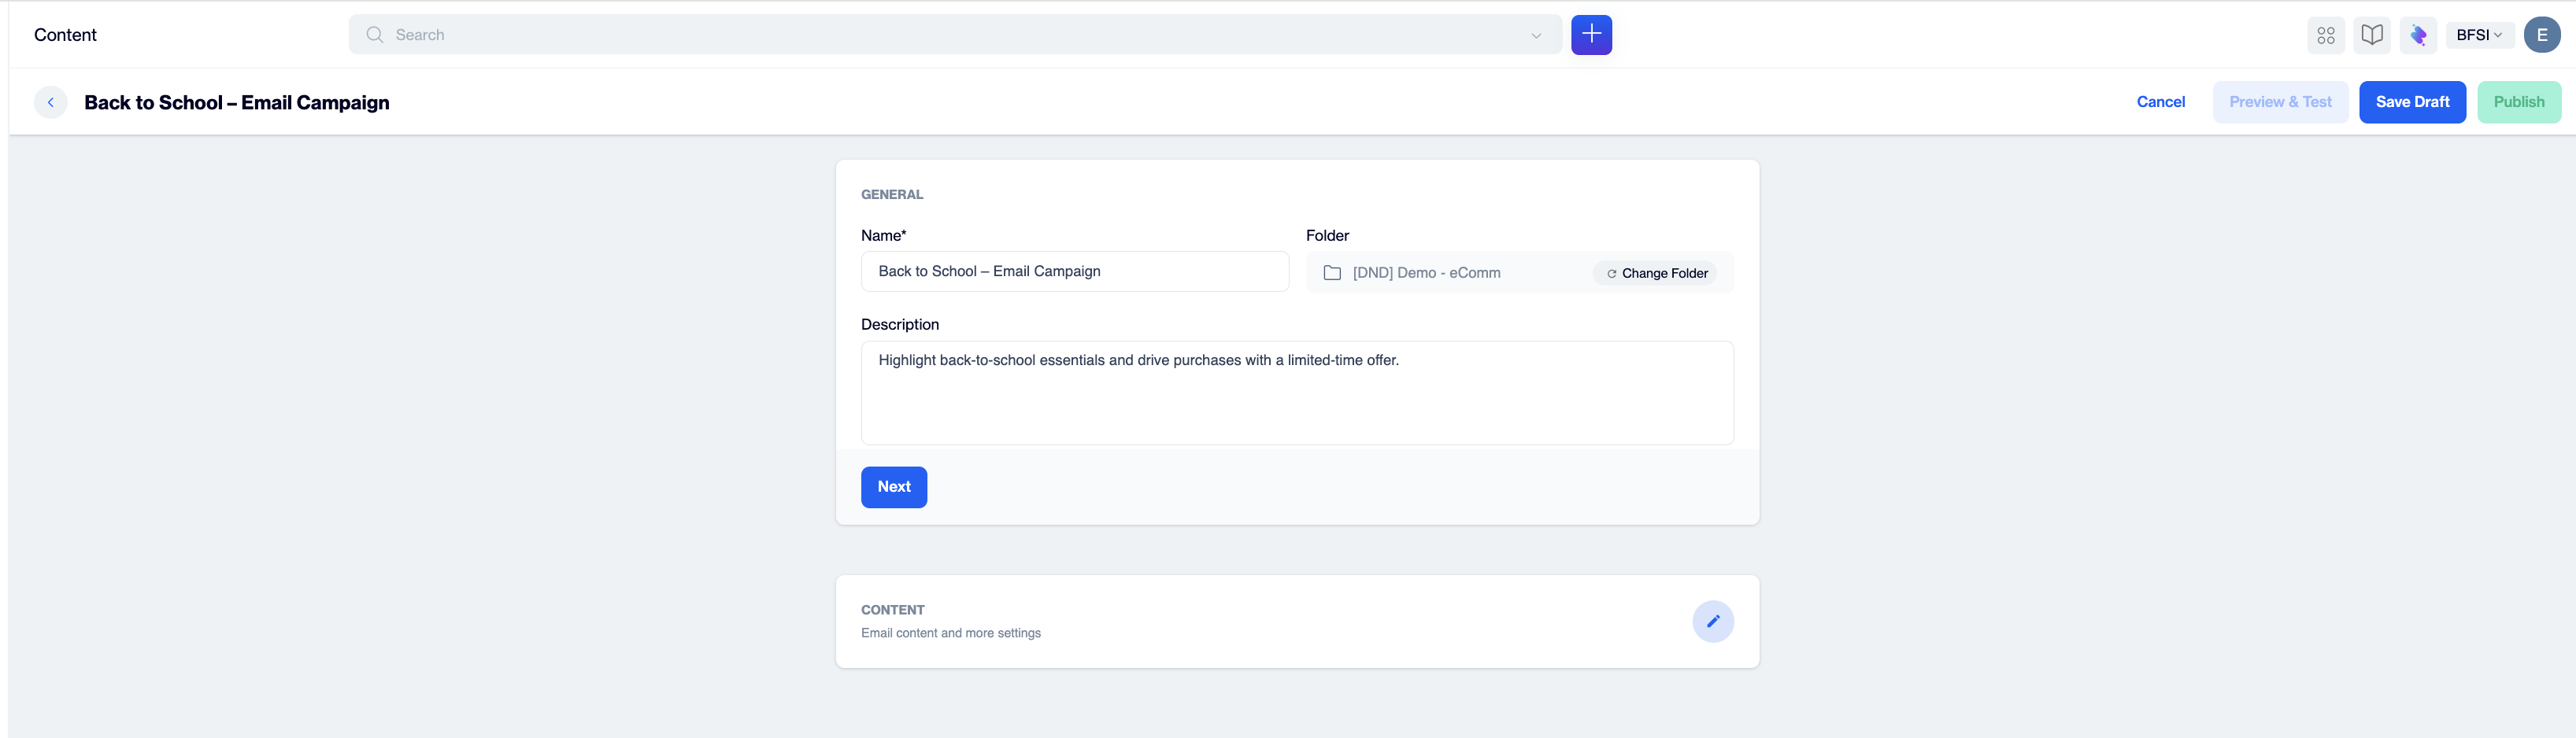
General section with Name, Folder, Description, and the Next button
Nothing is saved yetClicking Next only unlocks the next section. Your content is stored the first time you click Save Draft. If you leave the page before that, the content is lost.
Step 3: Set up the message details
The Content section is where you define what the recipient sees in their inbox before they even open the email.
| Field | Required | What it does |
|---|---|---|
| Sender Profile | Yes | A saved pairing of From Address and From Name that you can reuse across emails. Select an existing profile from the dropdown, or click New to create one. |
| From Address / Email | Yes | The address the email appears to come from. Only domains already registered and verified for your account can be used. To add a new sending domain, contact Dengage Support. |
| From Name | Yes | The display name shown in the recipient's inbox, such as your brand or company name. You can override it for this content only. The note under the field, "This name change will only be shown in this send", means the change does not update the saved Sender Profile. |
| Reply To | No | The email address that receives replies from your recipients. Supports personalization. |
| Subject | Yes | The subject line. Supports personalization and emojis. |
| Pre-header | No | The short line of preview text shown after the subject line in most inboxes. Supports personalization and emojis. If you leave it empty, most inbox clients fall back to the first line of your email body. |
| Annotation | No | Turn on Activate e-mail annotation to let Gmail highlight this email (with a deal image, discount, expiry date, and so on) in the Promotions tab. See Gmail Annotation Setup. |
Personalizing subject and pre-headerUse the Add Customization or Insert option next to a field to drop in contact attributes such as first name or city. Always set a fallback value, so a contact with no value stored does not receive an email addressed to a blank space. See Advanced Personalization in Email.
Step 4: Design the email body
How you build the body depends on the tool you chose in Step 1.
- Rich Text Editor: write directly in the editor, using the toolbar for headings, lists, links, images, and tables. Use Insert to add personalization and dynamic content. Switch to Source code if you need to check or tweak the underlying HTML. See Rich Text Editor.
- Code Editor: paste or write your HTML in the code pane and check the result in the live preview. See Code Editor.
- Email Builder: start from the Template Gallery (templates are grouped by Industry, Seasonal & Holidays, Usage & Campaign Types, and Automated), from Saved Templates, or from Blank Content. Then drag Content blocks onto Rows, and set global styling under Settings. Toggle Mobile and Desktop to check both views. See Email Builder.
- Upload File: upload a ZIP containing your HTML file and its images, and Dengage builds the content for you. See Upload File.
Things every email body needs
- An unsubscribe link. In the Email Builder, add it from a button or text link via Special Links > Unsubscribe (or Brand Unsubscribe). Emails without a working unsubscribe path damage deliverability and may breach local law.
- Alt text on images, so the email still makes sense when images are blocked.
Ad blockers and personalizationBrowser ad blockers can prevent the Insert and Add Customization dialogs from loading in the Email Builder. If personalization options do not appear, disable your ad blocker for app.dengage.com and reload.
Step 5: Add languages (optional)
To send the same email in more than one language, click Add Languages and choose:
- Copy from Content: start from the version you have already built and translate it, or
- Create Blank Email Content: start the language version from scratch.
How the right version is chosen: at send time, Dengage reads the language column on the contact's record in the master_contact table. If there is no version matching that contact's language, the default version is sent.
Configure the languages available to your account, and which one is the default, under Settings > Content Languages.
Each item's languages are shown in the Languages column of the listing, and you can filter the listing by language.
Translate the whole message, not just the bodySubject and pre-header are per-language too. A translated body with an English subject line is the most common mistake here.
Step 6: Preview and test
Before publishing, verify how your email will look and behave for real recipients. All preview and testing tools are gathered in the Preview & Test wizard, which you can open from the Preview & Test button in the upper right corner of the email content page. Save your content as a draft first; Preview & Test works on the saved draft version.
The wizard has three steps: Audience for Sample, Preview, and Send Test.
What to check on a test send
| Check | Why |
|---|---|
| Sender name and address | Confirms the right Sender Profile is selected |
| Subject and pre-header, including personalization | Fallback values are only visible on a real render |
| Rendering on mobile and desktop | Most opens are on mobile |
| Every link, including the unsubscribe link | Broken links are the most common post-send regret |
| Images loaded, alt text present | Many inbox clients block images by default |
| Spam Score | A high score predicts inbox placement problems. See Spam Checker |
Testing personalizationTo check how personalization renders with real contact data, send the test to a testing list of real contacts.
Audience for Sample
If your email uses personalization (customization tags or variables), the preview needs sample contact data to render real values instead of raw tags. In this step you choose where that sample data comes from:
- Pick a source type from the tabs: Segment, Predefined Segments, Table, or Remote Segment.
- Select an audience from the list. Use the search box and Filter to locate it quickly.
- Click Next.
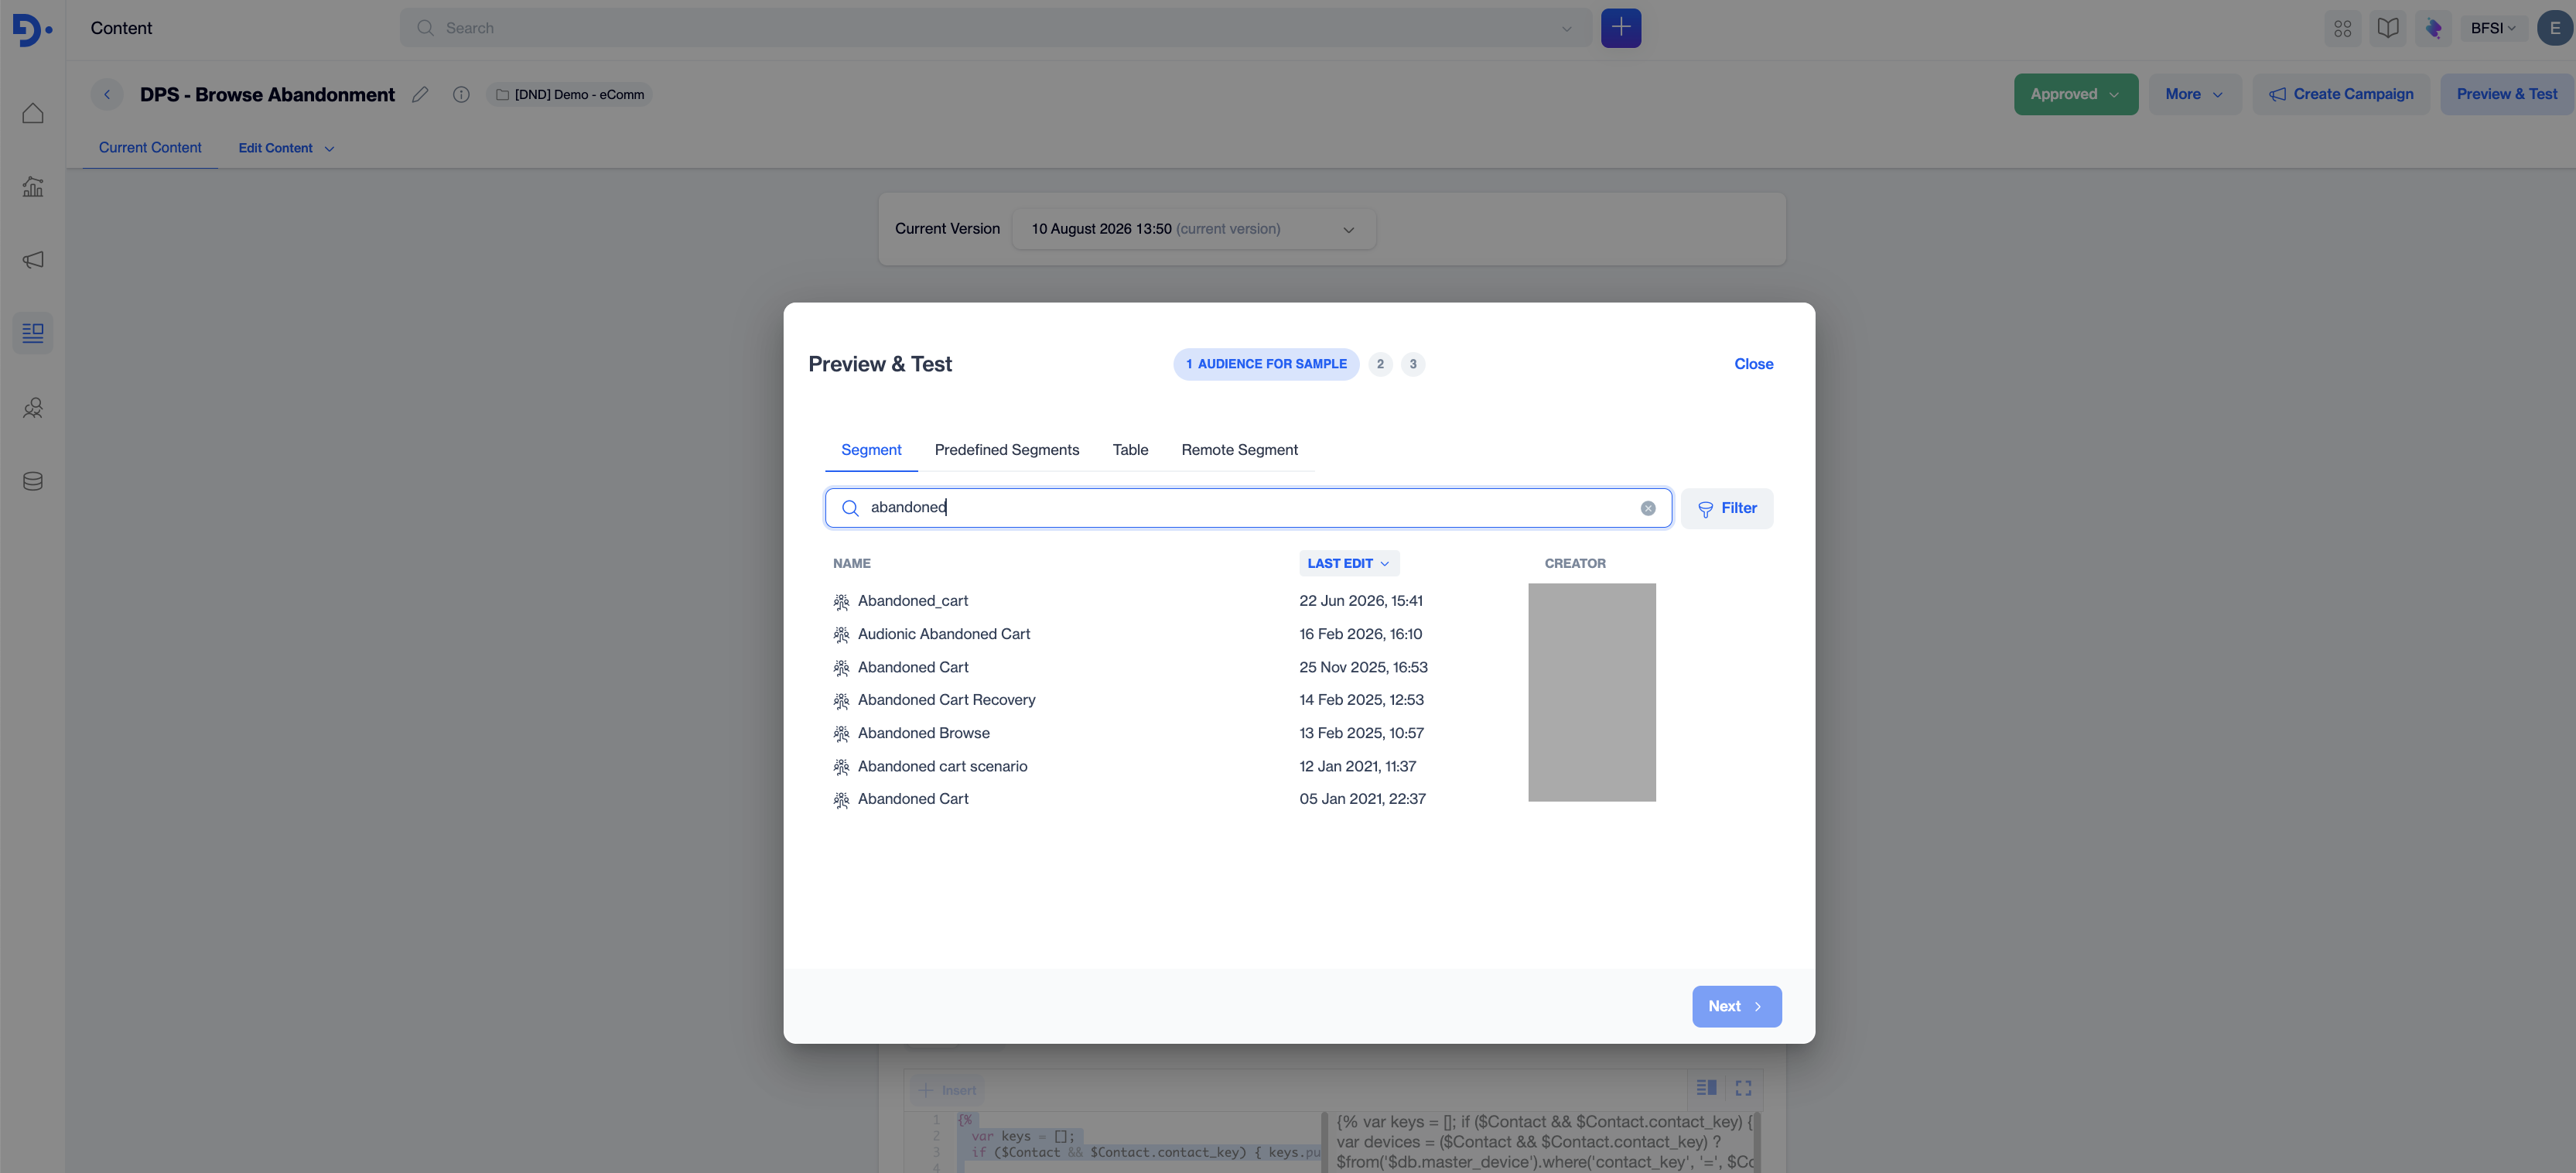
Audience for Sample step with the Segment tab and audience list
NoteThis step only matters for content that contains personalization. For a fully static email, simply select any audience and continue; the preview output will be the same.
Preview
The preview shows the email as a recipient would receive it: the From name and sender address, the subject line, the pre-header, and the fully rendered body, with personalization tags resolved using a contact sampled from the audience you selected in Step 1.
- Use the HTML and AMP tabs to switch between the two versions of your content.
- Use Back to sample from a different audience, or Next to continue to test sending.
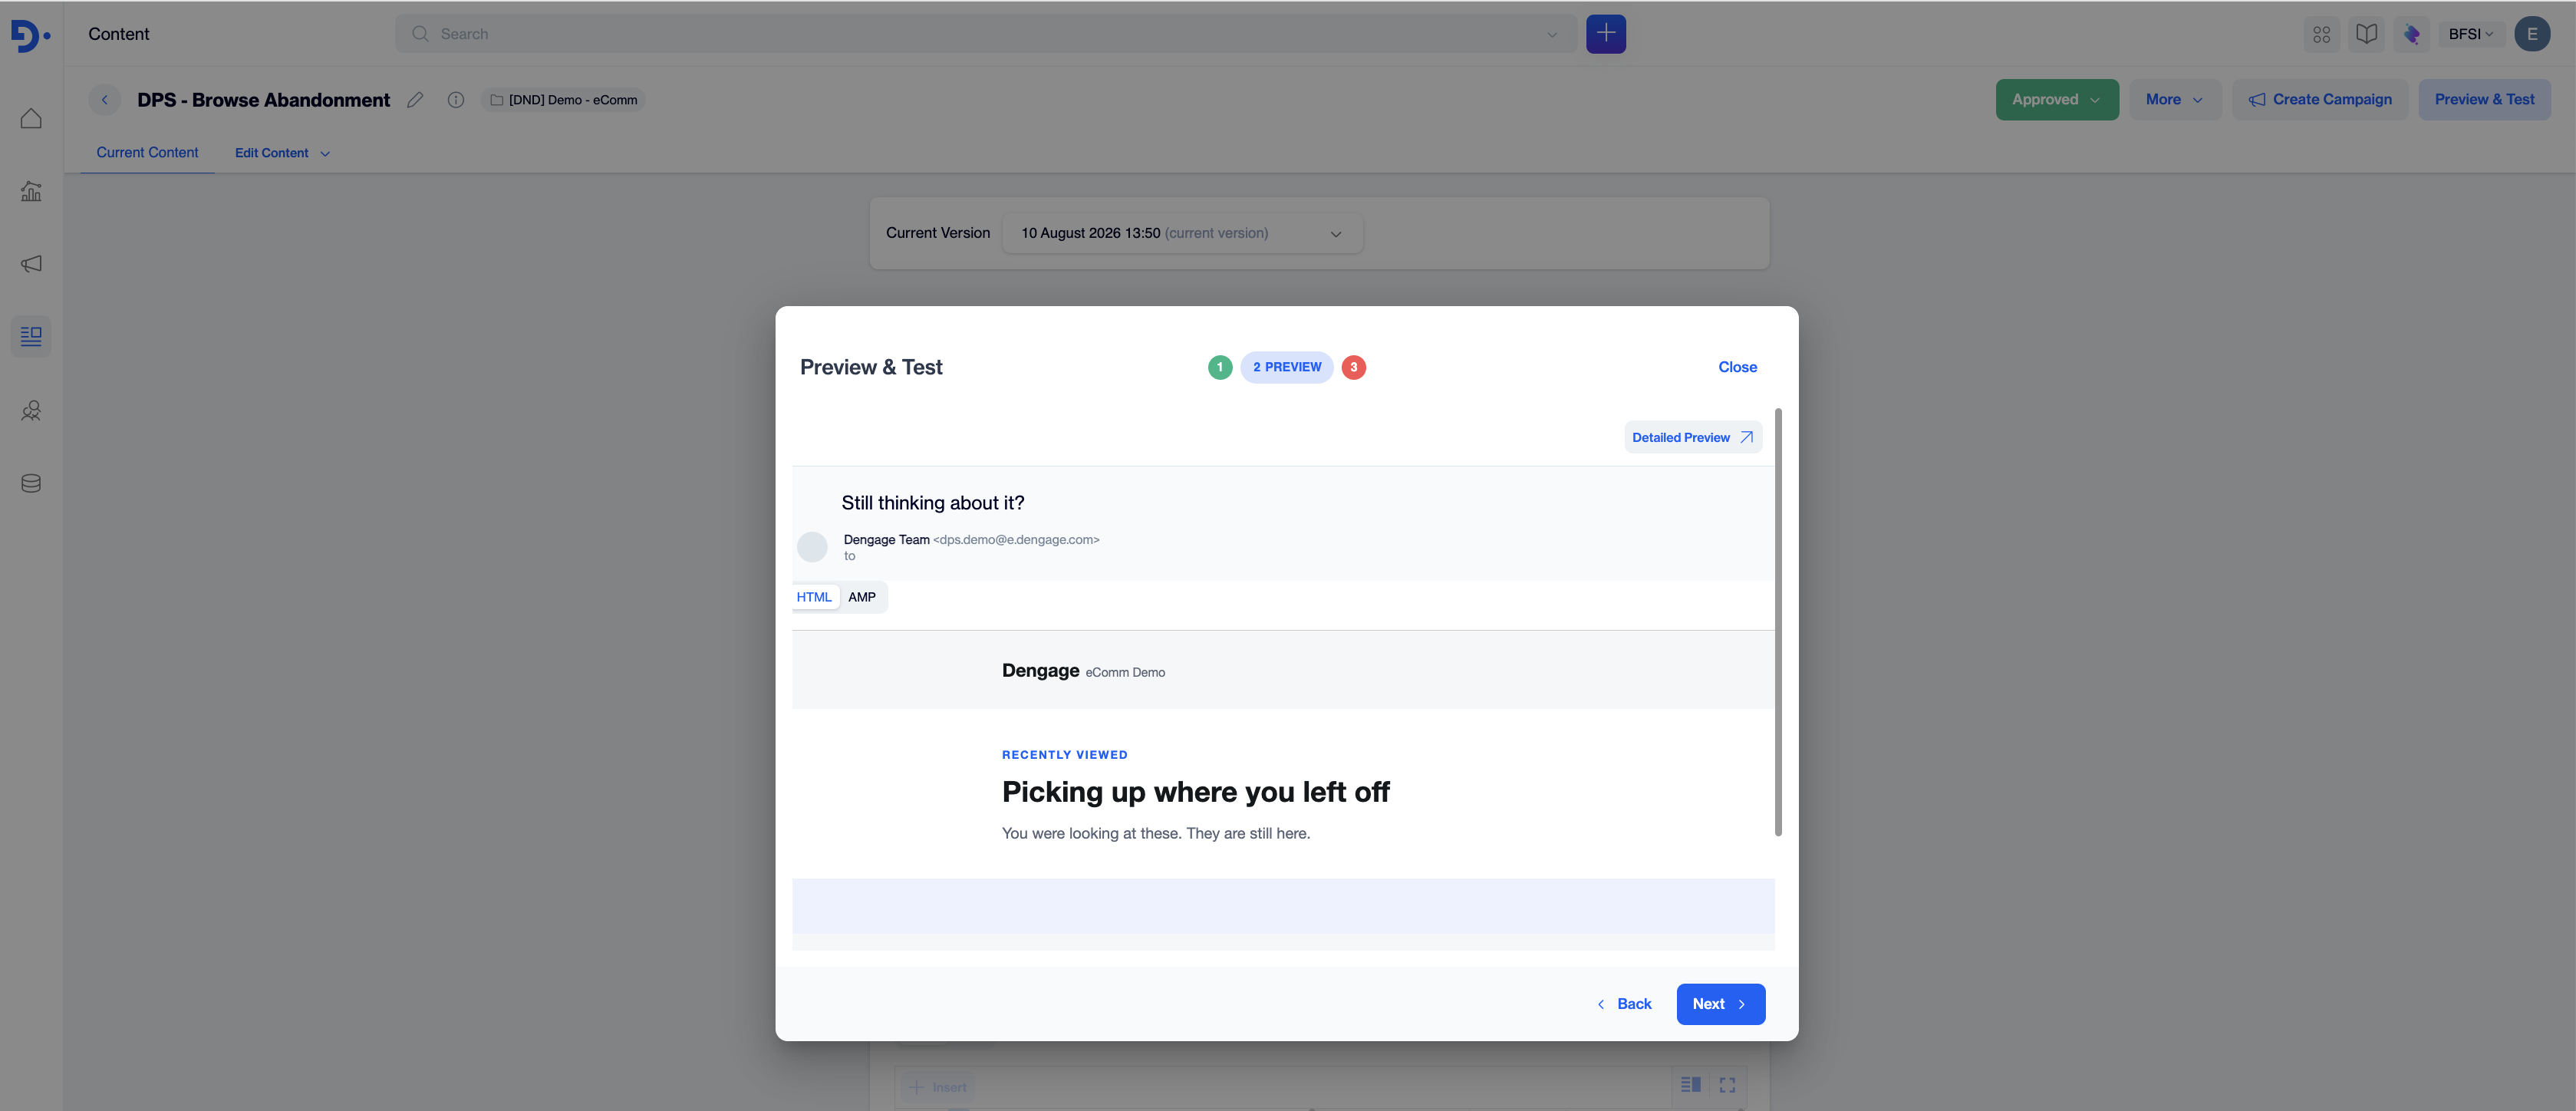
Preview step showing the rendered email with subject line and sender details
Detailed Preview
From the Preview step you can also open Detailed Preview, which generates previews of your email in a selection of real email clients and devices, so you can catch client specific rendering issues before sending. The detailed preview opens in a new browser tab, so make sure your browser allows pop-ups for the dEngage panel.
NoteClient previews are generated one by one, so they can take a moment to appear. If a preview shows an error mark, it can be generated again from the Detailed Preview page.
Send Test
A test send delivers the email to a real inbox, which is the most reliable way to check links, images, formatting, and how the subject and pre-header appear in an inbox list. Choose who receives the test:
- Predefined Audience: Select one of your saved test audiences from the dropdown.
- Type-in Addresses: Enter the recipient addresses manually.
Click Send Test Email to deliver the test.
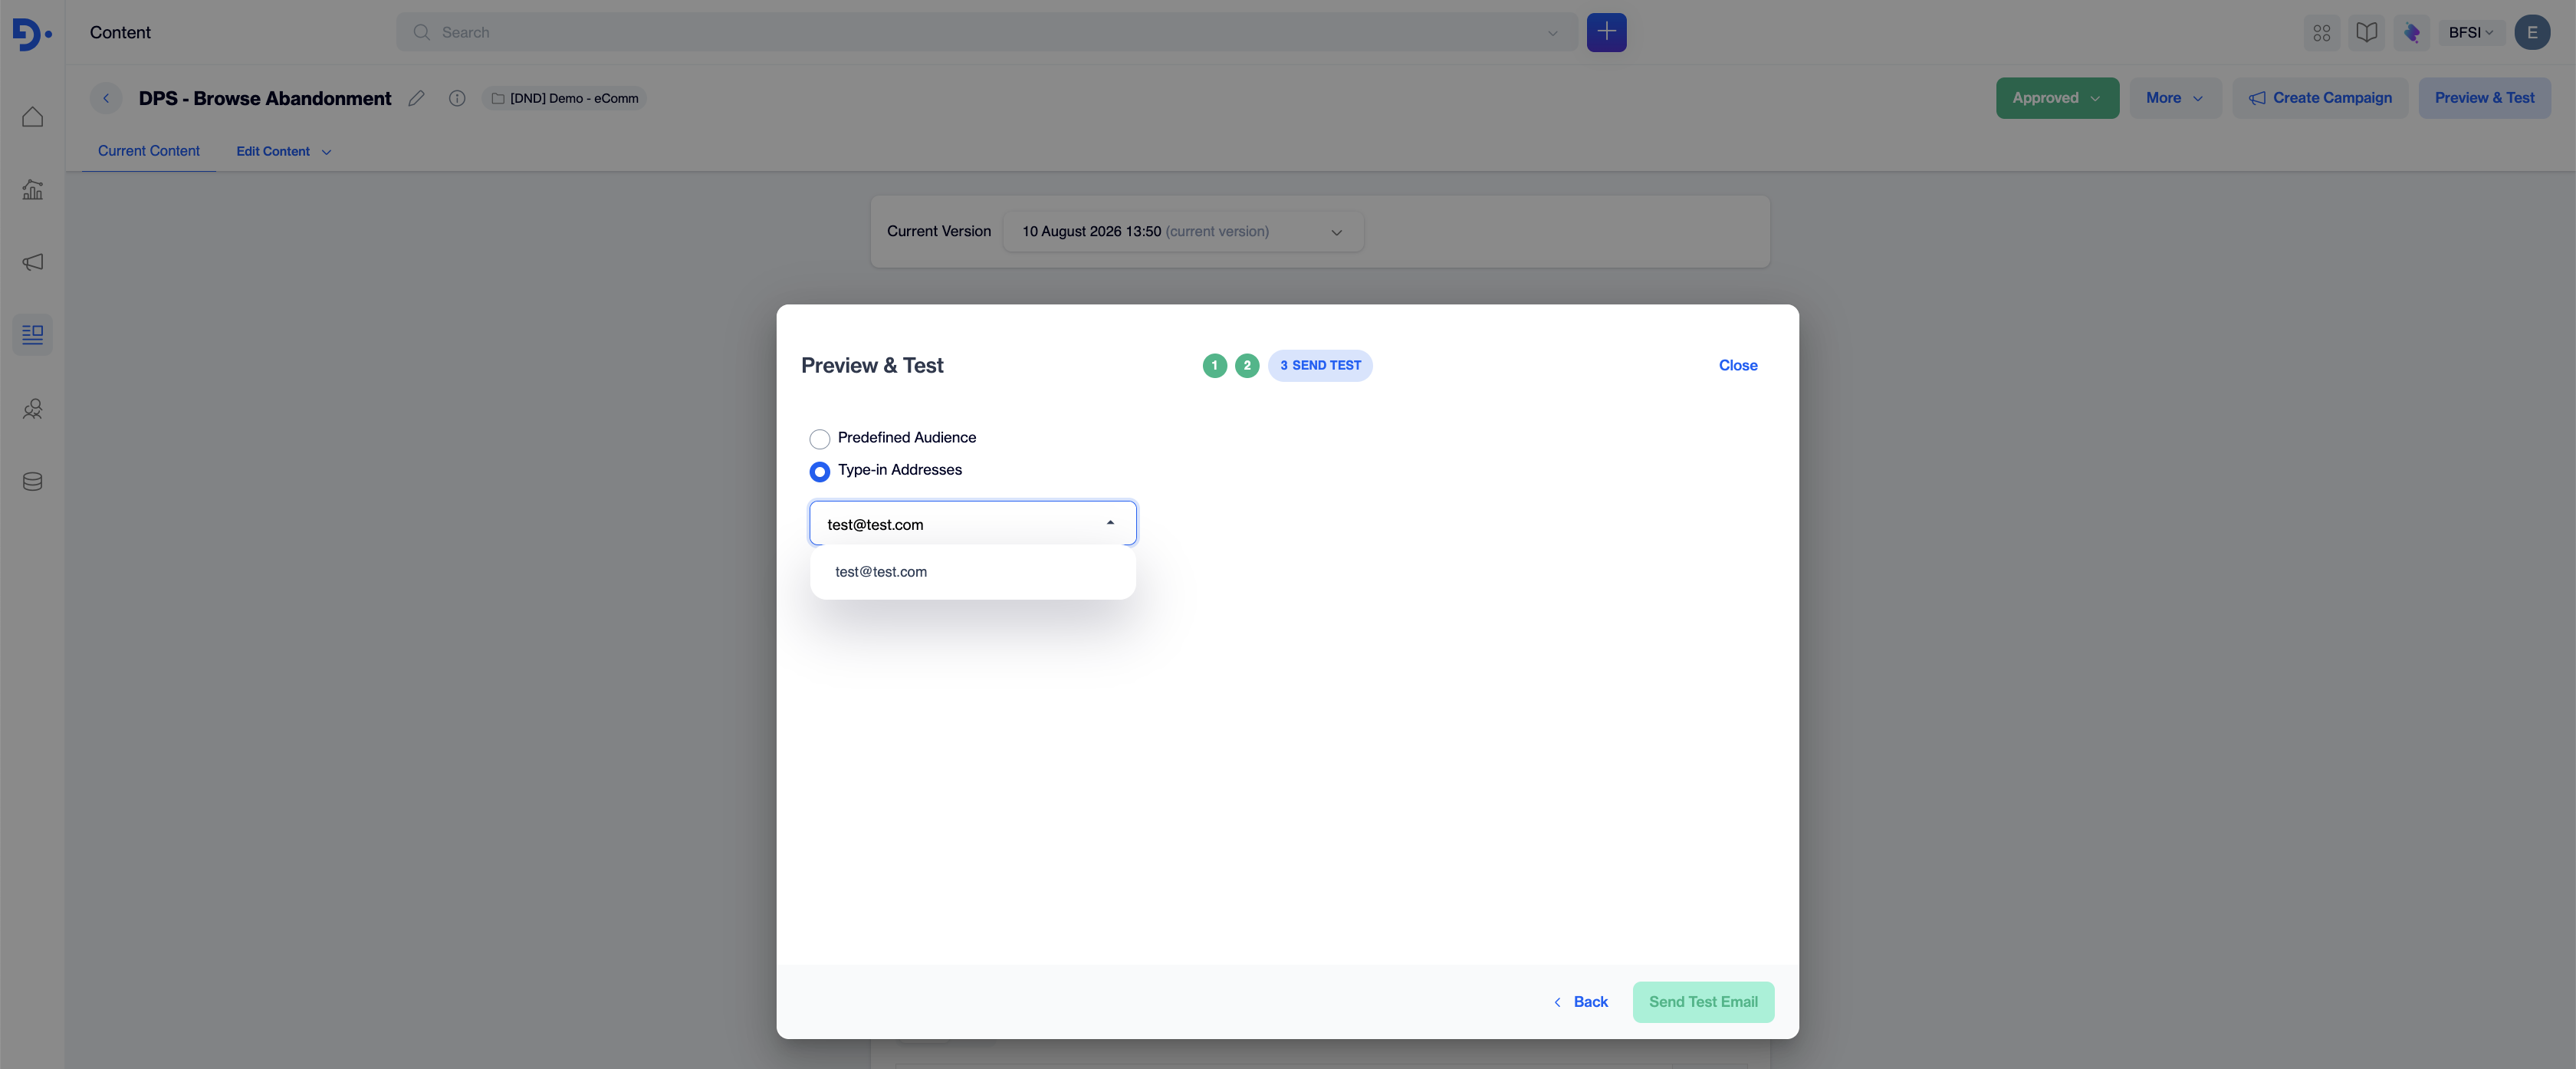
Send Test step with the Predefined Audience and Type-in Addresses options
Step 7: Publish
Publishing makes your content available to campaigns.
- Save Draft stores your work without making it available.
- Publish makes it available to campaigns or, if an approval workflow is enabled for your account, submits it for review.
The listing shows each item's status:
| Status | What it means | What you can do |
|---|---|---|
| Draft | Still being worked on. Not available to campaigns. | Edit freely |
| Waiting Approval | Submitted and waiting for a reviewer. Shown when an approval workflow is enabled for your account. | Edit, Duplicate, Move, Copy Public ID. Delete is not available. |
| Rejected | A reviewer sent it back for changes. | Edit and resubmit |
| Published | The live version of the content, ready to use in campaigns. | Create Campaign, or use Edit Content to start a new version |
Published vs. ApprovedThese are two different things. Published is about availability: the content is live and ready to be used in campaigns. Approved, shown on the content detail page, is about roles and access: it means the content has passed the approval workflow defined by your account's roles and permissions. Approval workflows are configured under Settings > Approval Workflows.
Step 8: Use your content in a campaign
Once published, your content is ready wherever email campaigns are set up:
- Create Campaign: the quickest route. Click the three-dot menu next to the content in the listing (or the Create Campaign button on the content page) and a wizard opens with this content already selected.
- Flows: add an Email action node to a Flow and select your content, to send it as part of an automated journey.
- Targeting campaigns: use the content in a Targeting campaign to send it to a chosen audience.
Transactional emails are separateOrder confirmations, password resets, and other system-triggered emails are created under Transactional > Email, not here. See Email (Transactional).
Editing content you have already published
Open the content from the listing. What you can do depends on its status.
- Draft content: edit it directly, with no restrictions.
- Published content: the current live version is shown under Current Content and is read-only. Click Edit Content and choose Copy from Content (start from the live version and change what you need) or Create Blank Email Content (start the new version from scratch). Your changes are saved as a draft alongside the live version, so the live email keeps going out untouched while you work.
Saving a draft does not update the live emailYour edits only replace the live content when you Publish them. Until then, campaigns keep using the previously published version.
Other actions on the content page
| Action | What it does |
|---|---|
| History | Shows previous versions of this content. See Content Versioning. |
| Create Campaign | Opens the campaign wizard with this content selected. |
| Preview & Test | Opens the preview and test-send pop-up (Step 6). |
| More > Copy Public ID | Copies the content's Public ID, for API and integration references. |
| More > Duplicate Template | Creates a copy of this content as a new item. |
| More > Delete | Deletes the content after a confirmation pop-up. |
Managing your email content
The Email listing shows all your content with its Name, Status, Last Edited On, Last Edited By, and Languages. Click any item to open it.
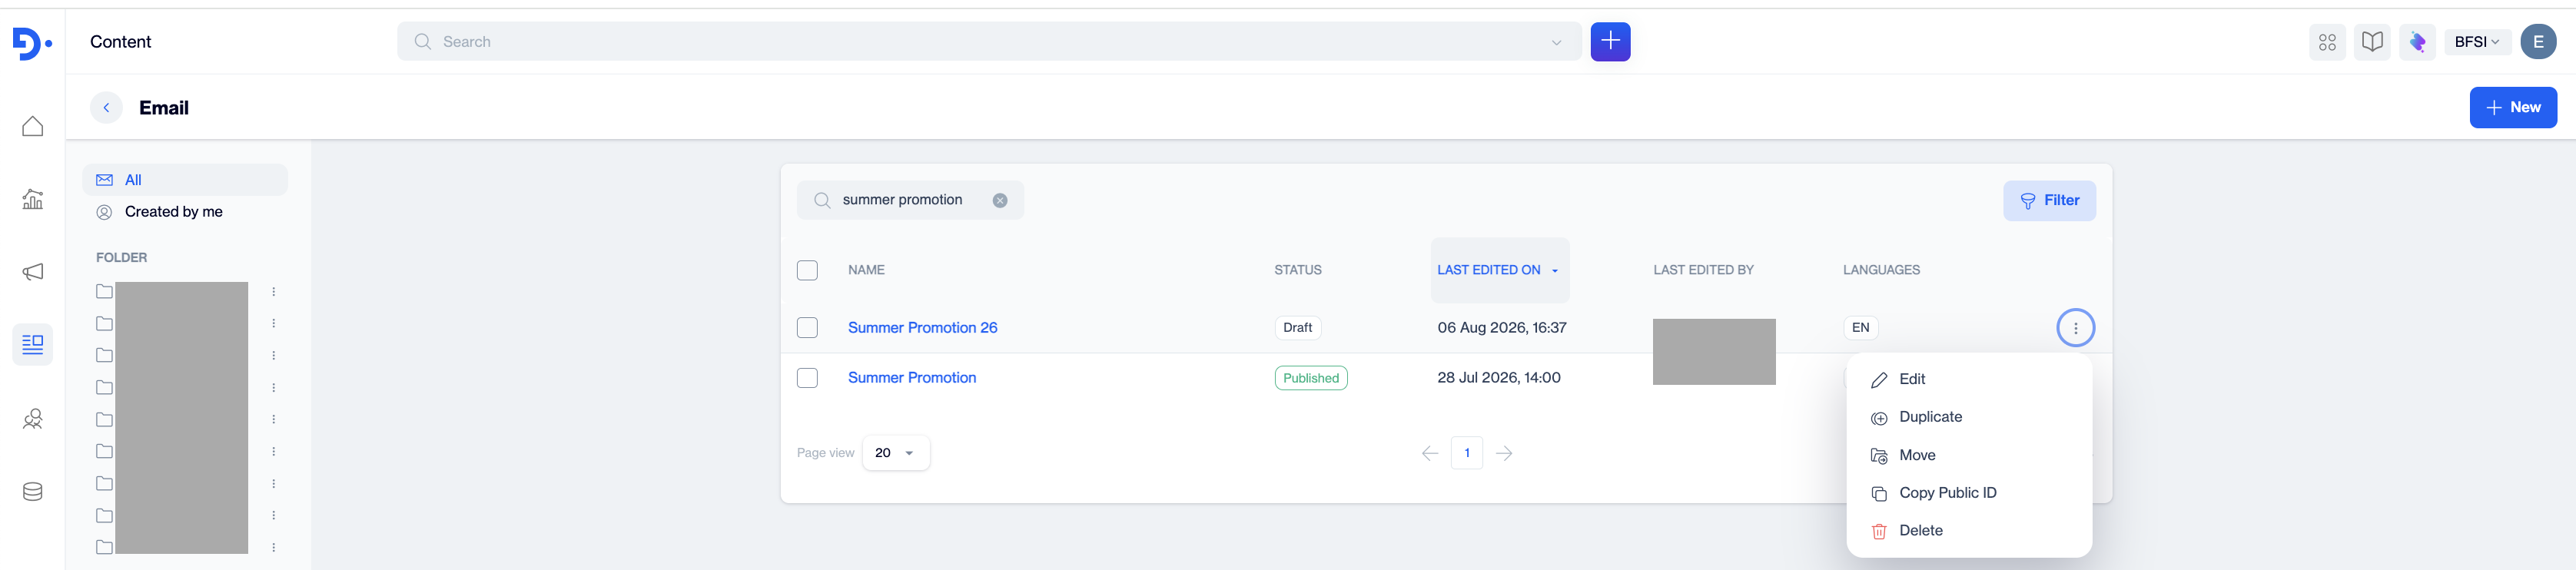
The listing with the folder pane, the columns, and one three-dot menu open
- Folders: Keep content organized by sorting it into folders. Click New Folder at the bottom-left to create one. The three-dot menu on a folder offers Rename, Copy Public ID, Move Item, and Delete. All shows everything; Created by me shows only the content you created.
- Search: Find content by name from the search box above the listing.
- Filters: Filter by language and by date range, based on either creation date or update date. Clear Filters removes all applied filters; Cancel closes the pop-up.
- Sorting: Sort by Name (A-Z or Z-A) or Last Edited On (newest or oldest first).
- Page view: Show 20, 30, or 40 items per page.
Item actions
The three-dot menu next to each item offers:
| Action | What it does |
|---|---|
| Create Campaign | Starts the campaign wizard with this content (see Step 8). Available on published content only. |
| Edit | Opens the item in the tool it was created with. |
| Duplicate | Creates a copy of the item in the same folder. |
| Move | Moves the item to another folder. You can also create a new folder as you move. |
| Copy Public ID | Copies the item's Public ID, e.g. for API references. |
| Delete | Deletes the item after a confirmation pop-up. Not available while an item is waiting for approval. |
FAQ
I published my email. Why hasn't anyone received it?
Publishing only makes the content available. To send it, use the content in a Targeting campaign or in a Flow with an Email action node (Step 8).
Why can't I select my content in a campaign?
Only published content is available to campaigns. Check the Status column: if it says Draft, Waiting Approval, or Rejected, the content is not yet available.
Which editor should I use?
See the comparison table in Step 1. In short: Rich Text Editor for simple text emails, Email Builder for designed emails without code, Code Editor when your team writes the HTML, Upload File when the email was designed elsewhere.
Can I change the editor after I have started?
No. Each tool creates a different content type, so the choice cannot be switched on an existing item. Create a new content item with the tool you need.
My From Address isn't in the list.
Only domains registered and verified for your account can be used as senders. Contact Dengage Support to add a new sending domain.
I edited a published email but recipients still get the old version.
Your edits are stored as a draft next to the live version. Click Publish to make them live.
How do I send the same email in several languages?
Use Add Languages on the content (Step 5). Each language version is managed on the same content item, and the version sent is chosen from the contact's language value.
Personalization options don't open in the Email Builder.
Disable your browser's ad blocker for app.dengage.com and reload the page.
What is a good Spam Score?
The scale runs from 0 to 5, and lower is better. Review the flagged items in Detailed Preview and rewrite the phrases it highlights before you publish. See Spam Checker.
Someone else's content is in Waiting Approval and I can't delete it.
Content waiting for approval cannot be deleted. Ask the reviewer to approve or reject it first. Approval workflows are configured under Settings > Approval Workflows.
Updated about 2 months ago