
Scenario Center
Scenario Center is the fastest way to launch a proven, AI-driven campaign in Dengage. Powered by Zeki, it turns a campaign that would normally take hours of flow building, audience setup and content work into a guided seven-step setup you can finish in minutes. You pick a scenario template, and Zeki does the heavy lifting: it pre-selects the settings that work best, picks the right channel for each contact, and writes personalized content for every recipient from your Brand Kit and AI Brand Persona. You review, test and publish; the scenario then runs automatically in the background, with no canvas to build or maintain.
What Zeki does for you in Scenario Center:
- Smart defaults: every step opens with settings Zeki has already chosen, marked with the Zeki Picked badge. You can keep them or change any of them.
- Best channel per contact: with AI Optimization on, each person receives the message on the channel they engage with most.
- Personalized content per recipient: with Zeki AI Content Generation on, Zeki writes the copy and creative for each channel and each contact, based on their profile, history and engagement data.
- Product picks: Zeki chooses the top product to feature and can add recommendations from your feed.
- Preview and test before launch: you see the message as your customers will and send yourself a test on every channel.
You can find it under Campaign > Scenario Center.
Key terms
| Term | Meaning |
|---|---|
| Scenario template | A pre-defined campaign type with a fixed trigger rule and Zeki-picked defaults. Listed on the Scenario Template tab. |
| Scenario | A campaign you created from a template. Listed on the Live Scenarios tab. |
| Zeki Picked | A badge shown on any step or setting whose default was chosen by Zeki AI. All of these defaults can be changed. |
| Event-based | Templates triggered by customer behaviour, such as viewing a product. They need event mapping. |
Before you start
Make sure the following are in place before you create a scenario:
| Requirement | Why it is needed |
|---|---|
| A sender or application for each channel you plan to use (email sender profile, SMS sender, push or in-app application, on-site domain) | Zeki sends from these. |
| Brand Kit and AI Brand Persona | Zeki uses them to write on-brand content when Zeki AI Content Generation is on. |
| A coupon list | Only if you switch on the Coupon add-on. |
The Scenario Center page
The page has two tabs and a New Scenario button in the top right, which takes you to the template gallery.
Live Scenarios
This tab lists every scenario created on your account. Use the search box and the Filter button to narrow the list. Each row shows the scenario name, the template it was created from, the channels it uses, its status (Draft, Active or Paused), the last run time and who last edited it.
The three-dot menu at the end of each row offers Edit, Pause or Resume (for Active and Paused scenarios) and Delete. Active and Paused scenarios also show a report icon that opens the scenario report.
Scenario Template
This tab is the gallery of available templates. Each card shows the template name, a short description and a summary of how it is triggered. Click Use Scenario to start.
Browse Abandonment
Browse Abandonment follows up with contacts who looked at products but did not buy. It is the classic "window-shopper" campaign: a contact views a product detail page, leaves the site or app without converting, and receives a message the next day featuring the products they viewed.
How it works
- Trigger: the scenario listens to the
product_viewevent. A contact who views a product detail page and leaves without converting enters the scenario. The rule is fixed by the template and cannot be edited. - Timing: the scenario runs once a day at the Send Time you choose, in the account timezone. Each run covers contacts who browsed products the previous day.
- Who is excluded: contacts who already purchased (when Quick Exclusions are on), contacts in any segment, campaign audience or send list you exclude, and contacts who only viewed products in excluded categories. Exclusions are checked at send time.
- Entry capping: the same contact enters the scenario at most once per period you set (default 1 per day), so a contact who browses every day is not messaged every day if you choose a weekly cap.
- Products in the message: when a contact viewed several products, Zeki sends either the top item or a bundle (Email only), picked by the Priority Rule you choose. A product a contact has already received is not featured again for the number of days set in Product Repeat Limit.
- Channel and content: with AI Optimization on, each contact receives the message on the channel they engage with most. With Zeki AI Content Generation on, the copy and creative are written per contact from your Brand Kit and AI Brand Persona.
Before you use it
- Map the
product_viewevent under Settings > Analytics Event Definition. - Make sure your product feed is active, so the viewed products and any recommendations can be shown.
- Have a sender or application ready for each channel you plan to use.
Creating a scenario
Clicking Use Scenario opens a guided setup with seven steps. The header shows the scenario name and date on the left, the stepper in the middle and the Cancel, Back and Next buttons on the right. You can click any completed step in the stepper to go back to it.
Every step opens with a short note from Zeki explaining what the step does and what has been pre-selected. Settings chosen by Zeki carry the Zeki Picked badge. Review them and change anything you like.
Step 1: Trigger & Timing
- Scenario Rule is defined by the template and cannot be edited. Browse Abandonment is triggered when a contact views a product detail page and leaves without converting. It listens to the
product_viewevent. - Wait Before Sending: choose the daily Send Time (hour, then :00, :15, :30 or :45) in the account timezone. The scenario sends once a day at this time to contacts who browsed products the previous day.
- Entry Capping: how often the same person can enter the scenario, for example 1 entry per 1 Day. With 1 per week, a contact who browses products twice in the same week is messaged only once.
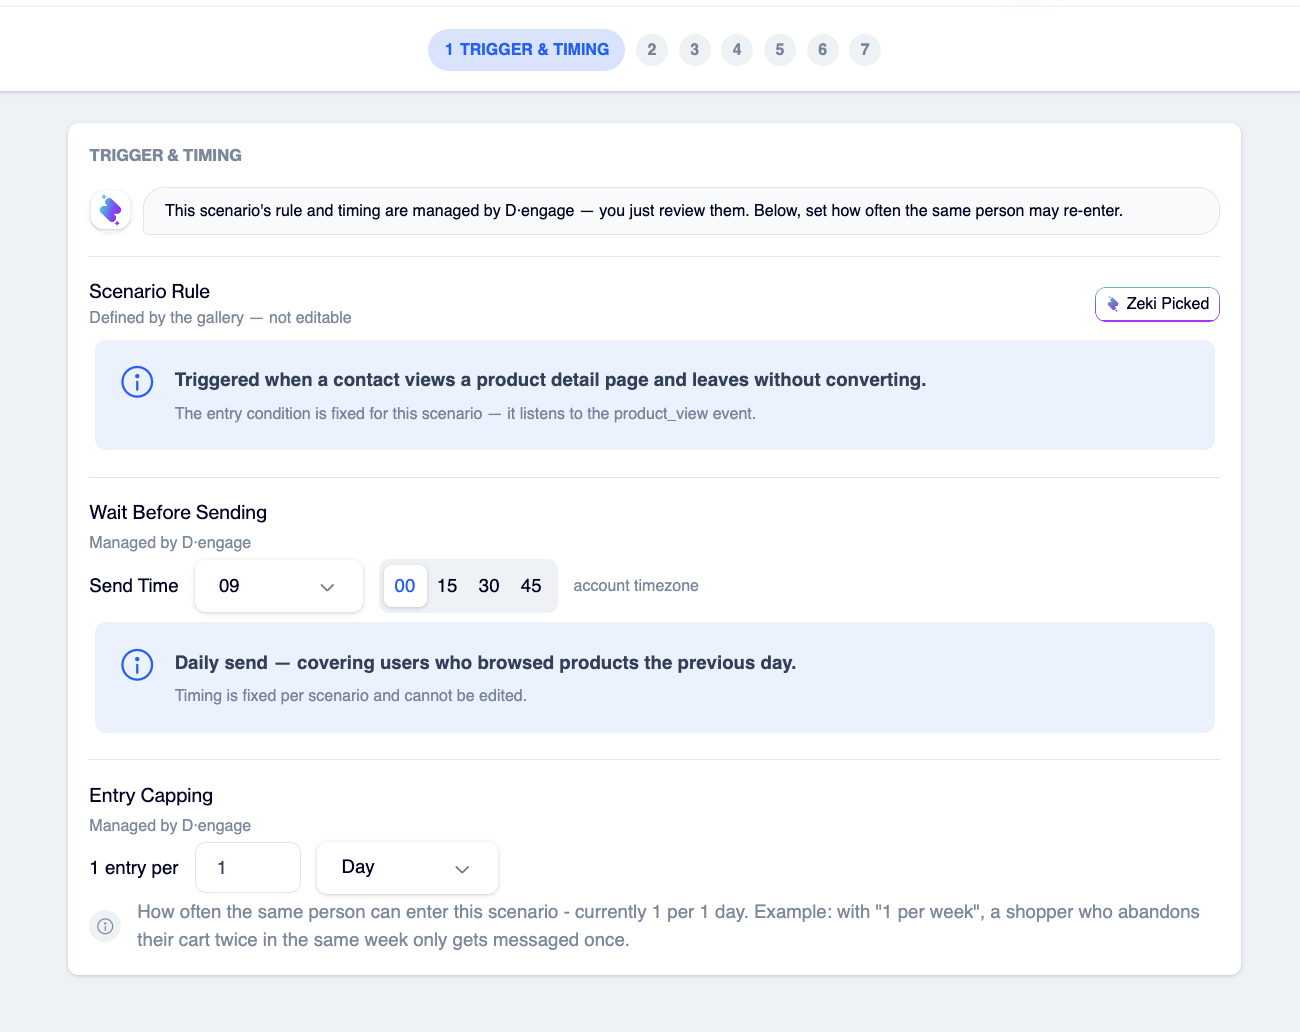
The trigger rule is fixed; you set the send time and entry capping.
Step 2: Exclusions
Decide who should not receive the scenario. Exclusions are checked at send time.
- Quick Exclusions: tick Already purchased today (recommended) and/or Already purchased this week.
- Exclusions: click Add Exclusions and choose Exclude Segment, Exclude Remote Segment, Exclude Campaign or Exclude Send List. Select one or more items in the picker and click Add. Selected items appear as removable chips.
- Exclude product categories: click Exclude Categories and tick categories in the tree. Picking a parent category excludes all of its subcategories. Products in excluded categories do not trigger the scenario.
Use this when some of your products should never be marketed, for example categories that are restricted by law or by your brand policy, items being discontinued, or low-margin products where a follow-up is not worth sending.
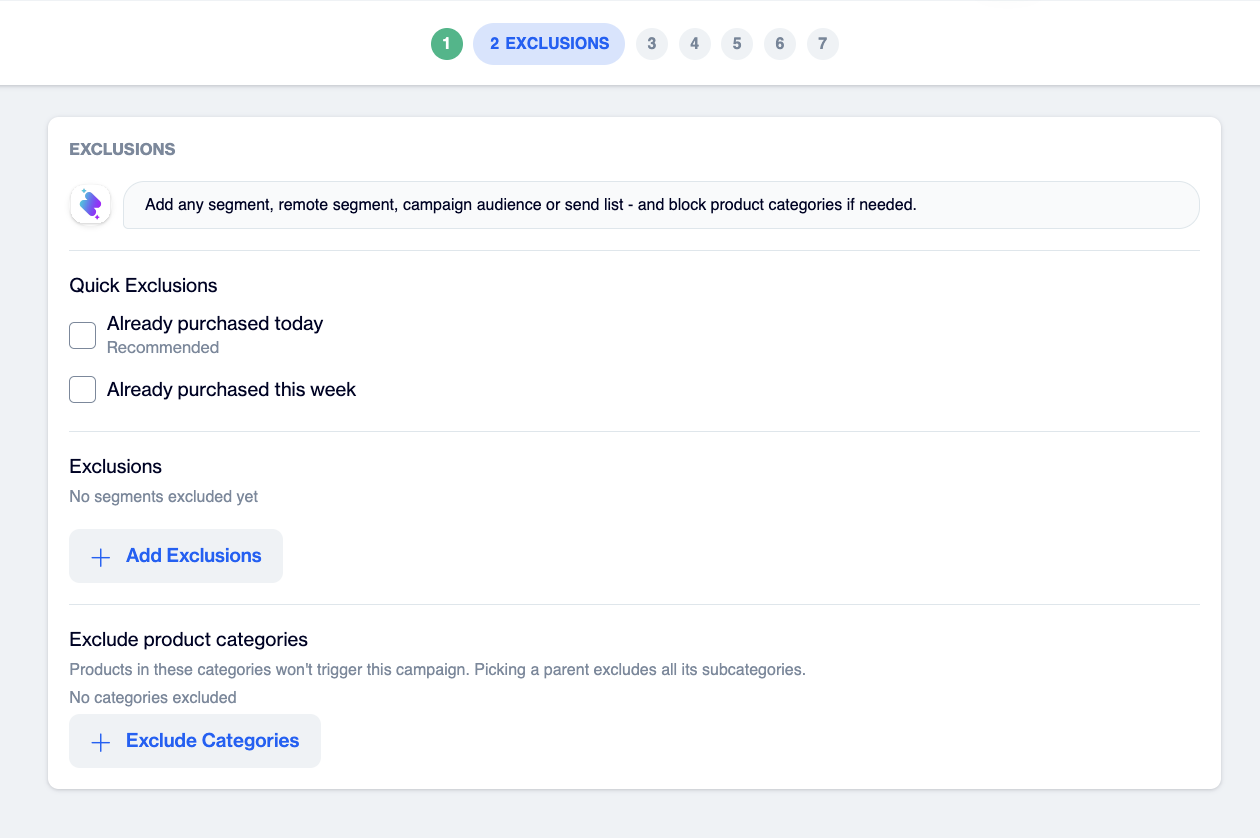
Exclude segments, campaigns, send lists or product categories.
Step 3: Channels & Senders
- AI Optimization (on by default): Zeki picks the best channel for each contact at send time. Email, SMS and Push take part in optimization; they are marked with a small zeki tag on the tile.
- Channels: click the tiles to select every channel you would allow: Email, SMS, Push, In-App, On-Site. At least one channel is required.
- Senders & Applications: for each selected channel, the most-used sender or application on your account is pre-selected. Click Change to pick a different one.
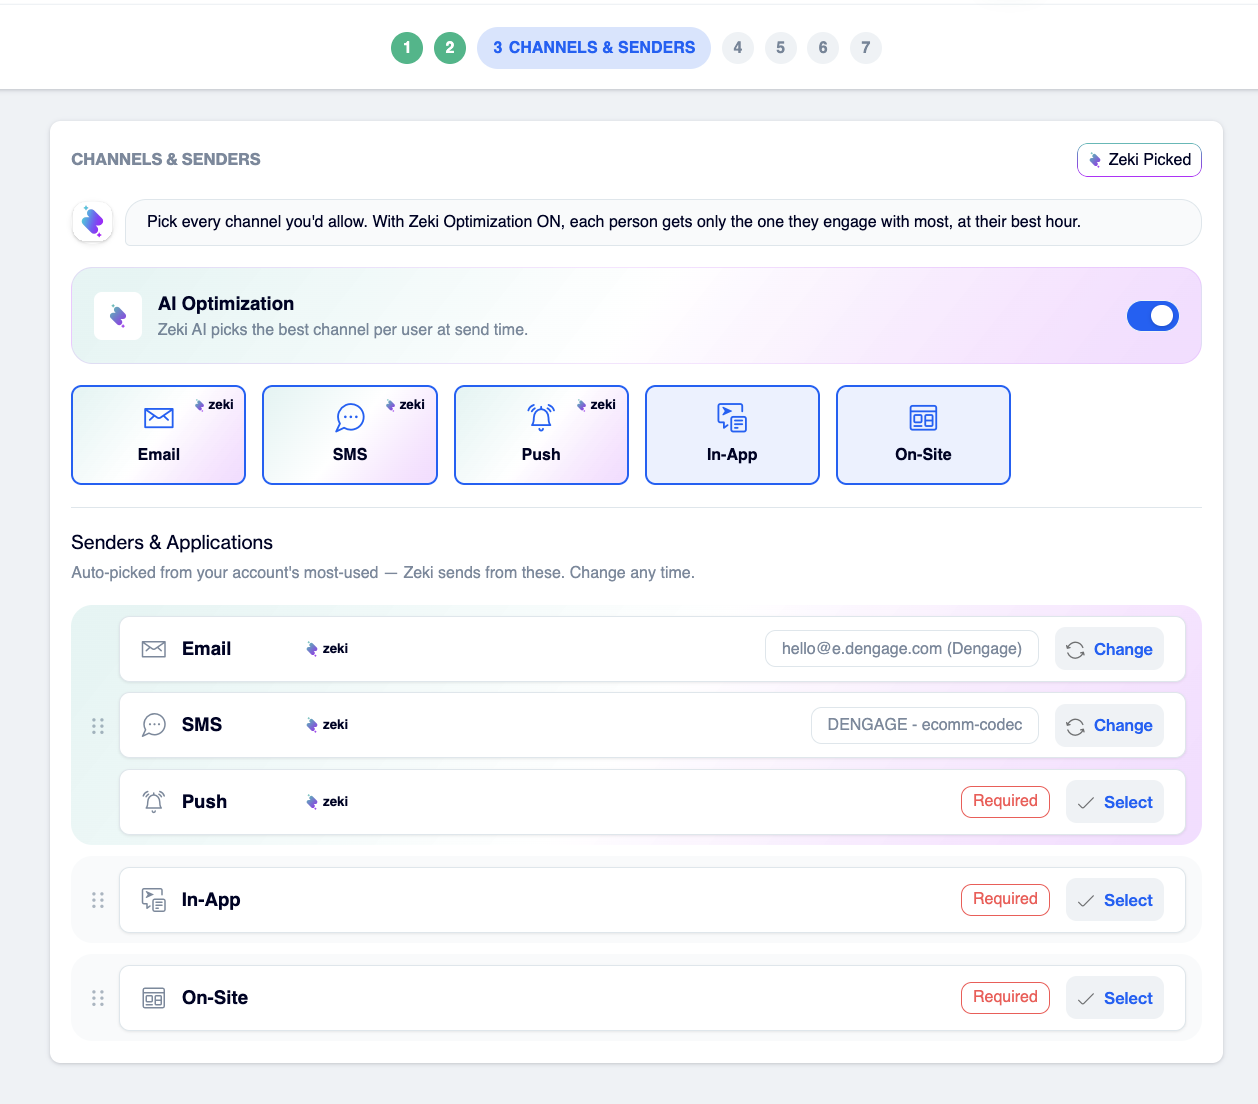
Select the channels you allow and confirm the sender for each one.
Step 4: Content
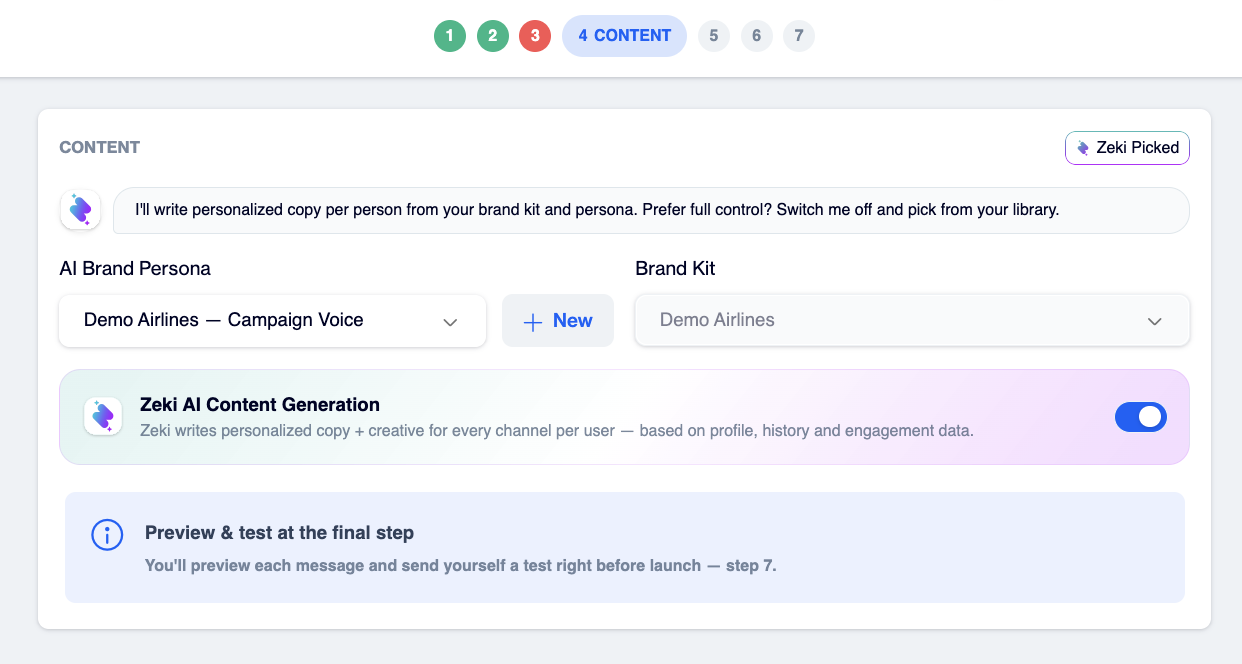
AI Brand Persona and Brand Kit: choose the persona and brand kit Zeki should write with. Use New to create a persona. Both apply whether Zeki writes the content or you use your own.
Content works in one of two modes, controlled by the Zeki AI Content Generation toggle.
Mode 1: Zeki AI Content Generation ON (default)
Zeki writes personalized copy and creative for every selected channel, per contact, based on profile, history and engagement data. You do not select content in this mode.
Mode 2: Zeki AI Content Generation OFF (your own content)
Switch Zeki AI Content Generation off. The Select or Create Content Per Channel section appears with one row per selected channel:
- Each row shows the channel and a red Required label until a content is attached.
- Click Select or Create to open the content drawer. In the same drawer you can either pick an existing content from your library or create a new one.
- Once a content is attached, the row shows its name and the Required label disappears. Content is required for every selected channel before you can publish; a missing one turns Step 4 red.
Email product box (own content only): the product box is not added automatically to your email template. Open the email content and place the block yourself (Insert > Product Blocks in the editor). For Browse Abandonment, Box 1: Product From Scenario shows the product(s) that triggered the scenario for each recipient.
Using Zeki's copy inside your own content. Even with your own templates you can let Zeki write the words: insert the variables below anywhere in your content and they are filled per recipient at send time, using the persona and brand kit you chose above.
| Variable | Use it for |
|---|---|
$Current.ai_email_subject / $Current.ai_email_preheader / $Current.ai_email_greetings | Email subject, preheader and opening paragraph |
$Current.ai_sms_message | SMS text |
$Current.ai_push_title / $Current.ai_push_message | Push title and body |
$Current.ai_inapp_title / $Current.ai_inapp_message | In-app title and body |
$Current.ai_onsite_title / $Current.ai_onsite_message | On-site title and body |
$Current.trigger_product_link / $Current.trigger_product_image | Link and image of the product that triggered the scenario (the top item chosen in Step 5: Boost) |
Test sends on the Launch step show you exactly how each variable renders.
In both modes you preview and test every message on the final step.
Step 5: Boost
- When multiple items match: choose Top Item (one message about the highest-priority product) or Bundle (the top products in one message). Bundle applies to Email only; Push, SMS, WhatsApp, In-App and On-Site always send the single top item.
- Priority Rule: how the top item is chosen: Best seller (recommended), Highest price, Biggest discount, Most recent, Longest waiting or Lowest stock.
- Product Repeat Limit: once someone receives a product, it is not shown to them again for the number of days you choose (default 7 days). This is per person; other contacts can still receive that product.
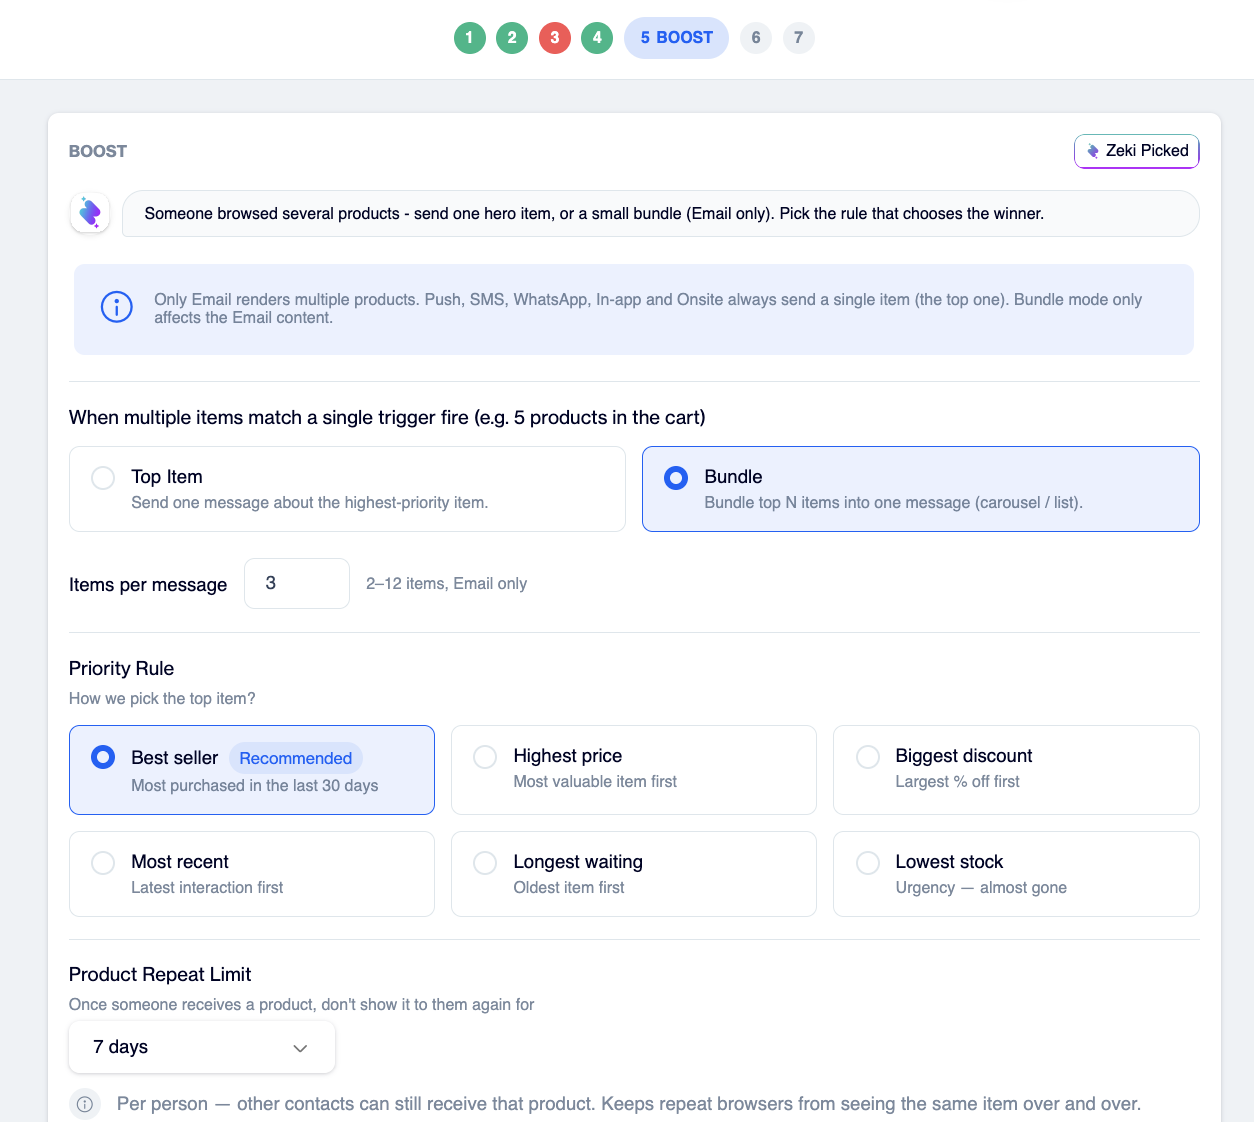
Choose how products are picked.
Add-ons. Click an add-on to switch it on; its options appear below.
- Recommendations (on by default): Zeki adds extra products to the email. Choose the Recommendation Model (default Frequently Bought Together), the number of Additional Products, the Product layout in email (Horizontal or Vertical), an optional Advanced Filter and a Fallback.
- Coupon: each recipient gets a unique code from the coupon list you select.
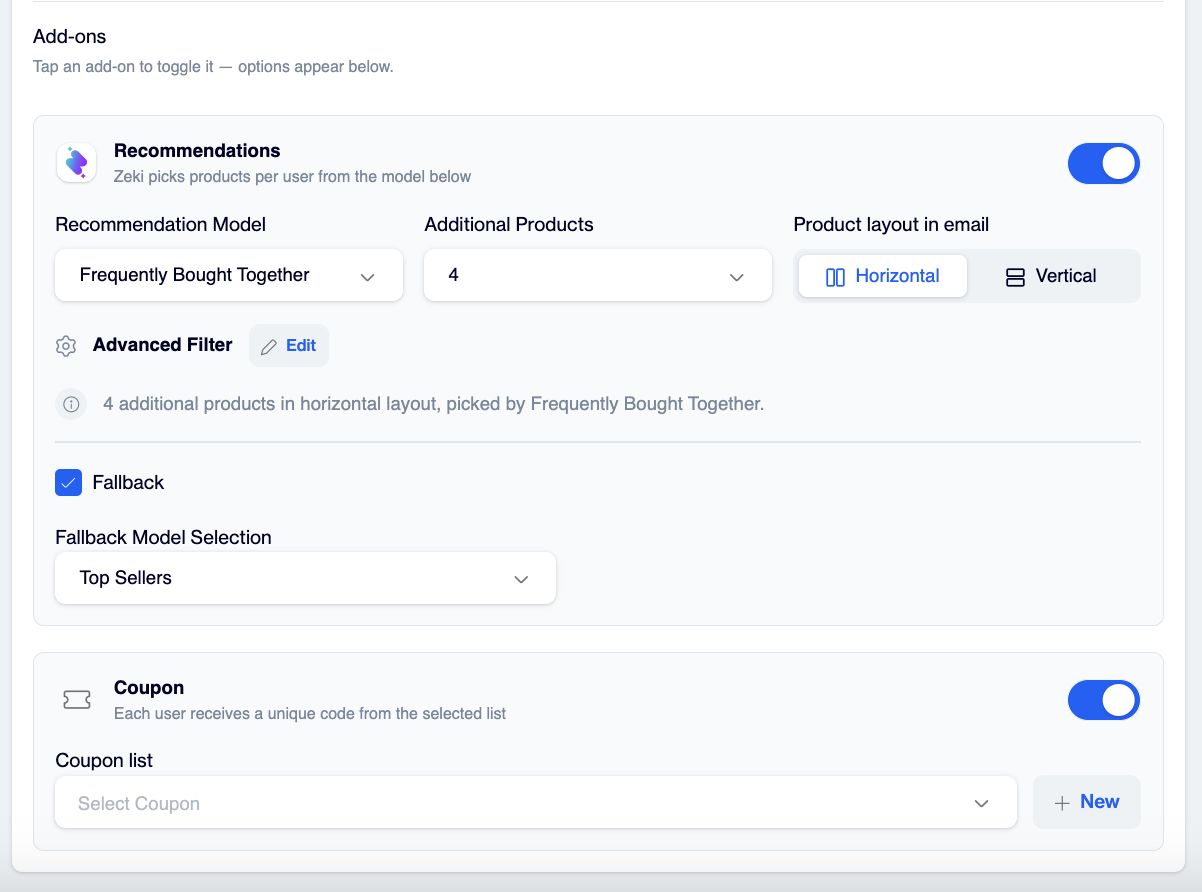
Add recommendations or a coupon.
Step 6: Settings
- Campaign Name (required): you cannot move to the Launch step without it.
- Advanced Configuration: click Manage to open the delivery settings for Google Analytics, Hourly Capping, Conversion Tracking and Drop Condition. The chips under the heading show the current values.
- Send Tag: tag the scenario for reporting.
- Quiet Hours: hold sends during the hours you set, in each contact's local timezone.
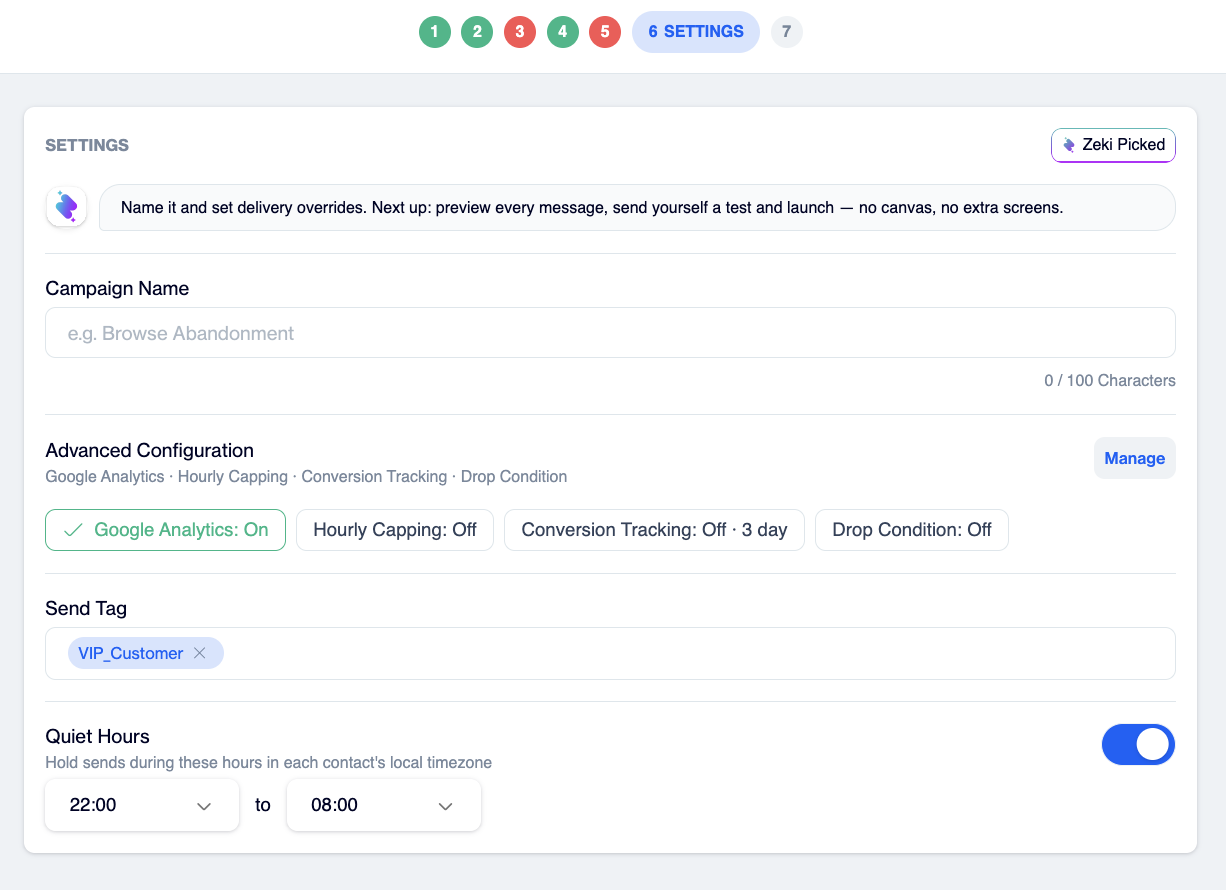
Name the scenario and adjust delivery settings if needed.
Step 7: Launch
The Launch step has two panels.
Full Summary (right) shows one card per step with the key settings you chose. Click Edit on any card to jump back to that step. If a required setting is missing, the summary tells you which steps still need attention and Publish stays disabled until they are completed.
See it as your customers will (left) is where you preview and test. Click Save Draft first; preview and test become available once the scenario is saved. Then:
- Select a channel in the channel bar.
- Use Preview as or Change audience to choose a sample recipient. Zeki generates the content with a sample persona.
- Click Send [Channel] Test to send yourself a test message. Test each channel one by one.
Test sends do not affect capping, reporting or coupon stock.
When you are ready, click Publish. The scenario appears under Live Scenarios as Active and runs in the background. Use Save Draft to finish later, or Delete to discard a saved draft.
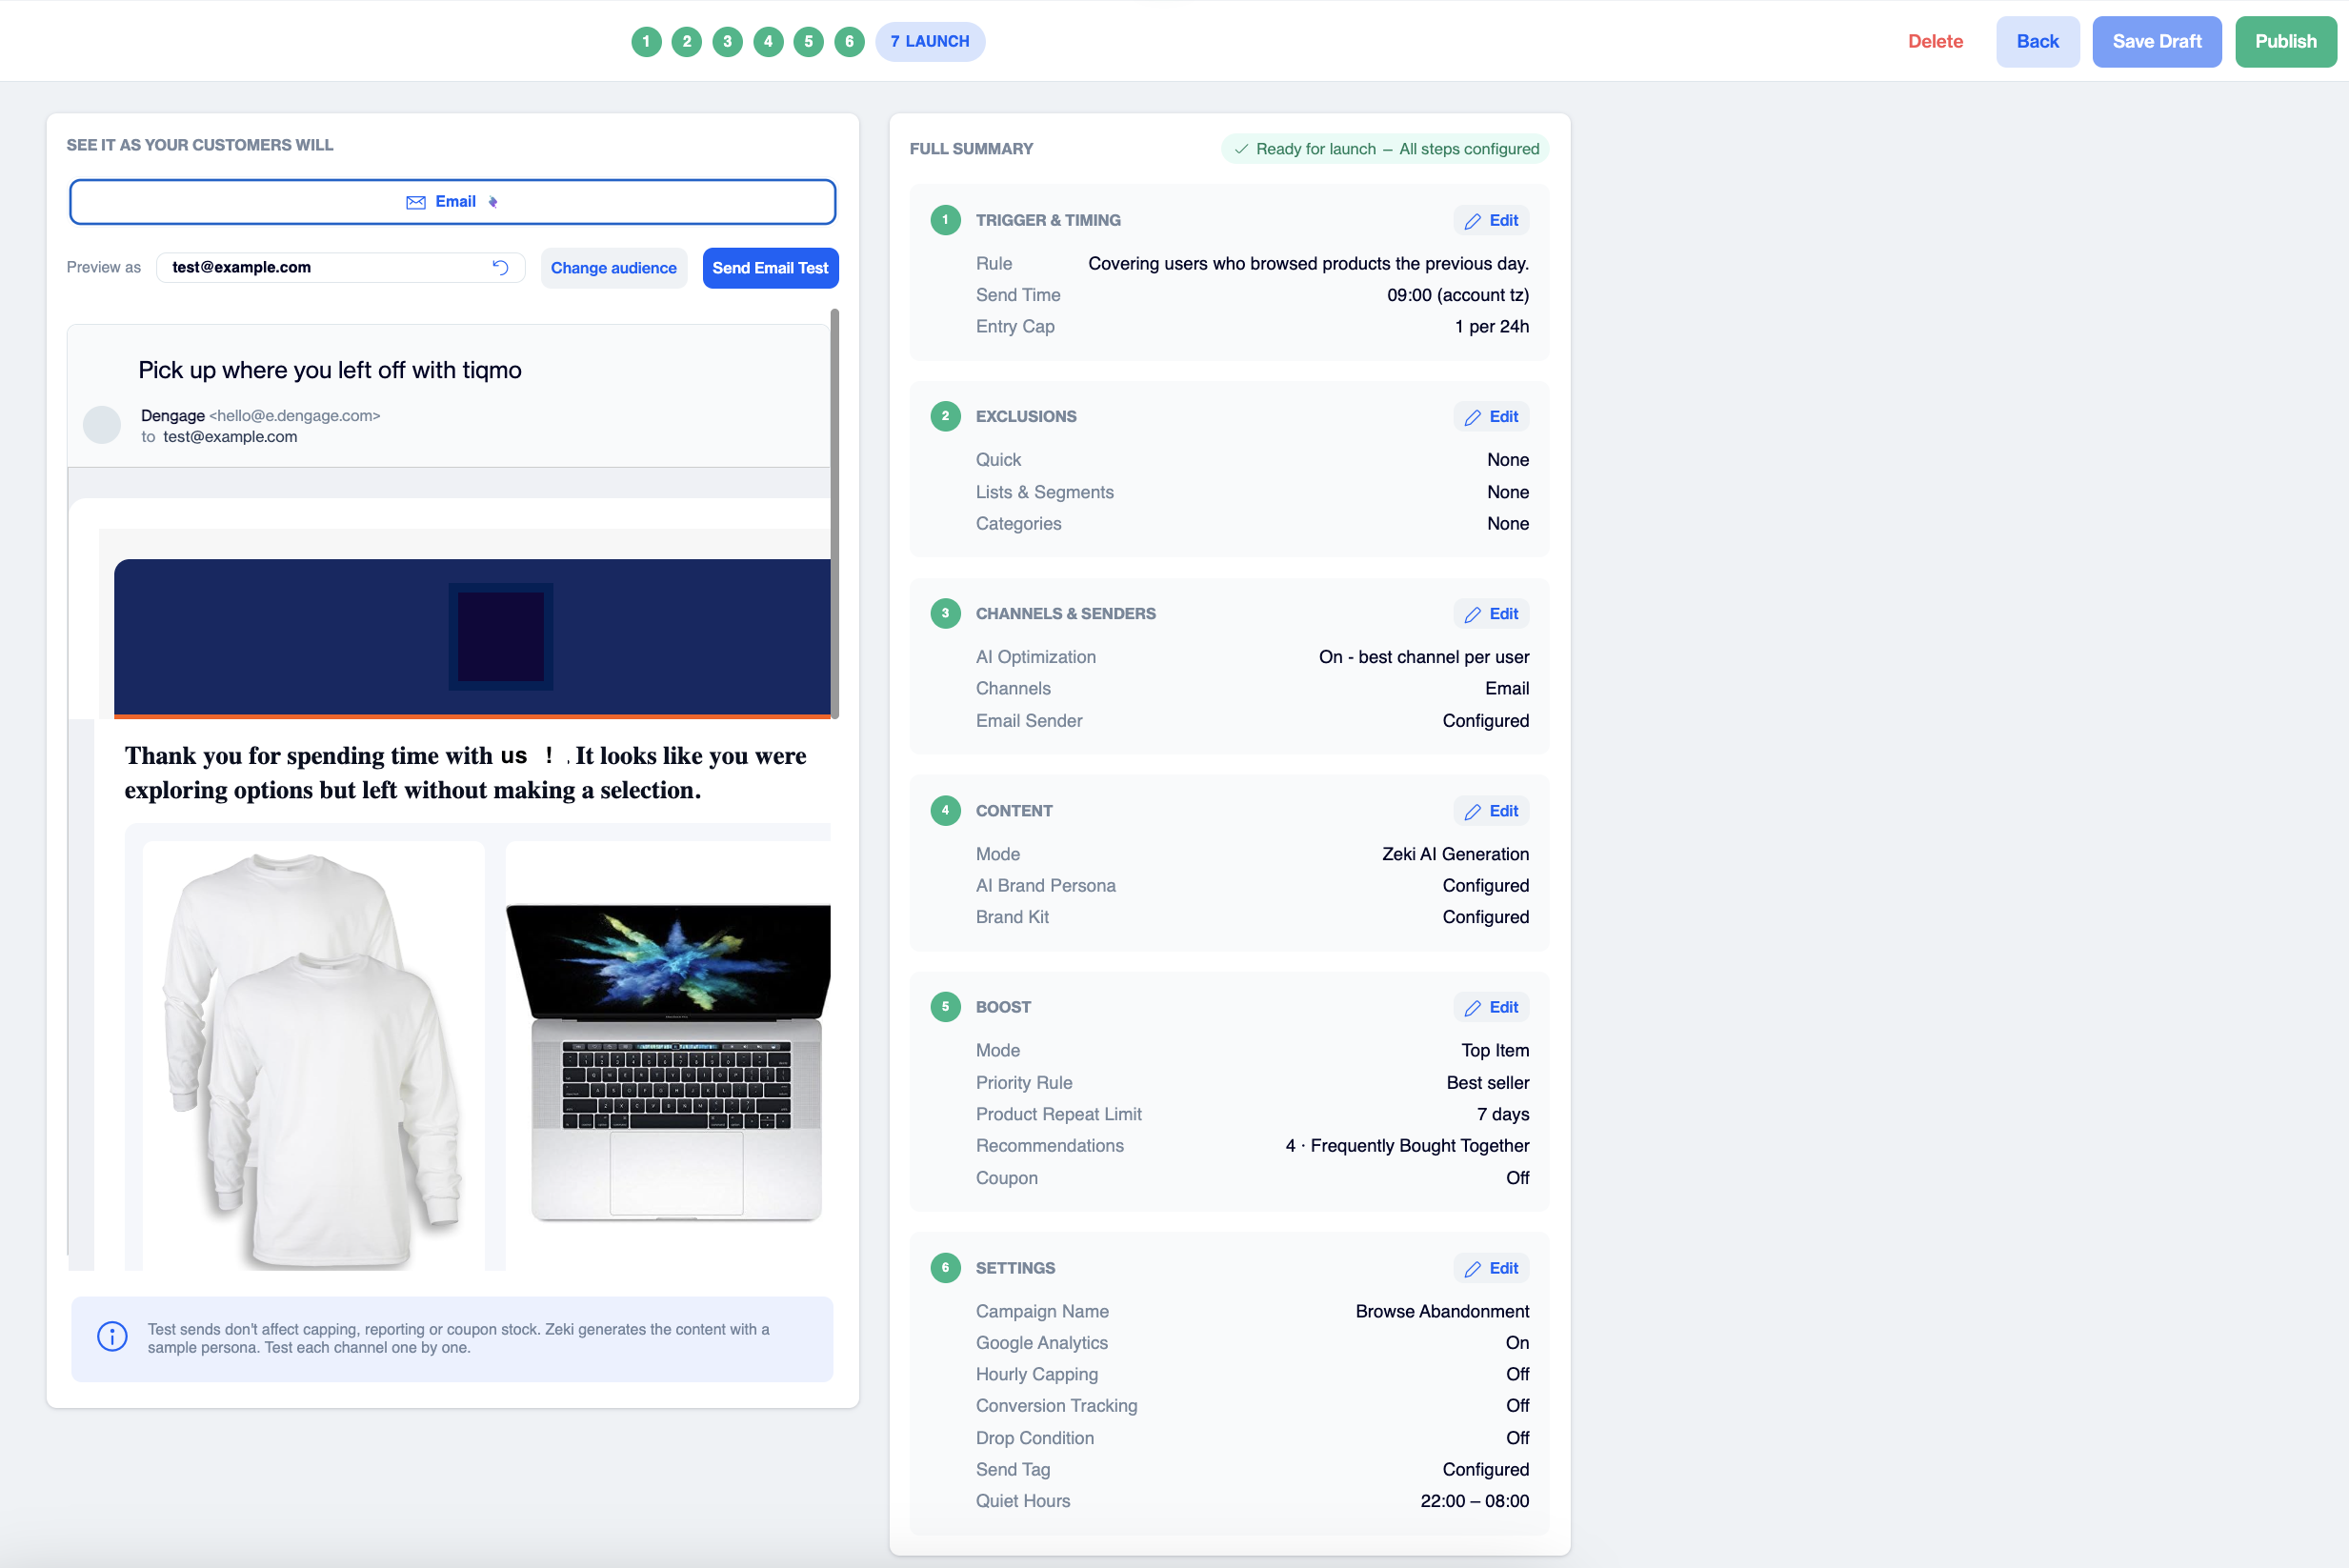
Save the draft, preview and test each channel, then publish.
Managing scenarios
All actions are on the Live Scenarios tab, in the three-dot menu of each row.
| Action | What happens |
|---|---|
| Pause | Sending stops. Runs that fall inside the paused period are not sent later. The status becomes Paused. |
| Resume | The scenario continues from the next run. It does not catch up on the paused period. |
| Edit | The seven-step setup reopens with the current values. Publish again to apply your changes. Changes take effect from the next run. |
| Delete | The scenario is removed. |
| Report (icon on Active and Paused rows) | Opens the scenario report. |
FAQ
Can I still use the Flow Canvas? Yes. Scenario Center is an addition, not a replacement. Custom journeys with branching and your own decision logic stay on the canvas; standard scenarios are faster in Scenario Center.
Why is a step marked in red? A required setting is missing, for example no channel is selected, a channel has no content when Zeki content is off, or the scenario has no name. Open the step and complete it. The Full Summary on the Launch step tells you exactly which steps need attention.
Why didn't my scenario send? Check that the scenario is Active (not Paused or Draft), that the product_view event is mapped and firing, that the contacts have consent for at least one selected channel, and that they are not caught by an exclusion or entry capping.
Updated 18 days ago