
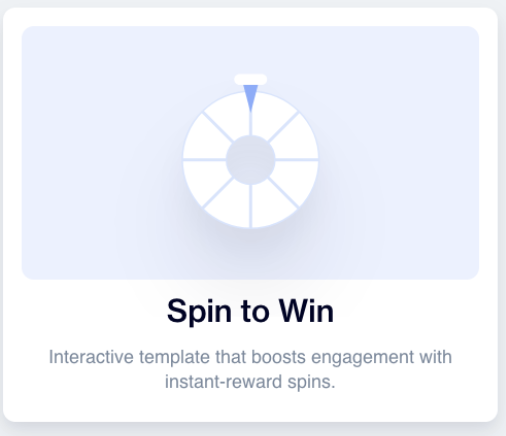
Spin to Win
Spin to Win is a gamification-focused campaign template designed to increase user engagement by turning promotions into an interactive game experience. Instead of passively showing a message, users actively participate by spinning a wheel to win a reward. This interaction naturally increases attention, time spent on the campaign, and conversion rates.
Spin to Win can be used in In-App and Onsite campaigns, allowing you to reach users across different touchpoints in their journey.
Spin to Win offers full visual customization so the wheel, colors, texts, and background can be aligned with your brand identity. You can define different rewards for each slice of the wheel and simulate the user interaction through preview mode before publishing the campaign. This allows you to test the full experience exactly as users will see it.
A common use case is running short-term promotions such as seasonal discounts, welcome offers for new users, or campaign-based giveaways. For example, an e-commerce brand can encourage users to spin the wheel to win rewards like “10% Discount”, “Free Shipping”, or “Better Luck Next Time.”
Prerequisite
The feature flag must be enabled for your account before you can use this feature.
For In-App campaigns, make sure your mobile application uses iOS SDK version 5.90 or higher and Android SDK version 6.0.88 or higher to support Spin to Win templates.
How to Access Spin to Win
To create a Spin to Win campaign:
- Go to Content > Marketing > In-App.
- Select Visual Editor.
- In the template categories, open the Gamification category.
- Select Spin to Win.
This opens the Spin to Win template, where you can start customizing your campaign.
Spin to Win
How to Access Spin to Win
To create a Spin to Win campaign, start by navigating to Content > Marketing > In-App.
After choosing In-App, continue by selecting Visual Editor. Once the Visual Editor opens, you will see different template categories. From there, go to the Gamification category and select Spin to Win. This will open the Spin to Win template, where you can start customizing your campaign.
Template Configuration
General
When you click on the Spin to Win template, the template configuration screen opens. In the first section, you define the basic information of the content. Here, you can give your campaign a Name to easily identify it later and add a Description to explain the purpose of the content internally.
This section also allows you to manage multilingual content. By using Add Languages, you can create the same Spin to Win experience in different languages.. If you want to reuse an existing content structure, you can select Copy from Content to duplicate a previously created content. Alternatively, you can start from scratch by choosing Create Blank Content.
Below this, you will see the Theme section. The Theme Name shows which theme is currently applied, and by default, the Default Theme is selected. Themes control the overall look and feel of the Spin to Win experience and ensure visual consistency across different elements.
By clicking Edit Theme, you can customize the general appearance of the Spin to Win content. This customization applies to common elements such as the overall layout, message texts, titles, and buttons. Within the theme settings, you can adjust visual properties like colors, border radius, text alignment, and font family. These settings allow you to align the Spin to Win campaign with your brand’s design guidelines without needing to modify each element individually.
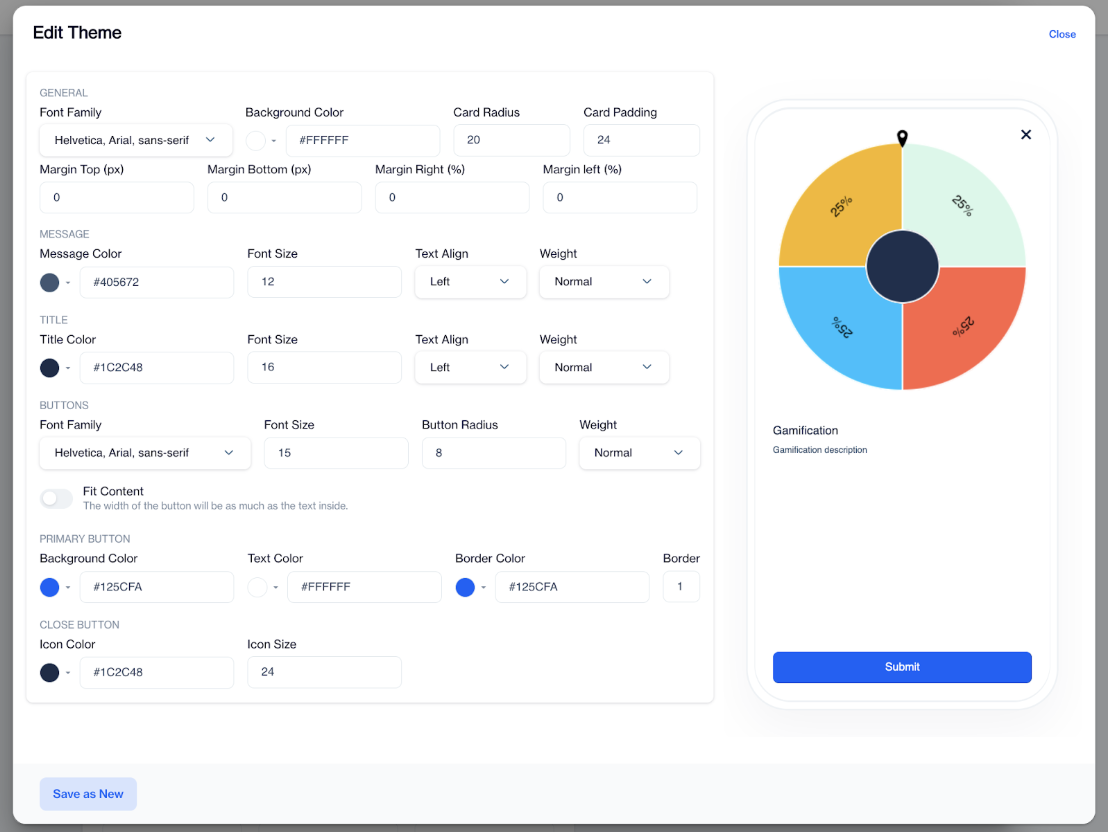
Edit Theme
For example, you can set your brand’s primary color for buttons, apply rounded corners to match your app design, center-align titles for a more balanced look, and choose a font family that is already used across your other campaigns. Once saved, the theme changes are reflected across the Spin to Win content, creating a consistent and polished user experience.
Wheel Settings
The Wheel Settings section lets you adjust how the Spin to Win wheel appears in your campaign so it fits well with your content and screen size.
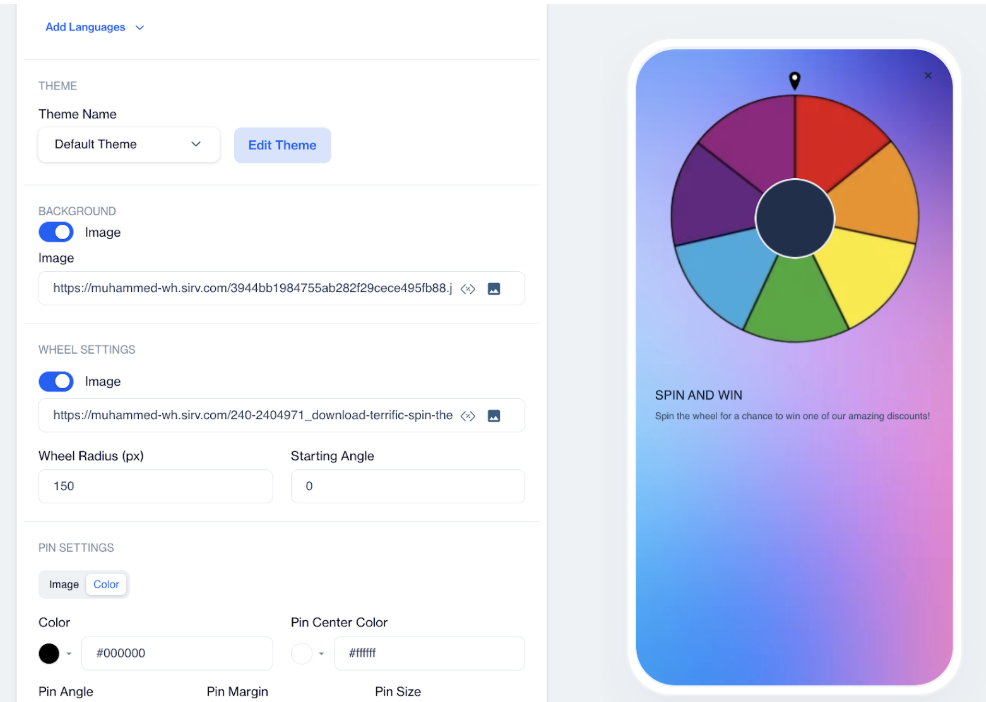
Wheel Settings
The Image field is where you add the wheel image that users will spin. Using a clean, marketing-ready image helps the wheel match the rest of your campaign design.
Wheel Radius (px) controls the size of the wheel on the screen. You can increase the value to make the wheel larger or decrease it to make it smaller, depending on your layout.
The Starting Angle defines the wheel’s position before the user spins it. Leaving this value as 0 keeps the default position, while changing it allows you to slightly rotate the wheel if needed. Overall, these settings make it practical and fast to set up a branded Spin to Win experience while keeping full control over how the wheel appears.
By default, the wheel is displayed with an 8-slice visual structure to provide a balanced and consistent appearance across preview and runtime views.
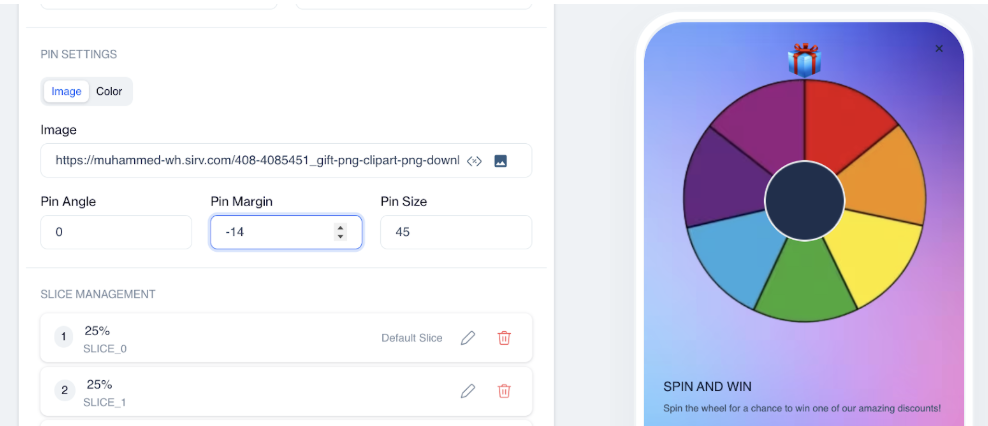
Pin Settings
The Pin Settingssection controls the pin that indicates where the wheel stops after the spin. This pin is a key visual element, as it clearly shows which reward the user has won.
Pin Settings
You can customize the pin by using either an image or color. If you already have a branded pin design, you can upload it as an image. If not, you can simply choose colors to match your brand, which makes setup quick and easy without extra design work.
The Pin Angle defines the direction the pin points to. Keeping this value at 0 uses the default position, which works well for most campaigns. The Pin Margin adjusts the distance between the pin and the wheel. A small negative value like -5 places the pin closer to the wheel, helping users clearly see the selected reward.
Pin Size controls how large the pin appears. You can adjust this to keep the pin visible without drawing too much attention away from the wheel itself.
The Pin Center Color allows you to set the color of the pin’s center area, for example using a value to match your brand color. These settings help ensure the pin is clear, on-brand, and easy for users to understand at a glance.
Slice Management
The Slice Management section is where you define the rewards on the wheel and decide how often each reward can be won. Each slice represents a possible outcome, such as a discount or a coupon, and together they shape the overall Spin to Win experience.
You can add new rewards at any time by clicking Add Slice, or update an existing one by using the slice edit icon. You can also add multiple slices at once, allowing you to quickly create wheel segments during setup.
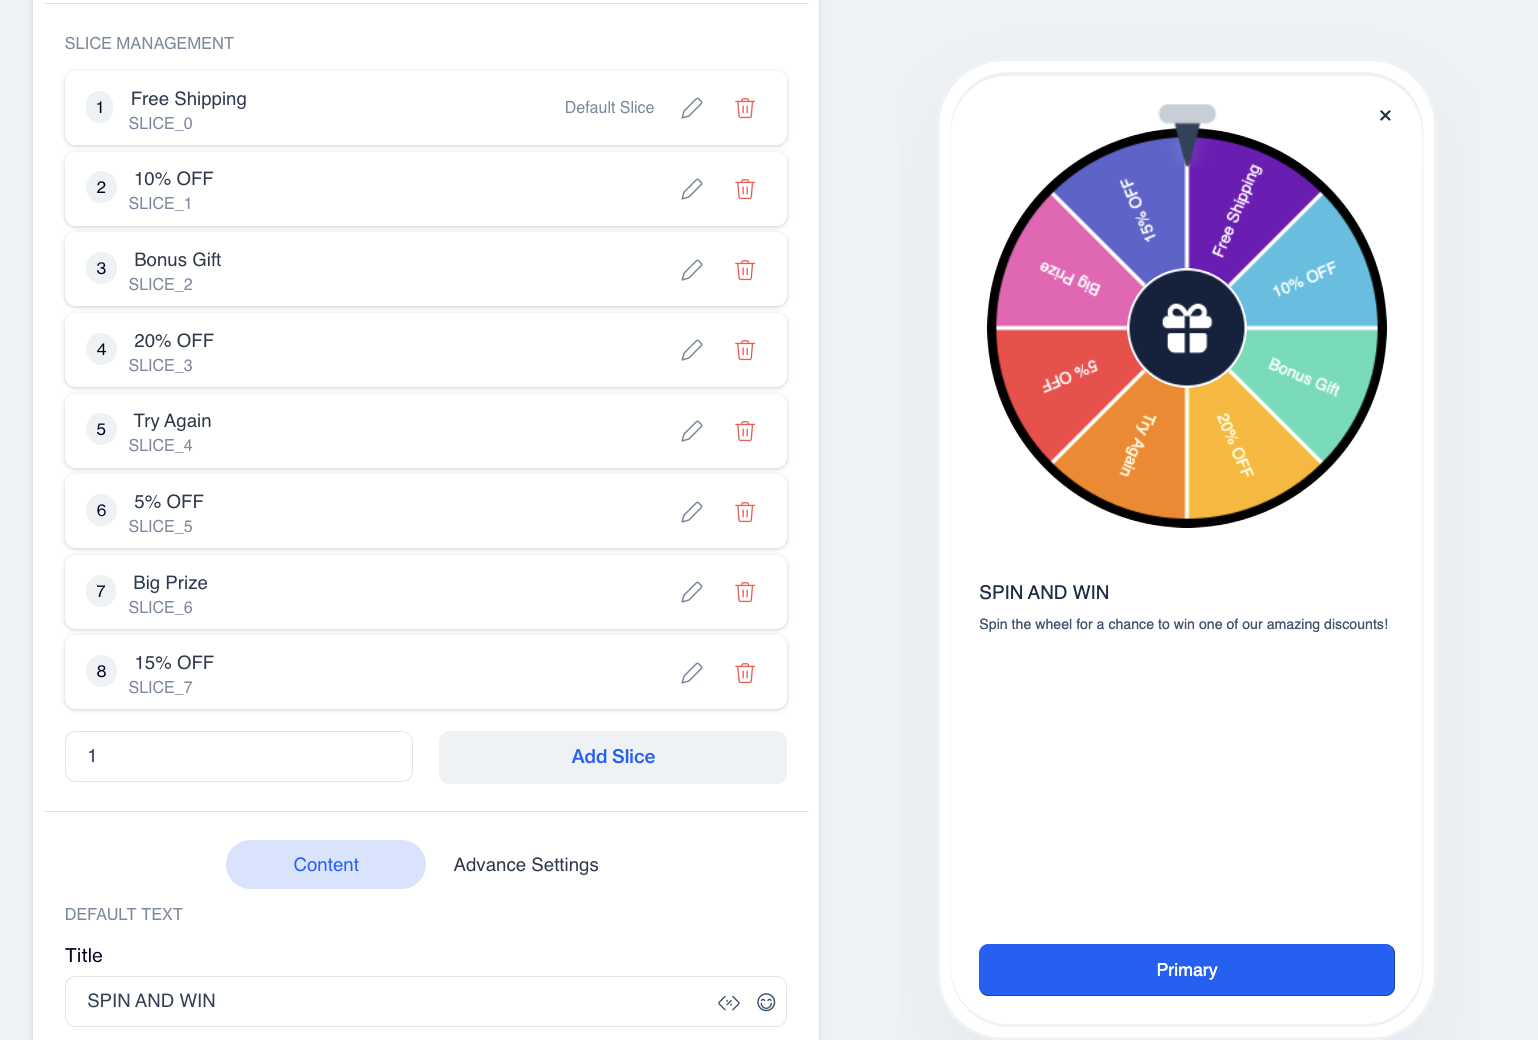
Slice Management
When editing a slice, you start by selecting the Coupon Type. If it is set to Static, the same coupon code is given to every user who wins that slice. If it is set to Dynamic, a unique coupon code is assigned for each user from a previously created coupon list. For dynamic coupons, you can also set a Win Limit, which defines how many times this reward can be given. This is especially useful when you want to limit high-value rewards.
The Fallback is a mandatory reward that ensures users always receive a valid outcome in the Spin to Win experience. Exactly one fallback must be configured, and it must be set as static. It is automatically triggered if all other coupons are exhausted or if a system error occurs during coupon assignment.
Slice Nameis used internally to identify the slice, while Slice Labelis the text shown to users on the wheel. You can also customize the look of each slice using Slice Background Color and Slice Text Color to match your brand style.
For static coupons, the Coupon Code field defines the code that will be delivered to users. The Win Probability (%) setting controls how often this slice is selected compared to other slices on the wheel.
Overall, Slice Management makes it easy to control rewards, manage limits, and deliver a clear and smooth experience to users.
Content Settings
The Content section is where you define the texts and basic interaction behavior of the Spin to Win experience. These settings control what users see before they spin the wheel and what they see after they win.
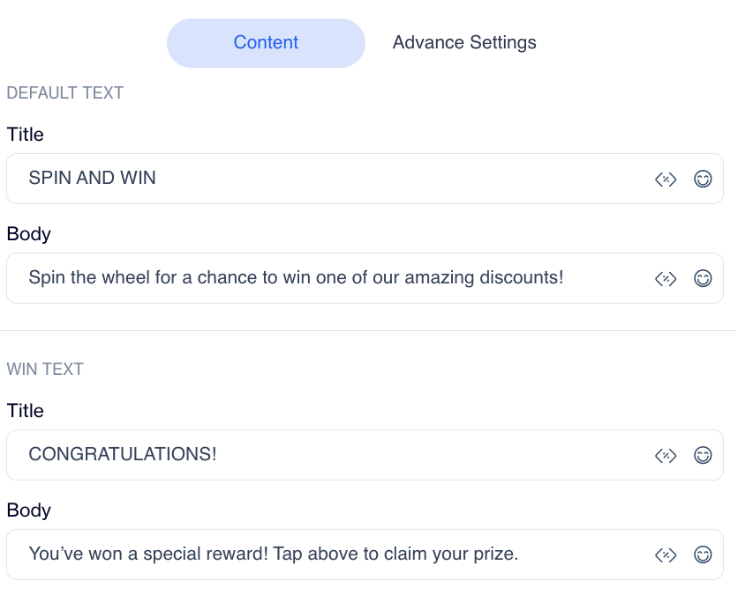
Content
Under Default Text, you can set the Title and Body that are shown when the wheel is first displayed. This is the message that invites users to interact with the wheel, so it should clearly explain what they can do and what they might win.
The Win Textsection is used to define the Title and Body shown after the user spins the wheel and wins a reward. This message confirms the result and can guide the user on what to do next, such as using the coupon.
You can control user actions with the options below. When users click the Primary Button, the spin action is triggered. Show Close Icon lets users close the campaign using a close button.
Advanced Settings
The Advanced Settings tab allows you to fine-tune the visual details and motion of the Spin to Win wheel. These settings are useful when you want more control over how the wheel looks and feels.
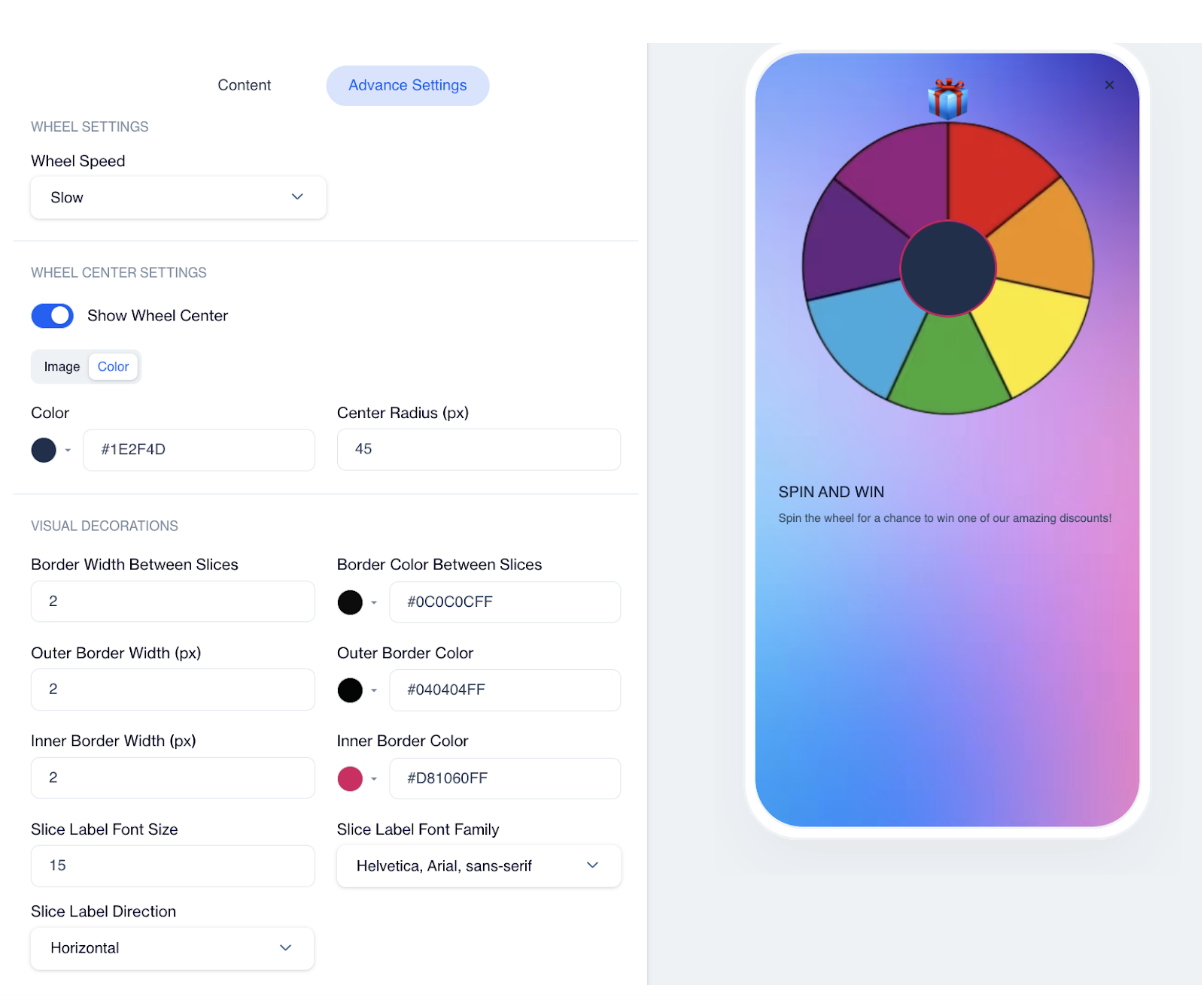
Advanced Settings
These settings help you shape both the message and interaction flow, ensuring the Spin to Win experience is clear, friendly, and easy for users to complete.
Wheel Speed defines how fast the wheel spins and can be set to Slow for a calm and easy-to-follow animation, Medium for a balanced and smooth experience, or Fast for a quick and energetic interaction that adds excitement.
In Wheel Center Settings, you can decide whether to show a center area on the wheel by enabling Show Wheel Center. The center can be customized using either an Image or a Color.
The Visual Decorations section controls borders and text styling on the wheel. You can set the Border Width Between Slices and choose a Border Color Between Slices to clearly separate each reward. The Outer and Inner Border settings define the borders around the wheel, helping it stand out from the background.
Text appearance is adjusted using Slice Label Font Size, Font Family, and Slice Label Direction.
Using Spin to Win Click Data in Segmentation
You can target users based on their interaction with the Spin to Win campaign. When a user completes the spin, the winning slice is reflected in the system as a click event. The slice name is recorded as the action button value, allowing you to build segments based on the specific reward users received.
To create this segmentation, go to: Audience > Segments > New > Interactive Segments
Add an Inclusion filter and select either Realtime In-App.
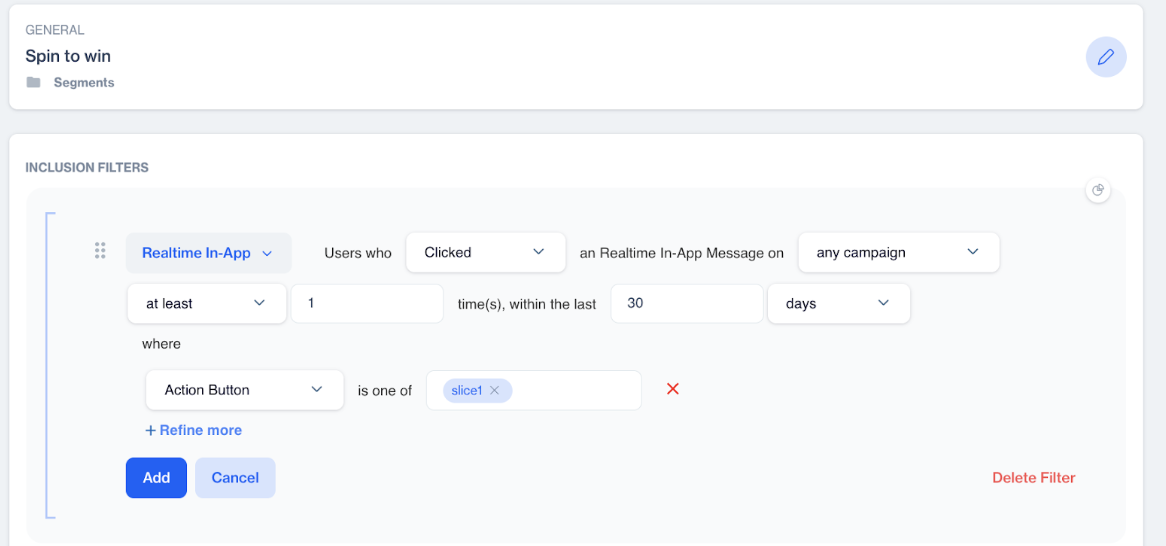
Spin to Win Click Data in Segmentation
Then configure the filter to target users who clicked a realtime in-app message. You can either select a specific campaign from the dropdown menu or keep it broader by targeting interactions across campaigns.
In the Action Button field, select the relevant slice name. The slice name corresponds to the reward defined in the Slice Management section. Since the winning slice is tracked as a click event, selecting the slice name allows you to target users who landed on that specific reward.
This way, you can easily retarget users based on the reward they won, create follow-up campaigns, or exclude certain winners from future promotions.
Rules and Limitations
The Spin to Win wheel has some rules to ensure it works correctly and provides a fair experience. The number of slices on the wheel must be at least 2 and no more than 12.
All wheel images must be uploaded in PNG format and must be square. The minimum supported size is 300 × 300 px, and the maximum allowed size is 700 × 700 px. The maximum size limit exists to prevent large file sizes that could negatively affect performance.
Defining a fallback is mandatory, and the fallback reward must be configured as static.
Finally, the total win probability must always equal 100%. This ensures that the reward distribution is calculated correctly and that every spin results in a valid outcome.
Updated 1 day ago