
Integration with a Service Provider
On the Dengage platform, integrating with a service provider is a vital prerequisite for sending WhatsApp marketing messages. This integration is a crucial step to enable WhatsApp marketing campaigns.
- Navigate to Settings> Integrations > 3rd Party Integration
- Locate WhatsApp in the list and click the Connect button.

If the Connect button is not visible, it means that WhatsApp is not activated yet for your account , would you please contact your Account Manager or our Technical Support team to Activate WhatsApp integration for your account.
- Click on the "New WSP" button, then select your provider and click "Next" to proceed.
Integration Process for WhatsApp Service ProvidersBeyond this stage, the configuration steps will differ depending on your chosen WhatsApp Service Provider (WSP). Please refer to the relevant section below to complete your configuration.
WhatsApp Business API Integration
Integrating your WhatsApp Business API into Dengage allows you to send WhatsApp messages directly, without relying on third-party platforms.
Prerequisite
Before starting the integration process, make sure WhatsApp is added to your Meta Business Manager.
If you haven’t added it yet, go to your Meta Business Account and add WhatsApp to your account. This step is mandatory, as the integration cannot proceed without it.
Requirements on Meta
In this phase you will prepare everything on Meta so you have the values Dengage needs (App ID, Access Token, WABA ID, Phone Number ID) and the correct permissions.
1.Create or Select a WhatsApp Business Account (WABA)
- Log in to Meta Business Manager: business.facebook.com > Business Settings.
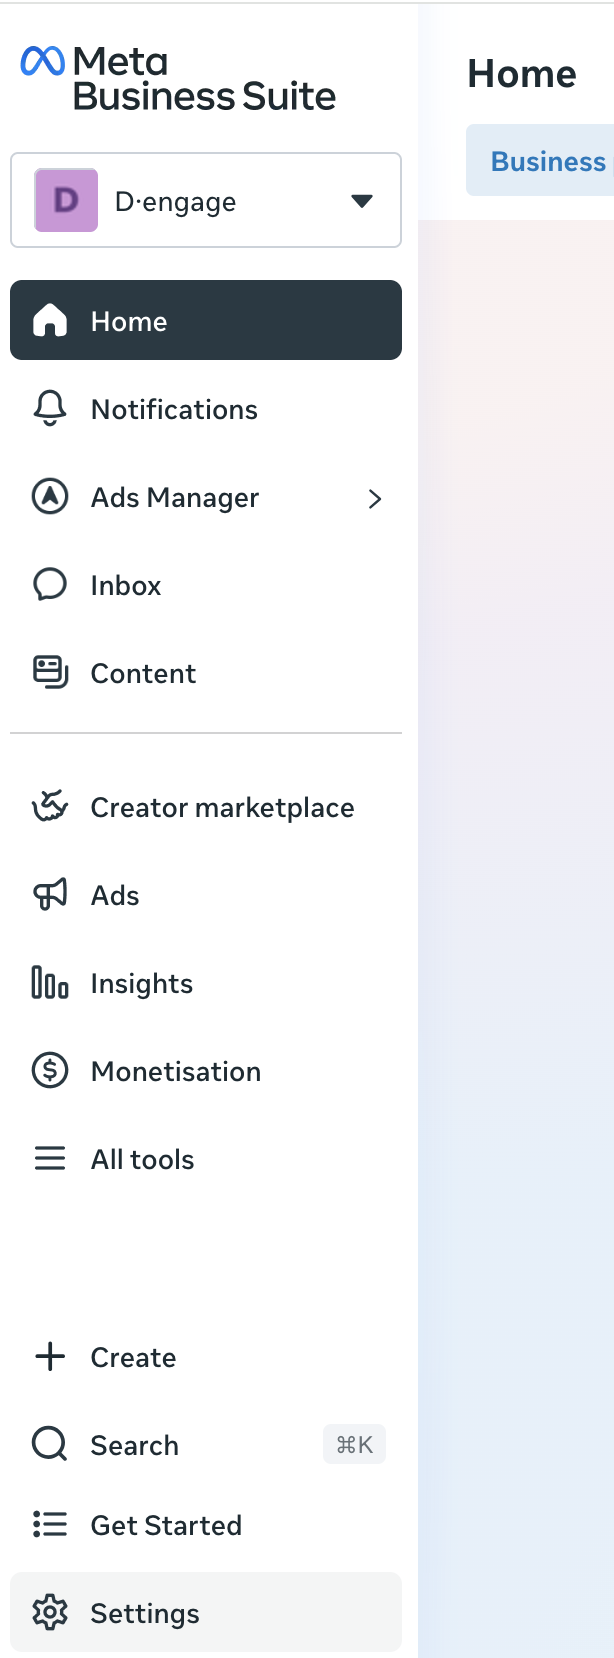
Business Settings
- Go to Accounts > WhatsApp Accounts.
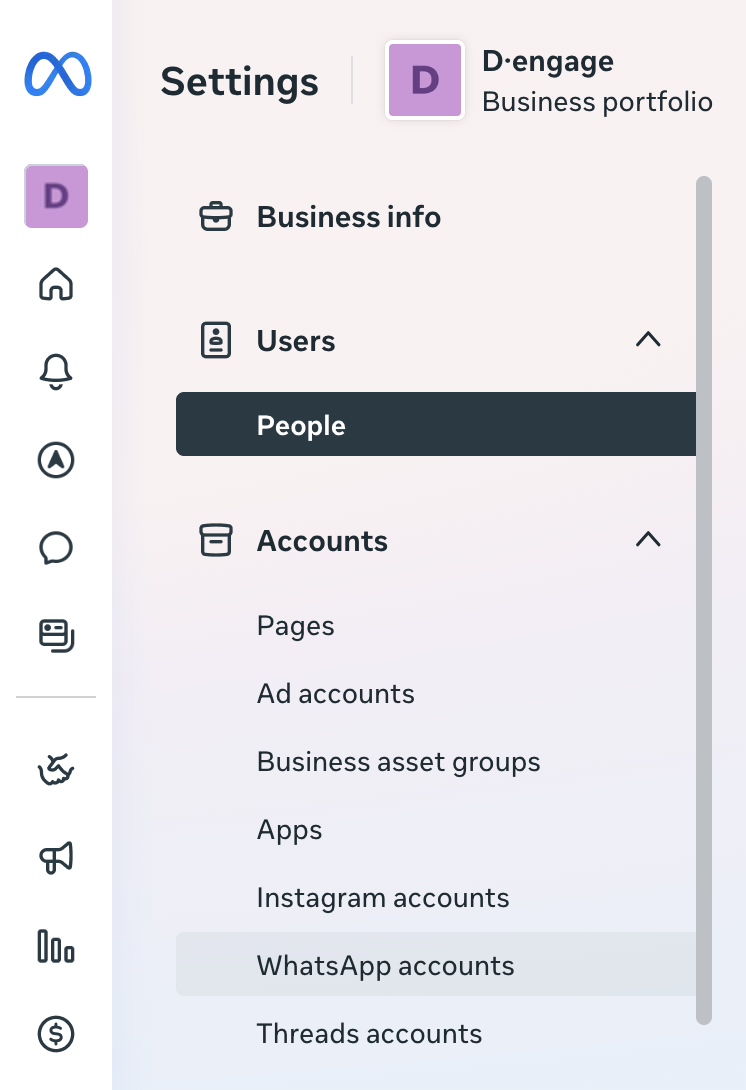
WhatsApp Accounts
- If you don't have a WABA, click Add / Create a new WhatsApp business account and follow the wizard. If you do, select it from the list.
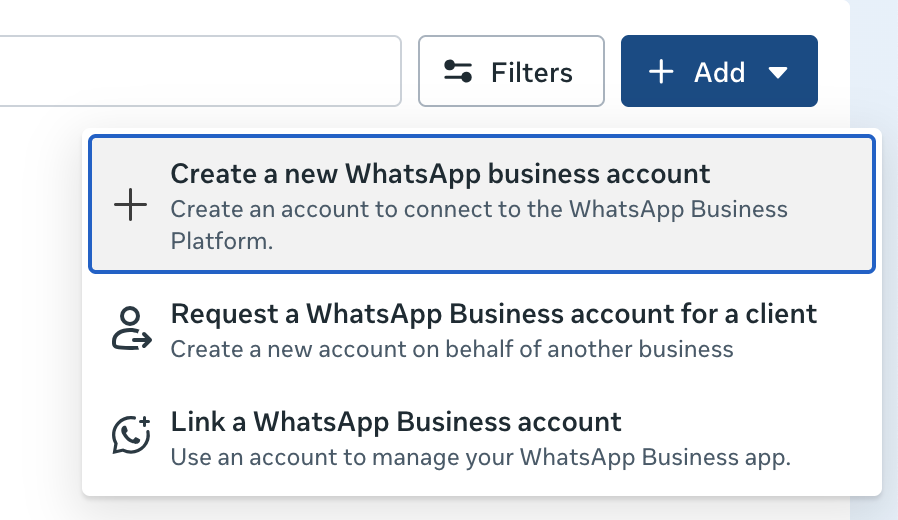
Create a WhatsApp Business Account
When creating a new WhatsApp Business Account, the wizard walks you through three steps: Details, Phone number, and Phone verification.
In the Details step, you will be asked to provide some profile details:
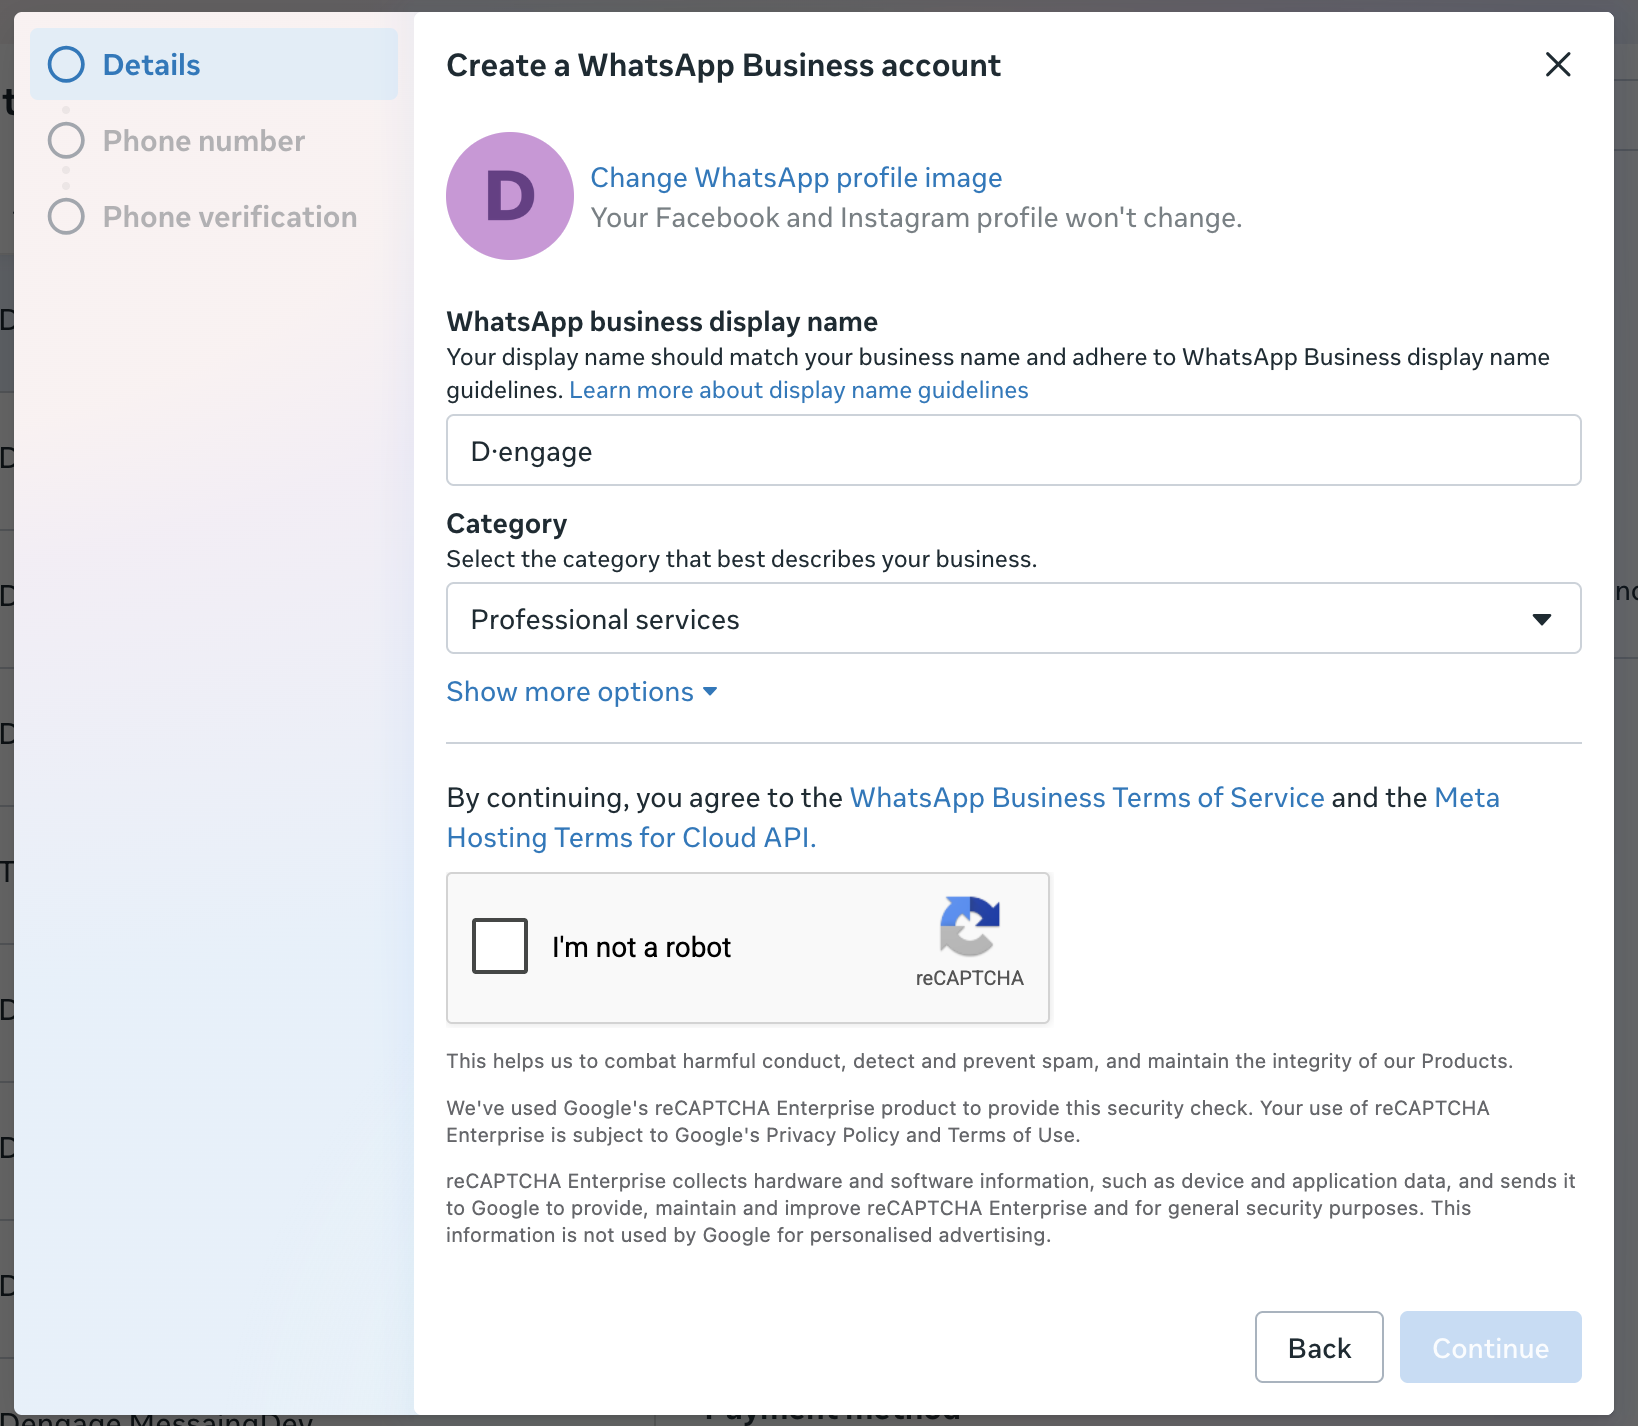
Business Profile
WhatsApp business display name: Enter your business display name. This must match your business name and follow WhatsApp Business display name guidelines.
Category: Select the category that best describes your business (e.g., Professional services).
Business description (optional): Click Show more options to enter a short description that tells people about your business.
Profile image (optional): You may also set a WhatsApp profile image. Changing it won't affect your Facebook or Instagram profiles.
After completing these fields, confirm the "I'm not a robot" (reCAPTCHA) check and click Continue.
In the Phone number step, you will be asked to choose the number to use with your WhatsApp Business Account. This number will be associated with the account and used to send and receive messages.
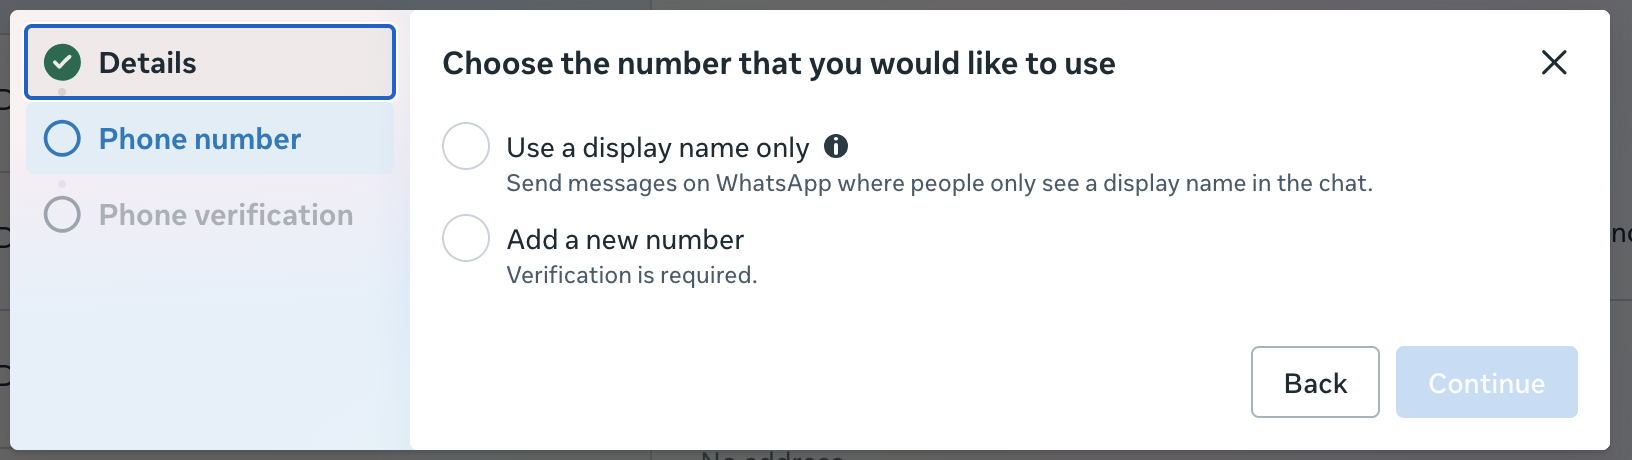
Phone number
- Add a new number: attach a phone number now. Verification is required — complete the Phone verification step with the OTP sent by SMS or voice call.
- Use a display name only: skip adding a number for now; people will only see your display name in the chat. You can add and verify a number later (see step 2 below).
Once the wizard is completed, you will see a confirmation that your WhatsApp Business account was created. Meta will review your business for compliance with the WhatsApp Business Messaging Policy and get in touch within 24 hours if there's an issue. Optionally, you can enable Connect this account in Ads Manager. Click Finish to close the wizard.
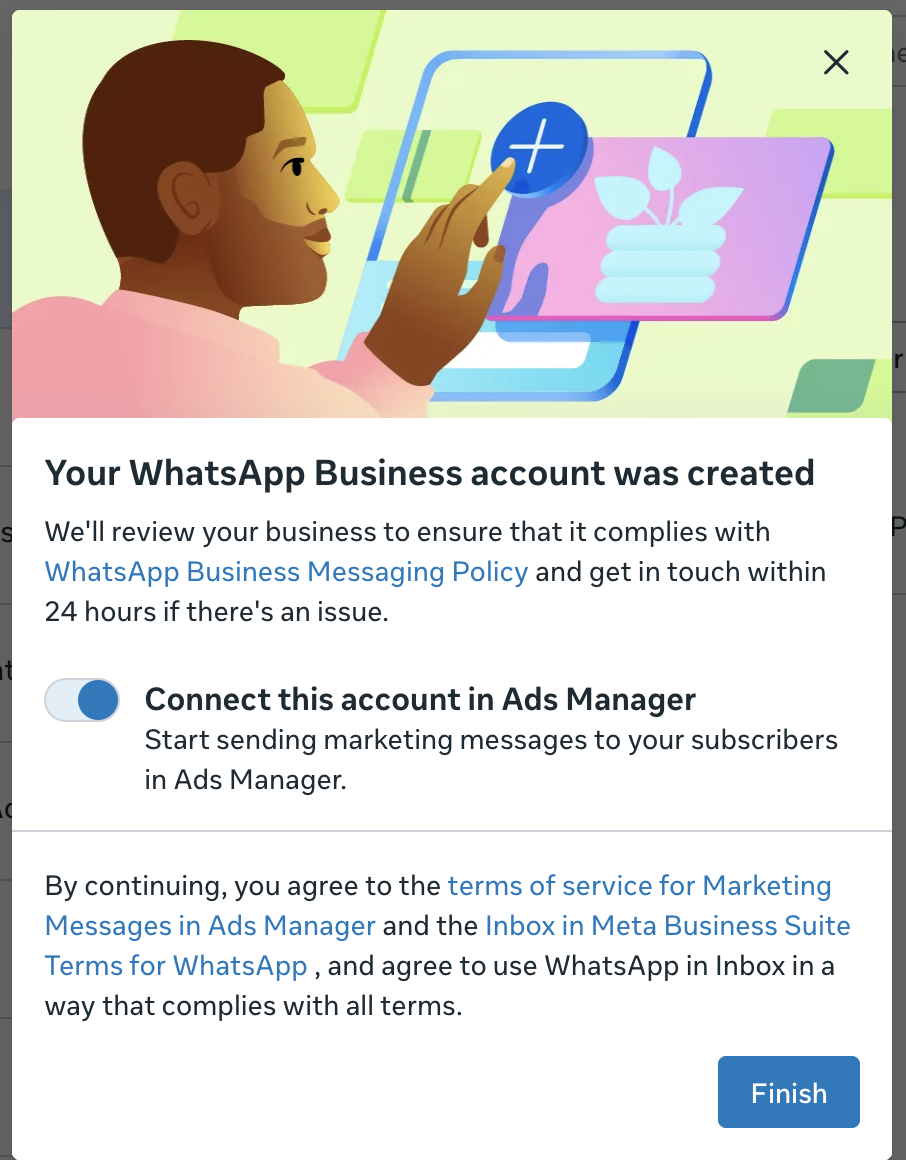
Account is created
- (Recommended) In Security Center, start Business Verification to avoid quota and template issues later.
2. Add and Verify a Phone Number
If you chose Use a display name only while creating your WABA, or you selected an existing WABA without a number, add and verify the phone number as follows:
-
Open WhatsApp Manager for your WABA and go to Account tools > Phone numbers > Add phone number (business.facebook.com/wa/manage/phone-numbers).
-
Fill Business Profile (Display Name, Category, etc.).
-
Use a number that:
- Can receive SMS or Voice Call OTP.
- Is not already registered on any WhatsApp account (personal or business). Numbers already in use with WhatsApp cannot be registered unless the WhatsApp account on that number is deleted first. If the number is on the WhatsApp Business app, you can migrate it instead.
- Is not a short code. Mobile numbers are recommended; landline, toll-free, and VoIP numbers are supported as long as they can receive the verification SMS or call.
- Can receive the verification call directly if you choose voice verification. The call cannot navigate through an IVR (Interactive Voice Response) menu, so the IVR must be temporarily disabled or the call should be redirected to a real person to complete the verification. For toll-free numbers behind an IVR, Meta shares one or two phone numbers that the registration call will come from; add them to an allow list and route those calls to a person or mailbox.
- Choose SMS or Voice and enter the OTP to verify.
3. Create a Meta App (Developers Console)
Go to developers.facebook.com > My Apps and click "Create App". Meta's app creation wizard consists of five stages, shown at the top of the screen: App details, Use cases, Business, Requirements, and Overview.
Step 1: App details
Enter an App name (this is the name shown on your My Apps page; you can change it later in Settings) and an App contact email that you check regularly, then click "Next".
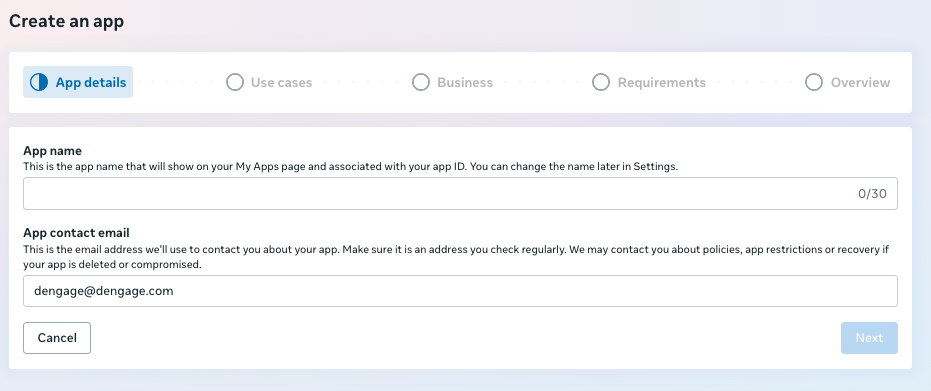
Create an app, App details
Step 2: Use cases
Select the use case "Connect with customers through WhatsApp" and click "Next". The footer confirms "1 use case added".
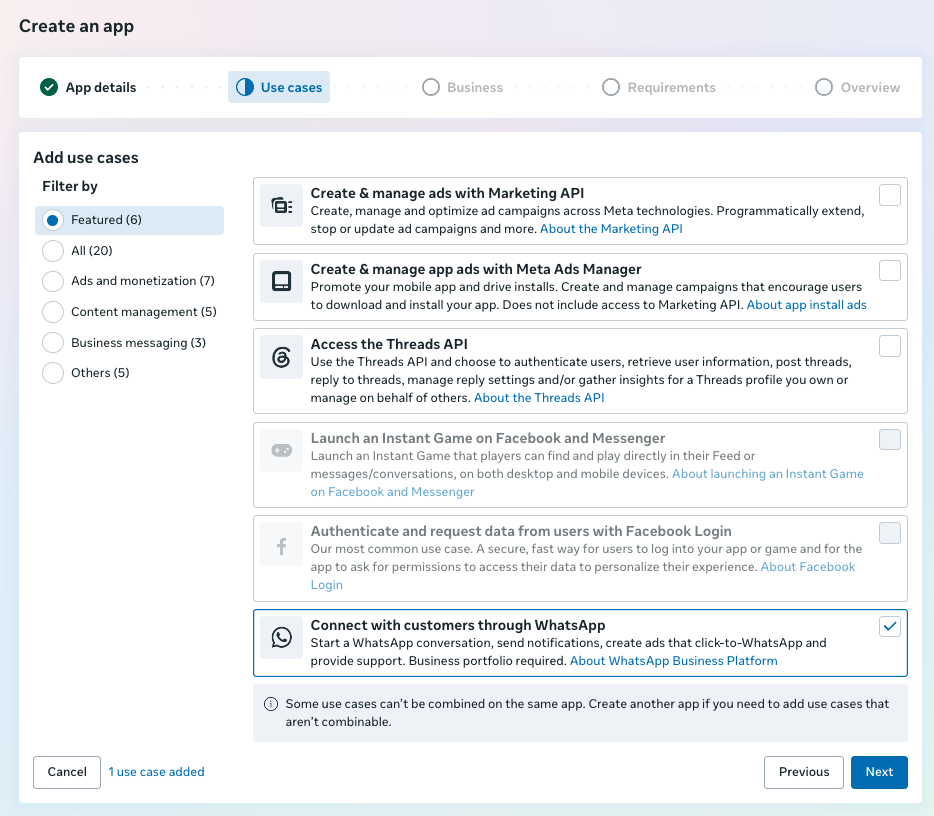
Create an app, Use cases
Step 3: Business
Under "Which business portfolio do you want to connect to this app?", select the same business portfolio that owns your WhatsApp Business Account (WABA) from section 1, then click "Next".
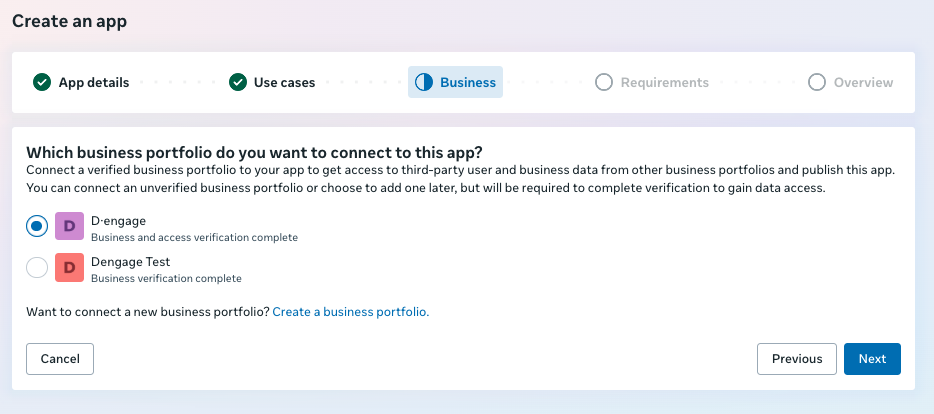
Create an app, Business
Note: A verified business portfolio is required to gain access to business data. You can connect an unverified portfolio (or add one later), but business verification must be completed before your integration can work with live data.
Step 4: Requirements
This step lists the publishing requirements that apply to the WhatsApp use case: Business verification, Access verification, and App Review. These are the steps required to get and maintain access to user and business data. No action is needed here during app creation; review the list and click "Next". You can track and complete them later from the "Required actions" menu in your app dashboard.
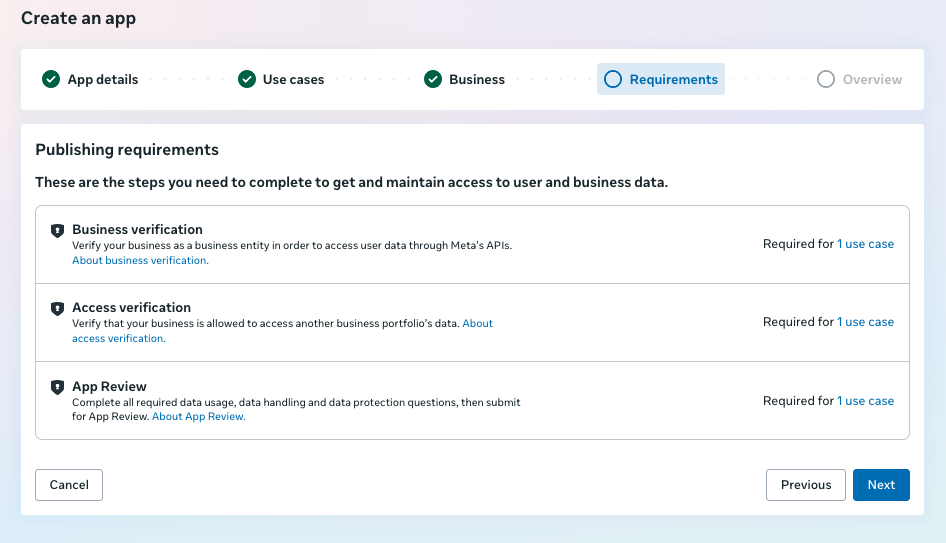
Create an app, Requirements
Step 5: Overview
Review your app details, use case, business portfolio, and requirements, then click "Create app". (By proceeding you agree to the Meta Platform Terms and Developer Policies.)
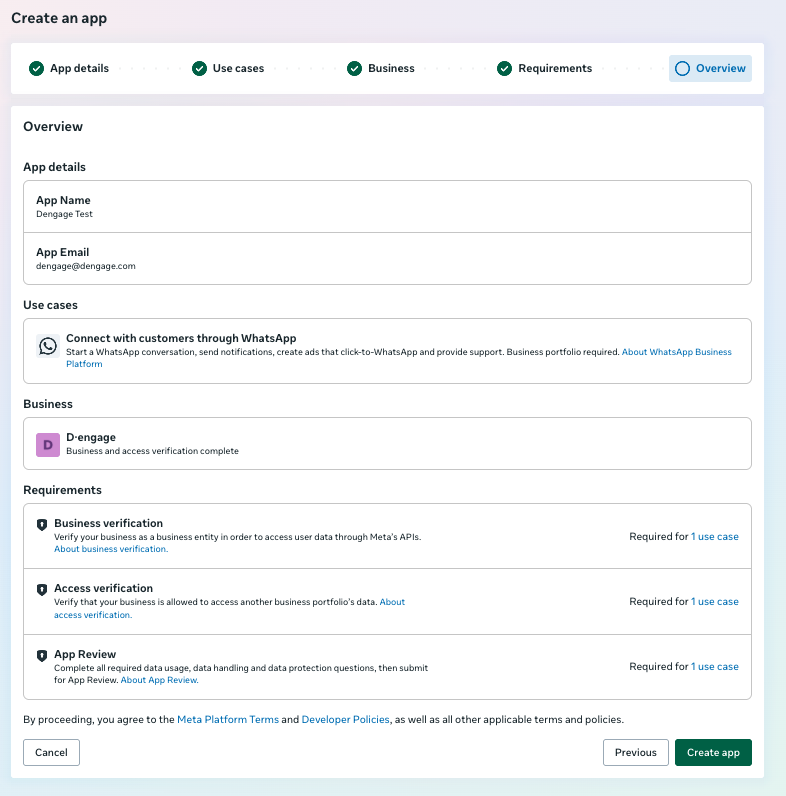
Create an app, Overview
After the app is created
The App Dashboard opens. In the new console, WhatsApp settings are managed from the "Use cases" menu on the left side. The left menu also contains Dashboard, Required actions, Review, and Publish.
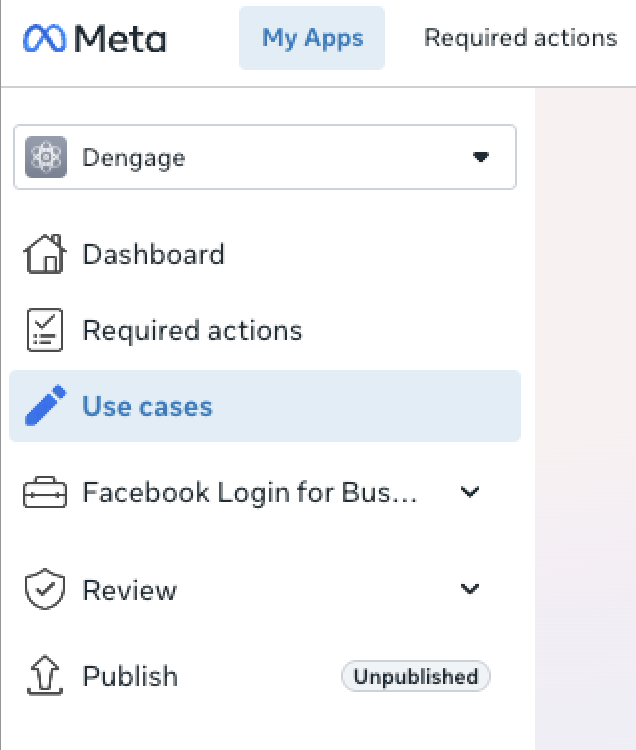
App dashboard menu > Use cases
To copy your App ID, go to App settings > Basic. The App ID is displayed at the top of this page; you will paste it into the "App ID" field on the dengage configuration screen later.
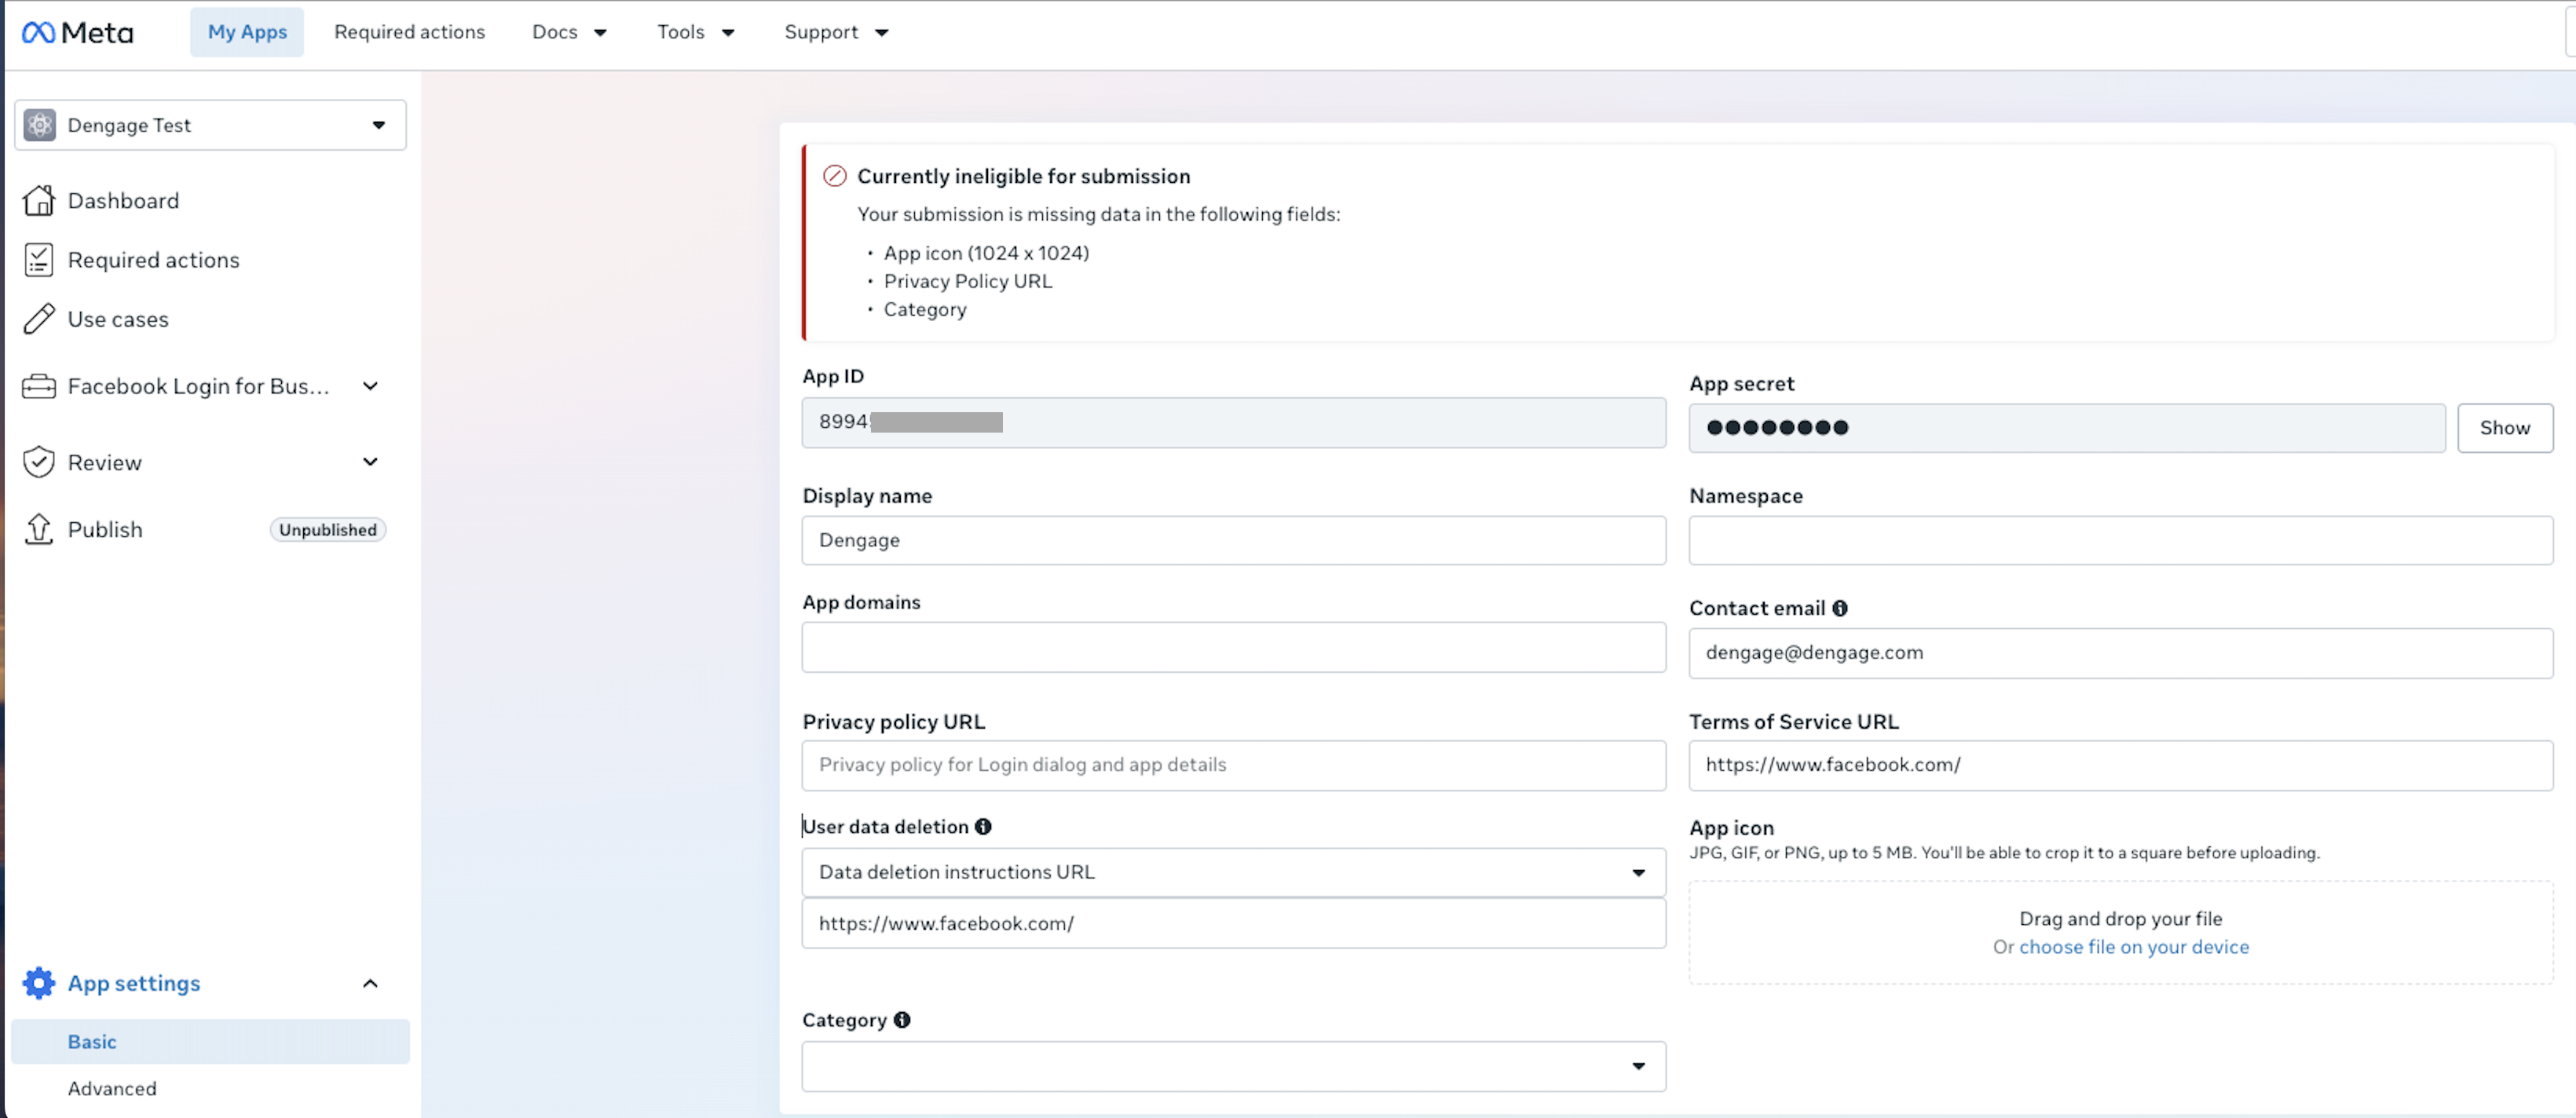
App settings > Basic
To open the WhatsApp settings, go to Use cases in the left menu and click "Customize" on the "Connect with customers through WhatsApp" card. The pages used in the next sections, API Setup and Configuration, are found in the left menu of this Customize screen.
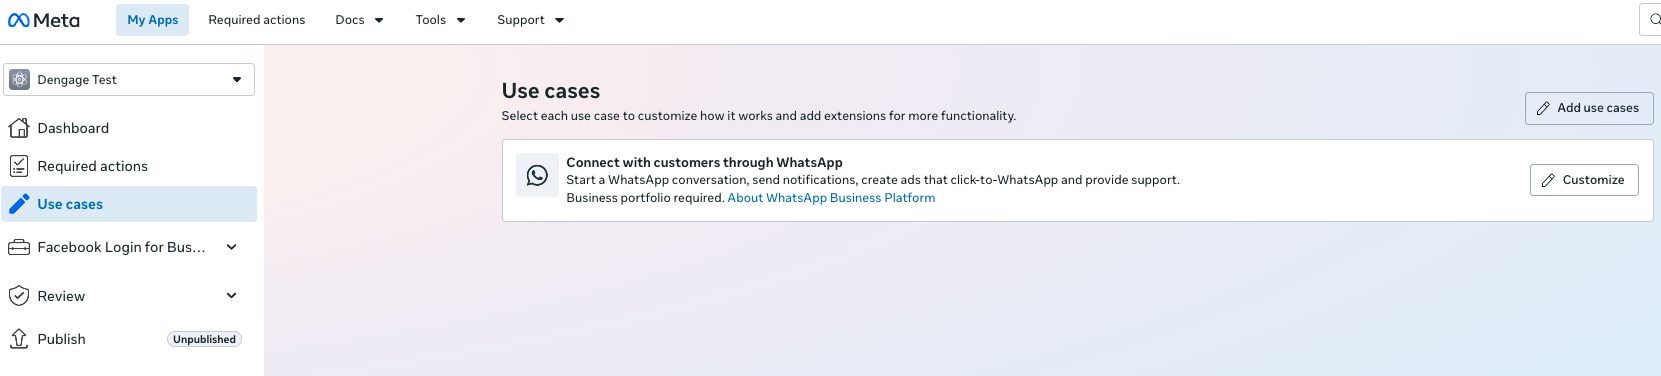
Use cases, Customize
4. Create a System User and Assign Roles
- Business Settings > Users > System Users > Add (if none exists).
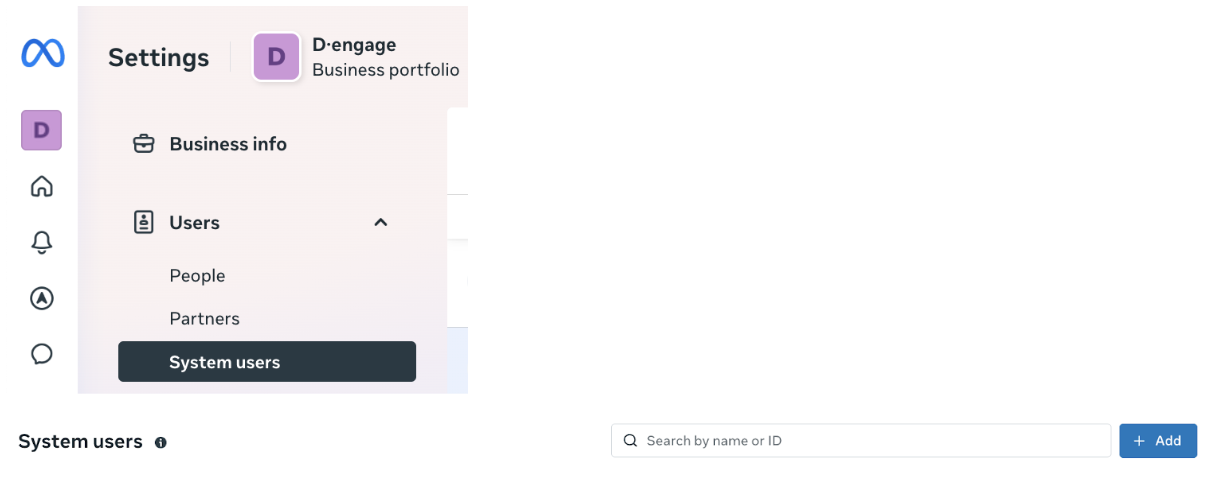
System Users
- Give the System User Full Control on the App
Go to Business Settings > Users > System Users > select your system user.
Click Add assets > choose Apps > select your App.
Turn Full Control (e.g., Manage app) on > Save.

Full Control
5. Generate a Permanent Access Token
- Business Settings > Users > System Users > select the Admin system user > Generate Token.

Token
-
Choose your app and Expiration = Never (recommended) or 60 days.
-
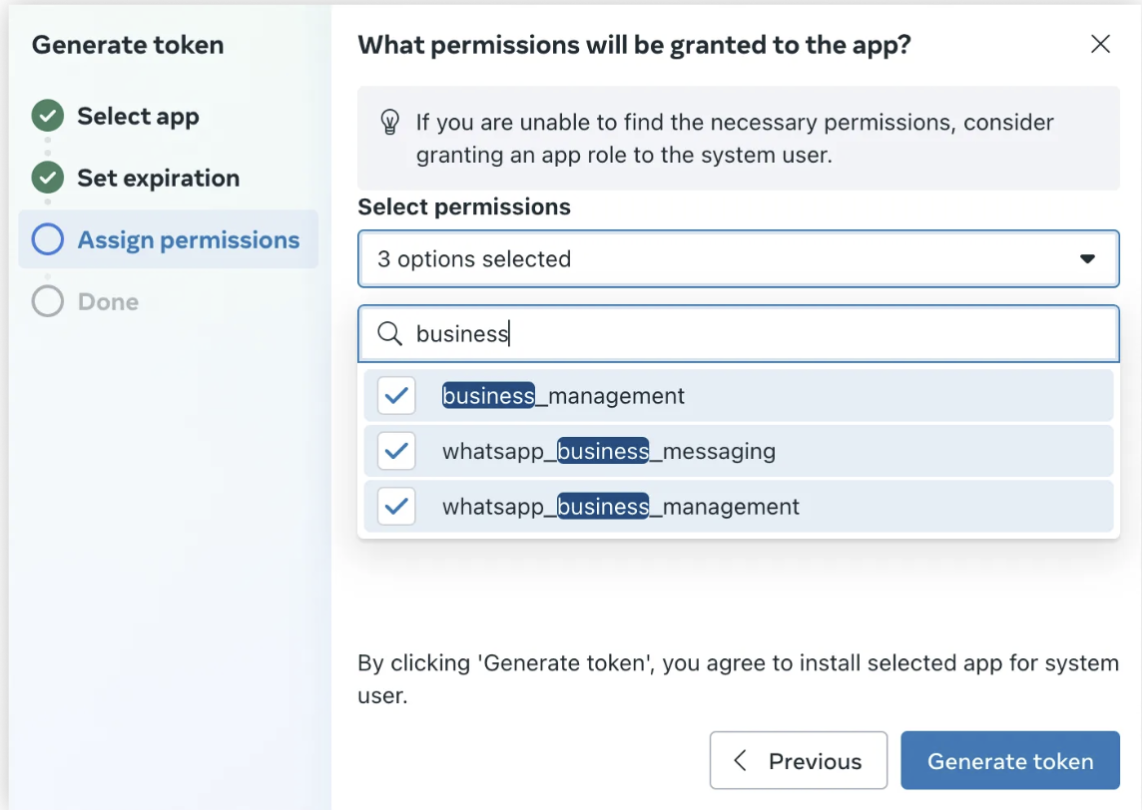
Select permissions:
-
business_management
-
whatsapp_business_messaging
-
whatsapp_business_management
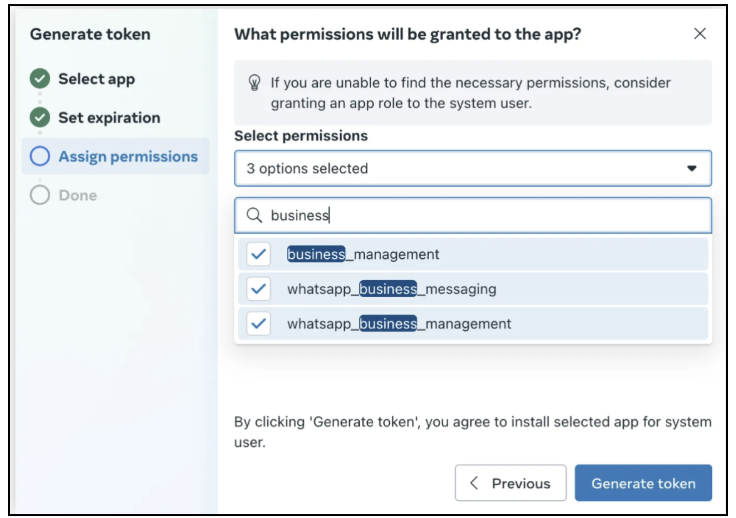
Select Permissions
-
-
Click Generate and copy the token immediately, it's shown only once.
6. Retrieve WABA ID and Phone Number ID
-
In the Developers Console, open your app and go to Use cases > "Customize" (on the "Connect with customers through WhatsApp" card) > API Setup.
-
In the "Send and receive messages" section, select your phone number from the "From" dropdown.
-
Copy the Phone number ID and the WhatsApp Business Account ID (WABA ID) displayed there. You will paste both into the corresponding fields on the dengage WhatsApp integration screen.
7. Prerequisites Checklist
You should now have:
- App ID (from Developers Console)
- Permanent Access Token (with the 3 permissions above)
- WABA ID
- Phone Number ID
- At least one verified phone number under your WABA
How to Start the Integration
Now that you have all Meta values, configure Dengage.
Open WhatsApp Integration in Dengage
To begin, go to: Settings > Integrations > 3rd Party Integrations > WhatsApp
If you don’t see Connect, WhatsApp is not activated for your account. Please contact your Account Manager or Technical Support to enable it.
In this section, you'll see a list of available third-party integrations, including WhatsApp.
To proceed with integration details, click the Details button.
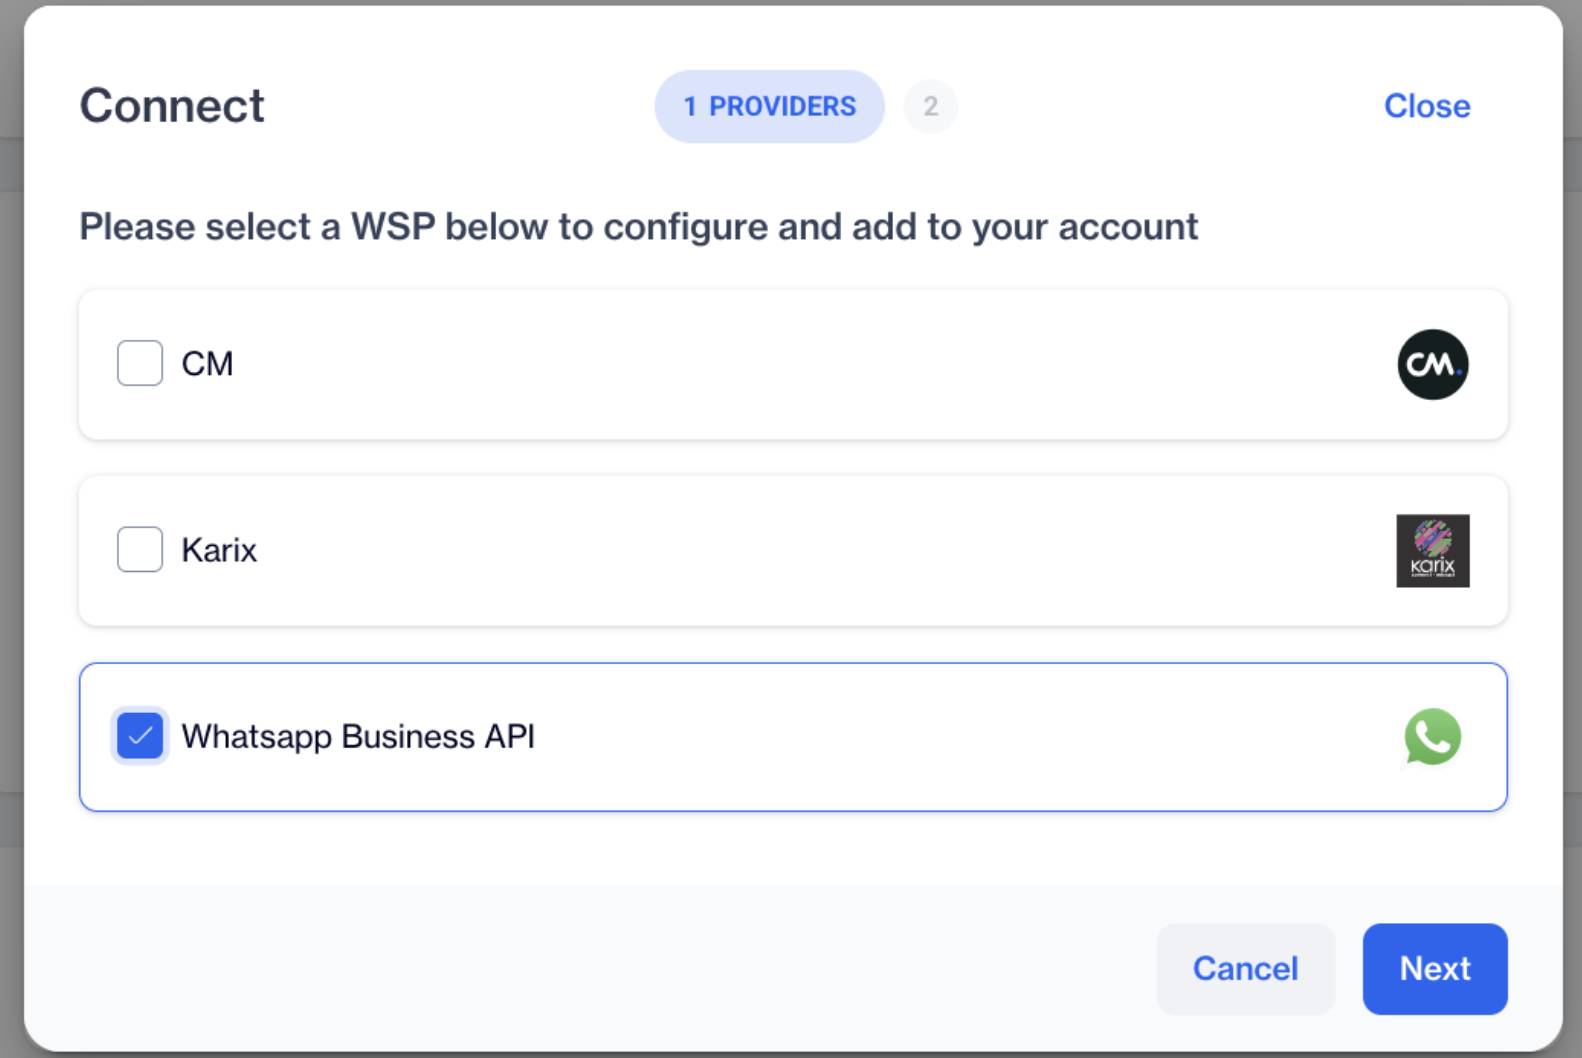
On the screen that opens, you’ll see the integration options for CM, Karix, and WhatsApp Business API.
Choose a Provider
- A modal (pop-up window) will appear with three provider options:
- CM, Karix and WhatsApp Business API
- In order to create a New Sender (WSP) Using WhatsApp Business API: Select WhatsApp Business API, then click Next to continue.
Providers
Fill in Configuration Details
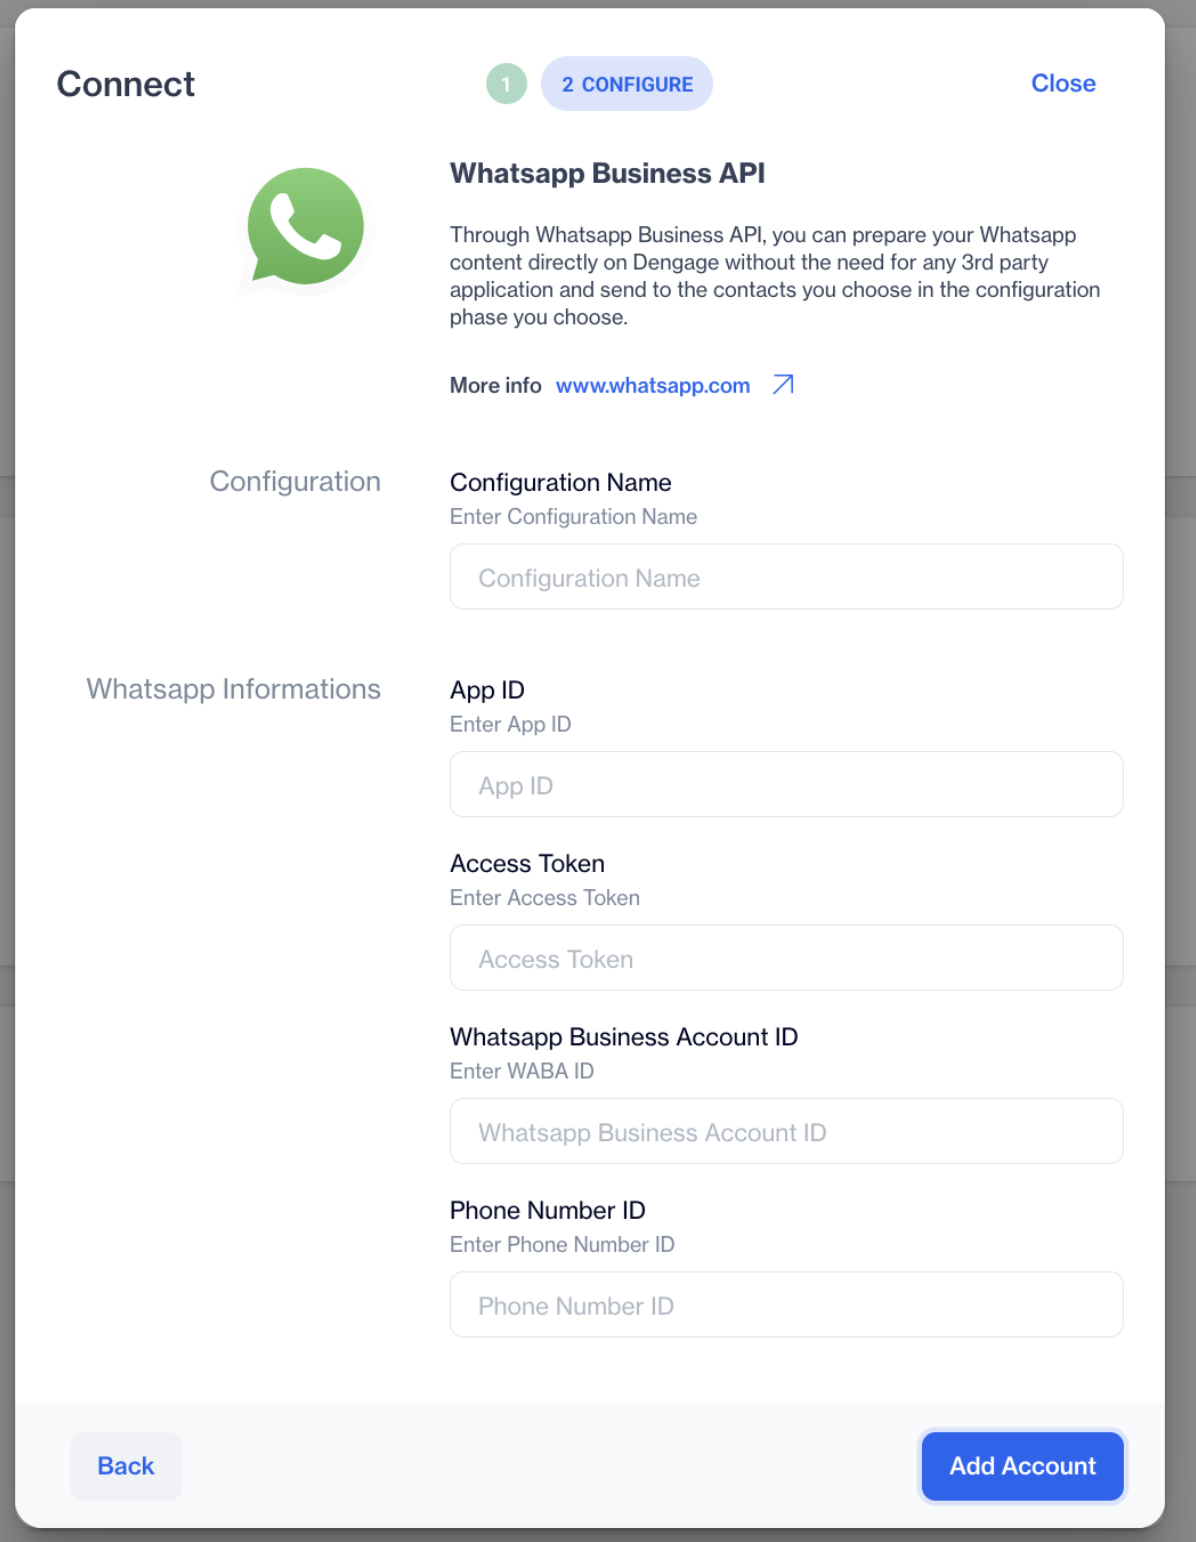
Configuration Name
Name your setup (e.g., “Main WhatsApp API”).
WhatsApp Information
In the Configuration screen, enter the required WhatsApp credentials, which must be retrieved from your Meta Developers Account.
Whatsapp Business API
App ID
Please refer to the Meta-specific requirements in Step 3: Create a Meta App.
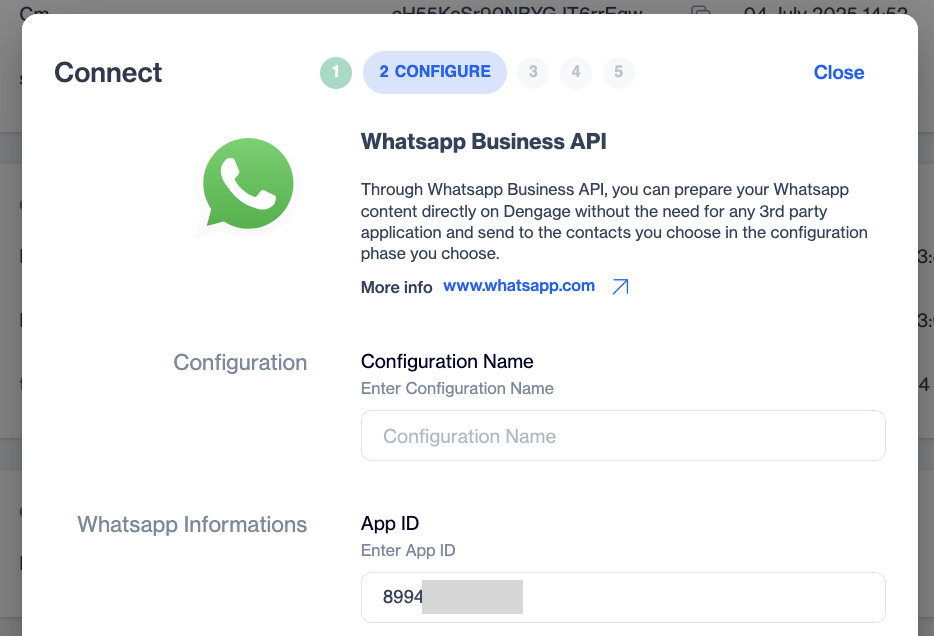
For the App ID field, log in to your Meta Developers Account, open your app, and go to App settings > Basic. The App ID is displayed at the top of this page. Copy this App ID and paste it into the "App ID" field on the Dengage configuration screen, then continue filling in the remaining required fields using the information provided in your Meta account.

Meta Account
Dengage Platform
Access Token
Important Note:While you can generate an access token from your Developer Account under the API Setup section, this token is temporary and will expire after a short period. To generate a permanent access token, you must navigate to your Meta Business Account and follow the steps under the System Users section as described above.
Please refer to the Meta-specific requirements in Step 5: Generate a Permanent Access Token.
To create a permanent access token, go to Meta Business Account . To ensure the "Generate Token" option displays the necessary permissions, you first need to assign the System Admin role correctly within your Business Account. Go to Accounts > Apps and select the app you want to link. Then, click Assign People and choose the user who will act as the System Admin. After this assignment is completed, navigate to Users > System Users, select the system user you just assigned as admin, and click Generate Token.
A pop-up window will appear—start by selecting the app you want to use for the integration.
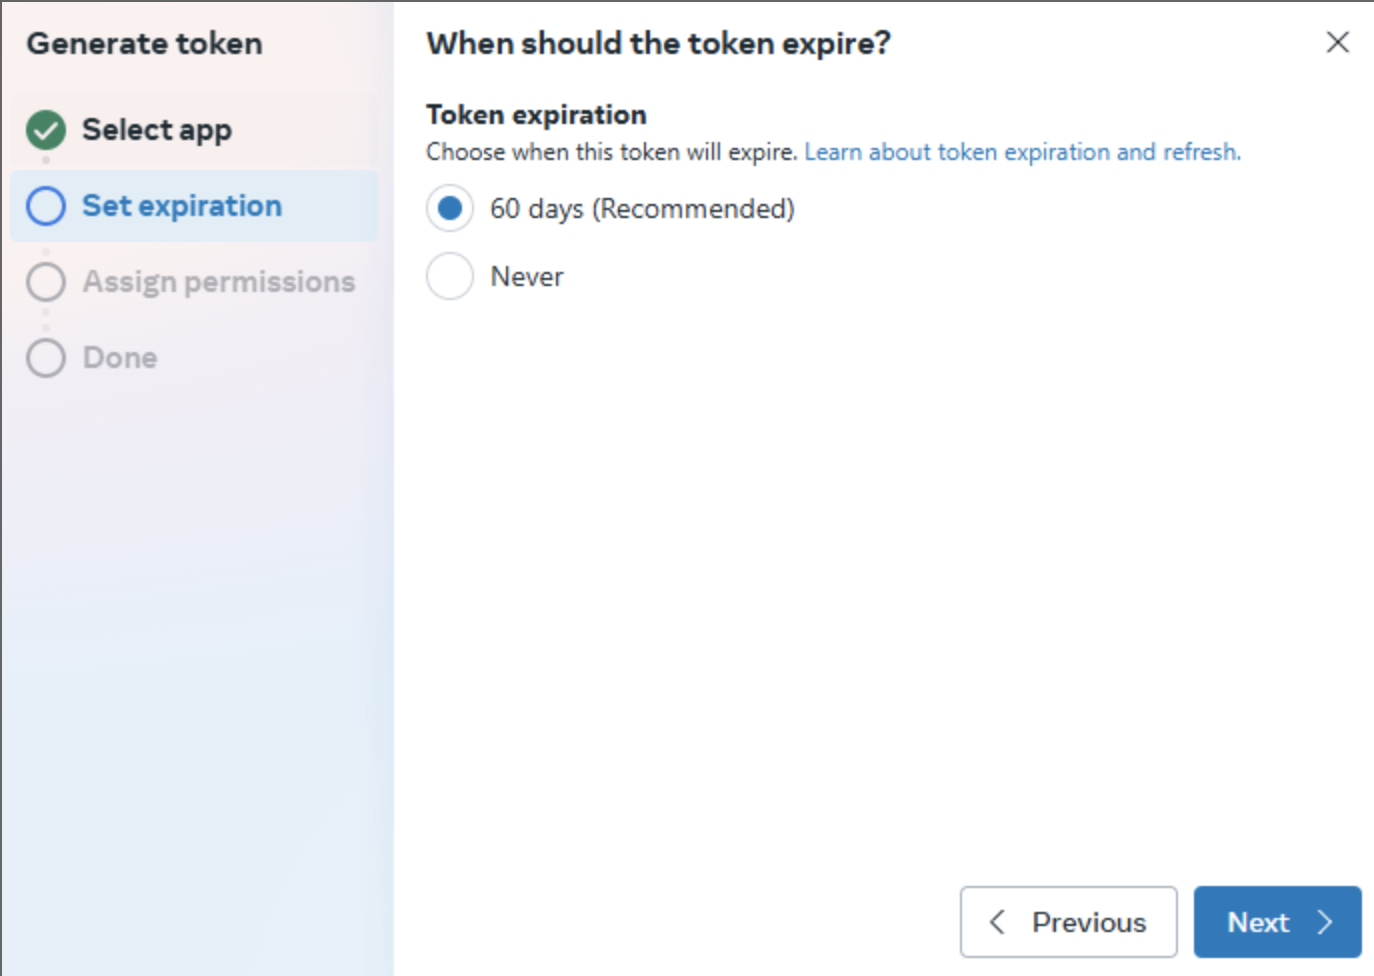
Next, you’ll be prompted to choose the token expiration period. You can select either 60 days or Never.
If you select 60 days, you must renew the token every 60 days—otherwise, your WhatsApp messages will not be sent. For this reason, it is recommended to choose Never to avoid interruptions.
Token Expiry
After assigning the necessary permissions—business_management (for sending messages), whatsapp_business_messaging (for creating templates), and whatsapp_business_management (for capturing events), click the Generate Token button.
Permissions
Once the token is generated, it will be displayed on the screen. Copy the token immediately and paste it into the Access Token field on the Dengage WhatsApp Integration screen.
Important:The token is shown only once. After you copy it, it disappears from the interface. If you forget to copy it or navigate away from the screen, you will not be able to retrieve it again and must generate a new one.
WABA ID (WhatsApp Business Account ID) and Phone Number ID
Please refer to the Meta-specific requirements in Step 6: Retrieve WABA ID and Phone Number ID.
In your Meta Developers Account, open your app and go to Use cases > "Customize" (on the "Connect with customers through WhatsApp" card) > API Setup.
On the API Setup screen, scroll to the Send and receive messages section. Select your phone number from the "From" dropdown, and you'll see both the WABA ID (WhatsApp Business Account ID) and the Phone Number ID displayed. Copy these values and paste them into the corresponding fields on the Dengage WhatsApp integration screen.
Adding WABA ID and Phone Number ID to Dengage
To add these values, go to your Dengage Panel and navigate to Settings > Integrations > 3rd Party Integrations > WhatsApp to open the Dengage WhatsApp integration screen. Under the section called WhatsApp Information, paste the WABA ID and Phone Number ID you copied from the Meta API Setup page into the corresponding fields. Once the information is entered, confirm by clicking the Add Account button.
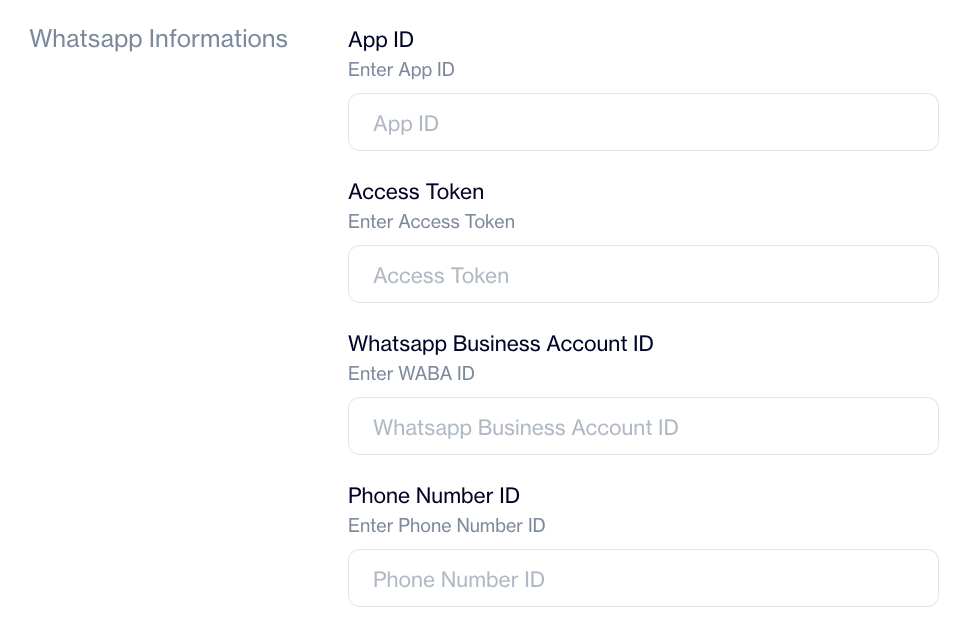
Adding WABA ID and Phone Number ID to Dengage
Dengage supports multiple numbers: use New WSP for each additional sender. App ID & Access Token usually remain the same; WABA ID / Phone Number ID change per number.
Webhook Configuration
- On dengage, after clicking the "Add Account" button, the Webhook Configuration section appears. The Callback URL and Verify Token fields are auto-populated; copy these values from the dengage configuration screen.
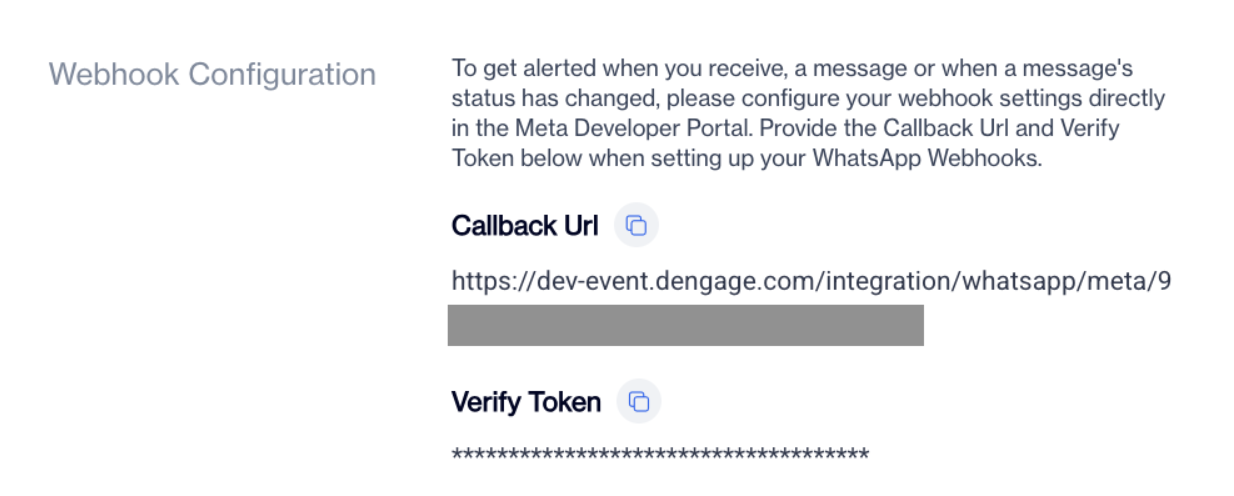
Dengage Webhook Configuration
- In the Meta Developers Console, open your app and go to Use cases > "Customize" (on the WhatsApp use case) > Configuration.
- In the Webhook section, paste the Callback URL and Verify token into the corresponding fields and click "Verify and save".
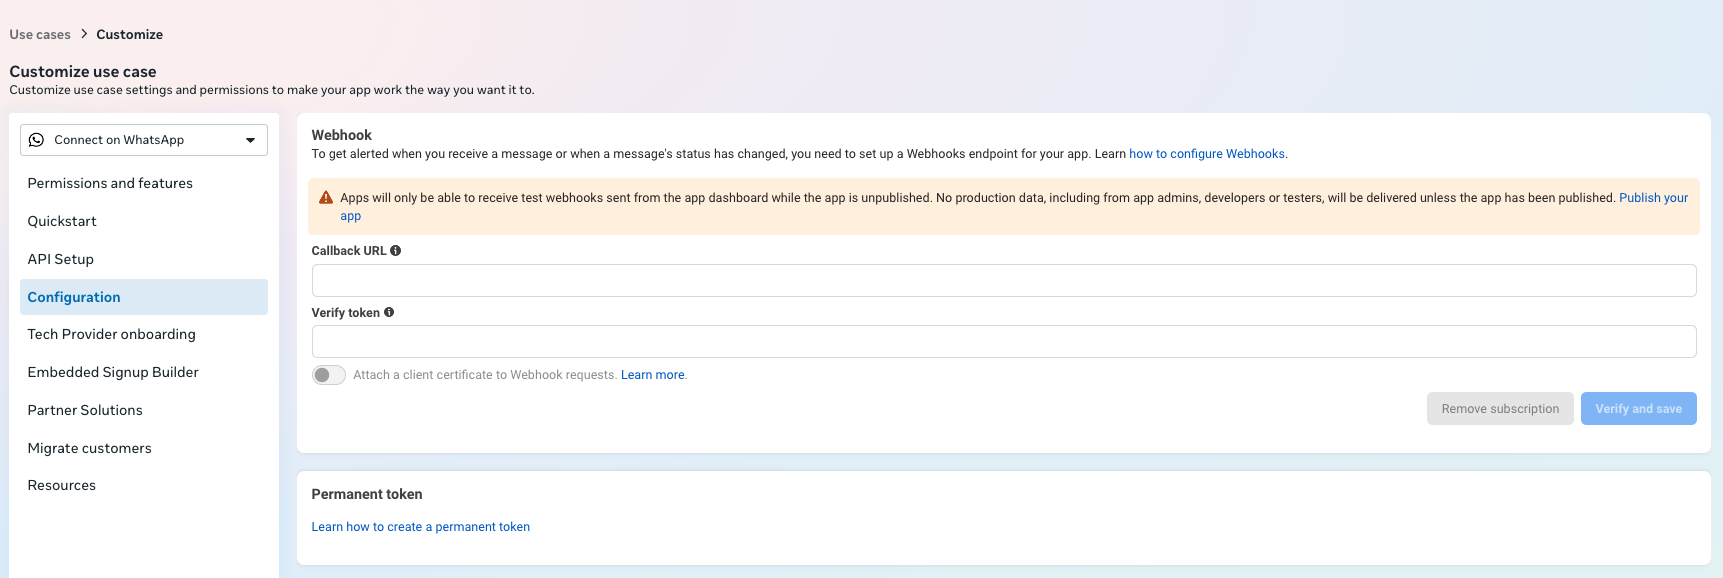
Configuration, Webhook
- If verification succeeds, the list of Webhook fields appears. Activate the subscribe toggle for "messages" only; do not subscribe to any other field.
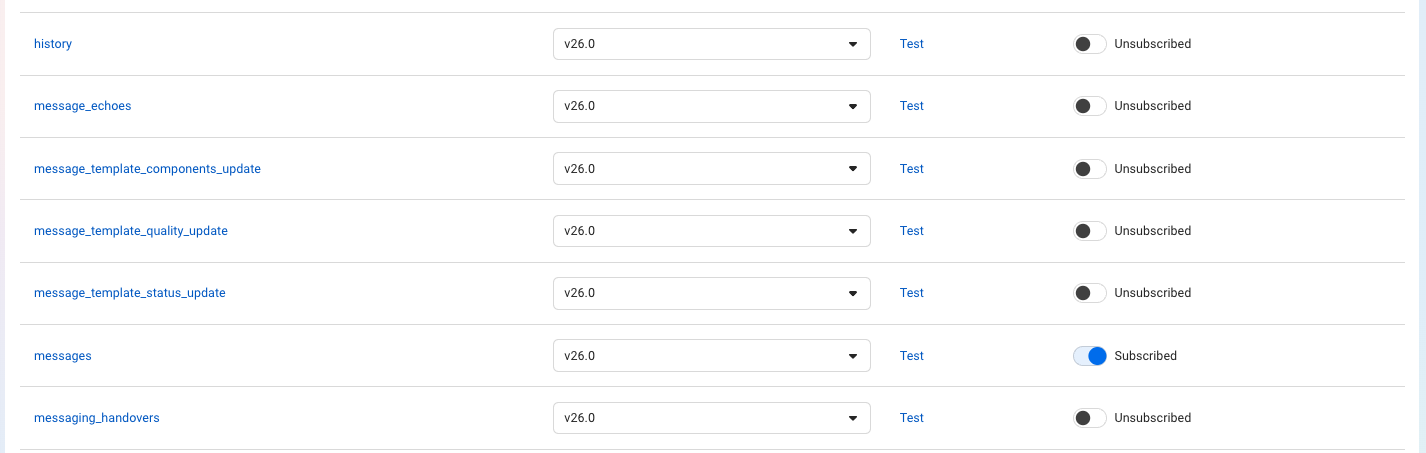
Webhook fields, messages subscribed
- After saving the webhook settings in Meta, return to the dengage panel and click "Update WSP" to finalize the configuration.
Important:All current enhancements are built for WhatsApp API version 22.0 and above. Make sure your Meta application is also set to use version 22.0 or above to ensure full compatibility.
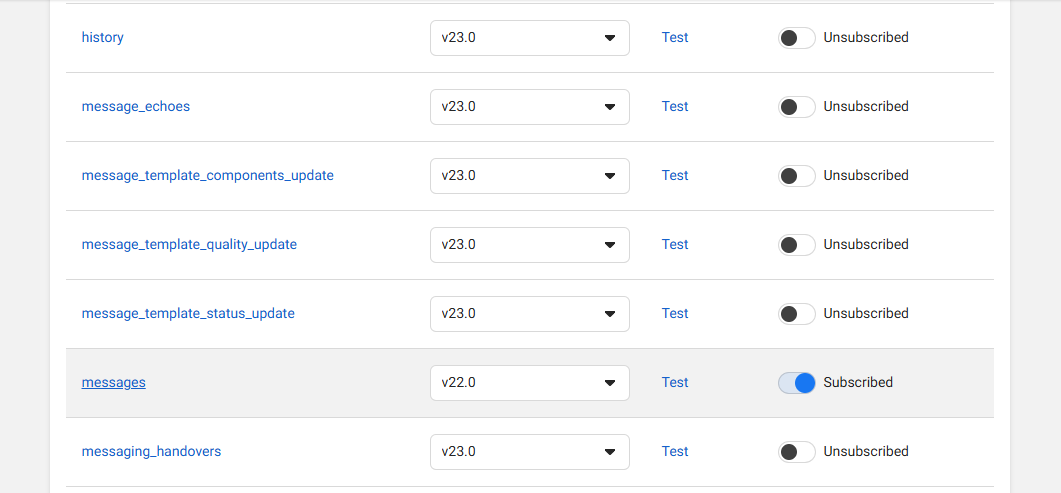
WhatsApp API version 22.0
You can enter multiple accounts, but only one account per modal.
Adding an Additional WhatsApp Phone Number
If the user wants to use more than one WhatsApp number,they should navigate to Developers Account > your app > Use cases > "Customize" > API Setup > Step 1: Select Phone Numbers. In this section, click the "Add Phone Number" button from the dropdown menu. In the modal that appears, fill in the required fields under the WhatsApp Business Profile section, such as the WhatsApp Business Display Name. Then proceed to the "Add Number" section to input the new phone number. In the final step, Verify Number, complete the number verification process.
Important Note:The number being added must not be associated with any existing WhatsApp account (personal or business).
Adding a Second Phone Number Under the Same Application in the Platform
When a new phone number is selected from the From dropdown in the API Setup, both the Phone Number ID and the WhatsApp Business Account ID (WABA ID) will change based on the selected number.
If you want to add an additional number to the same application via the Dengage platform, follow these steps:
- Go to Integration > 3rd Party Integration > WhatsApp.
- Click the "New WSP" button to add a new WhatsApp sender profile.
- Under the WhatsApp Information section:
- Enter a Configuration Name for the new setup.
- App ID and Access Token will remain the same. You can copy these from the existing configuration and paste them here.
- Update the Phone Number ID and the WhatsApp Business Account ID (WABA ID) fields using the values associated with the new phone number from Meta Developers Account.
- After filling in the required fields, click the Add Account button to complete the process.
Important Note:If the newly created application is linked to an existing WhatsApp Business account, all phone numbers connected to that account will automatically appear in the From dropdown under the API Setup section in the Meta Developer Console.
As a result, all content associated with the existing phone number(s) will be visible in the Dengage WhatsApp Content section. This is because content visibility is determined by the Phone Number.
However, when a new phone number is added and linked through the same application using the method described above, only content tied to that specific number will be visible. In this setup, it behaves as if a different partner is using the system, keeping content visibility limited to that number.
How Message Delivery Works
When sending a WhatsApp message through Dengage, the message is delivered to the number stored in the whatsapp_number field in the master_contact table. At the same time, the system checks the whatsapp_permission field to ensure the contact has granted permission to receive WhatsApp messages. A message will only be sent if the contact exists in the master contact list and has the appropriate WhatsApp permission.
Quick Validation (Optional but Recommended)
Send a test message using your WhatsApp test phone, then confirm:
- The event appears under your Dengage WhatsApp logs/reports.
- The delivery status updates as expected.
Webhook Checklist
- Callback URL & Verify Token set in Meta
- Messages subscription enabled
- Events visible in Dengage after a test
WhatsApp Unsubscribe
The WhatsApp Unsubscribe feature allows you to automatically unsubscribe contacts from WhatsApp communications when they send predefined keywords. This provides a simple and seamless way for users to stop receiving WhatsApp messages whenever they choose.
This feature is available only for WhatsApp Business API integrations. It enables you to manage unsubscribe behavior directly within Dengage, without relying on any third-party tools.
How to Access Unsubscribe Settings
The Unsubscribe section can be accessed through the WhatsApp Business API integration settings, applicable to both existing and new integrations. Here's how to access the unsubscribe settings for both cases:
For Existing WhatsApp Business API Integrations
To manage unsubscribe settings for an existing WhatsApp Business API integration:
- Navigate to Settings > Integrations > 3rd Party > WhatsApp.
- Open your WhatsApp Business API integration.
- Go to Step 3: Unsubscribe.
For New WhatsApp Integration Setup
To configure unsubscribe settings when setting up a new WhatsApp Business API integration:
- Go to Settings > Integrations > 3rd Party > WhatsApp.
- Select New WhatsApp (New WSP).
- Choose WhatsApp Business API as the integration type.
- Proceed to Step 3: Unsubscribe.
Unsubscribe Configuration
The Unsubscribe section lets you add keywords that users can reply with if they no longer want to receive WhatsApp messages. When a user sends one of these keywords in response to your WhatsApp message, Dengage automatically stops sending WhatsApp messages to that contact.
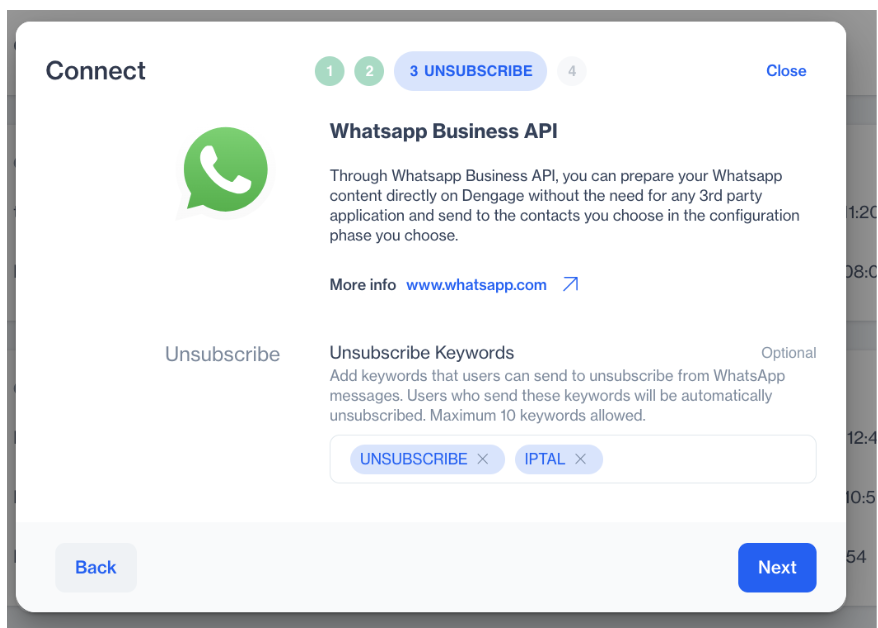
Unsubscribe
Setting Up Unsubscribe Keywords
This configuration is optional. If you do not define any unsubscribe keywords, users will not be automatically unsubscribed when they reply to your messages.
You can add up to 10 keywords that users may send as a response to your WhatsApp messages.
How the Unsubscribe Flow Works
Once a contact sends a defined unsubscribe keyword, the following flow takes place:
- A WhatsApp message is sent through the WhatsApp Business API using Dengage.
- The contact replies with one of the predefined unsubscribe keywords.
- Dengage automatically detects the keyword.
- The contact is unsubscribed from all future WhatsApp communications.
- No further WhatsApp messages are sent to the contact unless they re-subscribe.
This flow is fully automated, ensuring that the opt-out process is seamless and efficient.
Viewing WhatsApp Permission History for a Contact
You can view a contact’s WhatsApp permission history directly from their contact profile.
To access this information:
- Go to Audiences > Profiles > Contacts.
- Select the contact you want to review.
- Open the Permission History tab.
In this tab, you can see the contact’s WhatsApp permission status and any changes made over time.
WhatsApp Auto Reply
WhatsApp Auto Reply allows you to automatically respond to messages sent by users who initiate a WhatsApp conversation with your business. When a user starts a chat, WhatsApp opens a 24-hour conversation window. During this window, messages can be sent directly via REST services.
This feature enables you to define a single, optional automatic reply for each WhatsApp number configured in your account. The auto-reply is sent immediately when a user initiates a conversation, helping you acknowledge incoming messages instantly and improve response experience.
How to Access
To configure WhatsApp Auto Reply, navigate to Settings > Integrations > 3rd Party Integration.
Find WhatsApp in the list and click Details. On this screen, locate your WhatsApp Business API, hover over it, and click the Edit button. In the configuration screen, go to the Auto Reply tab (the 5th tab).
How to Use
In the Auto Reply tab, enable the auto-reply toggle. Enter your message content and click Update WSP to save your configuration.
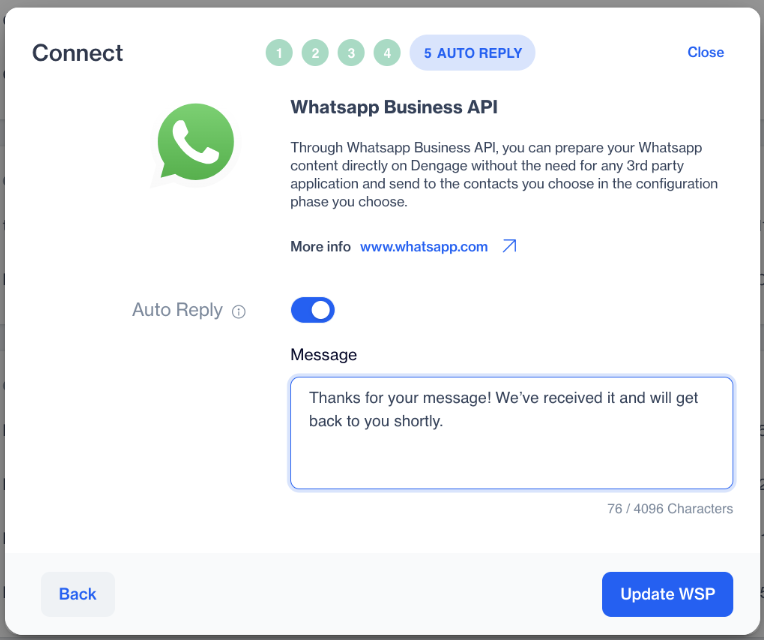
Auto Reply
Once enabled, the message is automatically sent when a user initiates a WhatsApp conversation within the 24-hour chat window.
WhatsApp Auto Reply provides a simple and effective way to automatically acknowledge user-initiated WhatsApp messages. By configuring one auto-reply per WhatsApp number, you can ensure faster engagement and a more responsive communication experience with minimal setup.
Integration with Karix
- From the list of providers, select Karix.
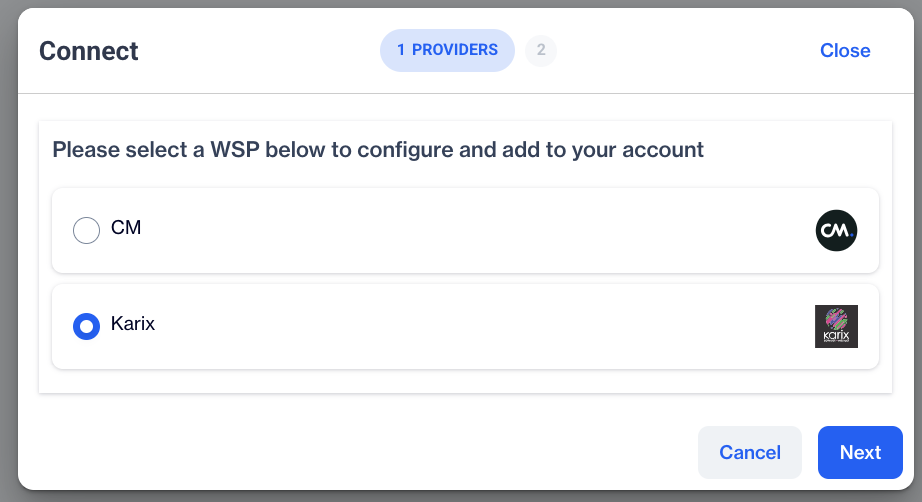
Karix
A configuration form will appear. Please follow the step-by-step guide below to fill in the necessary fields.
Obtaining WABA Id
- Login to your Karix Panel
- Navigate to WhatsApp Campaign
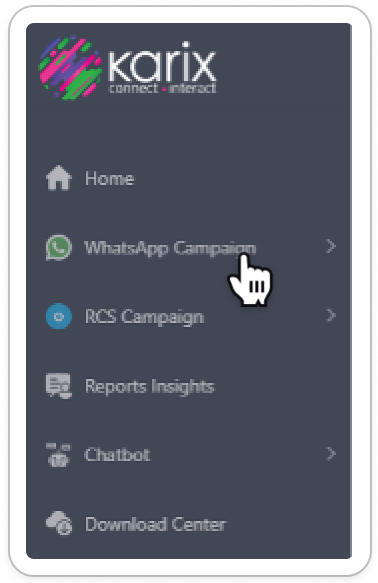
Karix WhatsApp Campaign
- Select the WABA Status
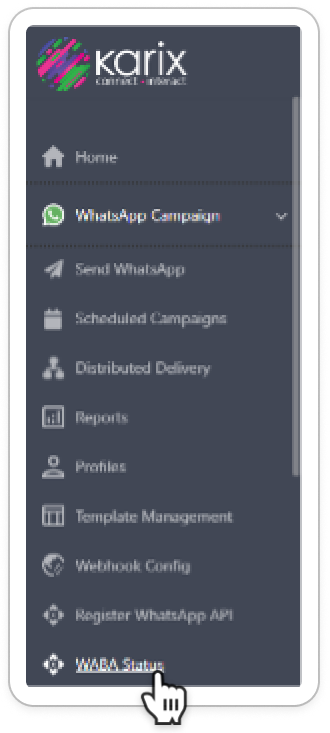
WABA Status
- From the data grid, Copy The WABA ID .
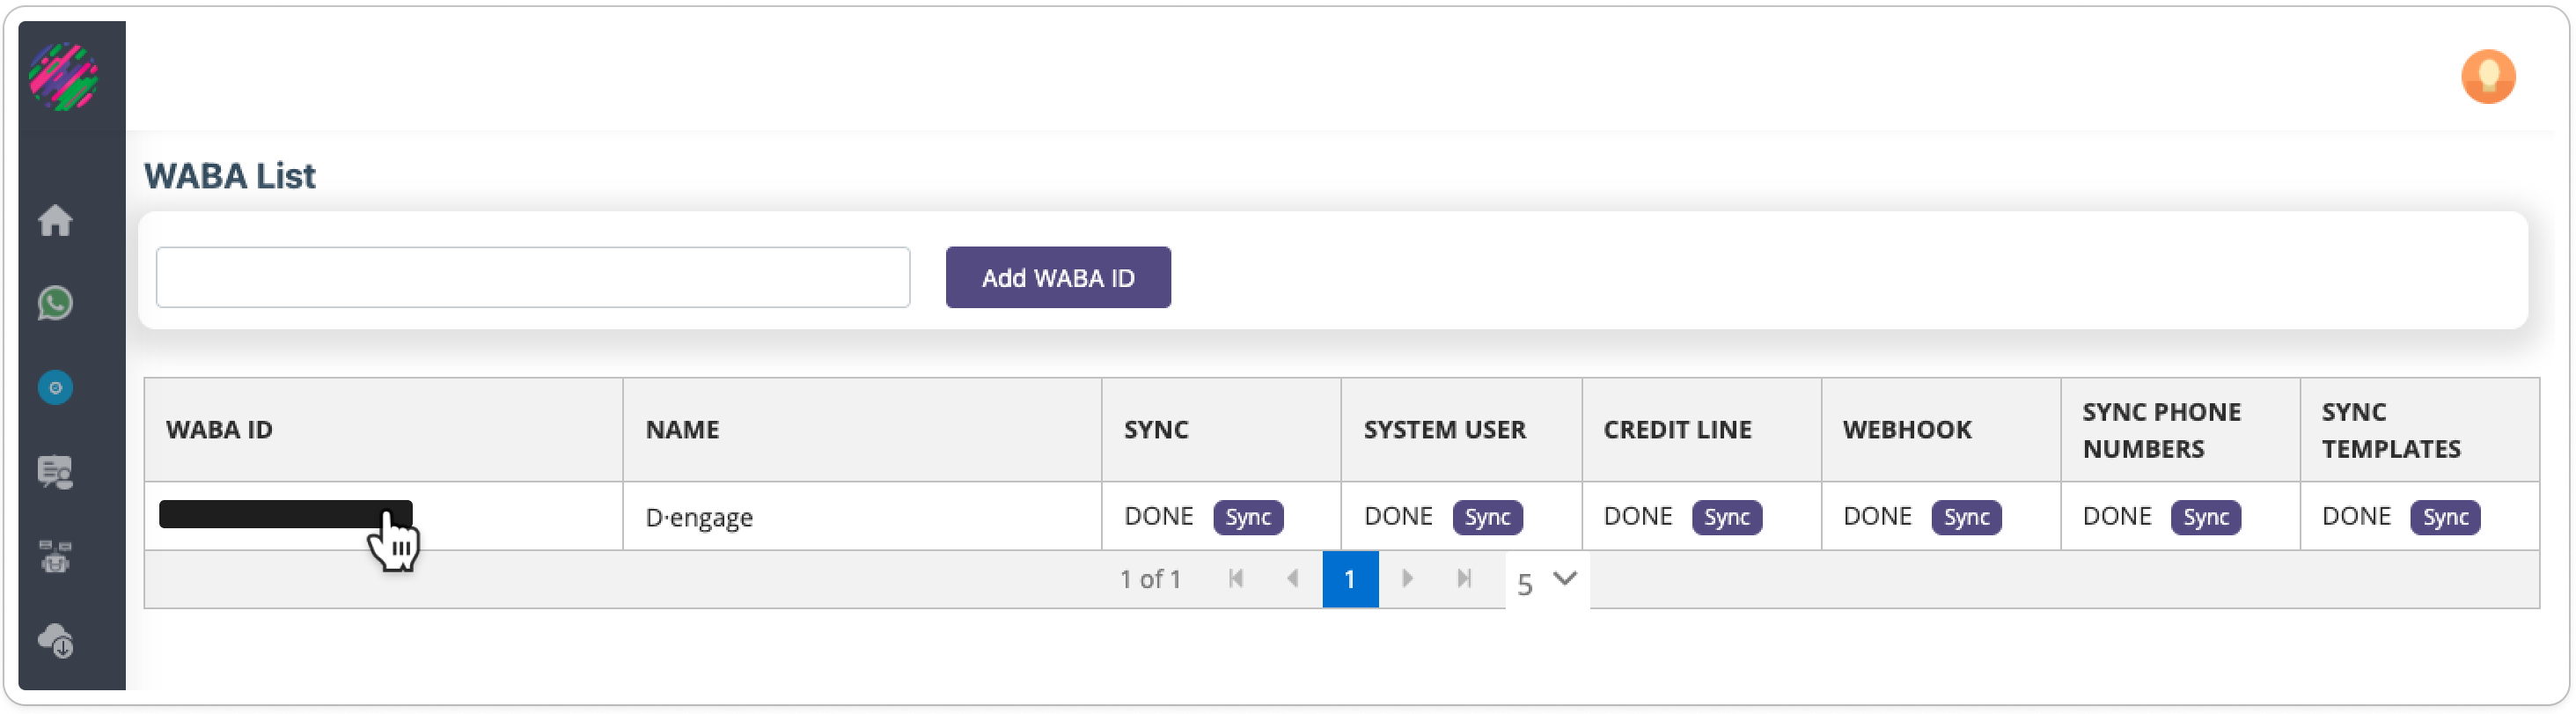
Copy The WABA ID
- In the WSP form, paste the WABA ID into the designated section.
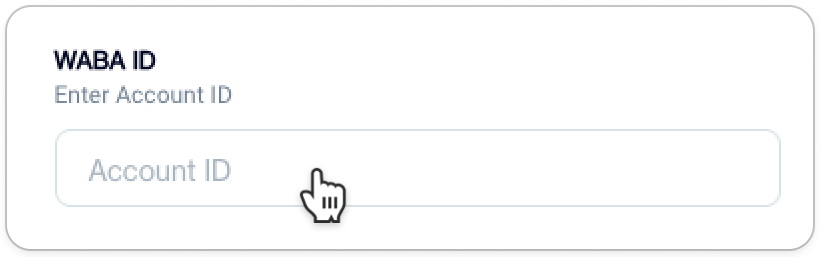
Paste WABA ID
Obtaining Product Token
- Access the Karix Lounge
- Under the Power API section, click on the API KEYS button.
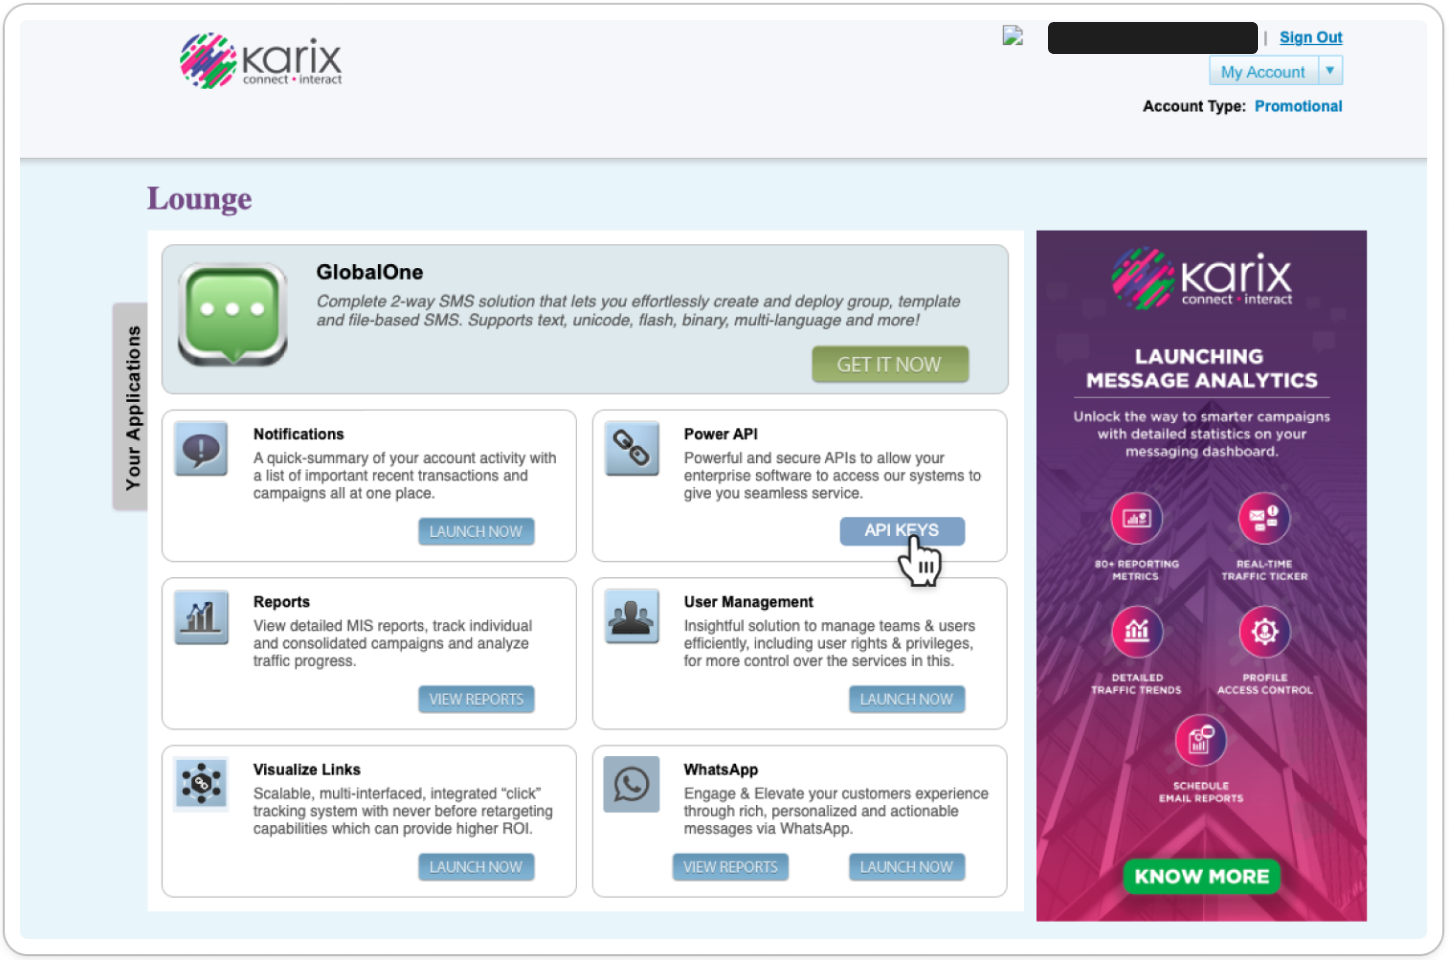
- Reveal the API Key by clicking the Eye icon and copy it.
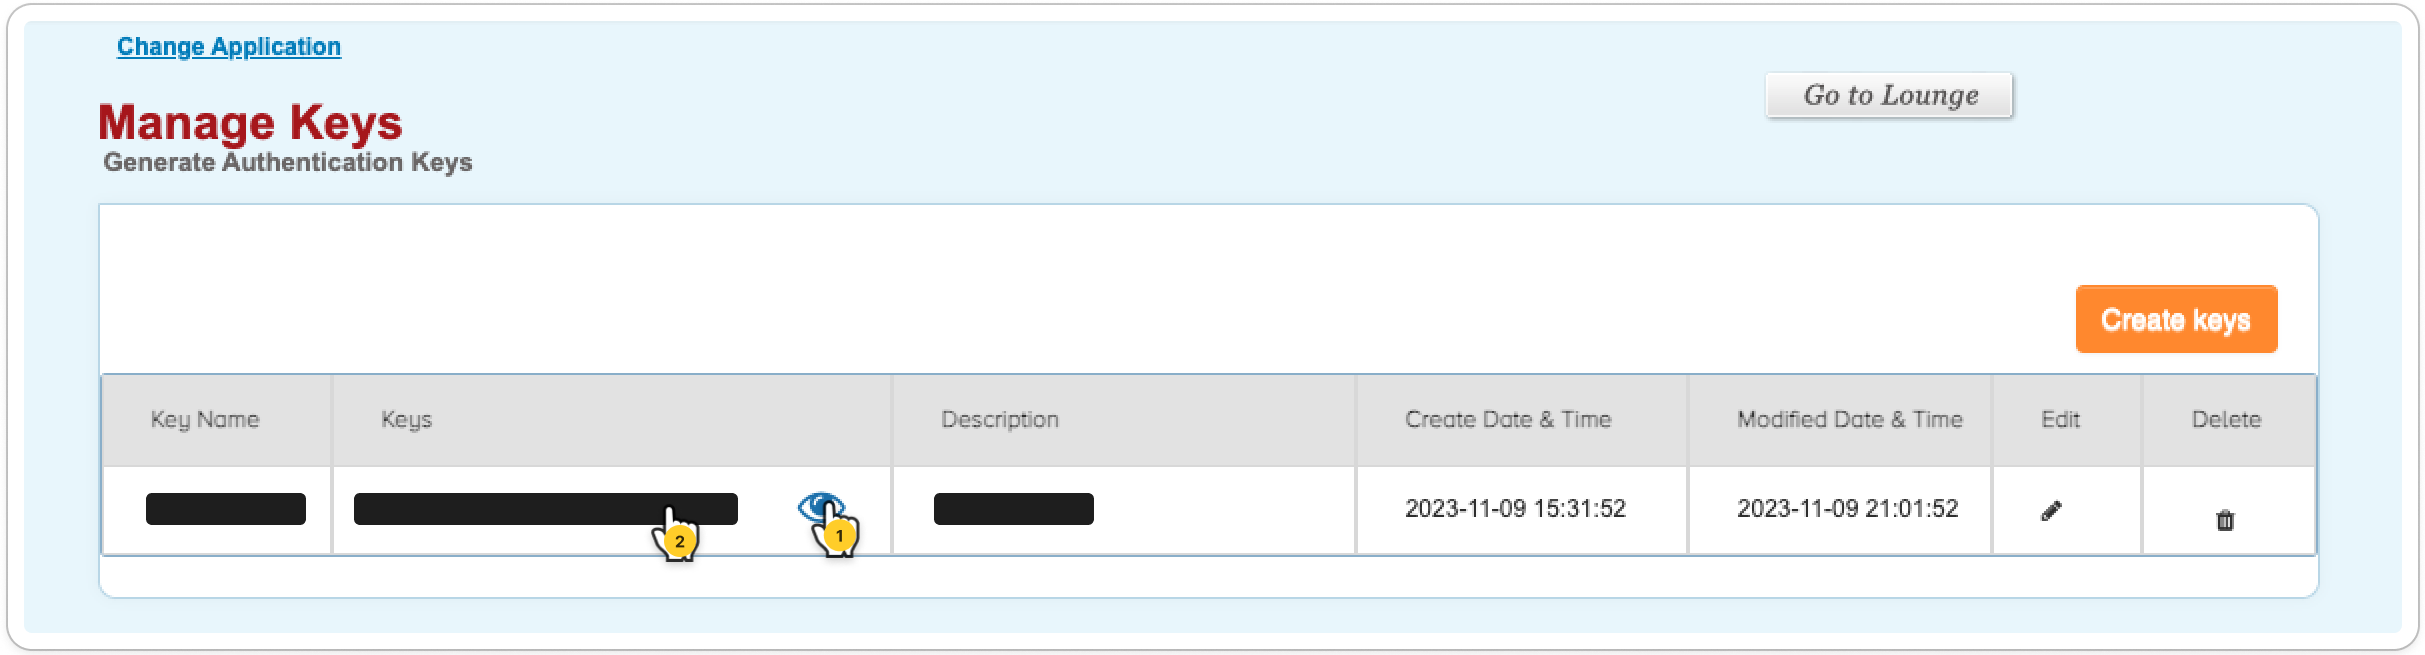
Manage Keys
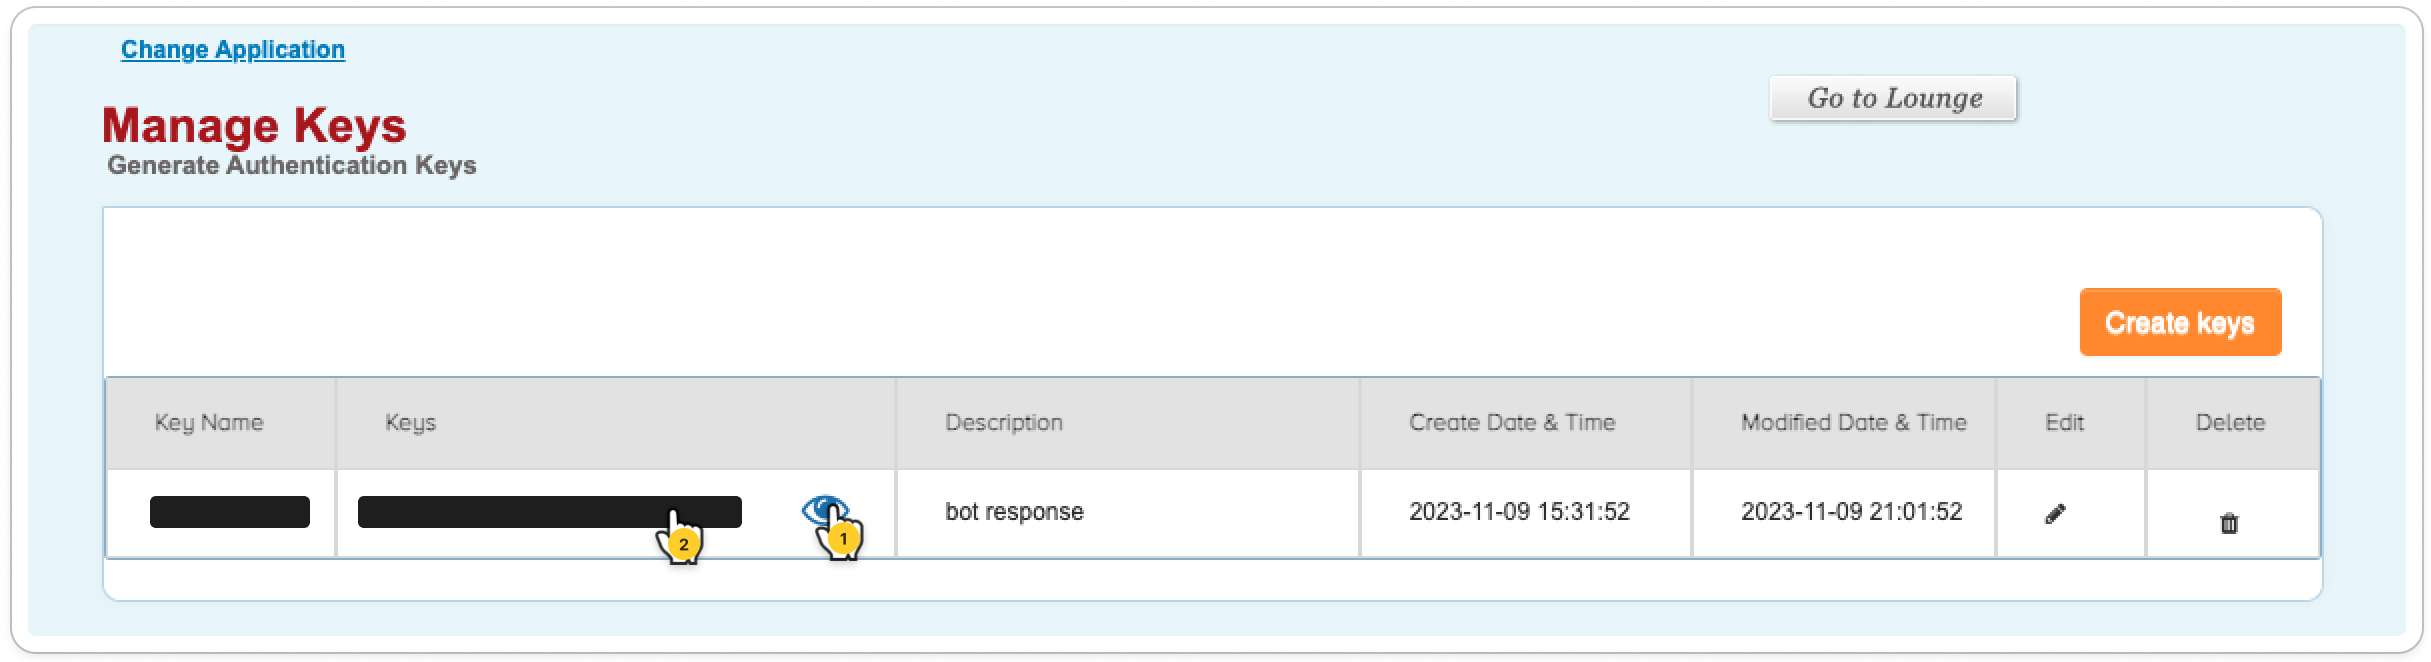
- Paste the copied ID into the Product Token section on the WSP form.
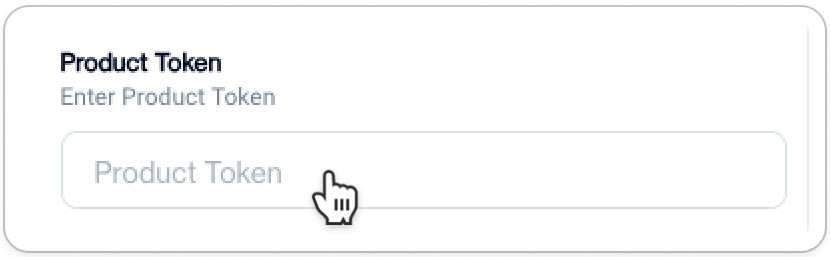
Product Token
- Enter your WhatsApp Business Profile number as Sender Name in the provided field.
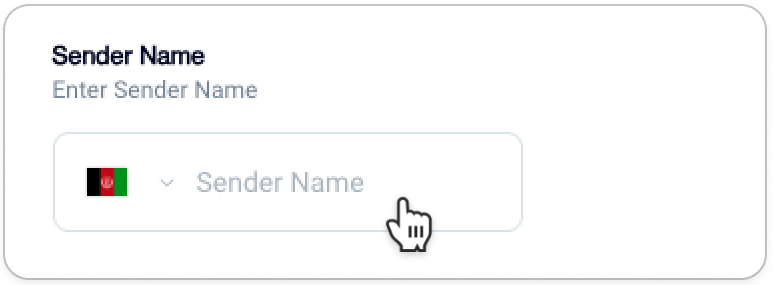
Sender Name
- To finalize the configuration, click the Add Account button.
Add Account
Important Information on Message Tracking & Reporting
- For seamless integration of data from the Karix platform into D·Engage Send Reports, please initiate a request with our Technical Support Team. This step is crucial to ensure accurate and complete data transfer.
- Additionally, comprehensive reports are readily available directly from the Karix panel, providing an alternative source for detailed insights.
Integration Complete
Your Dengage and Karix accounts are now connected. You're all set to send WhatsApp Marketing Messages through the registered WhatsApp Business Profile on Karix and receive detailed reports on your campaigns.
Integration with CM.com
- Provide a name for your configuration. This name will be used for selection when sending a campaign and can be any name of your choice.
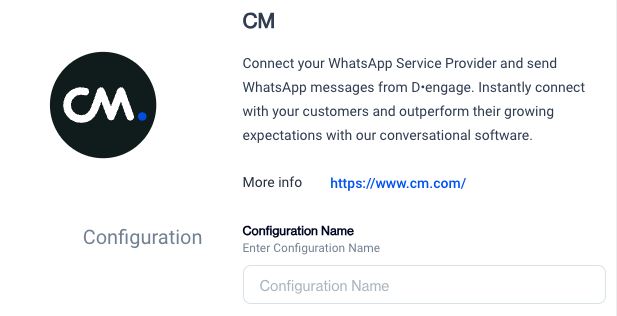
CM
- Complete all the required information in the following sections.
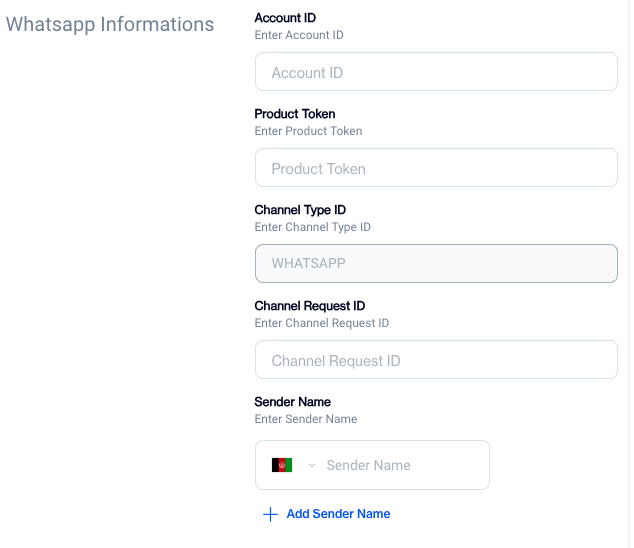
Required Info
Sender Name is your WhatsApp Business Profile NumberTo complete the integration, the "Sender Name" field should be filled with your WhatsApp Business Profile Number. If you intend to add more than one Business Profile, click on the "Add Sender Name" button.
Integration Complete
Your Dengage and CM.com accounts are now connected. You're all set to send WhatsApp Marketing Messages through the registered WhatsApp Business Profile on CM.com and receive detailed reports on your campaigns.
Updated about 2 months ago