
The Email node sends an email to every contact that reaches it in a flow. It is the action node you use to deliver email content in both One-Time and Recurring flow campaigns. A flow is the visual campaign builder where you drag nodes onto a canvas to build a customer journey. See Flow Components.
This page covers only what is specific to the Email node: selecting content, tracking options, IP pool, and contact extension. For creating the campaign, scheduling, and selecting the audience, see One-Time Flow Campaigns or Recurring Flow Campaigns.
Prerequisites
Before adding an Email node, make sure that:
- You created and saved the email content you want to send in Content → Email. The selection list also shows contents in Draft state, but you cannot select them. Finish and publish the content first. You can also create a new content from inside the node (see Step 1).
- Your audience contacts have email addresses and email permission. The flow skips contacts without permission at send time unless your delivery settings say otherwise. For sending without a permission check, see Channel Based Skip Permission.
Add the node to the flow
- On the flow canvas, drag the Email node from the Actions panel onto the canvas. The flow names the node Email Send and attaches a Wait node after it, so you can chain follow-up steps.
- Connect the node after the Audience node (or after any decision/wait node in your flow).
- Double-click the node to configure it. Configuration has two steps: Content and Settings.
The Node Counter on the canvas shows how many nodes the flow uses out of 100. Each Email node adds one to the count. The Wait node attached to it does not change the count.
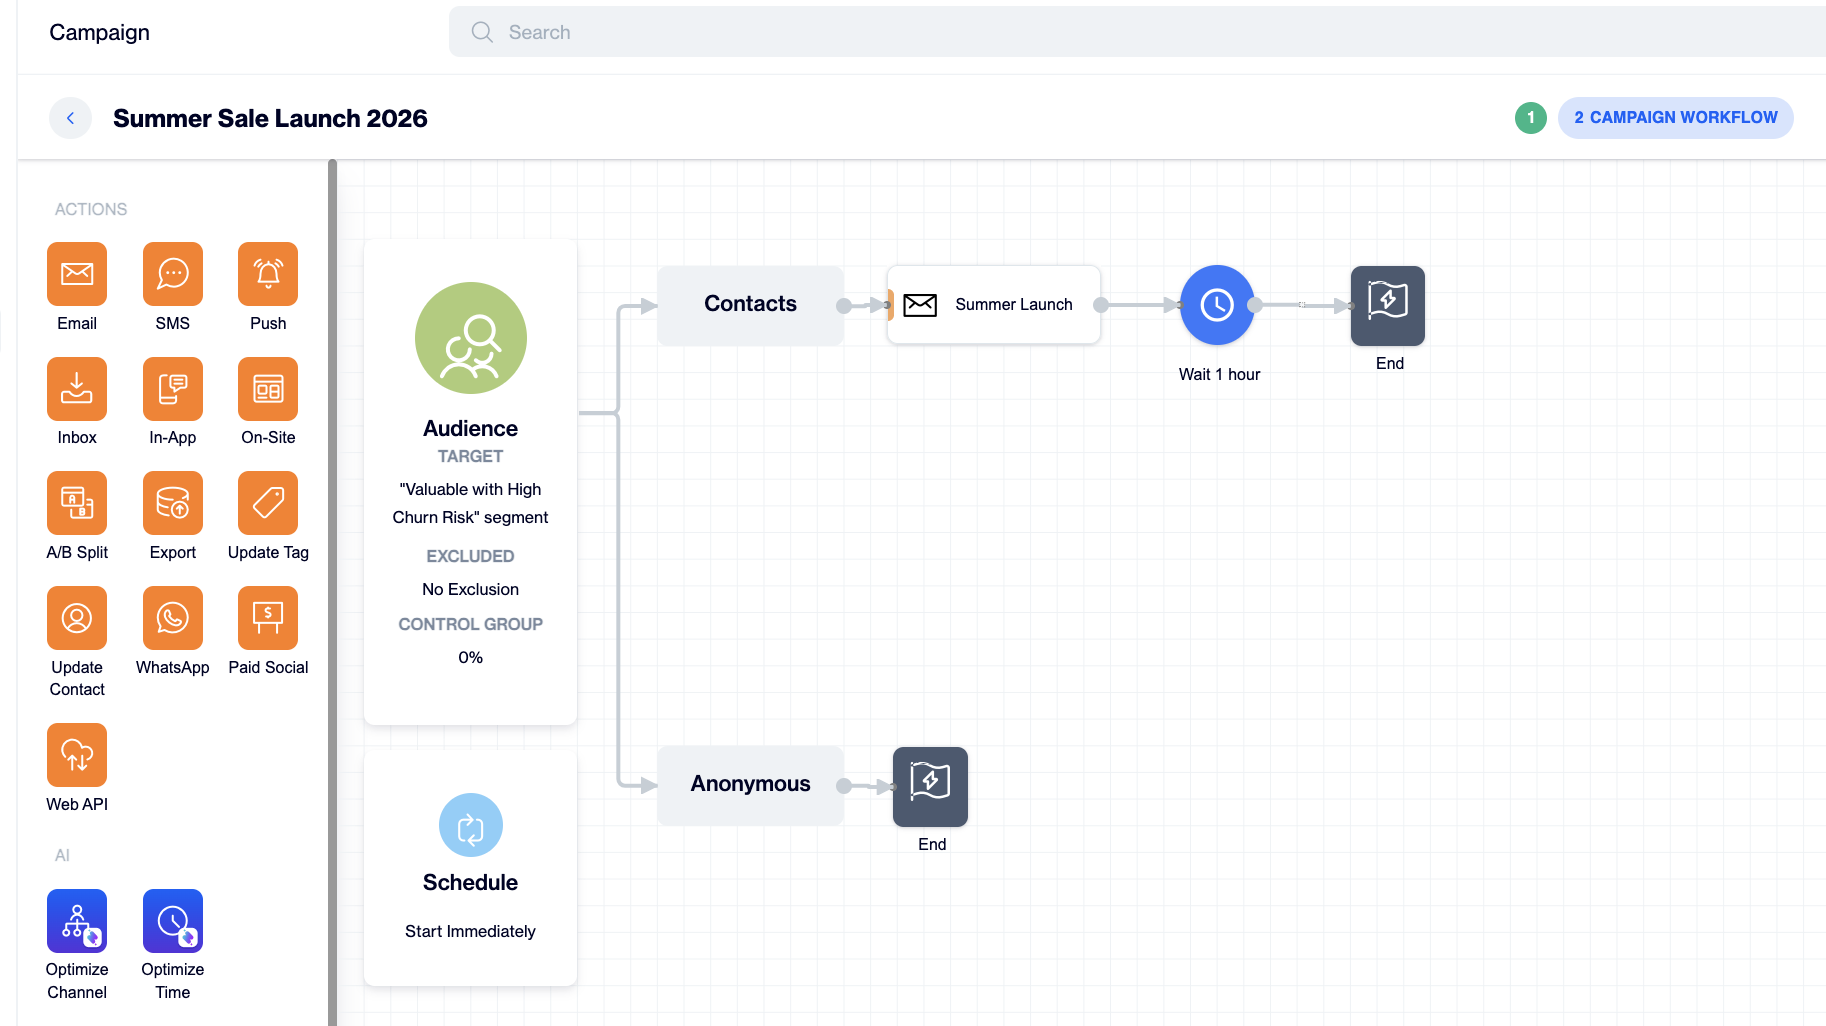
Email - Flow Campaign
Step 1: Select the content
| Element | Description |
|---|---|
| Node Name (optional) | Give the node a descriptive name (for example Welcome Email 1). Named nodes are much easier to tell apart in multi-message flows. After you save, the canvas shows this name on the node. If you leave the field empty, the node shows the name of the selected content. |
| Search | Find content by name across all folders. |
| Filter | Narrow the list by creation date or last update date. In the Filter window, pick a Date Range (for example Today, Last 7 Days, This Month, or dates from the calendar), choose by update date or by creation date, then select Apply. Clear Filter removes the filter. |
| Content list | The list uses the same folders as Content → Email. You cannot select contents marked Draft. Only published contents are available. |
| New content (+ icon) | Create a new email content without leaving the flow. Choose a type in the Select a Type window: Rich Text Editor, Code Editor, Email Builder, or Upload File. |
| Edit (pencil icon) | Open the selected content to make changes. The Email Content panel opens with the sender profile, From Name, Reply To, Subject, and Pre-header of the content, and an Edit Content link. |
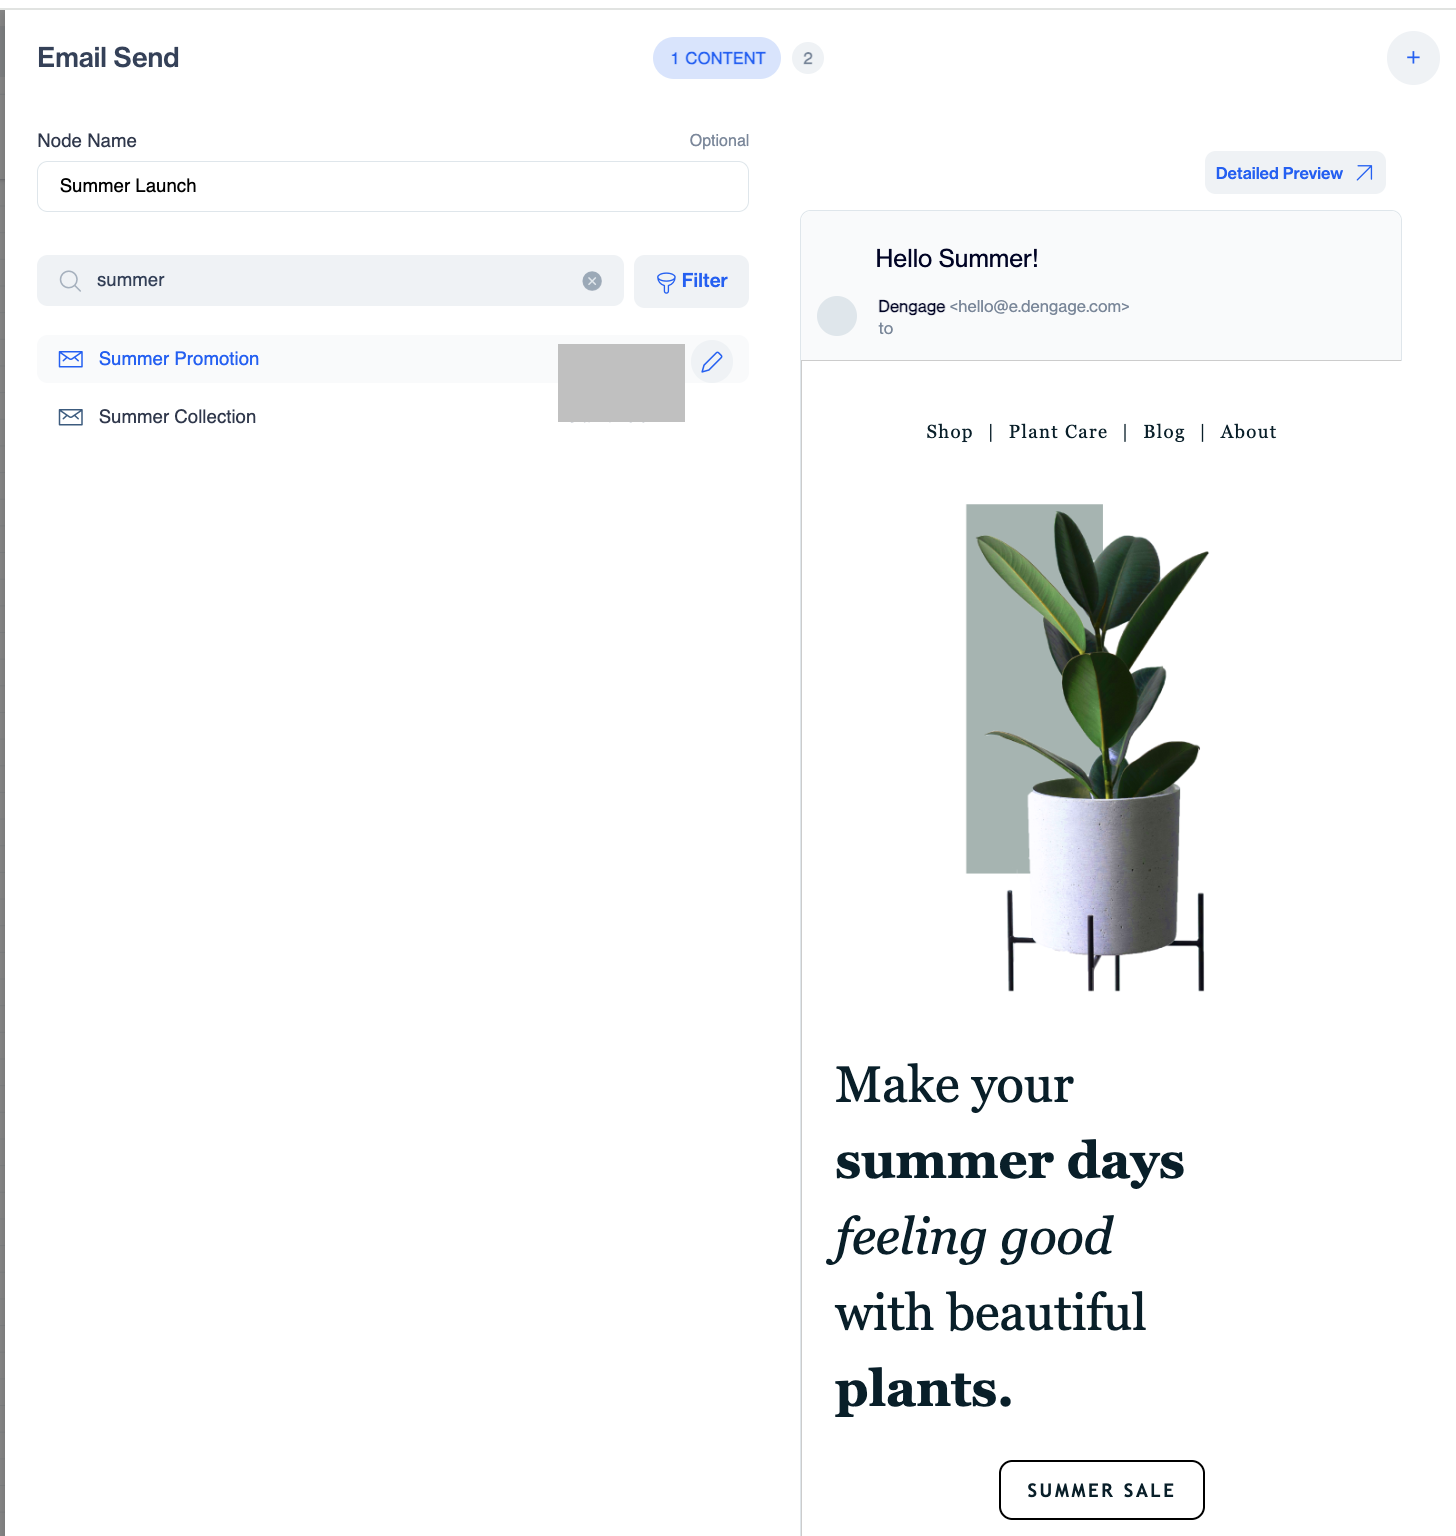
Email Send Node - Content
When you select a content, the preview panel shows the subject line, sender address, and a preview of the message. Until you select one, the panel shows Please select Content. From here you can also:
- Detailed Preview: see how the email renders across web clients, mobile devices, and desktop email applications before sending. The preview opens in a new browser tab. See Inbox Preview.
- Spam Score: check the content's spam score and fix issues that could hurt deliverability. Expand the score to see the points and description of each check. See Spam Checker.
Select Next to continue to the settings step. You can open the settings step without choosing a content, but Test and Save show the message Please select Content until you select one.
Step 2: Configure the settings
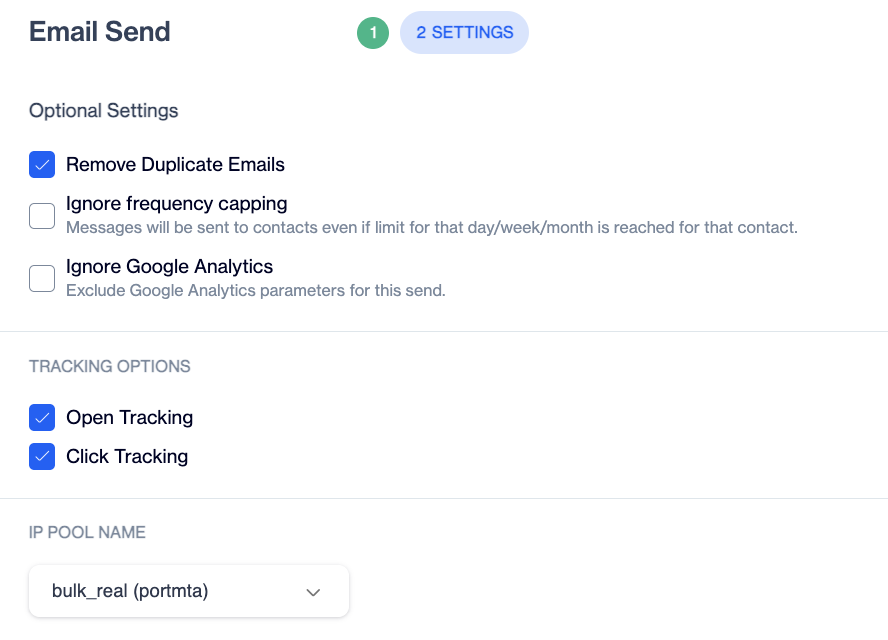
Settings
| Setting | Default | Description |
|---|---|---|
| Remove Duplicate Emails | On | If the same email address appears more than once in the audience, it receives the message only once. |
| Ignore frequency capping | Off | Sends the message even if the contact has reached the daily/weekly/monthly message limit defined in frequency capping. Use only for messages that must always be delivered. See Frequency Capping. |
| Ignore Google Analytics | Off | Excludes Google Analytics (UTM) parameters from the links in this send. |
| Open Tracking | On | Measures who opened the email. When you turn it off, the node shows this warning: "Disabling Open Tracking prevents the generation of open reports for this send." |
| Click Tracking | On | Measures which links recipients clicked. Turning this off disables click-based metrics and click-based flow conditions for this send. When you turn it off, the node shows this warning: "Disabling Click Tracking prevents the generation of click reports for this send." |
| IP Pool Name | Account default | The IP pool the email is sent from. |
| Contact Extension | Send to default | Controls which of a contact's email addresses receives the message. See Contact Extension in the next section. |
Contact Extension
A contact can store more than one email address using contact extension attributes (for example a work and a personal address). To set up extension attributes, see Contact Extension Types.
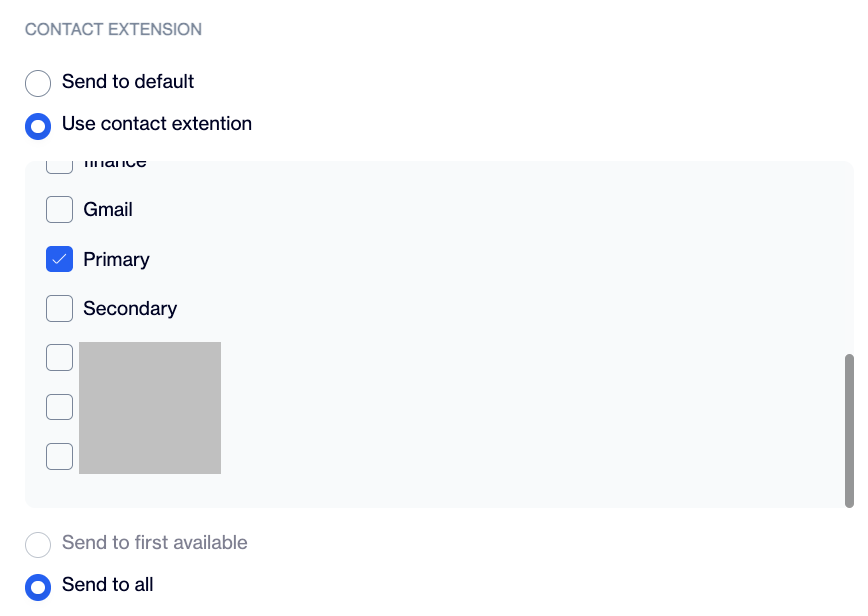
Contact Extension
- Send to default: the message goes to the contact's primary email address. This is the right choice for most campaigns.
- Use contact extension: select one or more extension attributes from the list, then choose:
- Send to first available: the message goes to the first selected attribute that has a value for that contact.
- Send to all: the message goes to every selected address the contact has.
Test and save
- Select Test to send the email to yourself or a test list. Always test before publishing: the test uses the selected content and settings exactly as configured.
- The Test Email Template window shows an Example Email: your content rendered for a sample recipient. Select Show Another to see it for a different recipient.
- Select Send Test Email, then choose the test audience: Predefined Audience to pick one of your Test Lists, or Type-in Addresses, where your own email address is already filled in.
- Select Send Test Email again to send the test.
- Select Save to close the node. The node on the canvas now shows the node name, or the content name if you left Node Name empty. Back returns to the content step. Cancel closes the node.
- Complete the rest of the flow (every path must end with an End node), then publish as described in One-Time or Recurring Flow Campaigns.
To change the node later, double-click it again. It opens on the content step with your node name and content still selected.
Example: a promotion with a follow-up
A marketer wants to send a sale announcement and re-send it to contacts who didn't open it:
- In a one-time campaign, drag the Email node after the Audience node and select the Summer Sale content. Name the node Sale Announcement.
- Keep the defaults: duplicate removal on, open and click tracking on.
- Set the Wait node attached after the Email node to 2 days, then add an Engagement Split checking opened Sale Announcement.
- On the "No" branch, add a second Email node named Sale Reminder with a different subject line. Close both branches with End nodes.
- Send a test of both emails, save, and publish.
Because open tracking was left on, the Engagement Split can route non-openers to the reminder. If it had been turned off, the split would have no open data to work with.
Troubleshooting
| Symptom | Likely cause |
|---|---|
| A content is visible but cannot be selected | It is still in Draft. Open it in Content → Email and publish it. |
| Test or Save shows Please select Content | No content is selected in the content step. Select Back and choose a published content. |
| Save shows Please select a contact extension | Use contact extension is selected and no attribute is checked. Check at least one attribute, or switch to Send to default. |
| Opens or clicks are not reported | Open/Click Tracking was turned off on the node, or the report has not refreshed yet. |
| A contact received the same email twice | The contact appears with two different email addresses, or Remove Duplicate Emails was turned off. |
Frequently asked questions
Can I create the email content without leaving the flow?
Yes. Select the + icon in the node and choose Rich Text Editor, Code Editor, Email Builder, or Upload File.
Why can't I select a content in the list?
The content is marked Draft. Publish it in Content → Email first.
What does the node show on the canvas after I save?
The Node Name you entered. If you left it empty, the node shows the name of the selected content.
Can I use the same content in more than one Email node?
Yes. Select Duplicate on a configured node. The copy keeps the same content.
Does the Email node count toward the Node Counter?
Yes, each Email node adds one. The Wait node that the flow attaches to it does not change the count.
Who receives the test email?
The test list you pick under Predefined Audience, or the addresses under Type-in Addresses. Your own address is filled in by default.
Updated 4 days ago