
Whatsapp Business API
Dengage now supports direct integration with the WhatsApp Business API. Users can seamlessly set up and manage their WhatsApp messaging without relying on third-party providers.
Once the integration is configured via Settings > Integrations > 3rd Party Integrations > WhatsApp, users can select New WSP and fill in the required configuration details in the modal that opens. This includes adding sender information and connecting their WhatsApp Business Account.
After completing the integration, a new WhatsApp option will appear under Content > Messaging in the main menu. Users can then create, manage, and send WhatsApp messages directly from Dengage.
Prerequisite
Before you can start using the WhatsApp content feature, please make sure the following conditions are met:
- Feature Activation:
Whatsapp requires a feature flag to be turned on. If you're not sure whether it's active, please contact your support team. - Master Contact Data: The whatsapp_number column in the master_contact table must be correctly filled in with the recipients’ WhatsApp numbers. WhatsApp messaging relies on this field to deliver messages to the intended contacts.
To run WhatsApp campaigns, make sure your WhatsApp Business API integration is complete. If you haven't set it up yet, click here to complete the integration.
Creating Marketing Campaign Flow with WhatsApp Send Node
To send WhatsApp messages through a campaign flow, follow the steps below to set up your campaign using the WhatsApp Send Node.
Start a New Campaign Flow
Go to the left-hand menu and navigate to Campaign > Flows. Click the +New button to create a new flow. You will be prompted to choose the campaign type:
- One Time – Send the campaign once at a specific time.
- Recurring – Set the campaign to repeat automatically.
Campaign Info
Fill in the basic campaign details:
- Flow Name: Enter a name for your campaign flow.
- Folder (optional): Organize your flow under a selected folder.
- Tags (optional): Add tags to help with reporting and tracking.
Schedule Options
Choose when your One-Time campaign should run:
- Now – Launch the campaign immediately.
- Scheduled – Set a specific time and date using the calendar.
When setting up a recurring WhatsApp campaign, the Schedule Options section allows you to define how and when the campaign should be triggered and repeated.
- Trigger Periodically: Enable this to schedule the campaign to run on a repeating basis.
- Start Date: Choose when the recurring campaign should begin. You can set it to:
- Now: Starts immediately.
- Scheduled: Choose a specific date and time from the calendar.
- End Date: Define when the recurring campaign should stop.
- Never: The campaign continues indefinitely until manually stopped.
- Scheduled: Set a specific end date.
- Recurring Periods: Click Add to define how often the campaign should repeat (e.g., daily, weekly, monthly).
- Trigger Externally: Use this option if the campaign should be triggered by a fire campaign action.
- Time Zone-Based Delivery: Enable this if you want the campaign to be delivered based on each user’s local time zone, ensuring messages are sent at appropriate times for every contact.
Click Next to proceed to the flow canvas.
Define the Audience
On the Flow Canvas, you’ll start configuring your campaign by defining the audience. Double-click the Audience node to open its settings. You’ll see several options to define who should receive the WhatsApp message:
- Segment
- Predefined Segment
- Table
- Remote Segment
- Tag
After selecting your target audience, use the Calculate button to estimate how many contacts have valid WhatsApp numbers and are eligible to receive the message.
Within the same Audience configuration panel, you’ll find two additional tools: Exclude and Control Group.
The Exclude section lets you filter out specific groups to make sure certain users don’t receive the campaign. You can:
- Exclude a specific Segment
- Exclude a Remote Segment from an external source
- Exclude contacts from a previous Campaign
- Exclude a predefined Send List
The Control Group option is useful if you want to measure the impact of your campaign by comparing results. You can randomly exclude a percentage of your audience (e.g., 5%) so that they don’t receive the WhatsApp message. This group acts as a benchmark for performance comparison.
Note: Control Group is available only for One Time campaigns.
Once you’ve defined your audience and applied exclusions or control group rules as needed, click Save. This completes your audience setup and you’re ready to continue building your WhatsApp campaign flow using WhatsApp Send node.
Whatsapp Send Node - Marketing Template
To send a WhatsApp message as part of your campaign, you’ll use the WhatsApp Send node in your flow.
First, open your campaign in the Flow Canvas. On the left-hand panel, under the Actions section, find the WhatsApp Send node.
Drag and drop it onto your flow. Then, double-click on the node to open the configuration panel.
Account & Template
In this section, you’ll choose the necessary setup for sending your message:
- Provider: Select WhatsApp Business API as your provider.
- Account: Choose the WhatsApp account you want to use from the dropdown menu.
Once you select your account, the system will automatically display templates that meet the following conditions:
- The template is active
- The category is Marketing
- All requested languages are approved
Only templates that meet these conditions will appear in the list.
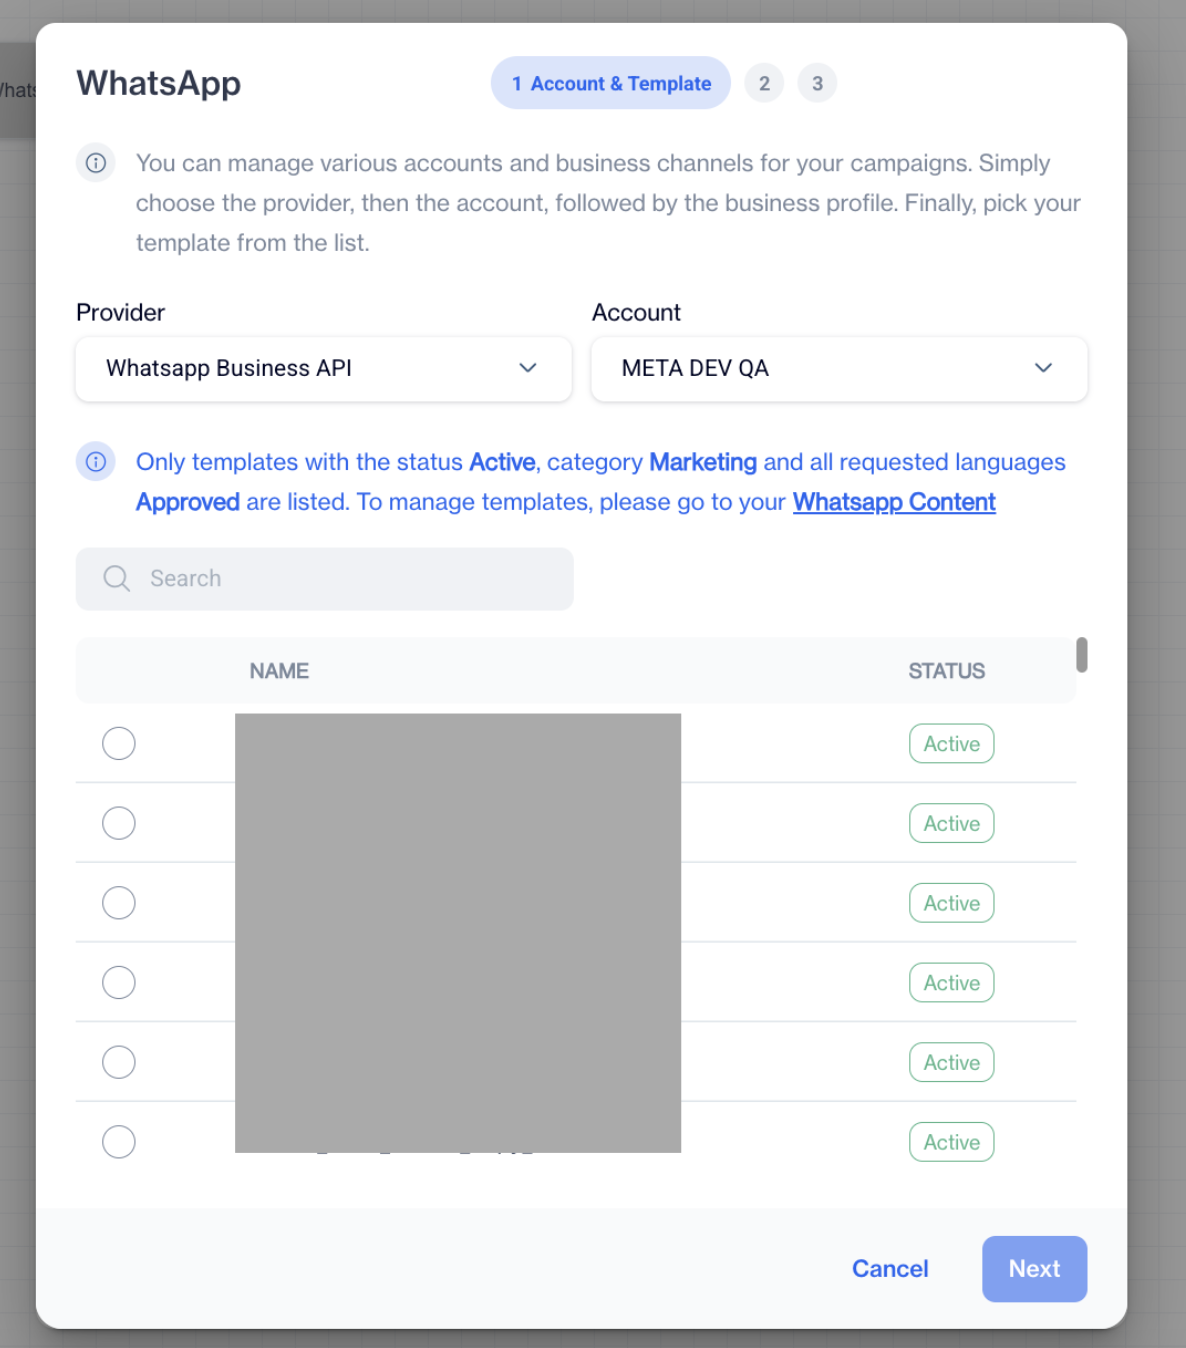
Templates
After selecting the appropriate template, click Next to proceed with the rest of the configuration.
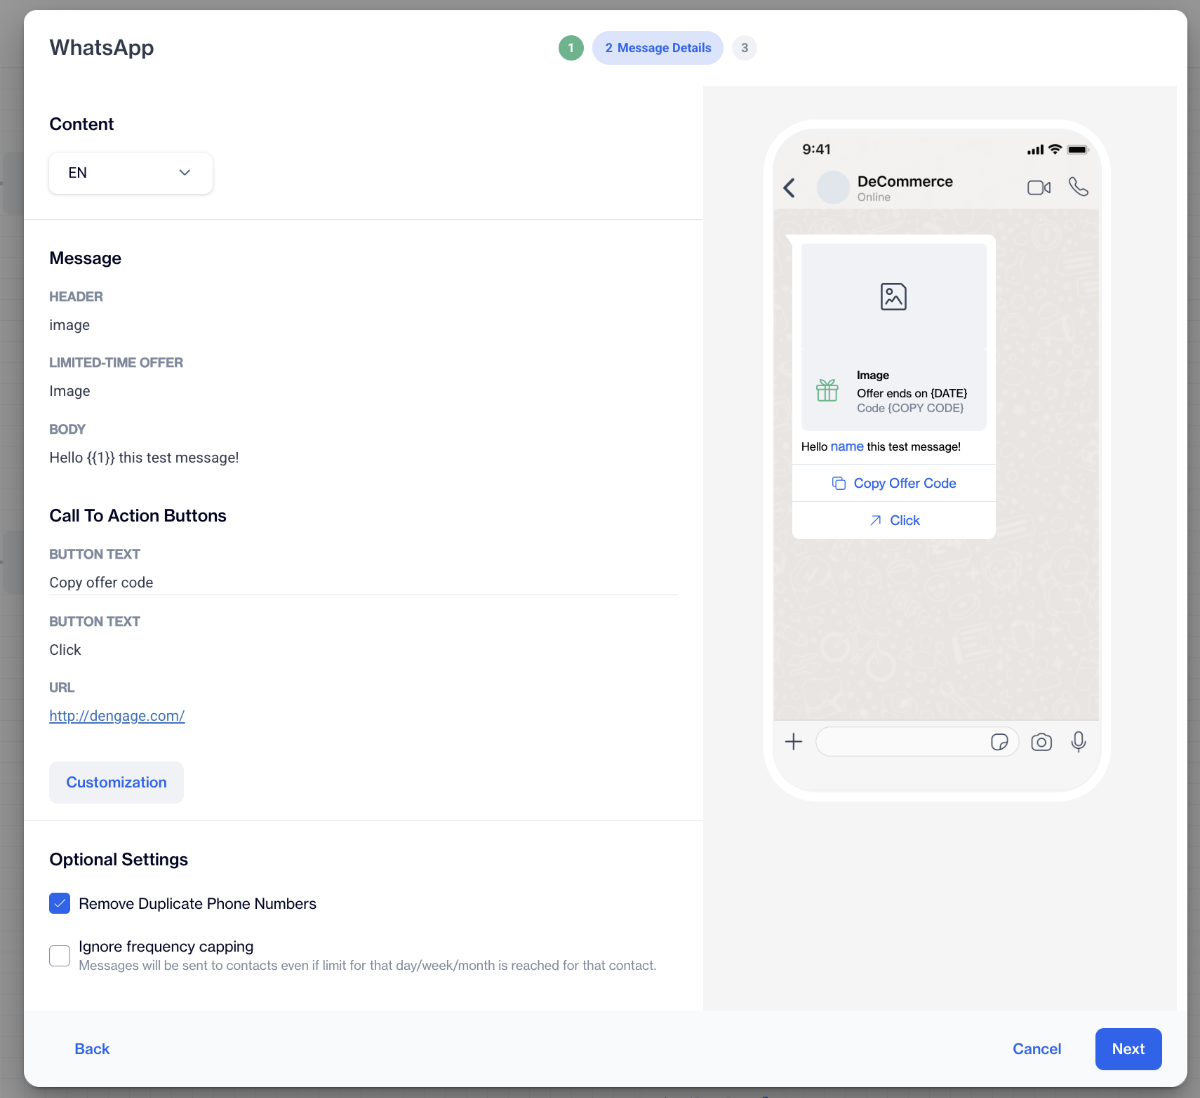
Message Details
Once you've selected your WhatsApp template, the next step is to customize the content. This is done in the Message Details screen, where you’ll personalize the message using data fields from your system.
Message Details
Content - Available Languages
If your selected template supports multiple languages, you’ll see a language dropdown at the top.
You can switch between the available language versions by selecting from this list. Each language must be configured separately, so make sure to check and complete all of them.
Set Customization
WhatsApp templates often include dynamic placeholders. These tokens are meant to be replaced with actual user data when the message is sent.To personalize the content click the Customization button.For each placeholder(variable) in your template, select the corresponding value.
Whatsapp Content Customization
If your template includes a media header (like an image, document, or video), you will also need to upload or select a file or type URL for that media. For each language, open the file selector and choose the correct file from your file directory.This step is required only if your template includes media.
Supported Media Formats and Limits
Below are the supported file types, formats, and size limitations for images, videos, and documents used in WhatsApp templates.
Supported image formats
Images must be 8-bit, RGB or RGBA.
| Image Type | Extension | MIME Type | Max Size |
|---|---|---|---|
| JPEG | .jpeg | image/jpeg | 5 MB |
| PNG | .png | image/png | 5 MB |
Supported Video Formats
Only H.264 video codec and AAC audio codec supported. Single audio stream or no audio stream only.
| Video Type | Extension | MIME Type | Max Size |
|---|---|---|---|
| 3GPP | .3gp | video/3gpp | 16 MB |
| MP4 Video | .mp4 | video/mp4 | 16 MB |
Supported document types
| Document Type | Extension | MIME Type | Max Size |
|---|---|---|---|
| Text | .txt | text/plain | 100 MB |
| Microsoft Excel | .xls | application/vnd.ms-excel | 100 MB |
| Microsoft Excel | .xlsx | application/vnd.openxmlformats-officedocument.spreadsheetml.sheet | 100 MB |
| Microsoft Word | .doc | application/msword | 100 MB |
| Microsoft Word | .docx | application/vnd.openxmlformats-officedocument.wordprocessingml.document | 100 MB |
| Microsoft PowerPoint | .ppt | application/vnd.ms-powerpoint | 100 MB |
| Microsoft PowerPoint | .pptx | application/vnd.openxmlformats-officedocument.presentationml.presentation | 100 MB |
| application/pdf | 100 MB |
Each language version of your template must be fully configured.
Optional Settings
At the bottom of the Message Details screen, you’ll find the Optional Settings section. These options allow you to fine-tune how your WhatsApp messages are delivered to your audience.
- Remove Duplicate Phone Numbers
When this option is enabled, the system will automatically detect and remove duplicate phone numbers from your selected audience list. This ensures that each contact receives your message only once, preventing multiple sends to the same number within the same campaign.
- Ignore Frequency Capping
Enabling this setting allows WhatsApp messages to be sent even if a contact has reached their daily, weekly, or monthly messaging limit. Normally, frequency capping prevents over-sending by limiting how often a user can receive messages. By choosing to ignore frequency caps, the system will bypass these restrictions and send the message regardless of past send activity.
Use this option with care, particularly in promotional campaigns, to avoid overwhelming users with excessive messages.
These optional controls are helpful when you need to ensure delivery for specific use cases, exceptions, or time-sensitive campaigns.
Review & Approval
After customizing your WhatsApp message, the final step before sending is to review everything in the Review & Approval screen. This step allows you to double-check your content, language versions, and dynamic field mappings to ensure everything is correct.

Review & Approval
Template and Language Overview
At the top of the screen, you’ll see:
- Template Name: Displays the name of the WhatsApp template you've selected for this campaign.
- Available Languages: A dropdown menu where you can switch between the languages you've configured. Select each language to review its content and settings.
Message Preview & Dynamic Field Mapping
Below the language selector, you’ll find the Message section.
- In the Dynamic Fields Mapping area, you'll see a summary of how each customization has correctly been mapped.
- On the right-hand side, you'll see a live preview of the message. This visual preview reflects how the WhatsApp message will appear to your users, based on the mappings and content you've defined.
Ready to Send
Once everything looks good, your WhatsApp marketing message is ready to be sent as part of your campaign flow.
You can still edit any configuration by going back to the previous steps before you publish the campaign.
If you’re not ready to publish yet, don’t forget to save your flow as a draft to keep your progress.
Sending Utility and Authentication Messages
For details on how to send WhatsApp utility and authentication messages, please refer to this section.
Whatsapp Marketing Report
Tracking the performance of your WhatsApp marketing campaigns is essential for understanding how your audience is engaging with your messages.
This section will guide you through how to monitor, analyze, and interpret key metrics to measure the success of your WhatsApp sends—helping you make informed decisions for future campaigns.
Note:
If the WhatsApp desktop application is installed directly on a PC, it has been observed that in some cases, the system may register two deliveries for a single recipient. This behavior should be taken into consideration when interpreting delivery metrics.
Send Report
The Individual Send Report allows you to track and analyze the performance of your WhatsApp marketing messages. It helps you understand how effectively your message reached your audience and how they interacted with it, using key metrics like delivery rate and open rate.
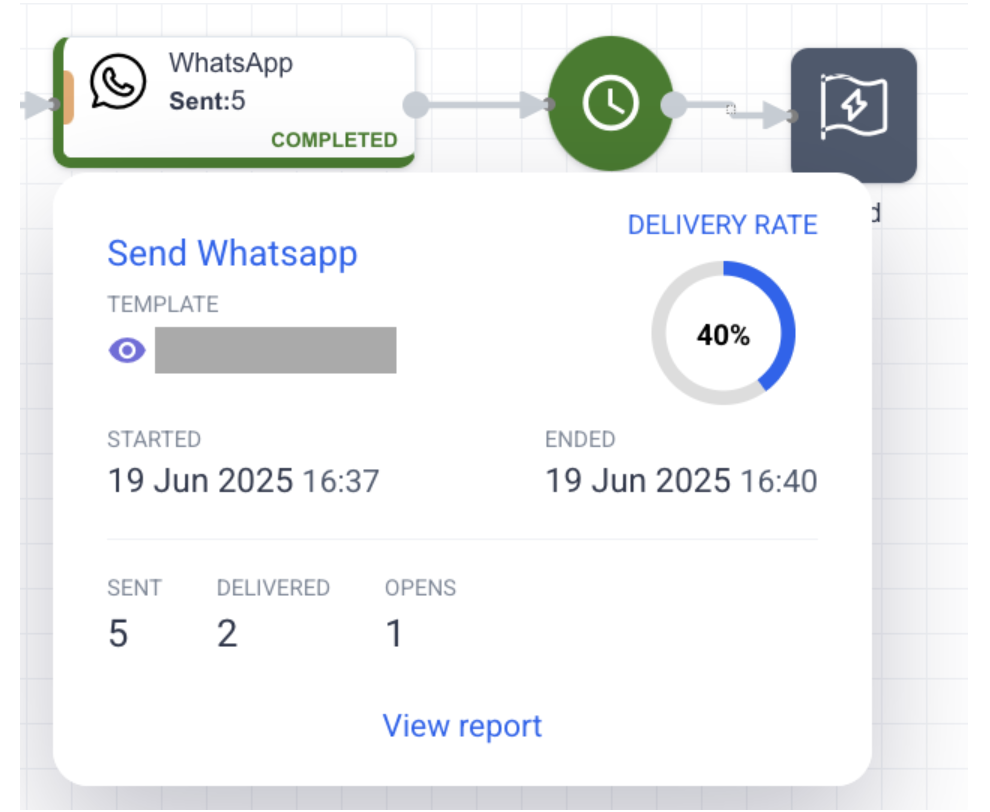
To access the report, navigate to the left-hand menu and go to Campaign > Flow. From the campaign list, select the specific campaign you want to monitor. Once inside the campaign flow, you'll see the WhatsApp send nodes placed within your flow structure.
When you hover your mouse over a WhatsApp send node, a quick snapshot will appear. This snapshot displays key figures including the number of messages sent, delivered, and opened, as well as the delivery rate. It gives you an instant overview of how that particular send is performing.
After clicking View Report from the campaign flow snapshot, you’ll be directed to a detailed Send Report screen. This page provides a complete breakdown of your WhatsApp campaign’s performance using key metrics and visual charts.
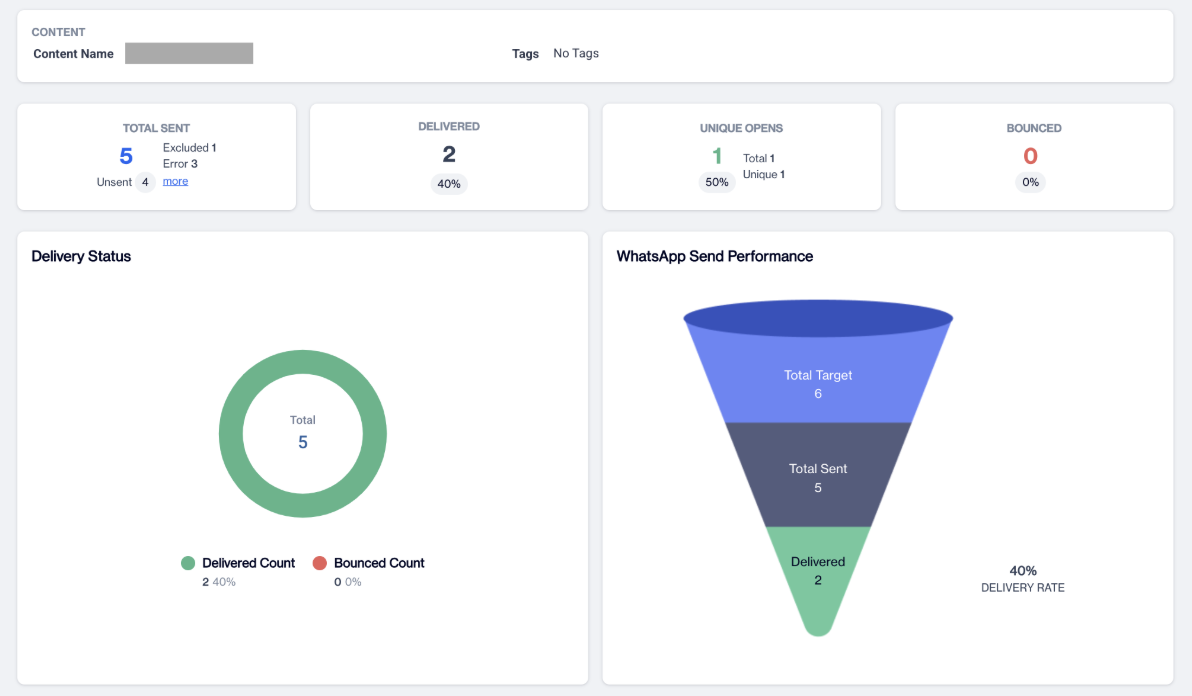
At the top, you’ll see the Content section, showing the Content Name (the WhatsApp template used in the campaign) and any associated Tags.
Below this, the Total Sent section displays how many messages were processed.
Next, the Delivered section shows how many messages were successfully delivered, along with the overall Delivery Rate as a percentage.
The Unique Opens section includes data on how many recipients opened your message. It shows both total and unique opens, helping you understand reach and engagement.
The Bounced section displays any failed delivery attempts and the corresponding Bounce Rate.
Further down the page, you’ll find two visual charts:
- Delivery Status: A graphical representation of your send performance. It includes visual bars or pie segments showing:
- Total messages
- Delivered count and percentage
- Bounced count and percentage
- WhatsApp Send Performance: This chart summarizes your overall campaign metrics, including:
- Total target
- Total sent
- Number of messages delivered
- Delivery rate (in percentage)
These visual summaries offer a quick and easy way to assess the success of your campaign at a glance.
WhatsApp Campaign Report
The Campaign Report section allows you to analyze the overall performance of the WhatsApp channel in comparison with other available channels. This report helps you evaluate the effectiveness of your WhatsApp sends by reviewing Sent and Impression metrics.
To access the Whatsapp Campaign Report, go to the left-hand menu and navigate to Analytics > Flow > Campaign Report. Once on the page, select a date interval to analyze performance across your selected time frame.
In this view, you'll see the Overall Performance section, which summarizes total activity. When you hover over the statistics bar, you can view the total numbers for Sent and Impressions.
Impressions for WhatsApp are calculated based on the number of messages that were opened.
Below the overall metrics, the Sent & Impressions chart offers a time-based breakdown of your WhatsApp performance. You can filter the chart by channel, selecting WhatsApp specifically, to track daily, weekly, or monthly changes.
This section helps you identify trends and evaluate message engagement over time.
Whatsapp Channel Report
The Channel Report provides a summary of all sends made through different messaging channels, including WhatsApp, within a selected time frame. It allows you to evaluate the overall performance of the WhatsApp channel using key metrics.
To access the whatsapp channel report, navigate to Analytics > Flow > Channel Report from the left-hand menu. On this page, click the Filter button to narrow down the report based on specific criteria.
To view data specifically for WhatsApp, set the Channel filter to WhatsApp. You can also customize the Date Range to analyze performance for a specific time period. By default, the report shows data for the last 30 days. After making your selections, click Apply to generate the filtered report.
Once applied, the following metrics will be displayed at the top of the page:
- Total Sent Count: Number of WhatsApp messages sent during the selected period.
- Total Open Count: Number of messages opened by recipients.
- Total Bounce Count: Number of messages that failed to deliver.
Below these summary metrics, you’ll see a detailed list of individual WhatsApp campaigns. Each row in the table includes the campaign name along with its specific performance metrics such as delivered, conversion, and revenue. This helps you compare and analyze the effectiveness of each WhatsApp campaign in one centralized view.
Updated 3 months ago