
Live Push / Live Activities
Live Push is an advanced type of push notification that stays visible on the user’s lock screen or Dynamic Island and can be updated in real time. Unlike standard push notifications, which are sent once and then disappear, Live Push allows you to continuously update the same notification with new information.
This feature is especially valuable for time-sensitive and continuously changing scenarios, such as live match scores, delivery tracking, or real-time status updates. For example, a user can subscribe to a football match and see the score update instantly on their lock screen without opening the app.
Live Push in Dengage is designed to work via REST APIs rather than the platform UI. After integrating the required SDK into your mobile application, Dengage starts collecting user tokens. You can then trigger and manage Live Push notifications by sending requests to Dengage’s REST endpoints.
With this setup, Dengage handles delivering updates to the right audience at the right time, while you control the content of the Live Activity through your own templates.
The Live Push flow is built around three main actions:
- Start: Sends the initial Live Activity to the selected audience
- Update: Updates the existing Live Activity in real time (can be triggered multiple times)
- End: Removes the Live Activity from the user’s screen
Prerequisites
- Live activity feature flag should be enabled.
- iOS SDK version should be 5.96 or higher.
- Android SDK version should be 6.92 or higher.
How It Works
SDK Integration
To use Live Push, you must first integrate the Dengage SDK into your iOS or Android application. This integration enables Dengage to manage device tokens required for sending Live Push notifications.
Token registration and update processes are handled by the SDK.
Template (Activity) Design
The design and content of a Live Activity are created and managed entirely by you within your mobile application. This means the layout, visuals, and structure must already be implemented on your app side before using Live Push.
Each design is defined as an activity type, which is simply the name you assign to that specific Live Activity template. Dengage uses this activity type to trigger and update the correct template, but it does not create or manage the content itself.
For example, you can create different activity types for use cases such as order tracking, flight status, or live match updates.
When sending a Live Push, Dengage only sends dynamic parameters. Your application receives this data and displays it using the templates you have already defined.
If you plan to send the same request to both iOS and Android, the activity type should be defined with the same name on both platforms.
Start Live Activity
You can start a Live Push by sending a Start request to Dengage via REST API. This request triggers the initial Live Activity for the selected audience.
Audience Selection
You can define your target audience in three different ways:
- Contact Key list
- Device ID list
- Segment Public ID
You only need to provide one of these to initiate the Live Push.
Additionally, you can refine your audience with:
- Application filtering: If you have multiple apps, you can target users of a specific app by providing the app ID. This is a required field. Select the mobile application where you want to send the Live push notification.
- Device preference: If a user has multiple devices, you can choose whether to send the notification to only the most recent device or all devices
Activity ID Management
Each Live Push is identified by a unique activity ID.
- If you do not provide one,system generates it automatically
- The same activity ID cannot be reused with a different activity type
- While a Live Push is still active, the same activity ID cannot be used again for another start request.If you want to start multiple Live Push notifications at the same time, each one must have its own unique activity ID.
Update Live Activity
You can update an active Live Push by sending an Update request with the activity ID.This allows you to send new content to all recipients in real time, as frequently as needed.
Live push updates can continue to appear even when the device screen is locked.
End Live Activity
You can end the Live Activity by sending an End request.
The End request:
- Removes the Live Activity from the user's screen.
- Stops future updates.
- Can optionally include a final status update before closing.
The expiration behavior depends on the platform.
iOS
- After the update token is generated, it remains valid for up to 13 hours. Once the token expires, the Live Activity is automatically closed.
- If you send an End request without an expiration time, the Live Activity is removed immediately.
Android
- If you send an End request without an expiration time, the Live Activity is removed immediately.
- If you send an End request with an expiration time, the Live Activity is automatically removed at the specified time, up to a maximum of 13 hours after the Start request.
- If you do not send an End request, the Live Activity does not expire automatically and remains visible until the user dismisses it manually.
Reporting
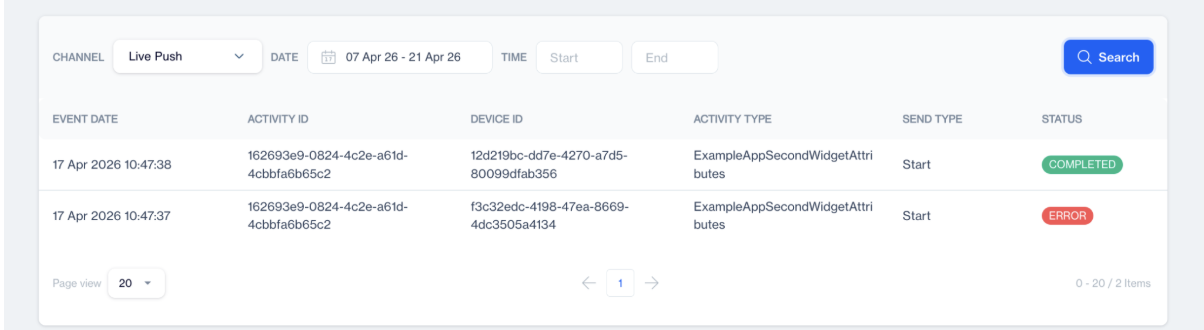
After your Live Push sends are completed, you can track delivery results from the Send Logs screen under Analytics > Delivery & Logs > Live Activity > Reports.
Each device is listed individually, and the delivery status is shown for every send. The status can be:
- Completed: The notification was successfully delivered
- Error: The delivery failed
The delivery failed due to an issue during the sending process, such as a validation problem or another interruption. Error does not indicate a single fixed reason, and multiple types of failures can occur during delivery. The detailed error reasons can be reviewed in the delivery reports.
This allows you to monitor the success or failure of each Live Push delivery at the device level.
Use Case: Flight Tracking Example
A passenger has a flight from Istanbul to London.
Normally, they would receive multiple notifications:
- Flight scheduled
- Gate changed
- Boarding started
- Flight delayed
- Flight landed
With Live Push, they only get one notification, and it updates continuously like a live screen.
Now let’s see how to build it step by step.
Step 1: Connect Your App (One-Time Setup)
Before anything works, your mobile app must be connected to Dengage using the SDK.
Think of this as turning on communication between your app and the system.
This step is required because the SDK:
- Recognizes the user’s device
- Allows notifications to be delivered
- Enables real-time updates
Without this step, Live Push cannot work.
Step 2: Create the Template in Your App
Next, you decide how the Live Push will look. You create a design in your app and give it a name. This name is called an Activity Type.
Important:
- This is NOT created in Dengage
- It is built inside your mobile app
For flight tracking, for example:
- flight_status
This template can show:
- Flight number
- Status (Scheduled, Boarding, In Air)
- Gate
- Time
Think of Activity Type as a pre-built screen in your app.
Step 3: Audience Selection
Audience selection defines who will receive the Live Push when it starts.
In Dengage, you can choose only one option:
- Contact Key List: Send to all passengers of a specific flight
- Device ID List: Send to a specific device (for example only iPhone or only one device of the user)
- Segment Public ID: Send to a group of users (for example all users with flights today)
You only need one option to start a Live Push.
You can also optionally refine targeting using:
- App ID: if you have multiple apps
- Device preference: choose latest device or all devices
In short, audience selection defines which passengers and which devices will receive the live flight updates.
Step 4: Start the Live Push (Show It to the User)
Now the flight journey begins.
When your system triggers the event, it sends a Start request.
At this stage, you define:
1. Audience
Who should receive the Live Push (based on Step 3).
2. Activity ID (Unique Identifier)
Each Live Push has a unique ID that keeps the entire flow connected.
Example:
FLIGHT_1711
Rules:
- If not provided, it is generated automatically
- The same ID must be used for updates and ending
What the user sees
A single live notification appears:
- Flight TK1983
- Status: Scheduled
- Departure time
This notification stays on the screen.
Step 5: Update the Live Push (Real-Time Changes)
This is the most important part.
As the flight changes in real life, you update the same notification.
Examples:
- Gate changes → Gate B12
- Boarding starts → Boarding
- Delay → 20 minutes delayed
- Takeoff → In Air
What you do:
- Send an Update request
- Use the same Activity ID
- Send new information
What the user sees:
- The SAME notification updates instantly
- No new notifications are created
- Everything changes in real time
So instead of multiple alerts, the user sees one live evolving status.
Step 6: End the Live Push (Finish the Journey)
When the flight is completed:
You send an End request.
What happens:
- The notification disappears
- No more updates are allowed
- The journey is finished
Step 7: Monitor Results (Reporting)
After sending Live Push, you can track performance:
Go to: Analytics > Delivery & Logs > Live Activity > Reports
Live Push Report
You can see:
- Who received the Live Push
- Delivery success or failure
- Status per device
Statuses:
- Delivered→ successfully delivered
- Error → failed delivery
Step 8: Full Flow
Here is the complete process in simple form:
- Connect your app (SDK setup)
- Create a screen/template in your app (Activity Type)
- Flight starts > Live Push appears
- Flight changes > Live Push updates
- Flight ends > Live Push disappears
Use Cases
E-Commerce
When a user places an order, the Live Activity starts automatically without requiring any additional action. The activity displays real-time order progress such as preparing, on the way, and delivered. Each user sees only their own order. This is the most common and recommended trigger model.
Finance / Banking
When a payment or transfer is initiated, a Live Activity appears and remains active until the process is completed. It shows status updates such as processing and completed, and may include remaining time information. The activity is fully personalized and designed with high security sensitivity.
Travel & Airlines
If a user has a booked flight, the Live Activity can activate automatically on the flight day. It may display gate number, boarding time, delay information, and real-time updates. Users can monitor their journey passively without repeatedly checking the app.
Sports Events
Users can follow a live match either by selecting a favorite team or by actively choosing to track a specific event. Once the match starts, the Live Activity displays live score, period details, and match time. Although thousands of users may follow the same match, each device maintains a separate activity instance.
Updated 14 days ago