
Note on Whatsapp API IntegrationBefore creating WhatsApp message templates, please ensure your WhatsApp Business API integration is complete. If it's not yet set up, click here to complete the integration.
WhatsApp Template (Content) Listing Page
The WhatsApp Content section allows you to manage all the WhatsApp messages you’ve created for your campaigns. This includes content intended for different purposes such as marketing, transactional (utility), or authentication. You can view important details, filter by specific criteria, and prepare your content for use in campaigns—all from one place.
How to Access
To access the WhatsApp Content section, navigate to the left-hand menu and go to Content > Messaging > WhatsApp. This will open the WhatsApp Content listing page where all your previously created content is displayed in a structured table.
Listing Page
The listing page displays the following columns and features:
- Name: The title of your WhatsApp message. This helps you easily identify each content item.
- Type: Indicates the category of your message: whether it is a Marketing, Utility (Transactional), or Authentication type.
- Status: Displays the current status of the content. This can be:
- **Approved:**the content has successfully passed Meta’s review and is ready to be used.
- Awaiting Approval:The content has been submitted and is currently under review by Meta.
- Rejected:
The content did not pass Meta’s approval process. You can edit your content or create a new one using the "+ New" button.
After saving templates, you may need to refresh the page to see the updated approval status.
- Languages; Lists the languages the message is available in. If you’ve created a multilanguage message template, the system selects the appropriate version based on the following logic: first, it checks the user’s language setting; if that is not available, it falls back to the account’s default language; and if neither is defined, it uses the first language listed in the template. This ensures the most suitable language is used when sending messages. The Languages section displays all the languages the message is available in—if you've created the same message in multiple languages, they will all be shown here.
Filters and Side Panel Options
On the left panel of the listing page, you will also see:
- Configuration Name; This shows the name of the WhatsApp Business API configuration associated with each content. It helps you track which account or setup was used to create and manage that content.
- Filter Options; At the top of the listing page, you can refine your view using filters:
- Languages: Use the dropdown menu to filter content by language.
- Category: Filter your content based on its purpose—Marketing, Utility, or Authentication.
These filtering and display options make it easier for you to find specific content, manage approval statuses, and keep your WhatsApp messaging organized and efficient. Let me know if you’d like a follow-up section on how to create or edit WhatsApp content.
Action Buttons
At the end of each WhatsApp content entry in the listing page, you will find three action buttons:
- Edit: Allows you to open and modify the existing content. This is useful for updating details or correcting information before sending or resubmitting for approval.
- Delete: Permanently removes the selected content from the listing.
Creating WhatsApp Content
To create a new WhatsApp template, navigate to the left-hand menu and go to Content > Messaging > WhatsApp. Then click the +New button located in the top-right corner of the page. This will open a modal where you can choose from three template categories, depending on the purpose of your message.
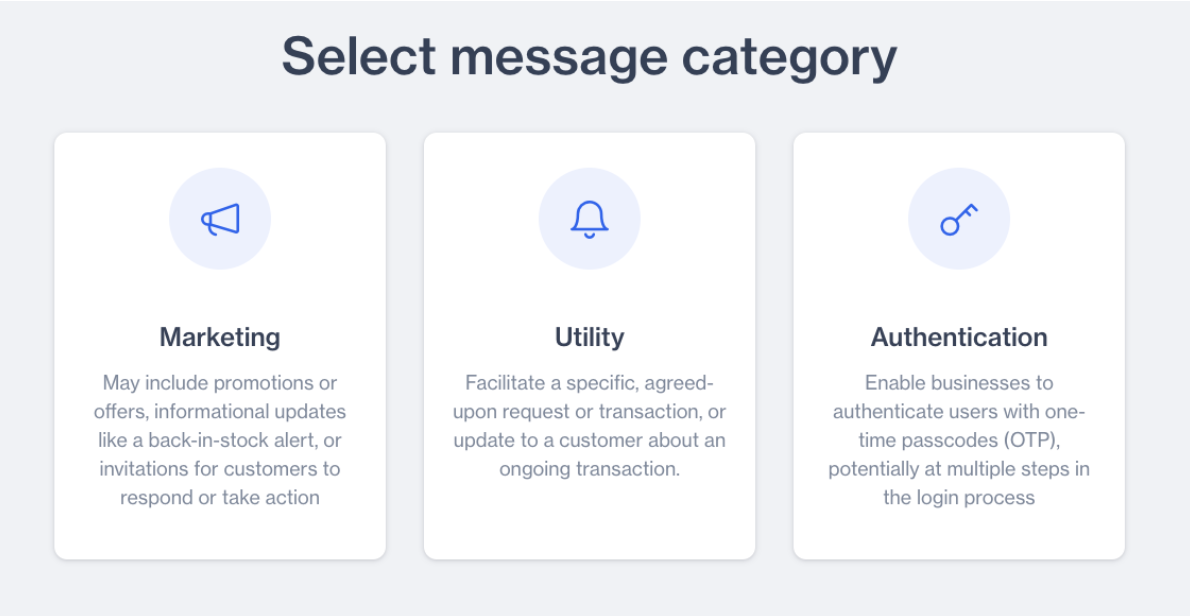
Message Category
Marketing: This type is suitable for messages that include promotions, special offers, back-in-stock alerts, or invitations for customers to take action or reply. These templates are designed to encourage engagement and often require user interaction.
Utility: Utility templates are used for transactional purposes. They are intended to fulfill a specific request or provide an update related to a transaction the customer has already agreed to—such as order confirmations, payment receipts, shipping notifications, or appointment reminders.
Authentication: This type is used to verify users with one-time passcodes (OTP). Authentication templates are helpful in login flows or identity verification steps, especially when users must be verified at multiple stages during access or registration processes.
For transactional message sending, both Utility and Authentication templates are used. However, if a Utility template contains promotional or marketing content, Meta may automatically reclassify it as a Marketing template during the review process. This categorization is done automatically by Meta. As a result, in the WhatsApp Content listing page, you will see the final template type as determined by Meta, regardless of the initial selection.
Select the most appropriate category for your message based on your use case. Once selected, you will proceed to the next step, where you’ll define the template name, language, and message content details.
Important Notes About WhatsApp Templates
- Approved templates can be edited, but with limits. You can make changes up to 10 times within 30 days, or only once within a 24-hour period.
- Rejected or paused templates can be edited as many times as needed, with no restrictions.
- If you delete a template, you will not be able to reuse the same name and language combination for 4 weeks. WhatsApp blocks the use of deleted name-language combinations during this time.
- When creating a new template, make sure the template name is clean and valid. Avoid using special characters or unnecessary formatting. This is known as sanitizing the name.
- You can only edit a template’s category and components (like header, body, footer, buttons). However, if a template has already been approved, you cannot change its category anymore. Also, you cannot change the name of a template once it is created.
Additional Information
- The default language of the content will automatically match the account's current default language during creation.
Invalid Format ErrorsWhile creating a WhatsApp template, you may encounter an “Invalid format error”. This happens when the template has formatting issues, such as incorrect variable usage or unsupported characters. Remember that product links cannot be used as the first or last parameter in the template. For full guidance on proper parameter formatting, refer to Meta’s WhatsApp Template Guidelines.
Creating Whatsapp Marketing Template
To create a new WhatsApp template, go to the left-hand menu and navigate to Content > Messaging > WhatsApp. On the WhatsApp Content page, click the +New button located in the top-right corner. A modal window will appear, prompting you to choose a template category. Select the Marketing category. This type is ideal for messages that include promotions, special offers, back-in-stock alerts, or invitations for customers to take action or reply. Marketing templates are designed to drive engagement and typically encourage some form of customer interaction.
After selecting the Marketing category from the template creation modal, a new screen will appear. This is where you will begin setting up the template details.
At the top of the screen, you will see the General section. Here, you need to enter the Template Name and select the WhatsApp Account you want to use. The selected account will be shown next to the name field, and you can change it if needed by clicking the "Change Account" button.
Once you enter the template name, click the Next button to proceed to the Content section. In this section, you will define the actual message content and settings. You’ll see fields such as Sender Name, Message, and additional message configuration options.
By default, the language is set to English. If you want to create the same message in other languages, click the “+” button next to the language. A modal window will open, allowing you to select one or more additional languages. After choosing the languages, click the Apply button to add them.
Below the language selection, you will find the Message Type dropdown menu. This menu allows you to select the format in which your marketing message will be sent. The available options are:
- Blank Content: Create a basic message template suitable for standardized messages tailored to your business needs.
- Carousel: Send a message with a single text and up to 10 carousel cards in a horizontally scrollable layout.
- Copy Coupon: A template with a copy code button that allows users to copy a promotion code directly to their clipboard when tapped.
- Limited Time Offer: Display an expiration date and countdown timer in your message, ideal for promoting time-sensitive offers and driving urgency.
You can choose the message type that best fits your campaign. Each message type has specific components and behavior, which will be detailed in the following sections.
Blank Content - Marketing
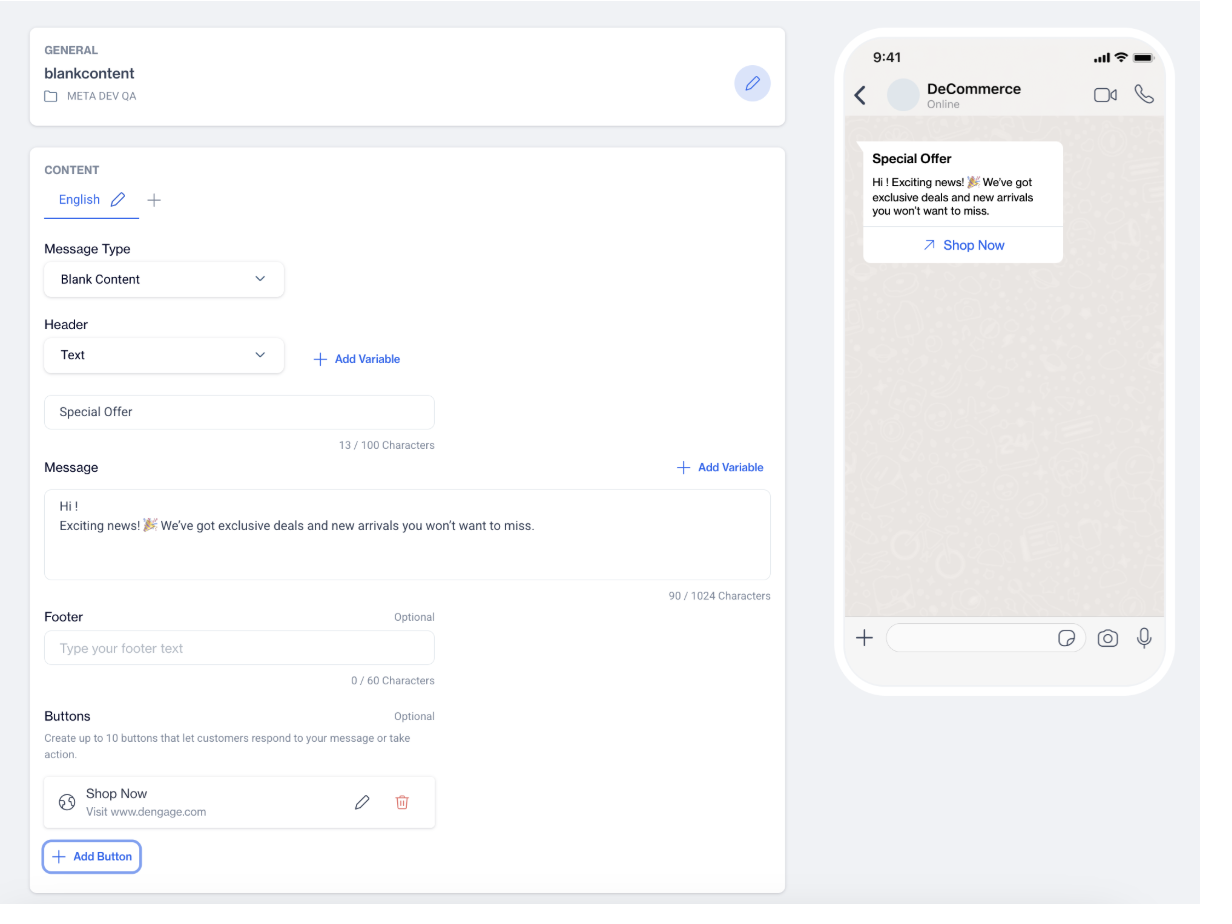
After selecting Blank Content as the message type, you will begin defining the structure and components of your WhatsApp template.
Blank Content - Marketing
Header Section
At the top, you’ll see the Header section with a dropdown menu offering several options: None, Text, Image, Document, and Video. If you select Text, an input field will appear where you can enter a short line to be used as the message header. This header is shown only in the preview and helps visualize how the message might appear.
Clicking Add Variable opens a small modal where you can define the name of a variable. Variables act like placeholders in the header. These variables allow you to personalize each header by dynamically replacing placeholders with real user data at the time of sending.
Message Body
Below the header, you’ll see the Message field. This is where you write the main body of your template. Next to it, there’s an Add Variable button.
Clicking Add Variable opens a small modal where you can define the name of a variable. Variables act like placeholders in the message content.
These variables allow you to personalize each message by dynamically replacing placeholders with real user data at the time of sending. Their primary purpose is to support customization while also being previewed in the right-hand preview panel during template creation. Mapping the actual values for these variables happens later on the sending screen.
Footer (Optional)
Just below the message body, there's an optional Footer field. You can use this to add additional context or disclaimers to the message, such as "Terms and conditions apply."
Buttons (Optional)
At the bottom, you can add Buttons to make the message interactive. Click the "Add Button" option to open a modal, where you can choose from three action types:
- Quick Reply
- Button Text: Enter the label (up to 25 characters) for a button that users can tap to respond quickly.
- Call Phone Number
- Button Text: Define the label for the call button.
- Phone Number: Enter the phone number in international format (e.g., +1234567890).
- Visit Website
- Button Text: Enter the label for the link button.
- URL Type: Select whether the URL is Static or Dynamic.
- URL: Enter the link that users will visit when clicking the button.
You can add up to 10 buttons, depending on the template design and layout. Buttons help drive interaction, such as visiting your website, calling customer service, or replying with preset options.
Carousel
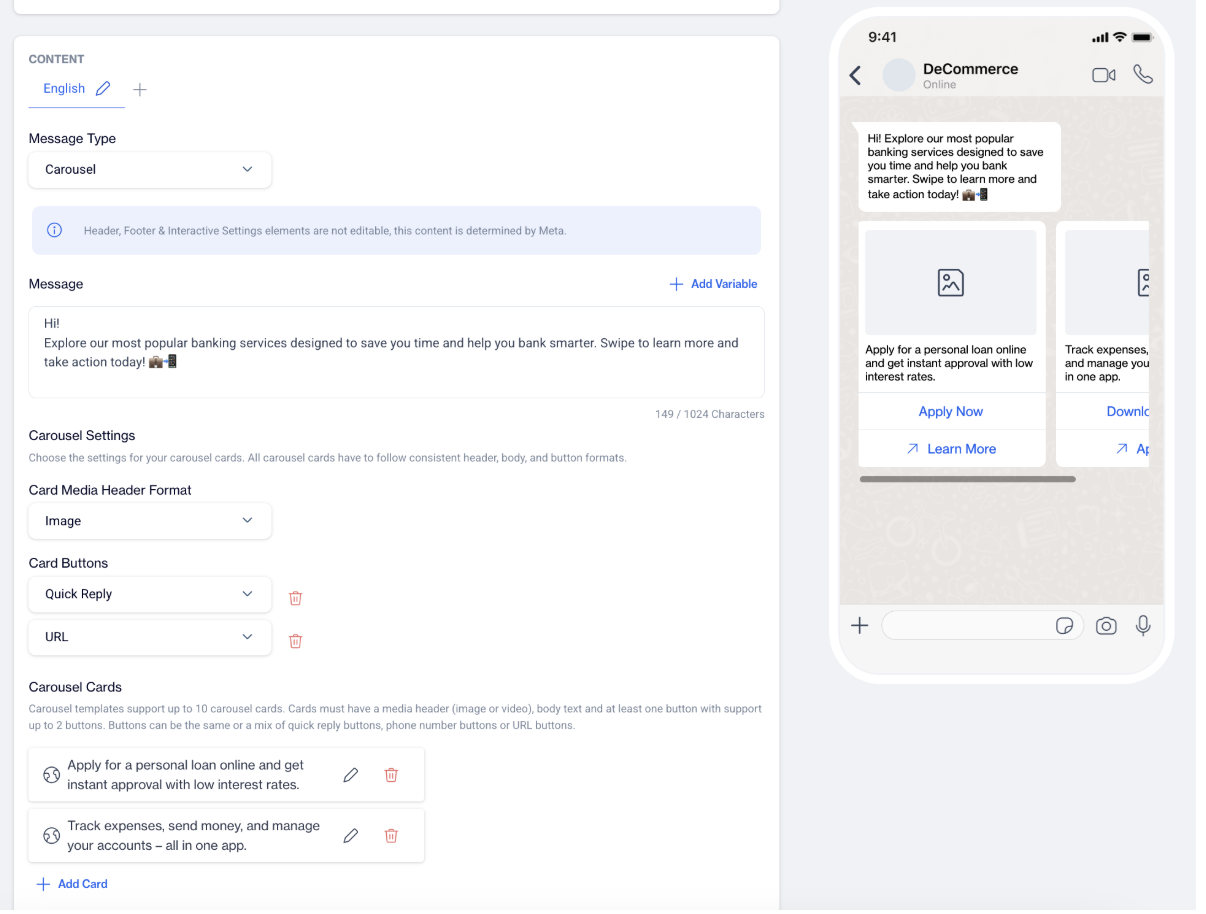
After selecting Carousel as the message type, you will begin defining the structure and settings for your WhatsApp template, which includes a horizontally scrollable set of cards.
Carousel
Message Body
At the top, you’ll see the Message field, where you can enter the main text of your message. This is the message that appears above the carousel cards. You can also use the Add Variable button to insert placeholders that will be filled in later when the message is sent. These variables allow you to personalize your content and are visible in the preview panel.
Carousel Settings
Below the message field is the Carousel Settings section. This is where you configure the rules that will apply to all the cards in your carousel.
All carousel cards must follow the same structure. According to Meta’s guidelines, each card must have:
- A media header format (selected from a dropdown: Image or Video),
- A body text, and
- At least one button (up to two buttons per card).
The Card Media Header Format dropdown sets the type of media that will be referenced in your template (image or video), though media files are not uploaded at this stage. This is just a structural definition for the template.
Under Card Buttons, you will choose the type of buttons that will be used across all carousel cards. Available button types include:
- Quick Reply: A simple reply action.
- Call Phone Number: Requires a phone number.
- Visit Website: Requires a URL and lets you select Static or Dynamic URL type.
Carousel Cards
Next, you’ll define the actual cards. A minimum of 1 card is required, and you can add up to 10 cards.
Click Add Carousel Card to create a card. For each card, you will fill out:
- Body Text: This is the main content of the card, describing what it’s about (e.g., a product, service, or offer). You can also add variables here.
When you click Add Carousel Card, a modal opens where you can enter the Carousel Body Text, and you also have the option to Add Variable specifically for each card. Unlike the main message body, each carousel card can have its own independent variable. Additionally, while standard message bodies are tied to the selected template language, carousel card bodies do not have this limitation—you can define their content freely, regardless of language selection.
Additionally, each carousel card can have a maximum of 2 buttons.
- Button Text: The label that will appear on the button (e.g., “Buy Now,” “Call Us,” or “More Info”).
Based on the button type(s) you selected earlier in Card Buttons, additional fields will appear here:
- If you select a Call Phone Number, you’ll be asked to enter the phone number in international format.
- If you select Visit Website, you’ll be prompted to enter the URL.
- If you select Quick Reply, only the button text is needed.
These fields are used to define the template structure. Media such as images or videos are not uploaded at this stage—they will be referenced later when you send the message using this template.
Carousel templates are ideal for highlighting multiple items or offers in one message, using a clean, scrollable card layout that improves customer engagement.
Copy Coupon
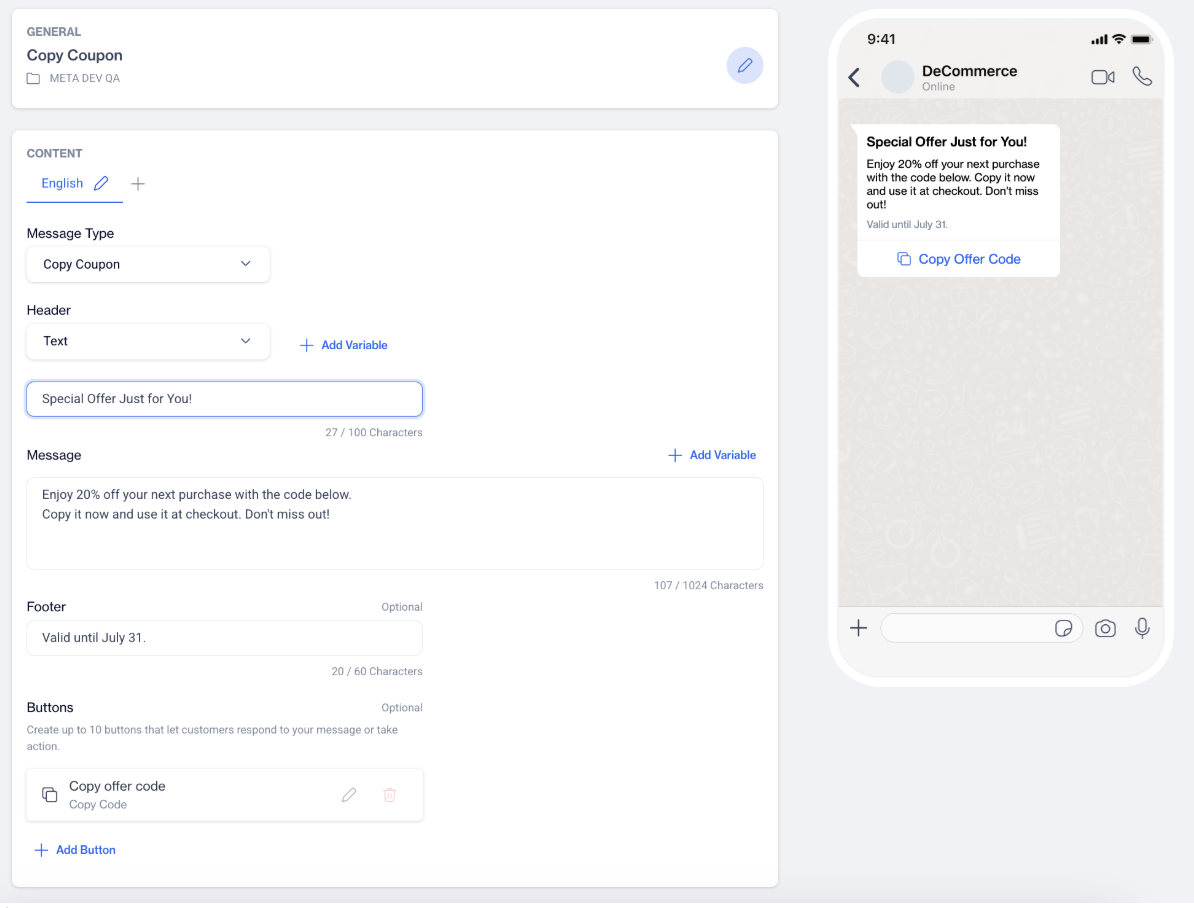
After selecting Copy Coupon as the message type, you’ll be guided through setting up your WhatsApp template. This format is ideal for sending promotional messages that include a copyable coupon code to encourage customer engagement.
Copy Coupon
Header
At the top of the screen, you’ll find the Header section with a dropdown menu offering several options: None, Text, Image, Document, and Video.
If you select Text, an input field will appear for you to type a short line of text to be used as the message header. This is only shown in the preview.
If you choose Image, Document, or Video, the type is noted in the structure, but you won't upload the media during this step—it's defined during message sending.
Message Body
Below the header is the Message field where you’ll enter the main text of your message. Next to this field is the Add Variable button, which lets you insert placeholders to personalize messages dynamically at the time of sending. These variables appear in the right-hand preview panel and are mapped with actual values later when the message is sent.
Footer (Optional)
Under the message section is an optional Footer field. You can use this to add any short notes, legal disclaimers, or additional context, such as "Valid until 30 June 2025."
Buttons (Optional)
At the bottom of the screen, you can add interactive Buttons to allow users to take action. Click the Add Button option to create a button. You’ll be prompted to choose from the following types:
- Quick Reply: Allows the user to send a predefined response.
- Call Phone Number: Lets the user call a number. You'll need to enter the button label and a phone number in international format (e.g., +1234567890).
- Visit Website: Lets the user visit a URL. You’ll provide the button label and choose whether the URL is Static or Dynamic, then enter the appropriate link.
After creating a button, it will appear below the message for review. Each button is editable and deletable, so you can make changes or remove them as needed. You can add up to 10 buttons in total.
Limited-Time Offer
After selecting Limited Time Offer as the message type, you can begin setting up your WhatsApp template. This format is designed to help you highlight time-sensitive promotions by showing expiration dates and countdown timers within the message—an effective way to create urgency and encourage user action.
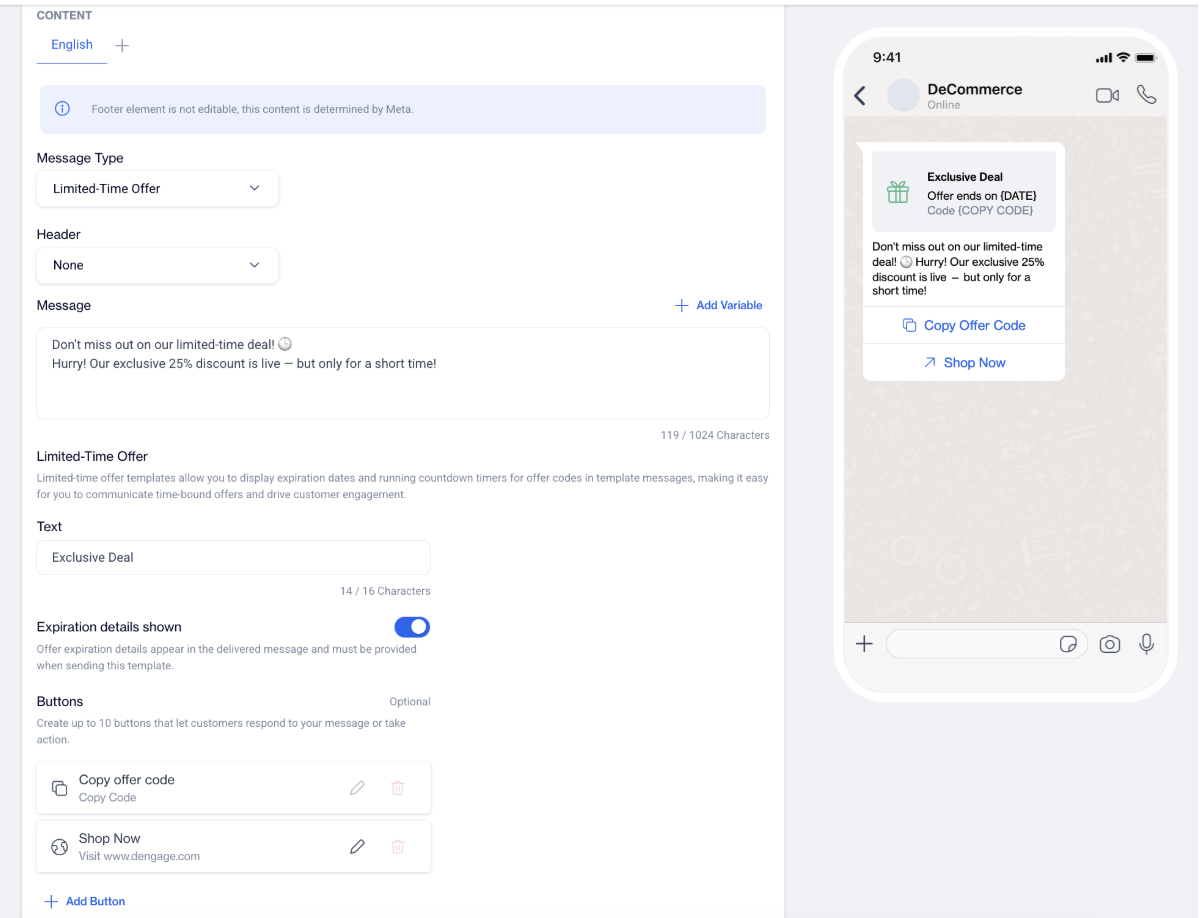
Limited Time Offer
Header Section
At the top, you’ll find the Header dropdown menu. Available options are:None, Image or Video.
This field determines the type of media that will appear at the top of your message. Like other formats, media is not uploaded during template creation—it’s defined when the message is sent.
Message Body
Below the header is the Message section, where you enter the main message text. This is the body of the message that supports your limited-time offer. You can also click the Add Variable button to insert dynamic placeholders that will be filled in with real values at the time of sending.
Limited-Time Offer Section
This section is specific to this message type and allows you to define the offer and its expiration details.
- Text: This is the main content of the limited-time offer—for example, the discount code or deal name.
- Value: This is where you enter the actual value tied to the offer, such as a promo code (e.g., "SUMMER25").
- Expiration Details Shown: Use the toggle to turn on this feature if you want to display the expiration date in the message.
Note: You must provide the actual expiration date when you send the message. This detail is not defined at the template stage but is required during the delivery of the message.
This structure allows the final message to include both the code and a visible countdown or deadline, based on the time it’s sent.
Buttons (Optional)
At the bottom of the screen, you can add Buttons to encourage user interaction. Click Add Button, and you’ll be prompted to choose one of the following:
- Quick Reply: Lets users respond with a predefined option.
- Call Phone Number: Add a text and a phone number in international format (e.g., +1234567890).
- Visit Website: Add a text and enter a Static or Dynamic URL.
You can create up to 10 buttons in total. Each button can be edited or removed as needed.
Creating Whatsapp Utility Template
To create a new WhatsApp template, go to the left-hand menu and navigate to Content > Messaging > WhatsApp. On the WhatsApp Content page, click the +New button located in the top-right corner. A modal window will appear, prompting you to choose a template category. Select the Utility category.
Utility templates are intended for sending transactional or service-related messages that the customer has explicitly requested or expects—such as order confirmations, shipping notifications, or appointment reminders.
After selecting the Utility category from the template creation modal, a new screen will open where you will begin setting up the template.
At the top of the screen is the General section. Here, you need to enter the Name and choose the WhatsApp Account you want to associate with this template. The selected account will appear next to the name field, and you can change it by clicking the Change Account button.
Once you have entered the template name, click the Next button to move on to the Content section. This is where you will define the actual message content.
The default language is set to English. If you’d like to create the same message in other languages, click the “+” button next to the language. A modal will appear where you can select one or more additional languages. Click Apply to add them to your template.
Below the language selection, you will see the Message Type dropdown. For Utility templates, the only available option is:
- Blank Content – Use this option to create a straightforward, customizable message structure suitable for delivering transactional information.
After selecting Blank Content, you can continue building your template by configuring the available components—header, message body, footer, and optional buttons. Each of these components is explained in the following section.
Blank Content - Utility
For Utility templates, the only available message type is Blank Content. This structure is ideal for sending essential transactional messages such as order updates, payment confirmations, or service notifications.
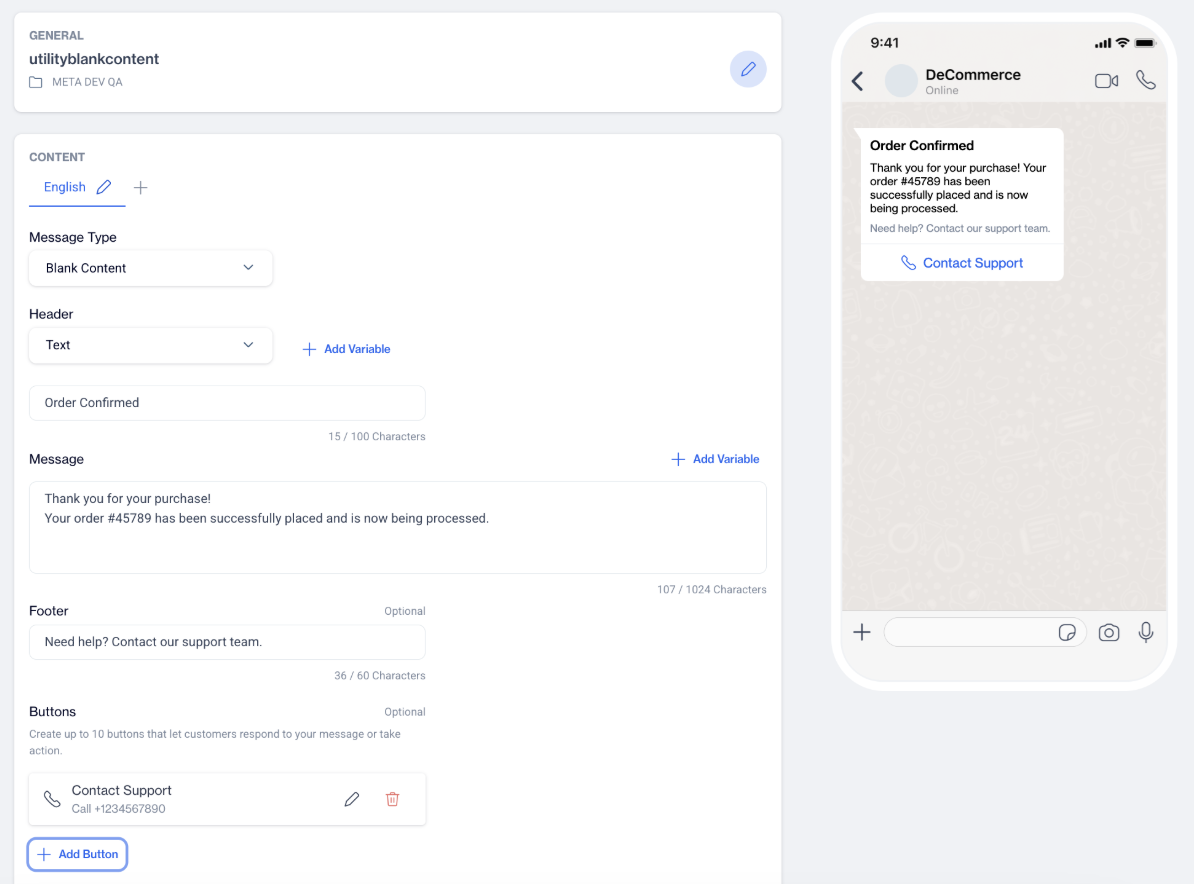
Blank Content - Utility
Once you select Blank Content, you will be directed to the screen where you can configure the components of your message, including header, body, optional footer, and optional buttons.
Header
The Header section appears at the top of the screen. You can choose one of the following five options from the dropdown:
None, Text, Image, Document, or Video.
- If you choose Text, a simple input field will appear where you can enter a short line of text to be displayed as the message header.
- If you select Image, Document, or Video, you define the header type only. The actual media file will be added later during the message sending process.
Message Body
In the Message field, enter the main content of your message. This is the text users will see when they receive your WhatsApp message.
Next to the message field is the Add Variable button. Clicking this allows you to insert placeholders which will be replaced with actual values when the message is sent. These variables help personalize the message for each recipient and are also visible in the message preview.
Footer (Optional)
Below the message body is an optional Footer field. You can use this space to add brief notes, legal disclaimers, or any additional context (e.g., “This is an automated message. Please do not reply.”).
Buttons (Optional)
You can enhance your message by adding interactive Buttons. Click Add Button to create a new one. You’ll be asked to choose from the following button types:
- Quick Reply – Add a short response option.
- Call Phone Number – Include a phone number users can call directly. Enter the text and phone number in international format (e.g., +1234567890).
- Visit Website – Add a link button. You’ll need to provide the text, select whether the URL is Static or Dynamic, and enter the destination URL.
You can add up to 10 buttons per template. Once added, each button will be shown below the message preview and can be edited or deleted as needed.
Creating Whatsapp Authentication Template
To create a new WhatsApp template for authentication purposes, navigate to the left-hand menu and go to Content > Messaging > WhatsApp. On the WhatsApp Content page, click the +New button at the top-right corner. A modal window will appear prompting you to choose a template category. Select Authentication.
Authentication templates are used to send one-time passcodes (OTPs) or verification codes to help users securely log into your app or verify their identity. These templates are designed to support a smooth and secure login or transaction flow.
Once you select the Authentication category, a new screen will open where you will configure the template.
At the top, under the General section, enter your Name and choose the WhatsApp Account you want to use. If needed, you can change the account by clicking the Change Account button. Once you’re ready, click Next to continue to the Content section.
By default, the template language is set to English. You can add more languages by clicking the “+” button and selecting them from the modal. After selection, click Apply to include them.
Message Type
For Authentication templates, there are two message types available:
- Copy Code
This type allows you to send a one-time passcode or verification code along with a copy button. When the user taps the button, the code is copied to their clipboard for easy pasting into your app. - One-Tap Autofill
This is the recommended method for the smoothest user experience. When a customer taps the autofill button in the message, the code is sent directly to your app without requiring manual input.
If Zero-Tap is enabled in your system, the code can be sent automatically, without requiring the user to tap anything.
If autofill is not possible, the system will automatically fall back to sending a Copy Code message instead.
Each message type is optimized to provide secure and user-friendly authentication, and you can choose the one that best fits your app’s login flow.
The rest of the content configuration—including variables, buttons, and optional footer—follows the same structure as described in the Blank Content setup. These components allow for personalized messages and interaction, which will be covered in detail in the next sections.
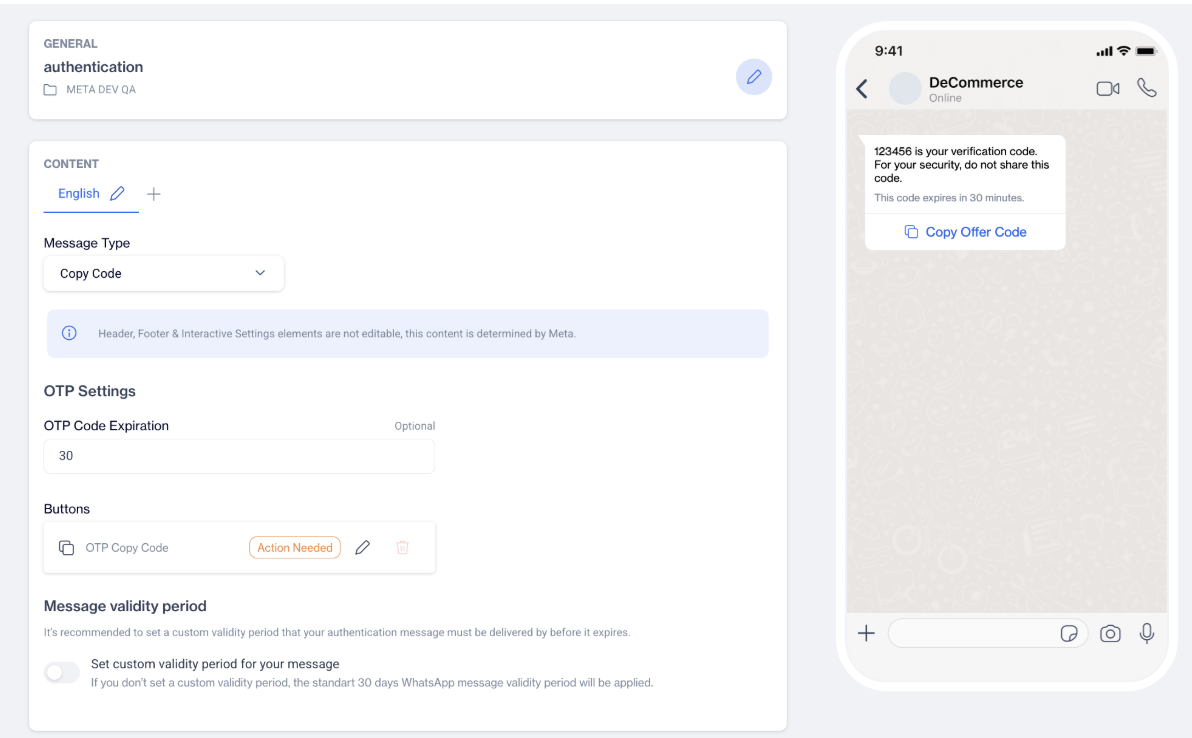
Copy Code
After selecting Copy Code as the message type in your Authentication template, you will configure the OTP delivery settings and message structure. This message type is ideal for sending one-time passcodes (OTP) that users can easily copy and paste during login or verification.
Copy Code
OTP Settings
Under the OTP Settings section, you will find two main configuration options:
OTP Code Expiration (Optional) This field allows you to optionally display a message indicating how long the OTP will remain valid.
If you leave it empty, no expiration note will appear in the message content. This field is not mandatory.
Buttons A Copy Code button is automatically included in this message type. This button enables users to tap and copy the OTP directly to their clipboard—streamlining the login or verification process.
Message Validity Period
Below the button settings, you will see the Validity Period section. This defines how long WhatsApp should try to deliver the message before it expires.
- You can toggle on the “Set custom validity period for your message” option.
- When enabled, a modal will appear where you can select a specific validity period from a dropdown menu (e.g., 1 minute, 10 minutes, etc.).
If you don’t set a custom validity period, WhatsApp will apply the default validity period of 30 daysi Setting a shorter, more relevant validity period is recommended for authentication messages to ensure the OTP arrives in time and maintains its security relevance.
One-tab Autofill
After selecting One-Tap Autofill as the message type in your Authentication template, you will configure settings that allow users to authenticate with minimal effort. This method streamlines the login or verification process by enabling WhatsApp to pass the OTP directly to your app, either with a single tap or automatically (if Zero-Tap is supported).
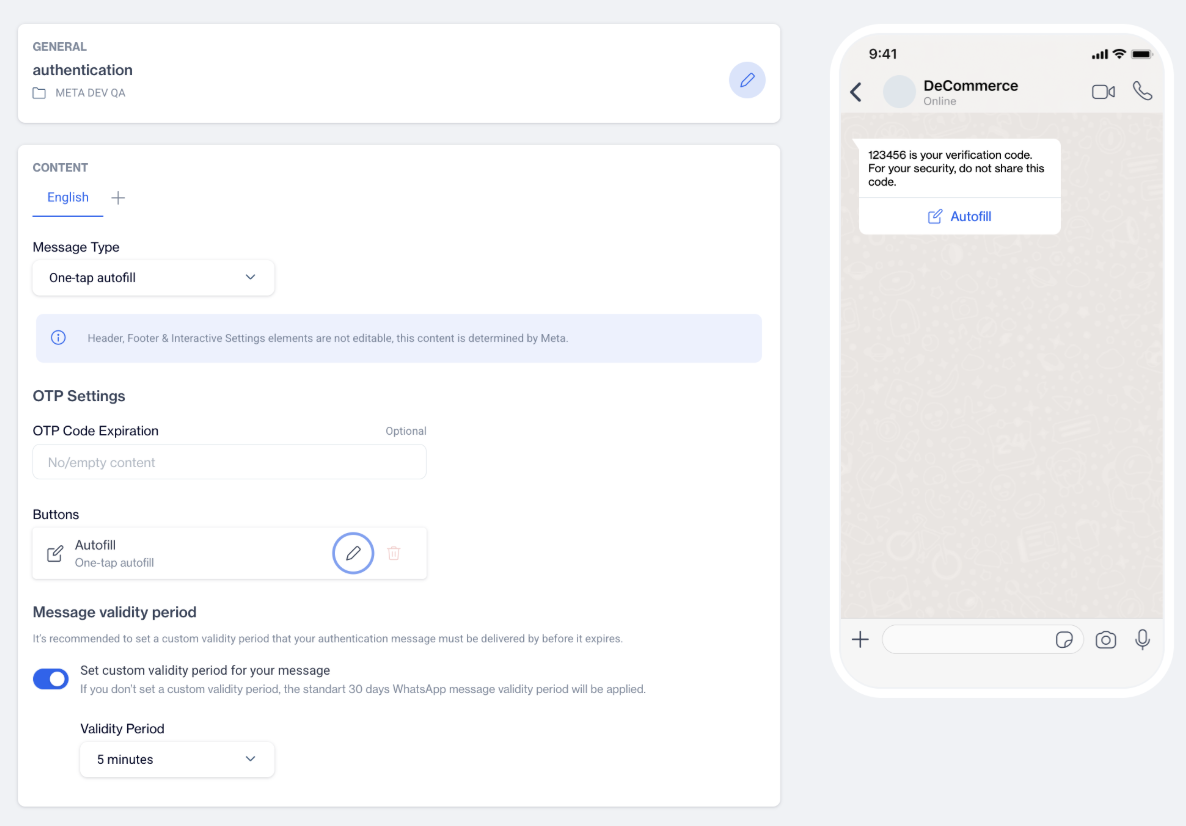
One-Tap Autofill
OTP Settings
This section includes options that define how the OTP behaves in the message and how users interact with it.
OTP Code Expiration (Optional) This optional field allows you to show the validity duration of the OTP to users.
If you leave this field empty, no expiration text will be shown in the message. The field is not required but can help manage user expectations.
Buttons The One-Tap Autofill message automatically includes a button that users can tap to send the code directly to your app.
- If your app supports Zero-Tap, the OTP will be sent automatically without requiring user interaction.
- If autofill is not supported on the user’s device or app setup, the system automatically falls back to a Copy Code message. This ensures a backup experience so users can still access and use their OTP.\
Message Validity Period
This setting controls how long WhatsApp should attempt to deliver the authentication message before it expires.
- You can toggle on “Set custom validity period for your message”.
- When enabled, a modal will appear where you can select the desired time window from a dropdown list (e.g., 1 minute, 10 minutes).
If no custom validity period is set, WhatsApp applies its default 30-day validity period. However, for authentication purposes, it is recommended to define a shorter window so the OTP does not reach the user after it is no longer valid in your system.
Updated 9 months ago