
Roles And Permissions
Roles and Permissions are the core of user security on the platform.
Roles and Permissions form the backbone of user security on our platform. They ensure that each user has access only to the resources and functionalities necessary for their role, minimizing the risk of unauthorized actions and data breaches. By defining clear roles and assigning appropriate permissions, administrators can manage user access efficiently and maintain a secure environment. This system not only enhances security but also streamlines workflows, as users can perform their tasks without encountering unnecessary barriers or restrictions. Properly configured Roles and Permissions are essential for protecting sensitive information and maintaining the integrity of our operations.
User and Role
Users log in to the platform with a specific role and inherit the permissions associated with that role. Therefore, it's essential to ensure that each user is assigned the correct role to maintain appropriate access and security levels.
NotePlease avoid assigning users 'Full Admin' role. Only assign 'Full Admin' role if absolutely necessary.
How to Create a User with Specific Role
Steps to follow:
- Ensure you create an appropriate role for the new user. Refer to the Roles and Permissions page to do this.
- Navigate to the Users page and create the user. Assign the role you have defined for this user.
Managing Roles And Permissions
To access Roles and Permissions, navigate to Settings Identity & Access Management Roles and Permissions.
- Name: The name of the role, which helps identify the role and its associated permissions.
- Description: Additional information or context about the role, such as the role's purpose or responsibilities.
- Type:Indicates the type or category of the role, which may influence the permissions and access levels associated with it. System Roles are predefined default roles, while User Defined Roles are created by platform users with the necessary rights.
- Created At: The date and time when the role was created. This can help track the age of the role and understand how long it has been part of the account.
How to Create a New Role and Assign Permissions
Creating a new role is crucial for platform security because it requires adhering to the minimum permission policy, ensuring that users are granted only the permissions necessary for their specific tasks.
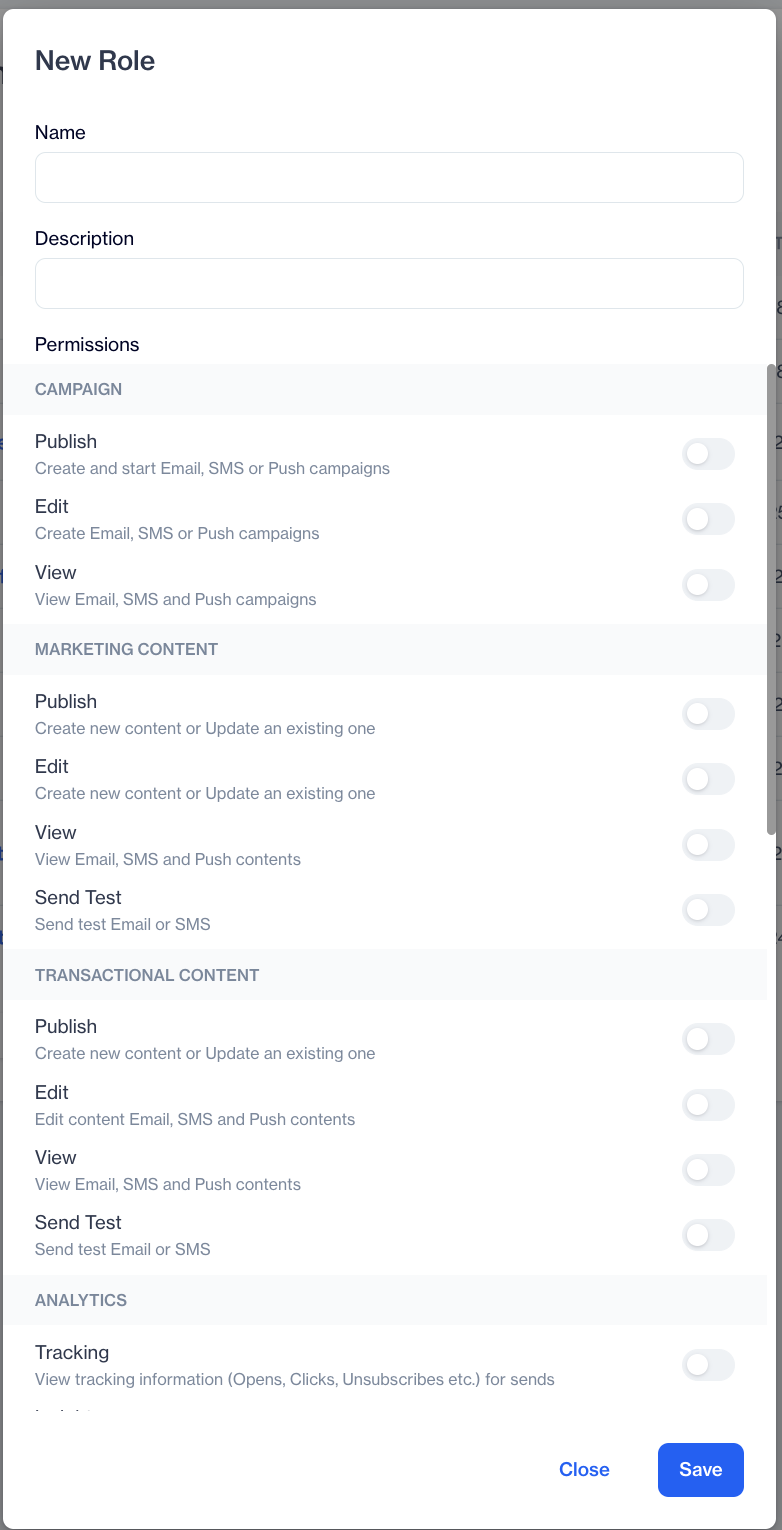
Click the Add button in the top-right corner to open a popup to see Role Details. The popup includes sections for Name, Description, and Permissions.
Assign New Roles And Permissions
In the Roles and Permissions section, you can assign new roles and permissions to users. This section allows you to customize user access and permissions to specific features and areas within the platform.
1.Name: Enter a name for the new role, such as “Campaign Executor” or another descriptive name that suits the purpose of the role.
2.Description: Provide a brief description of the role for context and clarity.
3.Permissions: The Dengage platform allows you to establish a detailed permission structure. You can grant read, write, and manage permissions for each object on the platform.
Permission DependencyIf a selected permission has dependencies, the related dependencies will automatically be enabled when you select the option.
There are several objects on the platform you can assign permissions to users.
1.Campaign
Campaign object is the journey on the platform. You can assign specific permissions in a role for the Journey tool. Publish, Edit and View permissions are mainly used on these objects.
Permission Levels
Publish: Admin permission. Users with this permission can view, modify, and deploy the object to the production environment.
Edit: Update permission. Users with this permission can view and modify the object.
View: Read-only permission. Users with this permission can only view the object.
| Permission | When Enabled | When Disabled |
|---|---|---|
| View(campaign.view) | The user can view the campaign list and campaign details. | The user cannot access the Campaign module, including the campaign list and details. |
| Edit(campaign.edit) | The user can create and edit campaigns. | The user can only view campaigns and cannot make any changes. |
| Publish(campaign.publish) | The user can publish or send draft campaigns. | The user can prepare campaigns but cannot publish them. The campaign must wait for approval or be published by another authorized user. |
| Delete(campaign.delete) | The user can delete campaigns. | The user cannot delete campaigns. |
2.Marketing and Transactional Content
Along with Publish, Edit and View permissions, Send Test permission can also be given to users in a role. With this permission, Users can send test messages on the specific channel.
| Permission | When Enabled | When Disabled |
|---|---|---|
| View(content.view) | The user can view the content and template list. | The user cannot access the Content module. |
| Edit (content.edit) | The user can create and edit content and templates. | The user can only view content and templates and cannot make any changes. |
| Test (content.test) | The user can send test messages. | The user cannot send test messages. |
| Publish(content.publish) | The user can publish content. | The user can prepare content but cannot publish it. |
| Delete(content.delete) | The user can delete content. | The user cannot delete content. |
3.Analytics
For the Analytics module, the platform has Tracking and Insights permission as described below.
Tracking: This permission allows users to view tracking information for sends, including details about opens, clicks, and unsubscribes.
Insights: This permission enables users to access insights and reports, providing an overview of the performance and engagement metrics for their sends.
| Permission | When Enabled | When Disabled |
|---|---|---|
| Insights (analytics.insights) | The user can access the Insights and reporting screens. | The user cannot access them. |
| Tracking (analytics.tracking) | The user can access tracking data. | The user cannot access them. |
| Advanced Analytics(analytics.advancedAnalytics) | The user can access advanced analytics screens (for example, detailed reports). | The user cannot access them. |
4.General
These are other general permissions you can assign to roles.
Invite User: Permit inviting new users by email.
Manage User: Allow changing the role of existing users.
Manage Role: Permit defining new roles and managing role properties.
Change Account Settings: Allow changing account settings and KPIs.
Global Frequency Capping: Permit changing account-wide frequency capping.
| Permission | When Enabled | When Disabled |
|---|---|---|
| Invite Users (general.inviteUser) | The user can invite new users to the panel. | The user cannot send invitations. |
| Manage Users (general.manageUsers) | The user can edit or deactivate existing users. | The user cannot access the User Management screen. |
| Manage Roles (general.manageRoles) | The user can create and edit roles | The user cannot access the Role Management screen. |
| Change Account Settings(general.changeAccountSettings) | The user can modify general account settings. | The user cannot modify account settings. |
| View Identity and Access Management(general.identityAccessManagementView) | The user can view Identity and Access Management (IAM) settings. | The user cannot access them. |
| Edit Identity and Access Management(general.identityAccessManagementEdit) | The user can modify IAM settings. | The user can only view them (if they have view permission). |
| View Integrations(general.integrationsView) | The user can view the integration list and settings. | The user cannot access them. |
| Edit Integrations(general.integrationsEdit) | The user can configure and edit integrations. | The user can only view them. |
| View Campaign Configurations(general.campaignConfigurationsView) | The user can view general campaign configurations. | The user cannot access them. |
| Edit Campaign Configurations(general.campaignConfigurationsEdit) | The user can modify campaign configurations. | The user can only view them. |
| Global Frequency Capping(general.globalFrequencyCapping) | The user can manage account-wide frequency capping settings. | The user cannot access these settings. |
5.Data Space
These are permissions on Data Space (Customer Data Platform) part of the platform.
View Segment/Table: Allow viewing data tables and segments.
View Data: Allow viewing data information.
Change the Contact Data: Permit changing contact data.
Manage Table: Allow creating new data tables.
Manage Table Relations: Allow creating or deleting data relations.
Import Data: Permit uploading data to tables and creating tables with data.
Export Data: Allow exporting and downloading data from data tables and segments.
Manage Segment: Allow creating and editing segments.
Show PII( Personal Identifiable Information):Allow viewing restricted contact/device columns.
The Dengage platform allows you to select these columns under Settings > Identity & Access Management > Data Masking.
First, you need to define the restricted columns using this page. By default, these columns are hidden for a role. When you enable this flag in a role, users with that role can view the data in these columns, such as the email and GSM number of a contact.
| Permission | When Enabled | When Disabled |
|---|---|---|
| View Data (dataSpace.viewData) | The user can view table data (record rows). | The user cannot view the data stored in tables. |
| View Segment Table(dataSpace.viewSegmentTable) | The user can view table and segment definitions, including system tables. | The user cannot access table or segment definitions. |
| Manage Segment(dataSpace.manageSegment) | The user can create and edit segments. | The user cannot create or edit segments. |
| Manage Table(dataSpace.manageTable) | The user can create new tables, add or edit columns, and modify table settings. | The user cannot access the table creation or editing screens. |
| Manage Table Relations(dataSpace.manageTableRelations) | The user can create and edit relationships between tables. | The user cannot define or modify table relationships. |
| Change Contact Data(dataSpace.manageContactData) | The user can manually add, edit, and tag contact records. | The user cannot modify contact data. |
| Export Data(dataSpace.exportData) | The user can export table or segment data. | The user cannot use the export feature. |
| Import Data(dataSpace.importData) | The user can import data from external sources (such as files or integrations). | The user cannot import data. |
| Show Personal Information (PII) (dataSpace.showPersonalInfo) | The user can view the actual values of columns marked as personal data (masked columns). | The user sees masked values (for example, email addresses, phone numbers, and personal text fields) and cannot view the actual data. |
Important Note — "Unable to View TEXT-Type Columns"
- If data masking is enabled for the account and a column is marked as personal data (isMasked), the actual values in that column can only be viewed by users whose role has the Show PII Data(dataSpace.showPersonalInfo) permission.
- Users without this permission can still access the same screen and view the table and column structure, but the values of columns marked as personal data (such as TEXT, EMAIL, PHONE, and JSON) are displayed in a masked format (for example, ***).
- The same permission also affects the table creation and column creation screens. If a role does not have the Show PII Data (dataSpace.showPersonalInfo) permission, users with that role cannot see or select column types that may contain personal data (such as TEXT, EMAIL, PHONE, and JSON) when creating a new column. To create columns of these types, the same permission must be assigned to the role.
- Coupon
| Permission | When Enabled | When Disabled |
|---|---|---|
| View (coupon.view) | The user can view the coupon list and coupon details. | The user cannot access the Coupon module. |
| Manage(coupon.manage) | The user can create, edit, and delete coupons. | The user can only view coupons. |
Permission Selection Required Before SavingBefore proceeding to save the roles and permissions section, you need to select at least one of the permissions. This ensures that each role has the necessary permissions assigned to it before saving the settings.
Save: Once you have specified the role name, description, and assigned the desired permissions, save the role.
Updated 9 days ago