
Email Builder
The Email Builder is the drag-and-drop editor for transactional email content in Dengage. Start from a ready-made template or a blank layout. Add your sender details, subject and pre-header. Personalize the message with contact data. Then publish the content for use in transactional sends.
This page covers the full flow. It starts with opening the builder and ends with managing existing content.
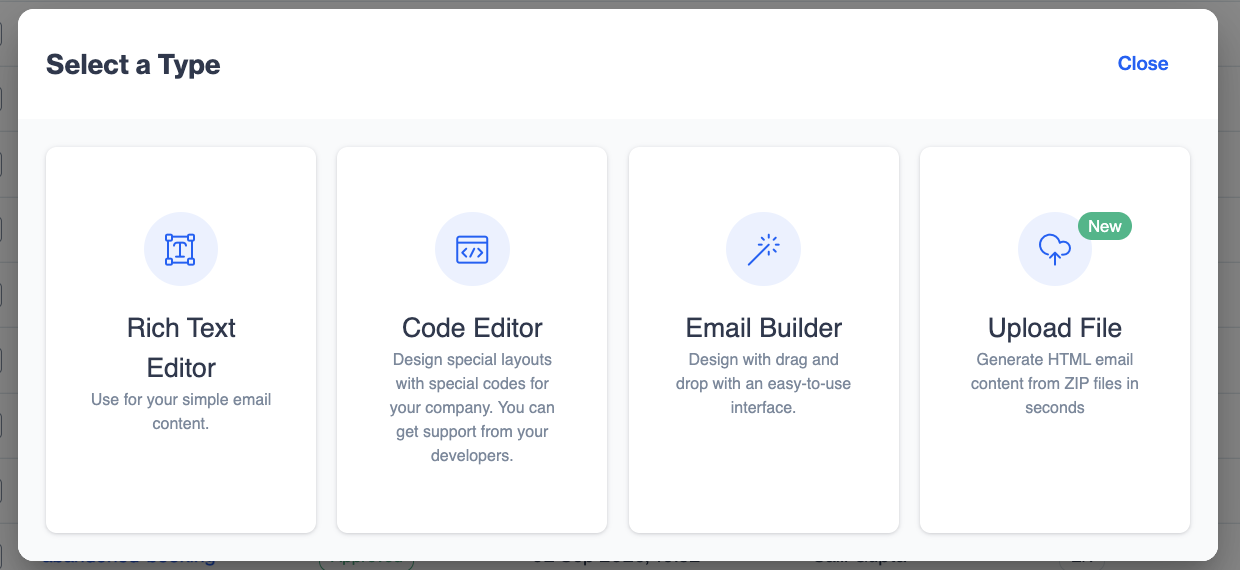
Select a Type dialog with the Email Builder
Key terms
| Term | Meaning |
|---|---|
| Sender profile | A saved combination of a verified sender domain, a from email address and a from name. |
| Customization Selector | The dialog that lists contact, device, segment, table and system values you can insert as personalization tags. |
| Public ID | The unique identifier of a published content. Your integration passes it in the transactional send API call. |
| Saved row | A row layout you save in the builder and reuse in other emails. |
What the Email Builder does
When you create a new transactional email, Dengage asks you to select a content type. Each type suits a different need:
| Type | Use it when |
|---|---|
| Rich Text Editor | You need simple text-based email content. |
| Code Editor | You want to write or paste your own HTML and CSS. |
| Email Builder | You want to design the email visually with drag-and-drop blocks and templates. |
| Upload File | You have a ZIP file and want Dengage to generate the HTML email content from it. |
The Email Builder gives you a template gallery, saved templates and reusable rows. It also has a visual canvas with desktop and mobile views, and export and import options.
Before you start
Make sure you have the following:
- A Dengage user with permission to create and publish transactional content.
- At least one sender profile (a verified sender domain and from email). You can also create one while you build the email.
- The text, images and links you want to use in the email.
Open the Email Builder
- In the Dengage app, go to Content > Transactional > Email. Dengage opens the Transactional Email list.
- Click New in the top right corner. Dengage opens the Select a Type dialog.
- Click Email Builder. Dengage opens the template gallery.
Choose a starting point
The template gallery has two tabs: Template Gallery and Saved Templates. Both tabs include a Blank content card to start from scratch.
Template Gallery
The Template Gallery lists ready-made designs. The heading shows the number of templates that match your current filter, for example All Templates (1,369).
- Categories: Use the Seasonal, Automated, Usage and Industry groups on the left to filter the gallery. Expand a group and select one or more checkboxes. The template count updates as you filter. Click clear all to remove all filters.
- Search: Type a keyword in the Search field to find a template by name.
- Blank content: Click the Blank content card to start with an empty layout.
- Load More: Click Load More at the bottom of the gallery to show more templates.
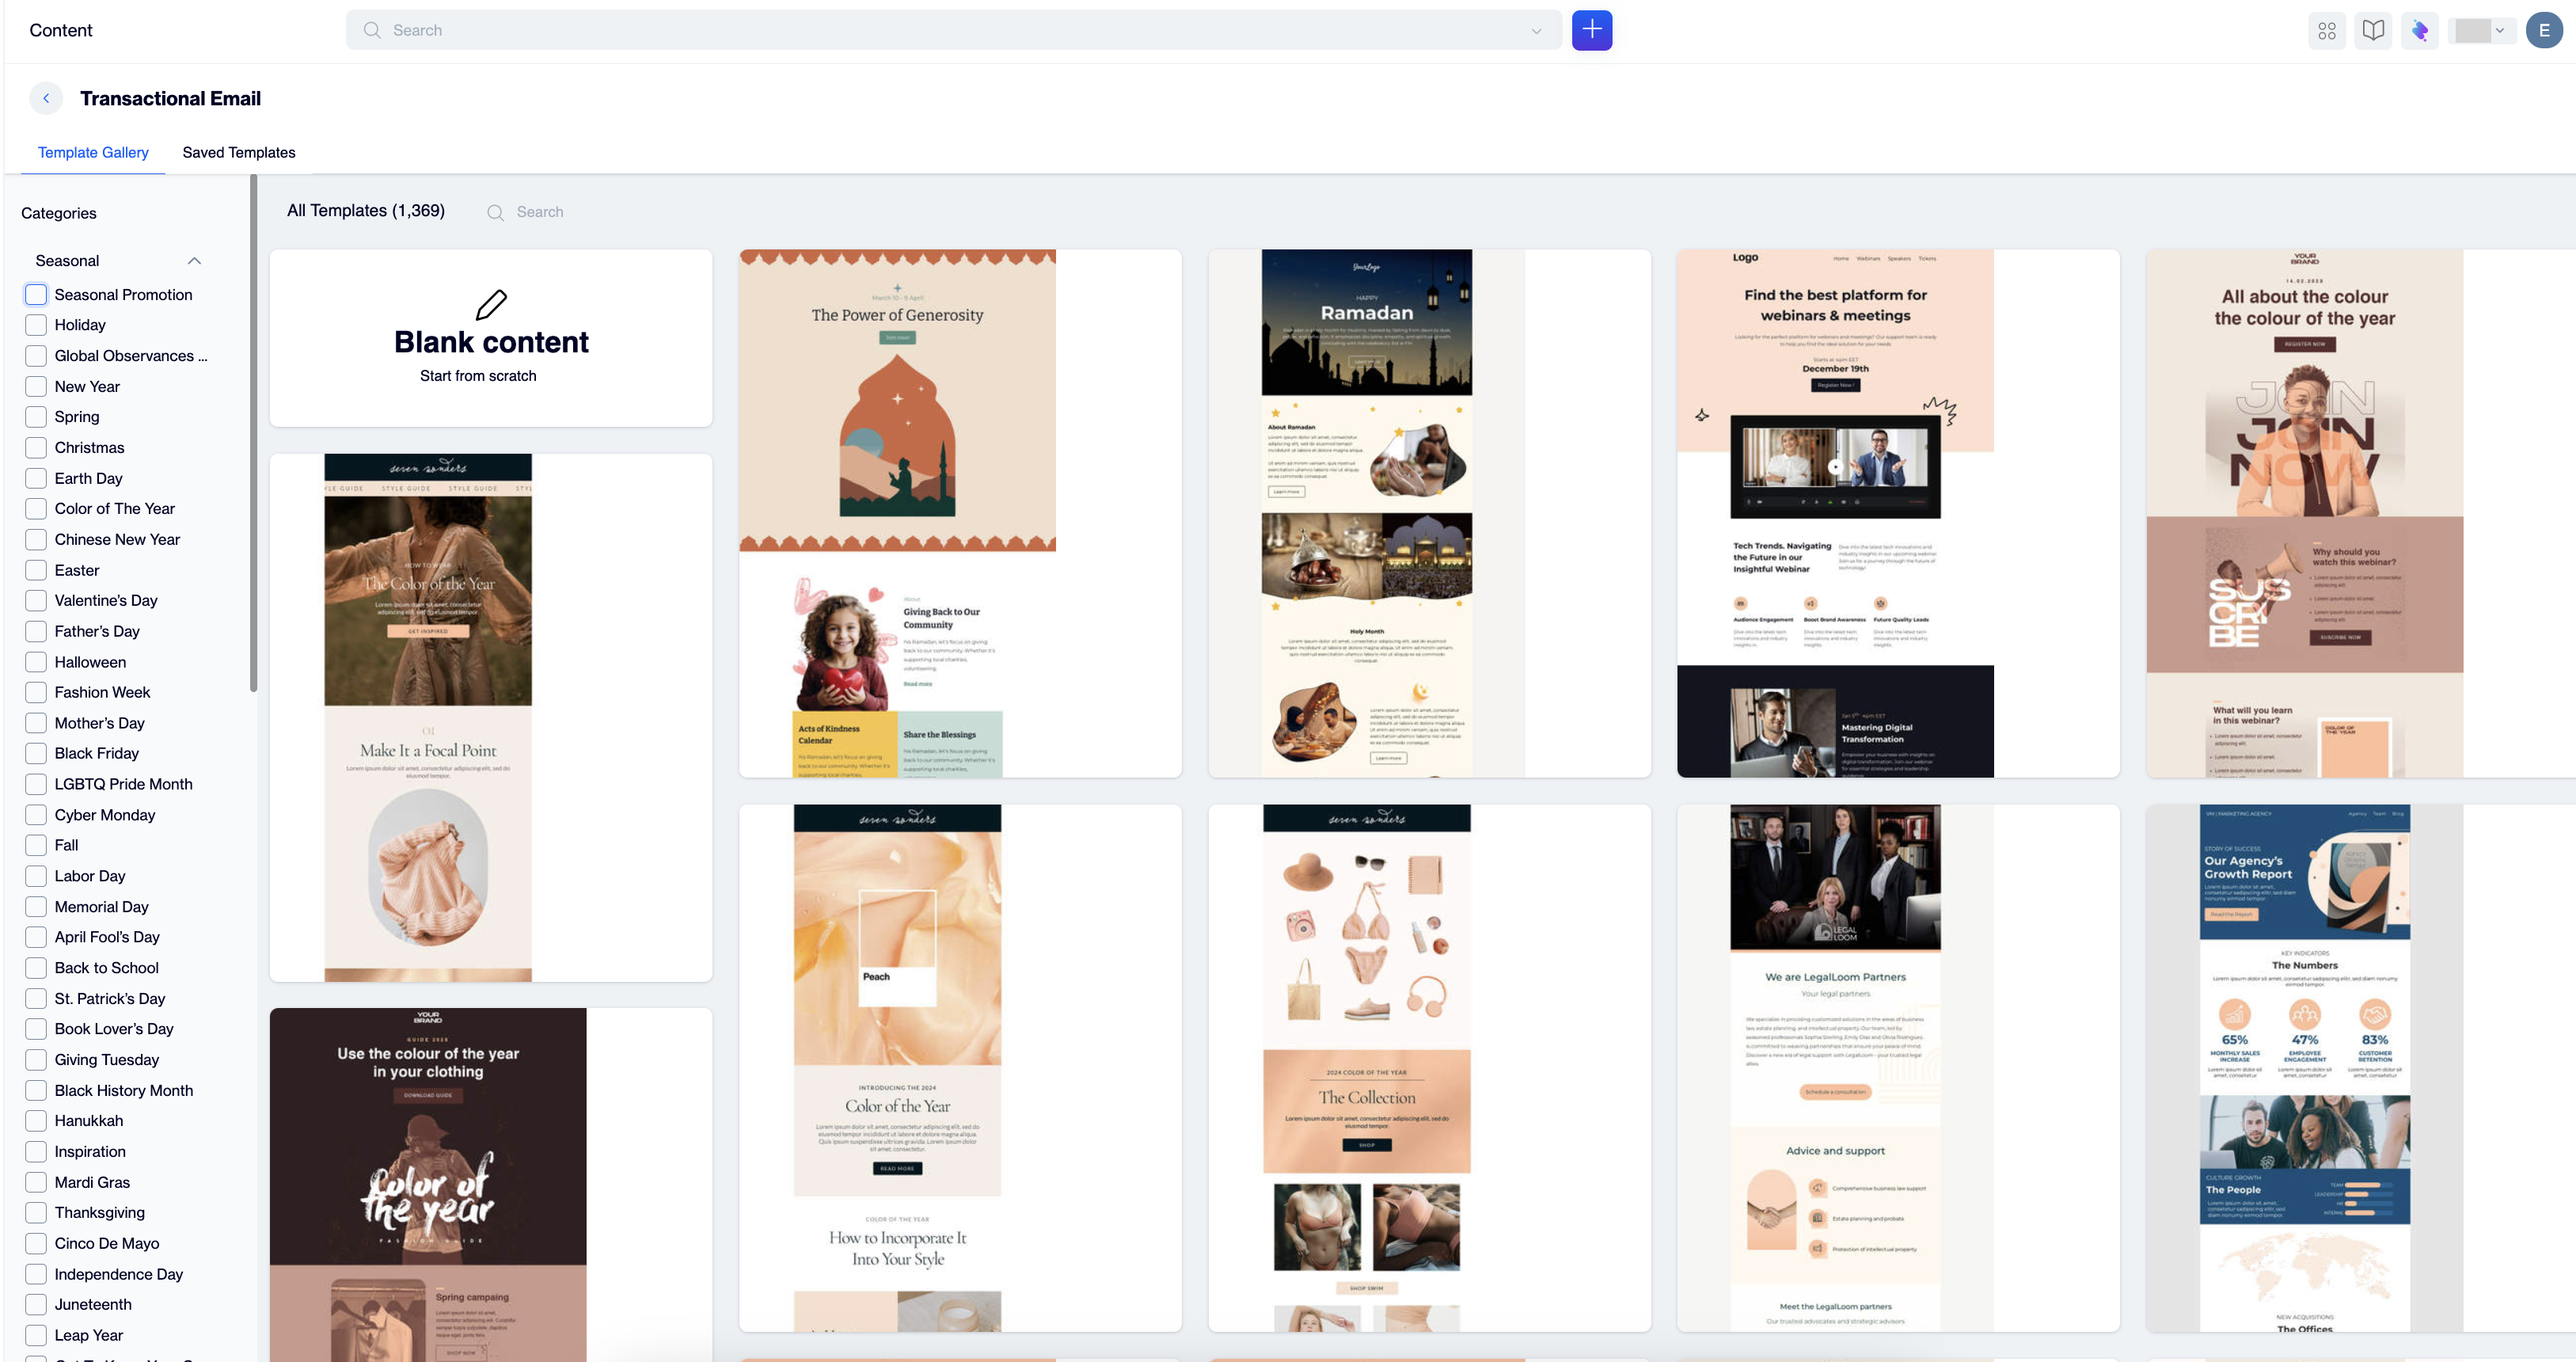
Template Gallery with the Seasonal category expanded
To use a template:
- Hover over a template card. Dengage shows the template name and two actions: view template and use.
- Click view template to open a larger preview of the design.
- Click use to open the content form with the template loaded.
Saved Templates
The Saved Templates tab lists templates that users in your account saved from the builder. The heading shows the number of saved templates, for example Saved Templates (6).
- All: Shows every saved template in the account.
- Created by me: Shows only the templates you saved.
- Creators: Lists each user who saved a template. Click a name to show only that user's templates.
- Search: Type a keyword in the Search field to find a saved template by name.
- Blank content: Click the Blank content card to start with an empty layout.
Hover over a saved template to see three actions: view template, use and delete template. Deleting a saved template removes it for everyone in the account. Confirm that nobody else needs it before you delete it.
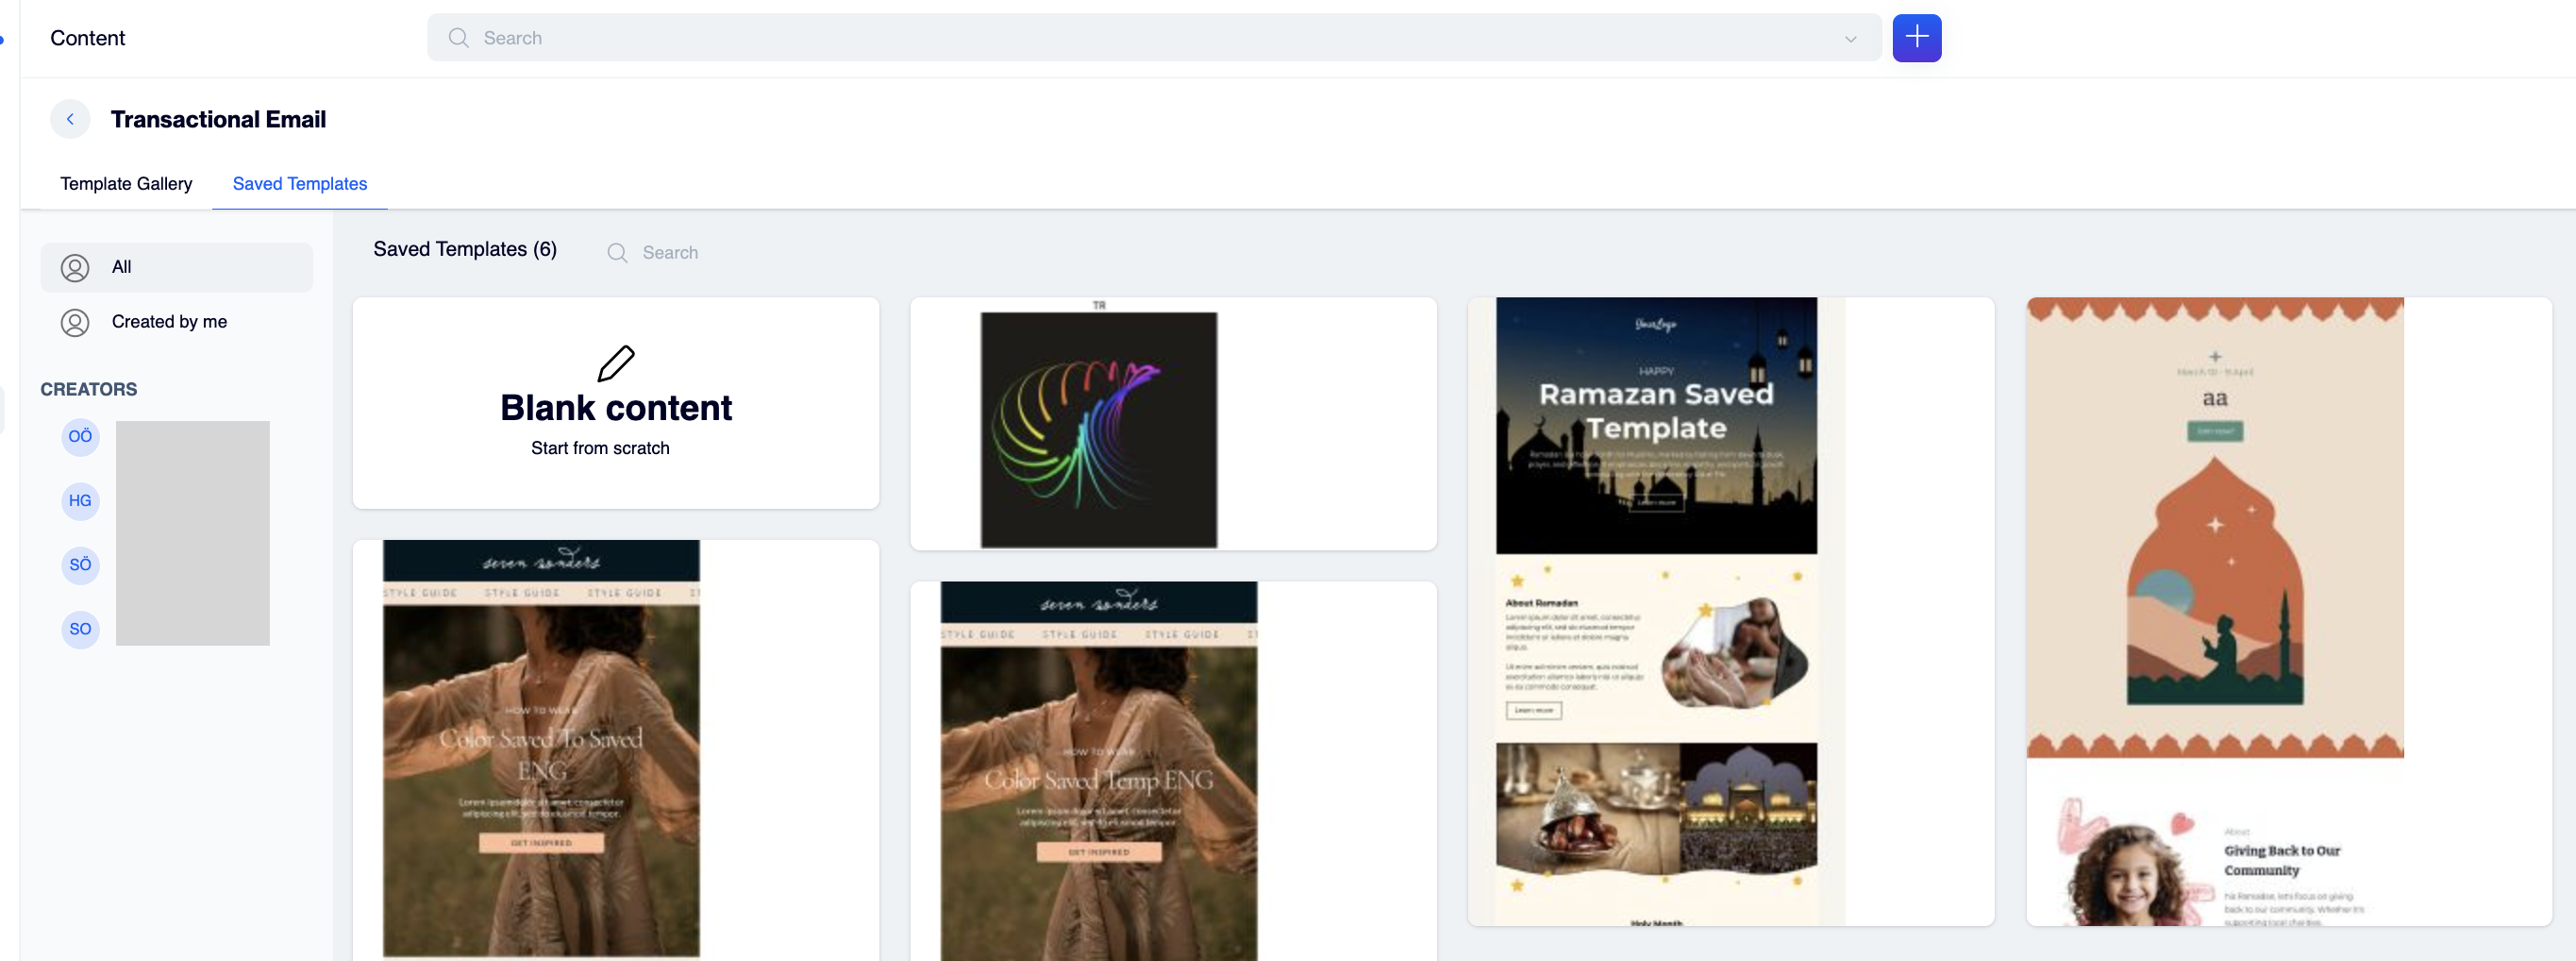
Saved Templates tab with the All, Created by me and Creators filters
General section
After you choose a template or Blank content, Dengage opens the content form. The form has two sections: General and Content. Complete the General section first.
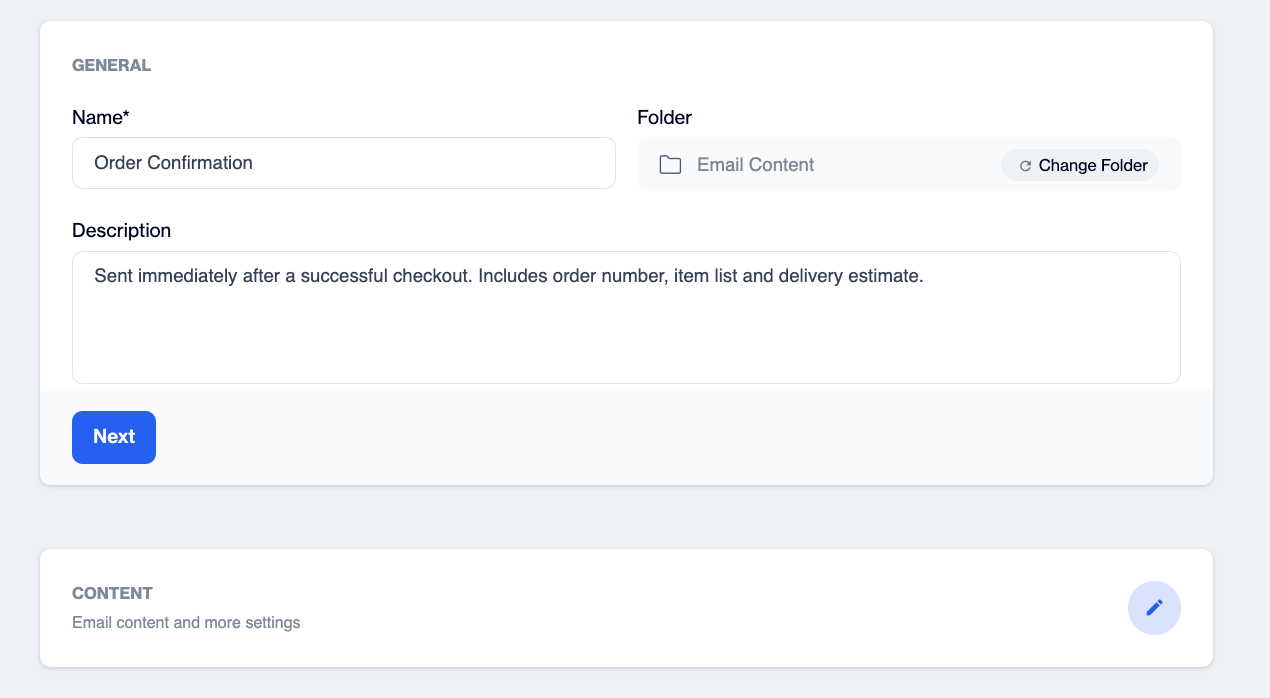
General section of the transactional email content form
| Field | Required | Description |
|---|---|---|
| Name | Yes | The internal name of the content. Dengage shows it in the Transactional Email list and in the page header while you edit. You cannot continue without a name. |
| Folder | No | The folder where Dengage stores the content. The default folder is the root transactional email content folder. Click Change Folder to select another folder. |
| Description | No | An internal note about the content. Recipients do not see it. |
To change the folder:
- Click Change Folder. Dengage opens the Select A Folder dialog.
- Expand a folder with the arrow next to its name if you need a subfolder.
- Click the folder you want.
- To create a new folder, click the new folder icon in the bottom right corner of the dialog, enter a name and confirm.
- Click Select to apply the folder, or Cancel to keep the current one.
When the General section is complete, click Next. Dengage collapses the General section and opens the Content section. To edit the General section later, click the pencil icon on the collapsed General card.
Content section
The Content section holds the email settings and the design. It starts with a Content Size indicator and a language row, followed by the sender and subject fields and the Email Builder area.
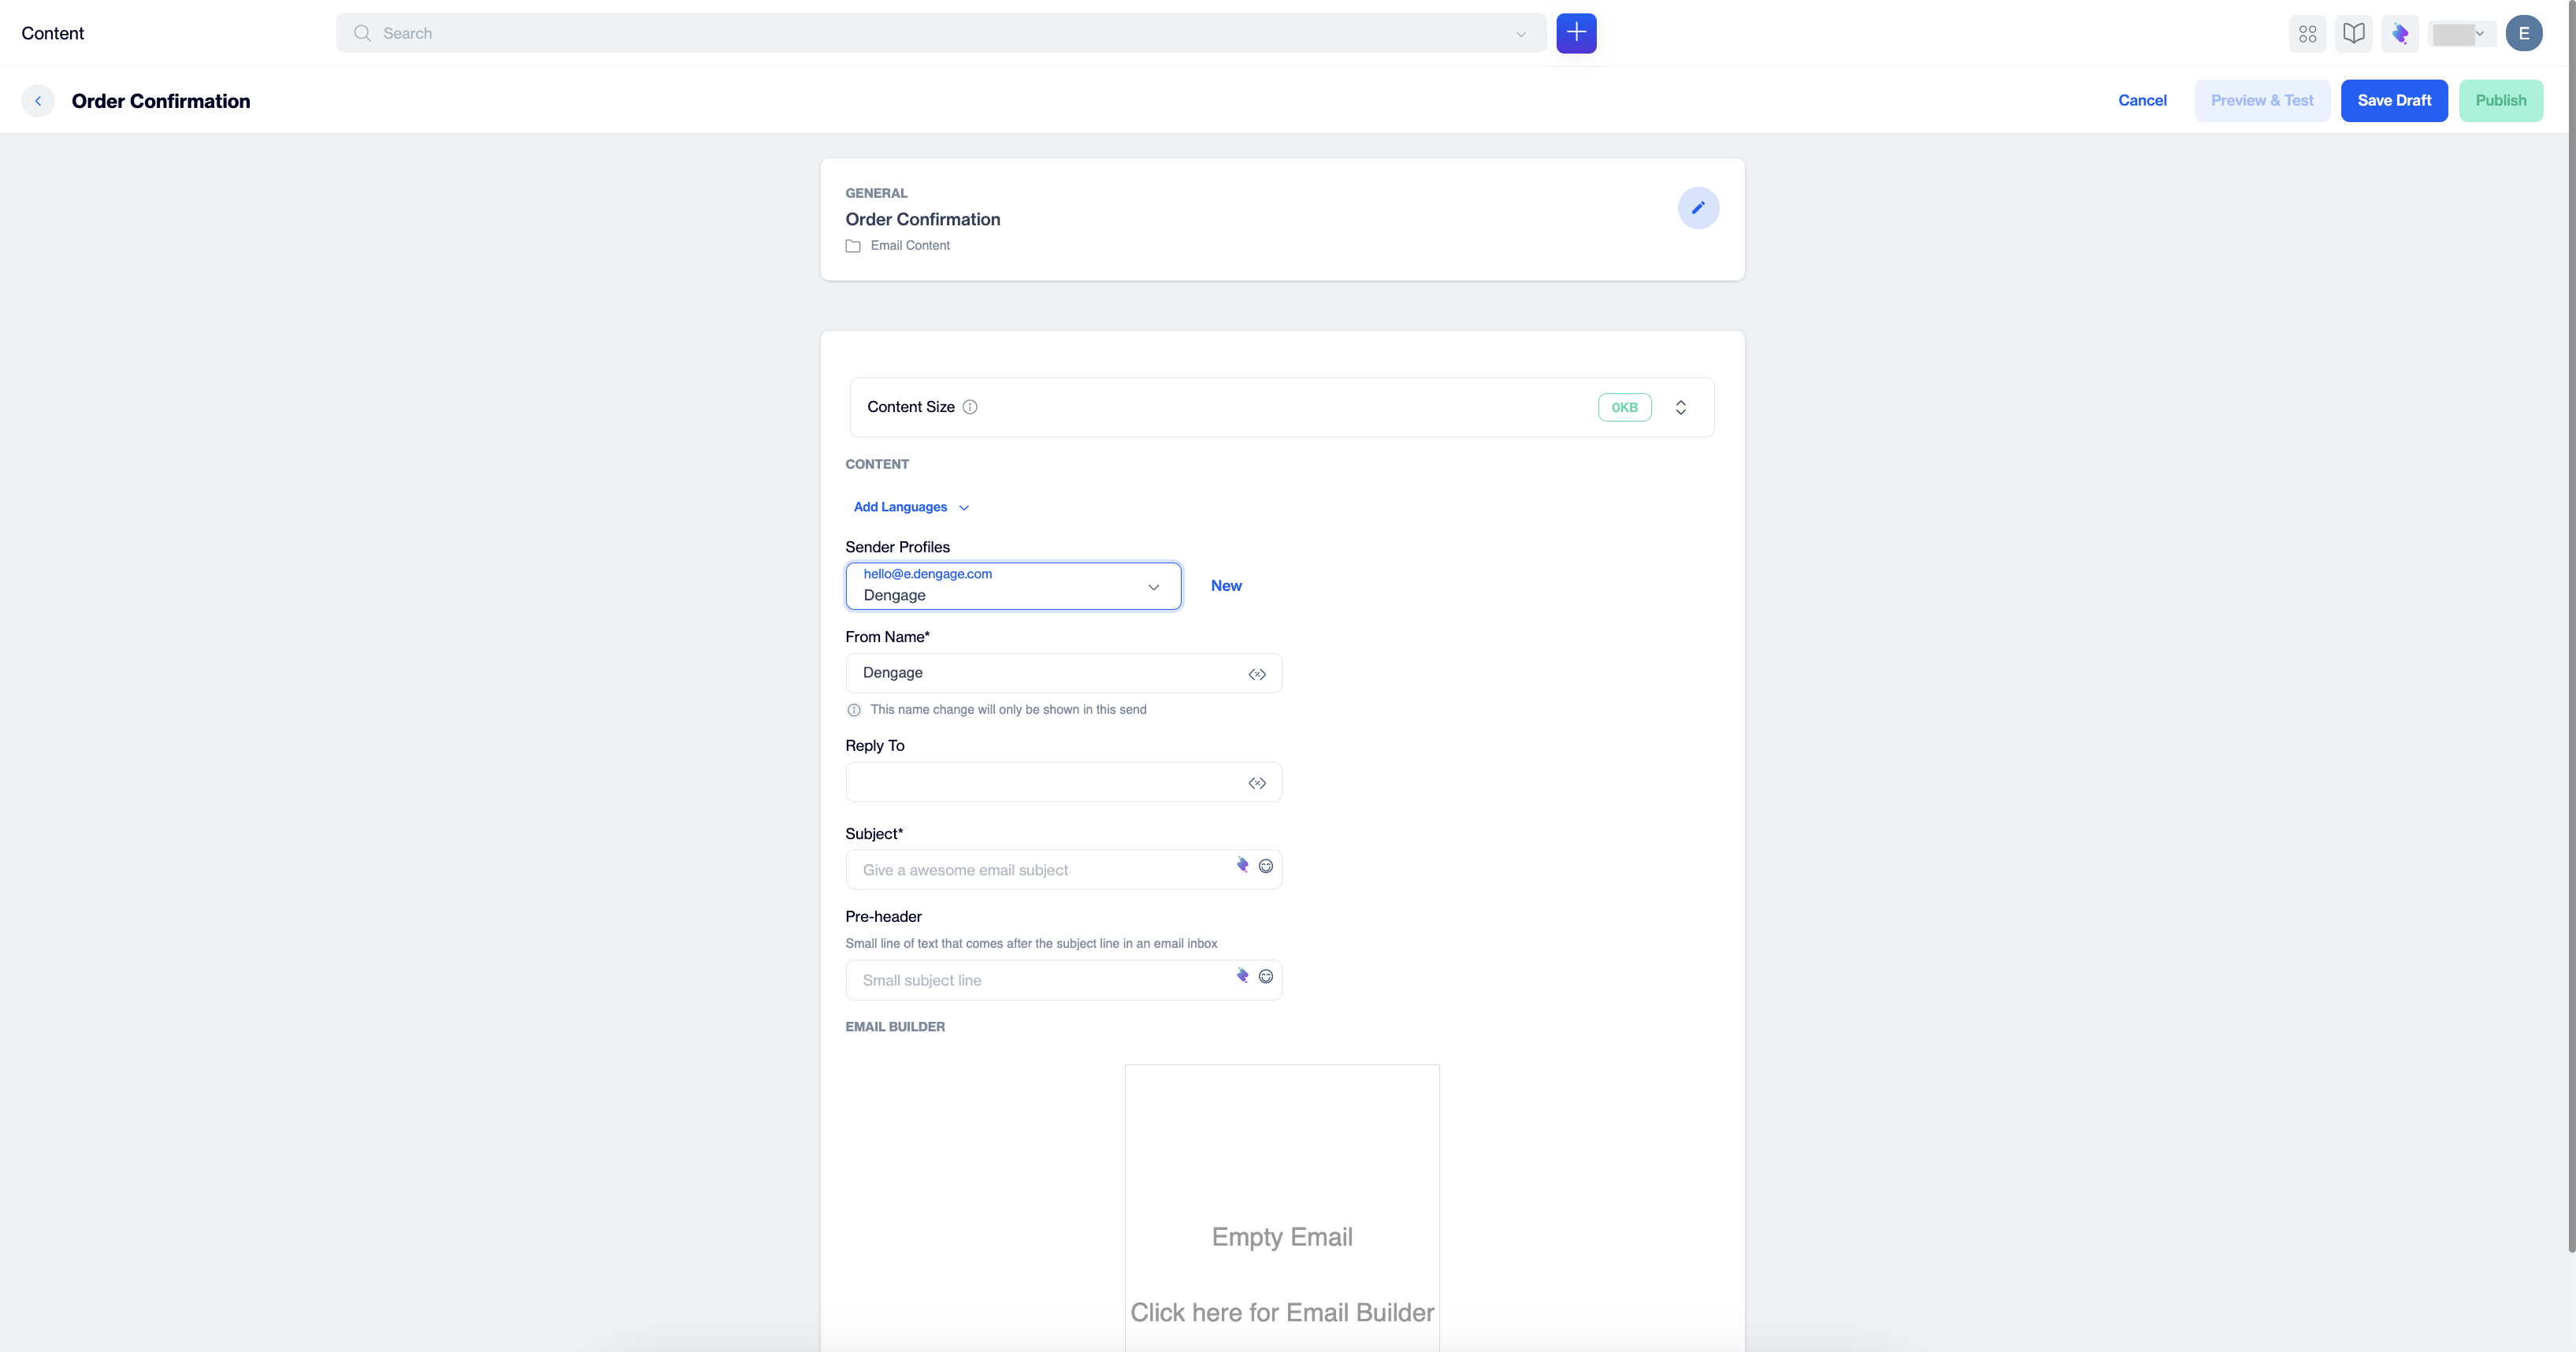
Content section with the Content Size indicator, language tabs, sender fields and Email Builder area
Content Size
The Content Size bar shows the current size of the email in kilobytes and as a percentage of the allowed limit. Keep the size low so that email clients render the message fully. Large images and long HTML increase the size. Hover over the info icon to read the limit.
Languages
You can create the same email in more than one language. Dengage sends each contact the version that matches the contact's language. When there is no match, it sends the default language.
To add languages:
- Click Add Languages. Dengage shows two options:
- Copy from Content: Copies the fields and design of the current language into the new language, so you only translate the text.
- Create Blank Email Content: Starts the new language with empty fields.
- Click one of the options. Dengage opens the Select Language dialog.
- Select one or more languages.
- If you select more than one language, choose the default language in the Please select default language content dropdown.
- Click Apply.
Dengage shows a tab for each language, with the default language marked Default. Click a tab to edit that language. Click the pencil icon next to the tabs to add or remove languages or change the default.
Sender Profiles
A sender profile combines a sender domain, a from email address and a default from name. Select a profile from the Sender Profiles dropdown. Dengage fills the From Name field from the selected profile.
To create a sender profile without leaving the form:
- Click New next to the Sender Profiles dropdown. Dengage opens the New Sender Profile dialog.
- Select a Sender Domain from the list of verified domains.
- Enter the local part of the From Email. Dengage appends the domain automatically.
- Enter the From Name that recipients see in their inbox, for example your brand name.
- Click Save. Dengage adds the profile to the dropdown and selects it.
Sender and subject fields
| Field | Required | Description |
|---|---|---|
| From Name | Yes | The sender name that recipients see. Dengage fills it from the sender profile. You can change it for this content only; the change does not update the sender profile. Click the tag icon to insert a personalization tag. |
| Reply To | No | The address that receives replies. Type an address or click the tag icon to insert a personalization tag. |
| Subject | Yes | The subject line of the email. Click the tag icon to insert a personalization tag or the emoji icon to add an emoji. |
| Pre-header | No | The short text that inbox clients show after the subject line. Click the tag icon to insert a personalization tag or the emoji icon to add an emoji. |
Fill these fields for every language tab.
Personalization with the Customization Selector
The tag icon next to From Name, Reply To, Subject and Pre-header opens the Customization Selector. It lists the data you can insert into the field. Use the Search box to find a column quickly, then click a value to insert its tag.
| Tab | What it contains |
|---|---|
| Contact Columns | Fields from the contact table, such as name, email and custom columns. |
| Device Columns | Fields from the device table. |
| Dynamic Contents (Plain Text) | Plain text dynamic content blocks defined in your account. |
| Columns From Segment | Columns available from a segment. |
| Columns From Remote Segment | Columns available from a remote segment. |
| Columns From Table | Columns from custom data tables. |
| System Parameters | System values such as unsubscribe links. |
Transactional sends can also pass values in the API request. See Customization in Transactional Messages for the tag format and API parameters.
Design the email in the builder
Click Click here for Email Builder in the Email Builder area. If you selected a template, Dengage opens it in the builder. If you chose Blank content, the canvas shows an empty drop area with the text Drop content blocks here.
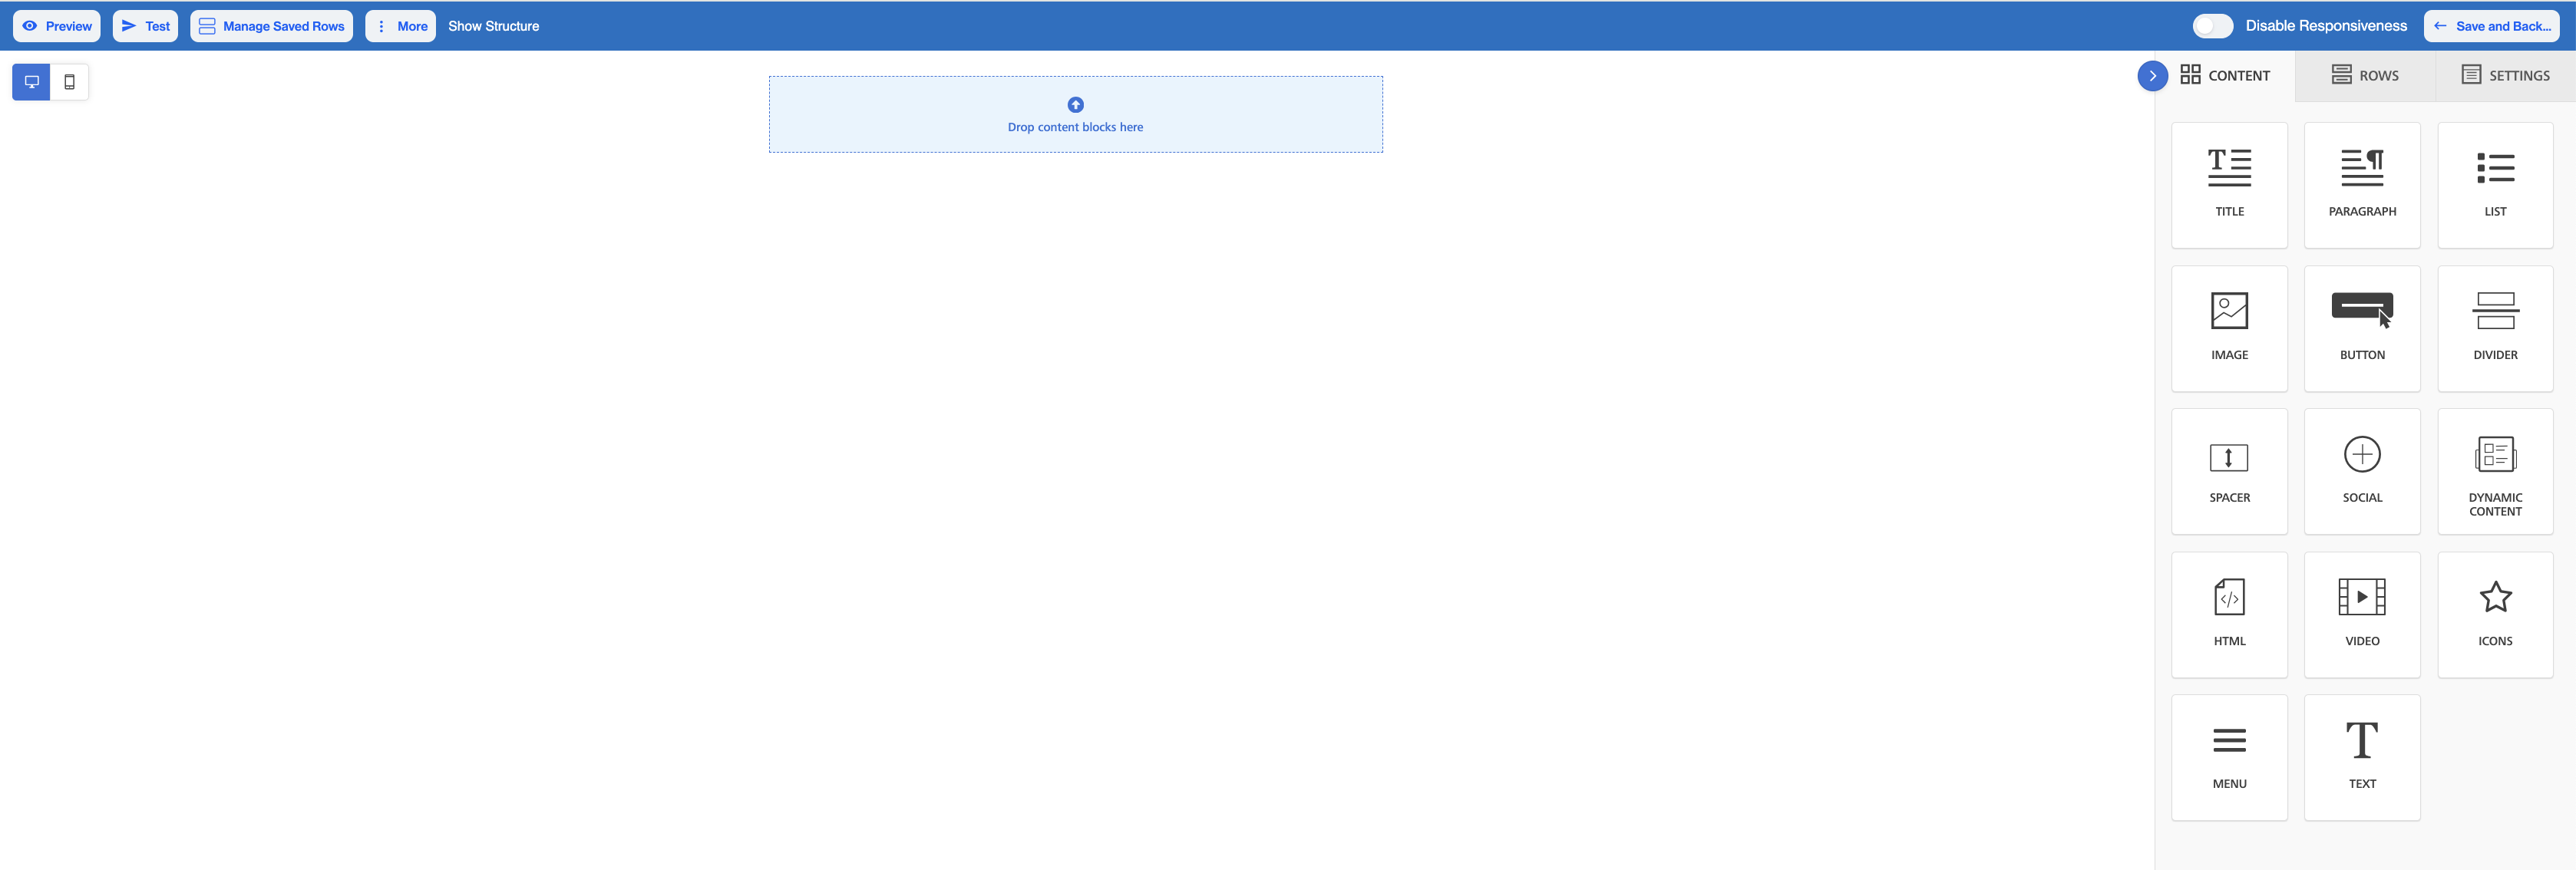
Email Builder canvas with the toolbar and the Content panel
Builder layout
- Canvas: The email design in the middle. Drag rows and blocks here. Click an element to edit it.
- Desktop and mobile toggle: The two icons in the top left corner switch the canvas between desktop and mobile views.
- Content tab: Blocks you drag into a row.
- Rows tab: Empty row layouts with one or more columns, and rows you saved earlier.
- Settings tab: Email-wide settings such as content width, background color, default font and link color.
Content blocks
Drag a block from the Content tab into a row on the canvas. Click the block to edit its text, image, link and style options in the right panel.
| Block | Use it for |
|---|---|
| Title | Headings. |
| Paragraph | Body text. |
| List | Bulleted or numbered lists. |
| Image | Pictures and logos. Upload a file or paste an image URL, and add alt text. |
| Button | A call-to-action link styled as a button. |
| Divider | A horizontal line between sections. |
| Spacer | Vertical white space. |
| Social | Links to social media profiles with icons. |
| Dynamic Content | A placeholder that Dengage fills at send time with dynamic content. |
| HTML | Custom HTML for elements the visual blocks do not cover. |
| Video | A video thumbnail that links to the video. |
| Icons | Small icons with optional text and links. |
| Menu | A row of navigation links. |
| Text | Free text with rich formatting. |
Rows and saved rows
- Open the Rows tab.
- Drag a row layout onto the canvas.
- Drop content blocks into the columns of the row.
To reuse a row in other emails, select the row on the canvas and save it. Saved rows appear in the Rows tab. Click Manage Saved Rows in the toolbar to open the Manage Rows dialog, where you can review and delete the saved rows of your account.
Toolbar actions
| Action | What it does |
|---|---|
| Preview | Shows the email as it renders on desktop and mobile. |
| Test | Sends a test email of the current design. |
| Manage Saved Rows | Opens the Manage Rows dialog. |
| More > Export Template | Downloads the current design so you can keep a copy or import it into another content. |
| More > Upload Template | Imports a design file that you exported earlier. The upload replaces the current design. |
| More > Show Structure | Outlines the rows and columns on the canvas so you can see the layout. |
| Disable Responsiveness | Turns off the mobile-friendly stacking of columns. Leave it off unless the design needs a fixed layout. |
| Save and Back | Saves the design into the content form and returns to the Content section. |
Click Save and Back when the design is ready. Dengage shows a thumbnail of the design in the Email Builder area. Click the thumbnail to open the builder again.
Preview, test, save and publish
The buttons in the top right corner of the content form control the content status.
| Button | What it does |
|---|---|
| Cancel | Closes the form without saving the changes. |
| Preview & Test | Opens the preview, where you can check the rendered email and send a test email. The button is active once the content has a design. |
| Save Draft | Saves the content with the Draft status. You can edit and publish it later. |
| Publish | Saves the content and makes it available for transactional sends. The button is active once the required fields (Name, From Name, Subject and a design) are complete. |
Recommended order:
- Click Preview & Test and check the email on desktop and mobile.
- Send a test email to yourself or a colleague and check the subject, pre-header, sender name and links.
- Click Save Draft if you need to continue later, or Publish to make the content live.
After you publish, the content appears in the Transactional Email list with the status Approved. Use its Public ID in the transactional send API to reference the content.
Manage existing email content
The Transactional Email list shows all content in the selected folder.
| Column | Description |
|---|---|
| Name | The content name. Click it to open the content. |
| Status | Draft or Approved. |
| Last Edited On | The date and time of the last change. |
| Last Edited By | The user who made the last change. |
| Languages | The language codes of the content. |
| Public ID | The identifier you use in API calls. The list shows a shortened version. |
Use the tools around the list:
- Search: Filters the list by name.
- Filter: Filters by Languages and by a Date Range based on the update date. Click Apply to filter or Clear Filter to reset.
- All / Created by me: Shows all content in the account or only the content you created.
- Folders: Click a folder to show its content. Use the folder menu to Rename, Copy Public ID, Move Item or Delete the folder, and click New Folder to add one.
- Page view: Sets how many rows the list shows per page (20, 30 or 40).
Open the three-dot menu at the end of a row to act on one content:
| Action | What it does |
|---|---|
| Edit | Opens the content form. |
| Duplicate | Creates a copy of the content in the same folder. |
| Move | Moves the content to another folder. |
| Copy Public ID | Copies the full Public ID to the clipboard. |
| Delete | Removes the content. Transactional sends that reference its Public ID stop working, so check your integrations first. |
Troubleshooting
| Problem | What to check |
|---|---|
| The Next button in the General section does nothing. | Enter a Name. The field is required. |
| Publish is disabled. | Fill From Name and Subject for every language tab and add a design in the Email Builder. |
| Preview & Test is disabled. | Open the Email Builder, add at least one block and click Save and Back. |
| The Content Size percentage is high. | Compress or resize images, remove unused rows and avoid pasting large HTML. |
Updated 16 days ago