
Microsoft Dynamics 365
This guide explains how to integrate Microsoft Dynamics 365 by setting up an application in Azure, configuring permissions, and creating an application user in the Power Platform Admin Center.
Step 1: Sign in to Microsoft Dynamics 365
Go to <https://www.microsoft.com/en-us/dynamics-365>, click Sign In, and log in with your Microsoft account. Once signed in, navigate to Dynamics 365 Sales and click on to open the Sales application by filling correct email details
Step 2: Access Microsoft Azure
Open <https://portal.azure.com> and sign in using the same Microsoft account. From the left-hand menu, select Microsoft Entra ID to access app registration settings.
Step 3: Register a New Application
On the Microsoft Entra ID page, click Add and choose App Registration. On the Register an application page, enter a display name for your application in the Name field, ensure that Accounts in this organizational directory only remains selected under Supported account types, and then click the Register button at the bottom of the page.
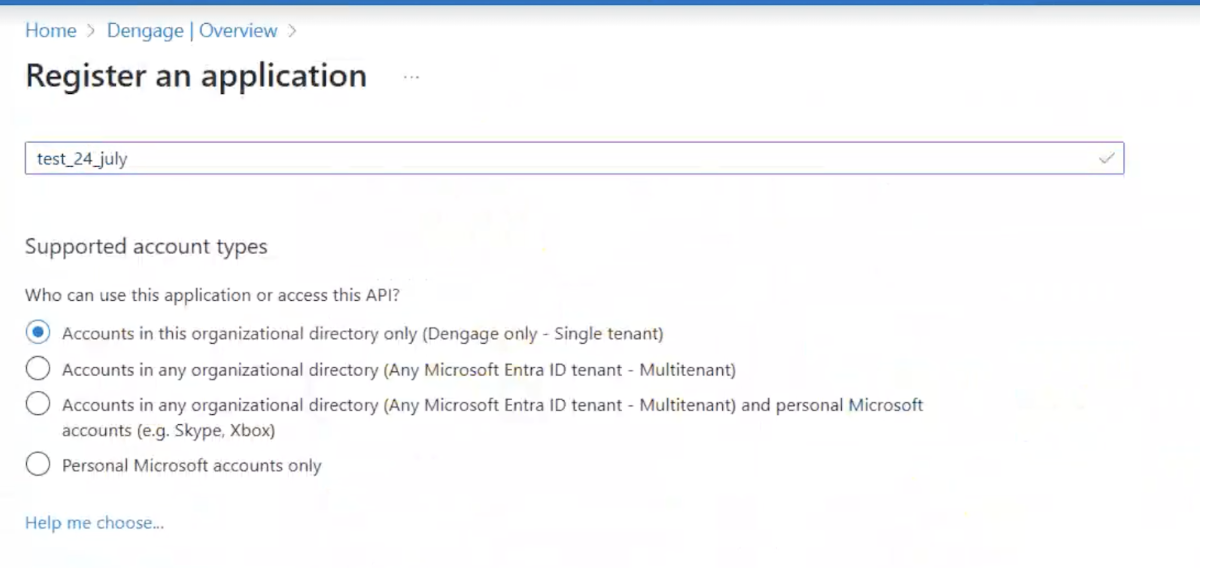
Register an Application
Step 4: Review the Registered Application
Once the application is registered, you will be directed to its Overview page, where you can view details such as Display name, Application (client) ID, Object ID, Directory (tenant) ID, and Supported account types.
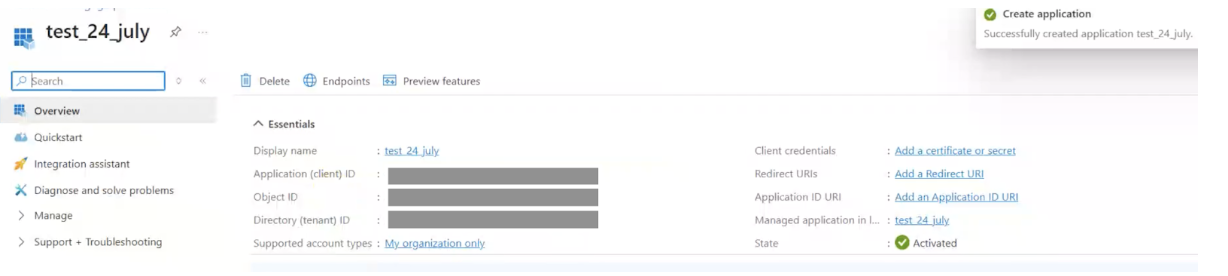
Application Overview
Step 5: Configure API Permissions
On the application's Overview page, you will see all the details of your application. From the left-hand menu under Manage, go to API Permissions. On the Configured permissions section, click the Add a permission button. In the Request API permissions window, select Microsoft APIs, then choose Dynamics CRM. Scroll down to the Permissions section, and click on "Delegated permissions" section. Check the box for user_impersonation (Access Common Data Service as organization users), and click Add permissions button to update the permissions.
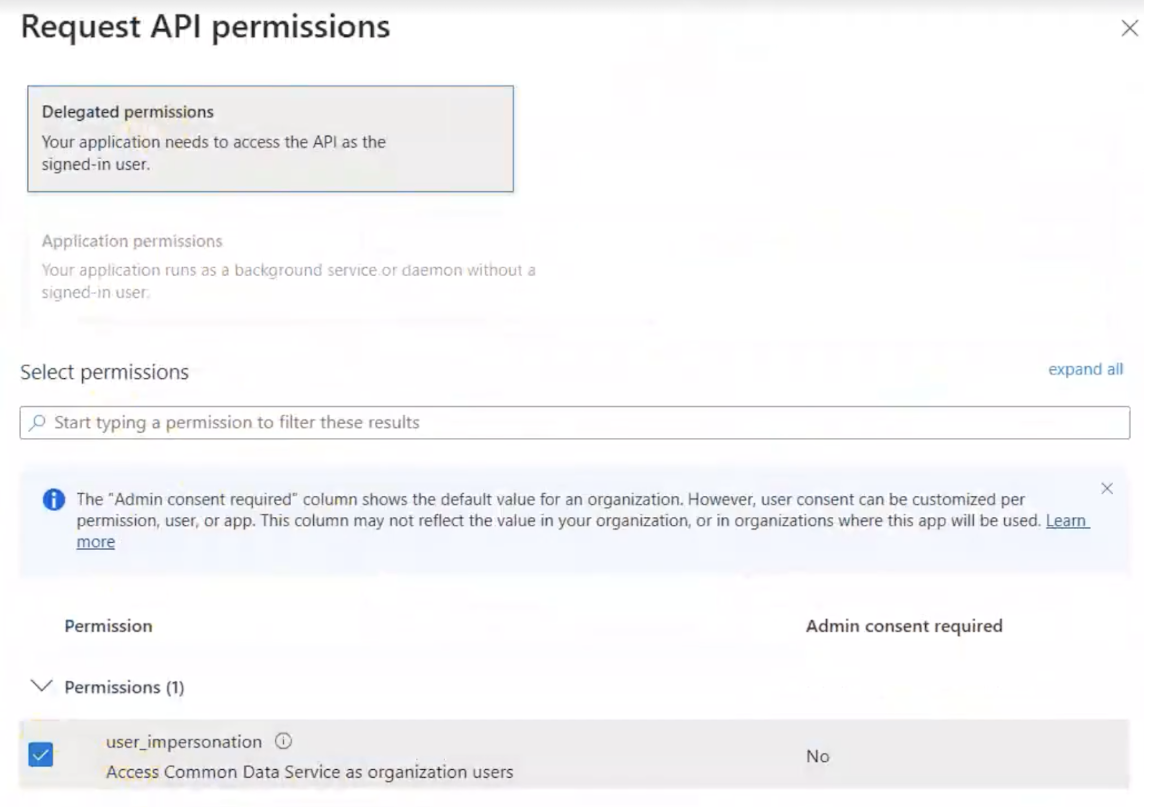
API Permissions
Step 6: Create a Client Secret
Next, go to Certificates & Secrets under the Manage section in the left-hand panel. In the Client secrets section, click on +New client secret. On the Add a client secret screen, enter a description and leave the expiration option as the default 180 days. Click Add to create the secret. Once added, you will see it listed under the Client secrets section along with its details: Description, Expires, Value, and Secret ID. Make sure to copy and securely store the Value.

Client Secret
Step 7: Create an Application User in Power Platform
Go to this Microsoft guide for reference on creating an application user. Then, open the Power Platform Admin Center by using your Microsoft account. And from the left-hand menu, go to Manage > Environments. On the Environments screen, you will see a list of environments, each with three dots next to them. Click on the three dots for your desired environment and select Settings.
In the Settings screen, navigate to the Users + Permissions section and click on Application Users.
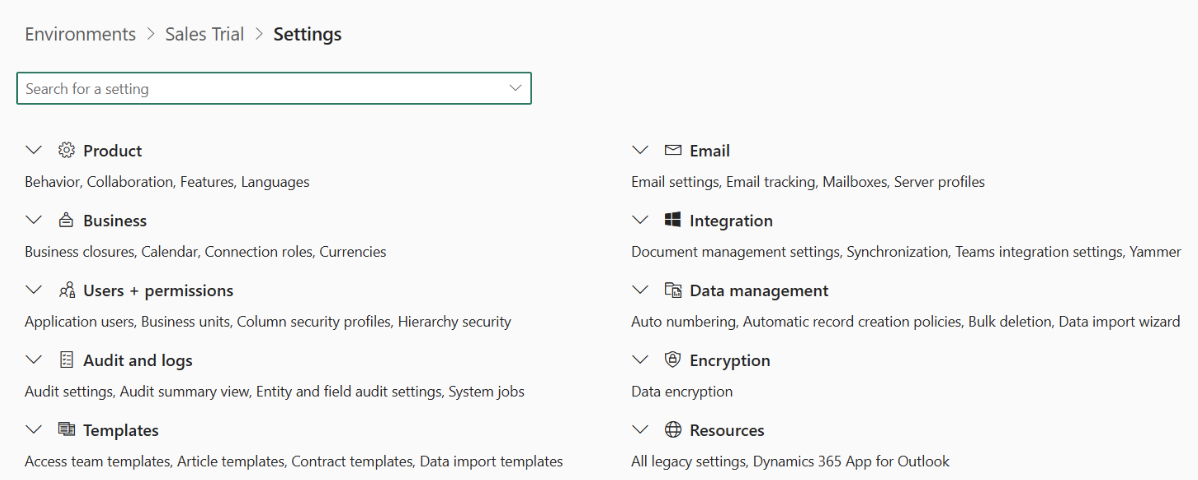
Settings Screen
On the Application Users screen, you will see a list of existing users and a + New App User button in the top left corner. Click on + New App User.
New App User
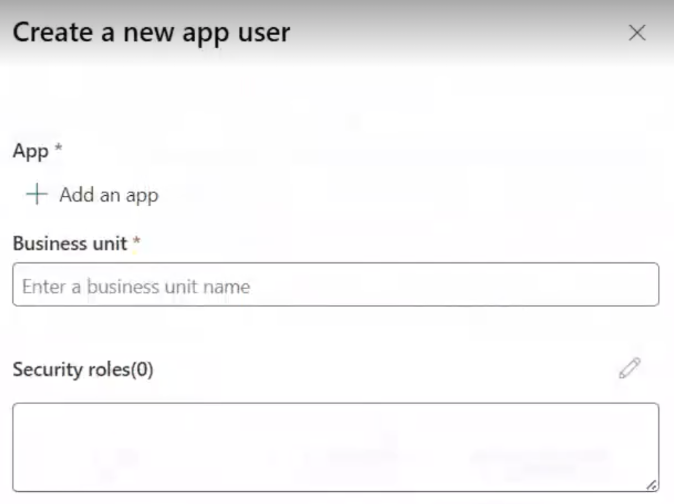
On the Create a new app user screen, first add an app: under the App section, click + Add an App, select the application you created earlier from the Add an app from Microsoft Entra ID screen, and click Add.
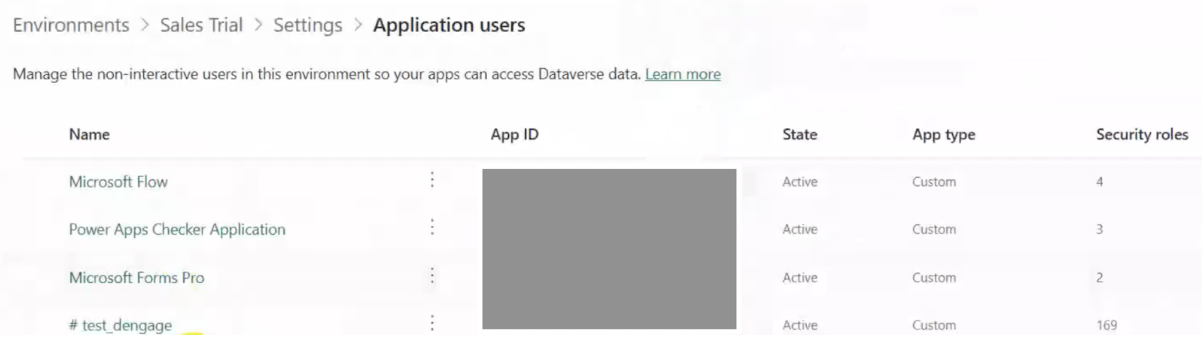
Next, in the Business Unit field, type in the desired business unit. Then, under Security Roles, select all required roles. Once you have filled in all three sections (App, Business Unit, and Security Roles), click Create. You will now see the new user listed under Environments > Sales Trial > Settings > Application Users.
Application Users
Step 8: Collect Integration Details
After completing the above steps, note down the following information required for integration:
- Application (client) ID
- Directory (tenant) ID
- Client Secret Value
These details will be used in the Dengage platform to complete the Microsoft Dynamics integration.
Integration on Dengage Platform
Pre-requisites: Columns for CRM Integration
| master_contact | crm_opportunities |
|---|---|
| contact_key | opportunity_id |
| name | contact_key |
| surname | name |
| description | |
| email_permission | parent_account_id |
| email_status | status |
| gsm | rating |
| gsm_permission | sales_stage |
| gsm_status | close_probability |
| originating_lead_id | total_amount |
| entity_name | total_discount |
| qualifying_opportunity_id | estimated_close_date |
| parent_contact_id | actual_close_date |
| parent_account_id |
Go to your Dengage account and navigate to Settings > Integrations > 3rd Party Integration. Locate Microsoft Dynamics 365 in the list and click the Connect button.
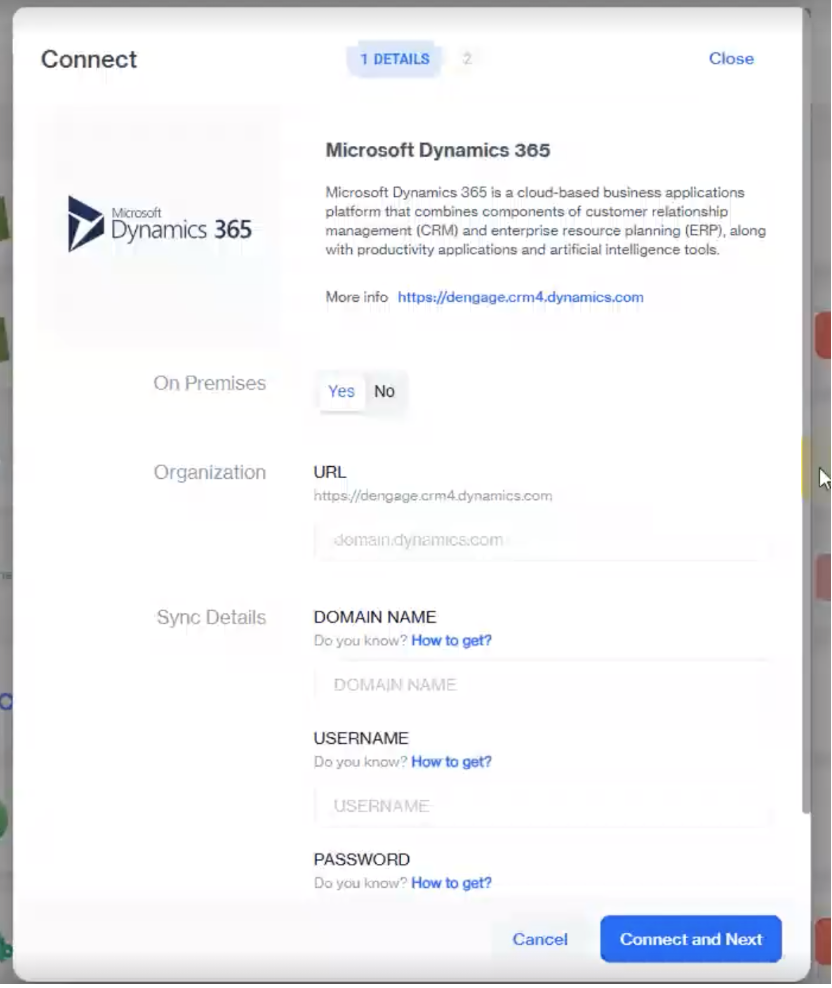
Dengage supports connections to both On-Premises (Yes) and Cloud (On-Premises: No) versions of Microsoft Dynamics CRM.
For the On-Premises (Yes) Version:
Refer to Microsoft Dynamics 365 Customer Engagement (on-premises) system requirements and required technologies for detailed prerequisites.
Provide the following credentials:
- Organization URL: The base URL of your CRM Dynamics.
- Domain Name: Your CRM Dynamics domain name.
- Username: The username for your CRM Dynamics account.
- Password: The password for your CRM Dynamics account.
On-Premises Configuration
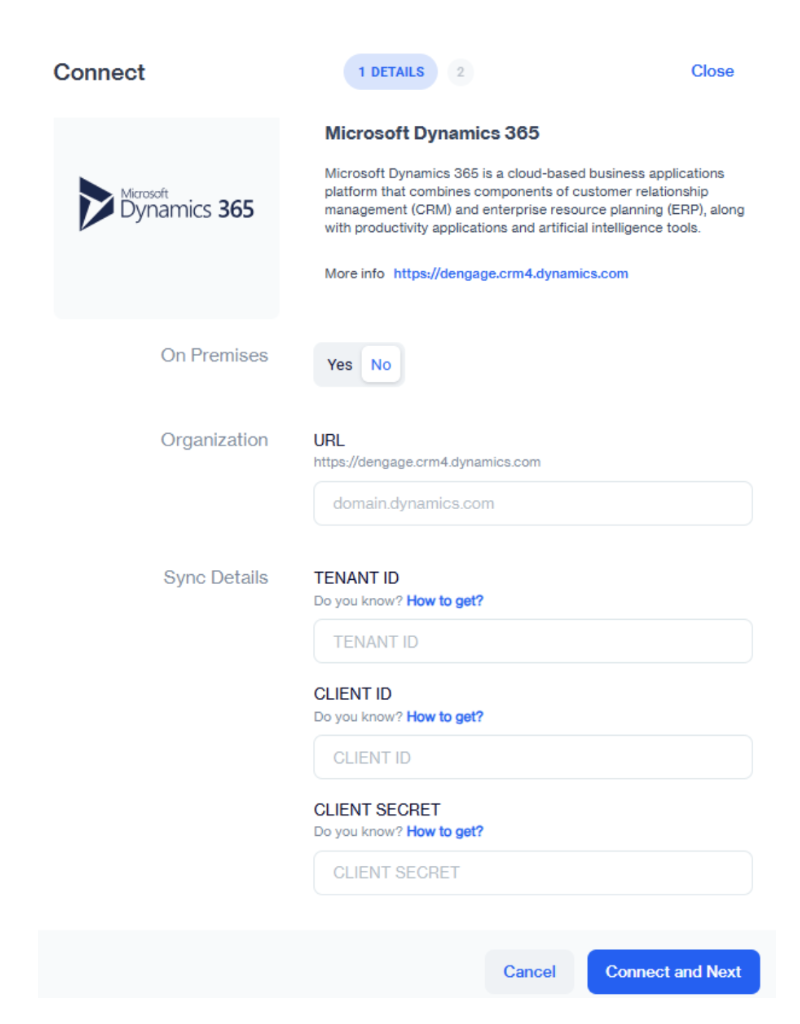
For the Cloud (On-Premises: No) Version:
Provide the following credentials:
- URL: The base URL of your CRM Dynamics instance.
- Tenant ID: The directory (tenant) ID from your Azure app registration.
- Client ID: The application (client) ID from your Azure app registration.
- Client Secret: The client secret value generated during app registration.
You can find the Tenant ID and Client ID on the Overview page of your registered application in Microsoft Azure (Microsoft Entra ID), and the Client Secret under the Certificates & Secrets section of the same application.
Cloud Configuration
After entering the correct credentials, click on Connect and Next. A confirmation message will appear indicating that the connection is successful.
To proceed with data synchronization, click on the Start Sync button. You can also choose the Notify by Email option to receive an email notification once the sync is complete.
Finally, click Got it to be redirected to the details page where the connection status will be displayed as Connected.
Sync Details and History
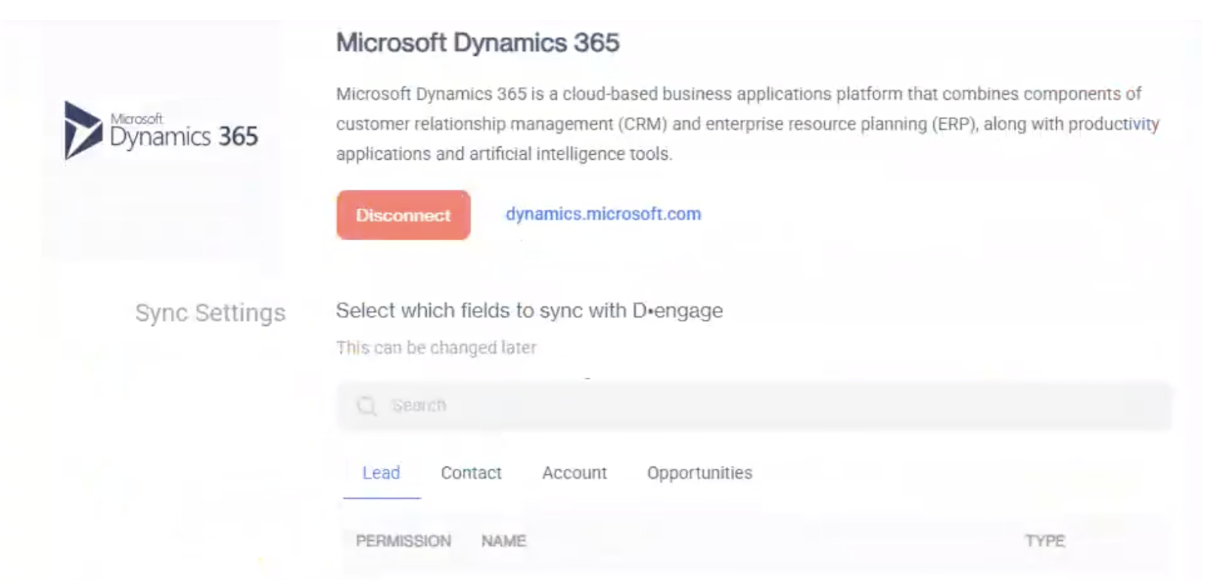
Once the integration is connected, you will see the Sync Settings screen, where you can configure which data types to sync with Dengage. The available options include Lead, Contact, Account, and Opportunities. You can select the fields you want to sync for each data type as needed.
Sync Settings
You can also access the Sync Details page to review the integration settings.
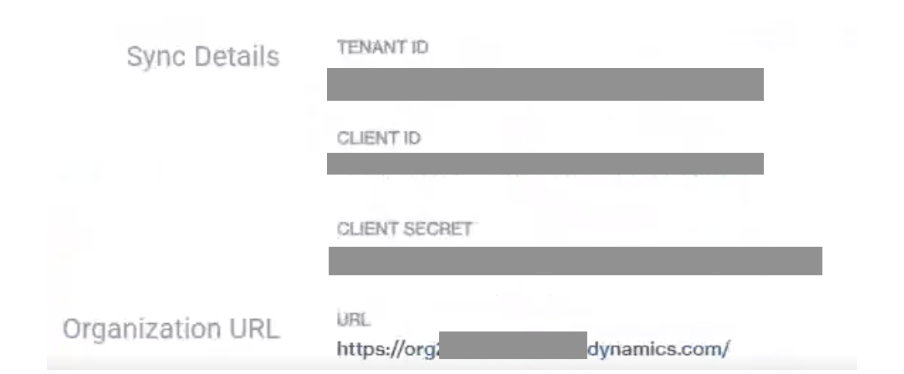
Sync Details
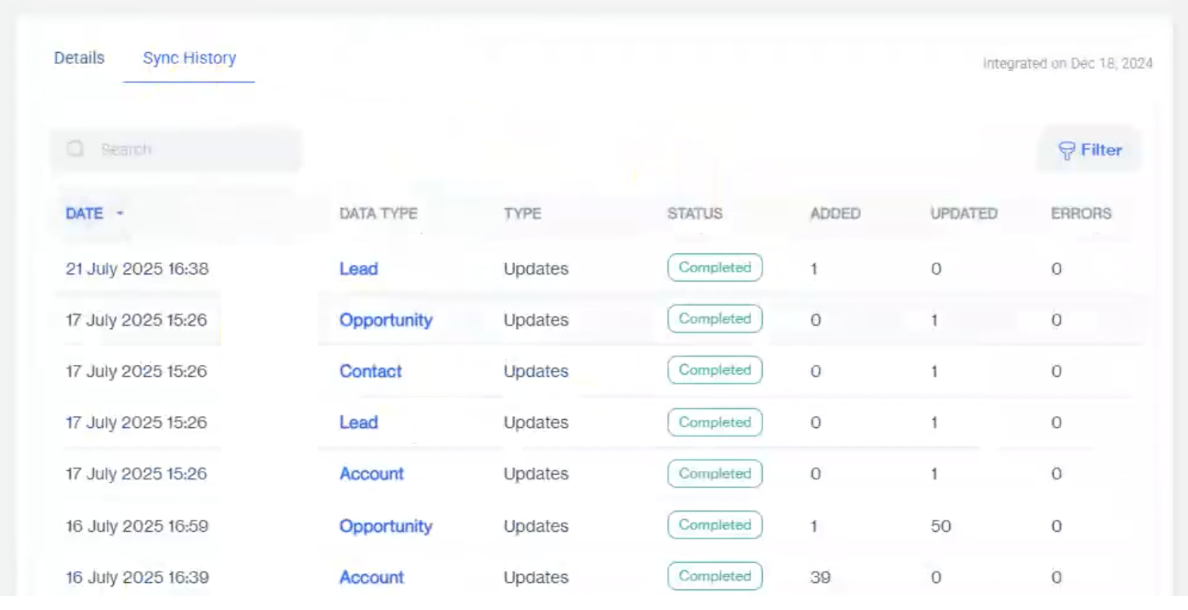
Additionally, there is a Sync History page where you can review all previously synced records. This page allows you to search records by specifying their Data Type (e.g., Lead, Contact, Account, Opportunities).
Sync History
Note:
- Searching only works by Data Type. For example, if you search for "Account", all records with the Account data type will be displayed.
- Records can also be filtered based on their Type and Status. Click on the Filter option to open a pop-up window where you can select from the following:
- Type: Bulk Sync, Updates, or All.
- Status: Displays the status options of the synced records.
This allows you to manage which fields are synchronized and easily track your sync history.
Using Microsoft Dynamics with Dengage
Accessing Sales Hub
Log in to your Microsoft Dynamics account and click on Sales Hub. From the left-hand panel, you will see the following sections:
- Under Customers: Accounts and Contacts.
- Under Sales: Leads and Opportunities.
- Under Marketing: Marketing Lists (includes both Static and Dynamic lists).
Creating Marketing Lists
-
Go to the Marketing Lists screen and click on the + New button.
-
On the Summary tab, fill in the following fields:
- Name: Provide a name for your list.
- List Type: Choose between Active or Passive.
- Targeted At: Select the entity type from the dropdown (Account, Contact, or Lead).
-
Click Save to create the list.
-
Navigate to Lookup Records, type in the record name you want to add (e.g., contact, lead, or account), and click Add. The record will now appear under the Members tab. Click Save & Close.
You can create multiple marketing lists as needed, for example:
- A Static List targeted at Contacts.
- A Dynamic List targeted at Leads.
Syncing with Dengage
After creating your marketing lists, go to the Sync History screen in Dengage to confirm that the records (e.g., contacts, leads, or accounts) have been synced successfully.
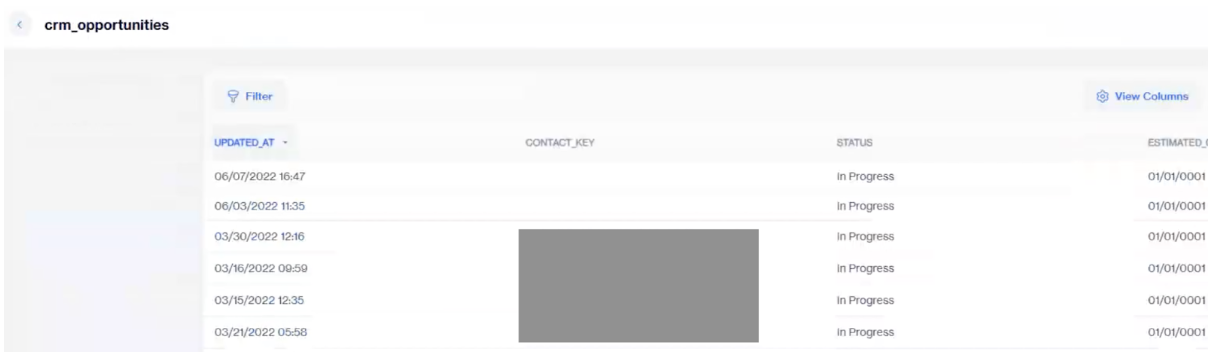
You can also verify synced data by navigating to Data Space > Tables > All in Dengage. Use the search bar to look for "CRM" and click on tables such as CRM Opportunities.
CRM Data Verification
Any changes made to Contacts, Leads, or Accounts in Microsoft Dynamics CRM will automatically reflect in the master_contact table.
You can verify these changes by creating a segment in Dengage Platform. For example:
- Create a segment with the condition:
Contacts where master_contact → Entity Name contains "Lead".
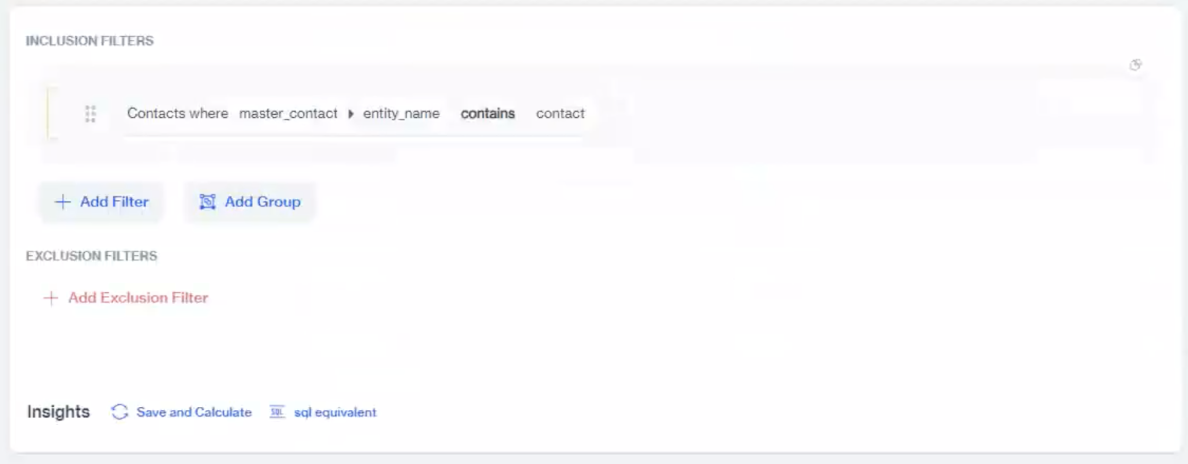
Segment Configuration
- Click on the Calculate button to see the record count of matching records.

Calculate Results
- Click on the record count to view detailed information for each record.
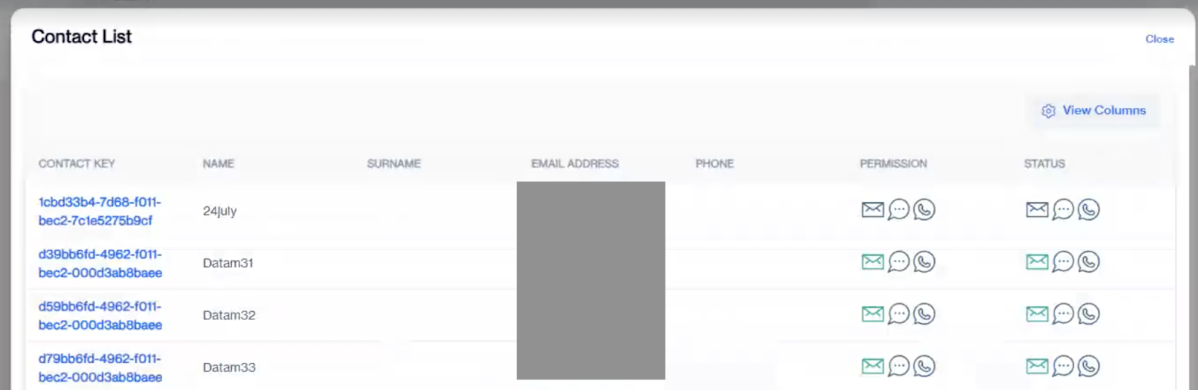
Record Details
This allows you to easily confirm that updates in Microsoft Dynamics CRM are successfully synced and stored in Dengage Platform.
Using Marketing Lists in Segments
You can use your Microsoft Dynamics Marketing Lists directly while creating segments in the Dengage platform. To do this:
-
Go to Audience > Segments > Interactive Segments in the Dengage Platform.
-
Click + New Segment and enter a Name and Description for your segment, then click Next.
-
In the Inclusion Filter section, click the Add Filter button.
-
From the dropdown menu, under Existing Segments, choose Microsoft Dynamics Com.
-
Select from the available Static or Dynamic Marketing Lists synced from Microsoft Dynamics.
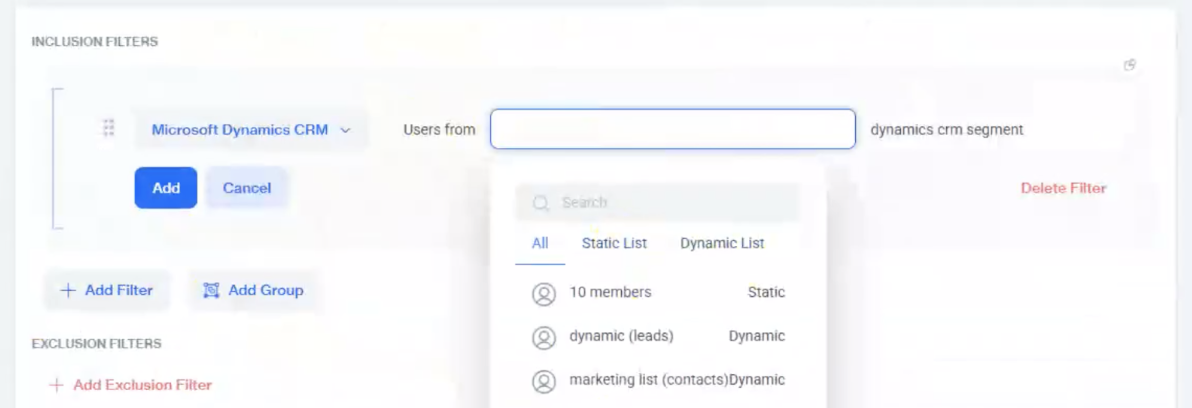
Marketing Lists
-
Click Save & Calculate to generate the segment and view the results based on the selected list.
-
Click Save at the top to store your segment for future use.
This allows you to easily target and engage audiences from your Microsoft Dynamics marketing lists directly within Dengage campaigns.
Disconnecting Microsoft Dynamics
At any stage, you can disconnect your Microsoft Dynamics account from Dengage. To do this, click on the Disconnect button. A confirmation pop-up will appear.
- Click Yes, Disconnect to confirm and proceed with disconnecting the account.
- Click Cancel to return to the details page without making any changes.
Updated 4 days ago