
CTA Image Popup
The CTA Image Popup is an On-Site template that shows one image with a call-to-action (CTA) button on top of your web page. Use it to promote a product, collect sign-ups, or send visitors to a specific page.
You can build the popup in the Dengage On-Site Visual Editor and then use it in a Flow campaign or a Real-time Targeting campaign.
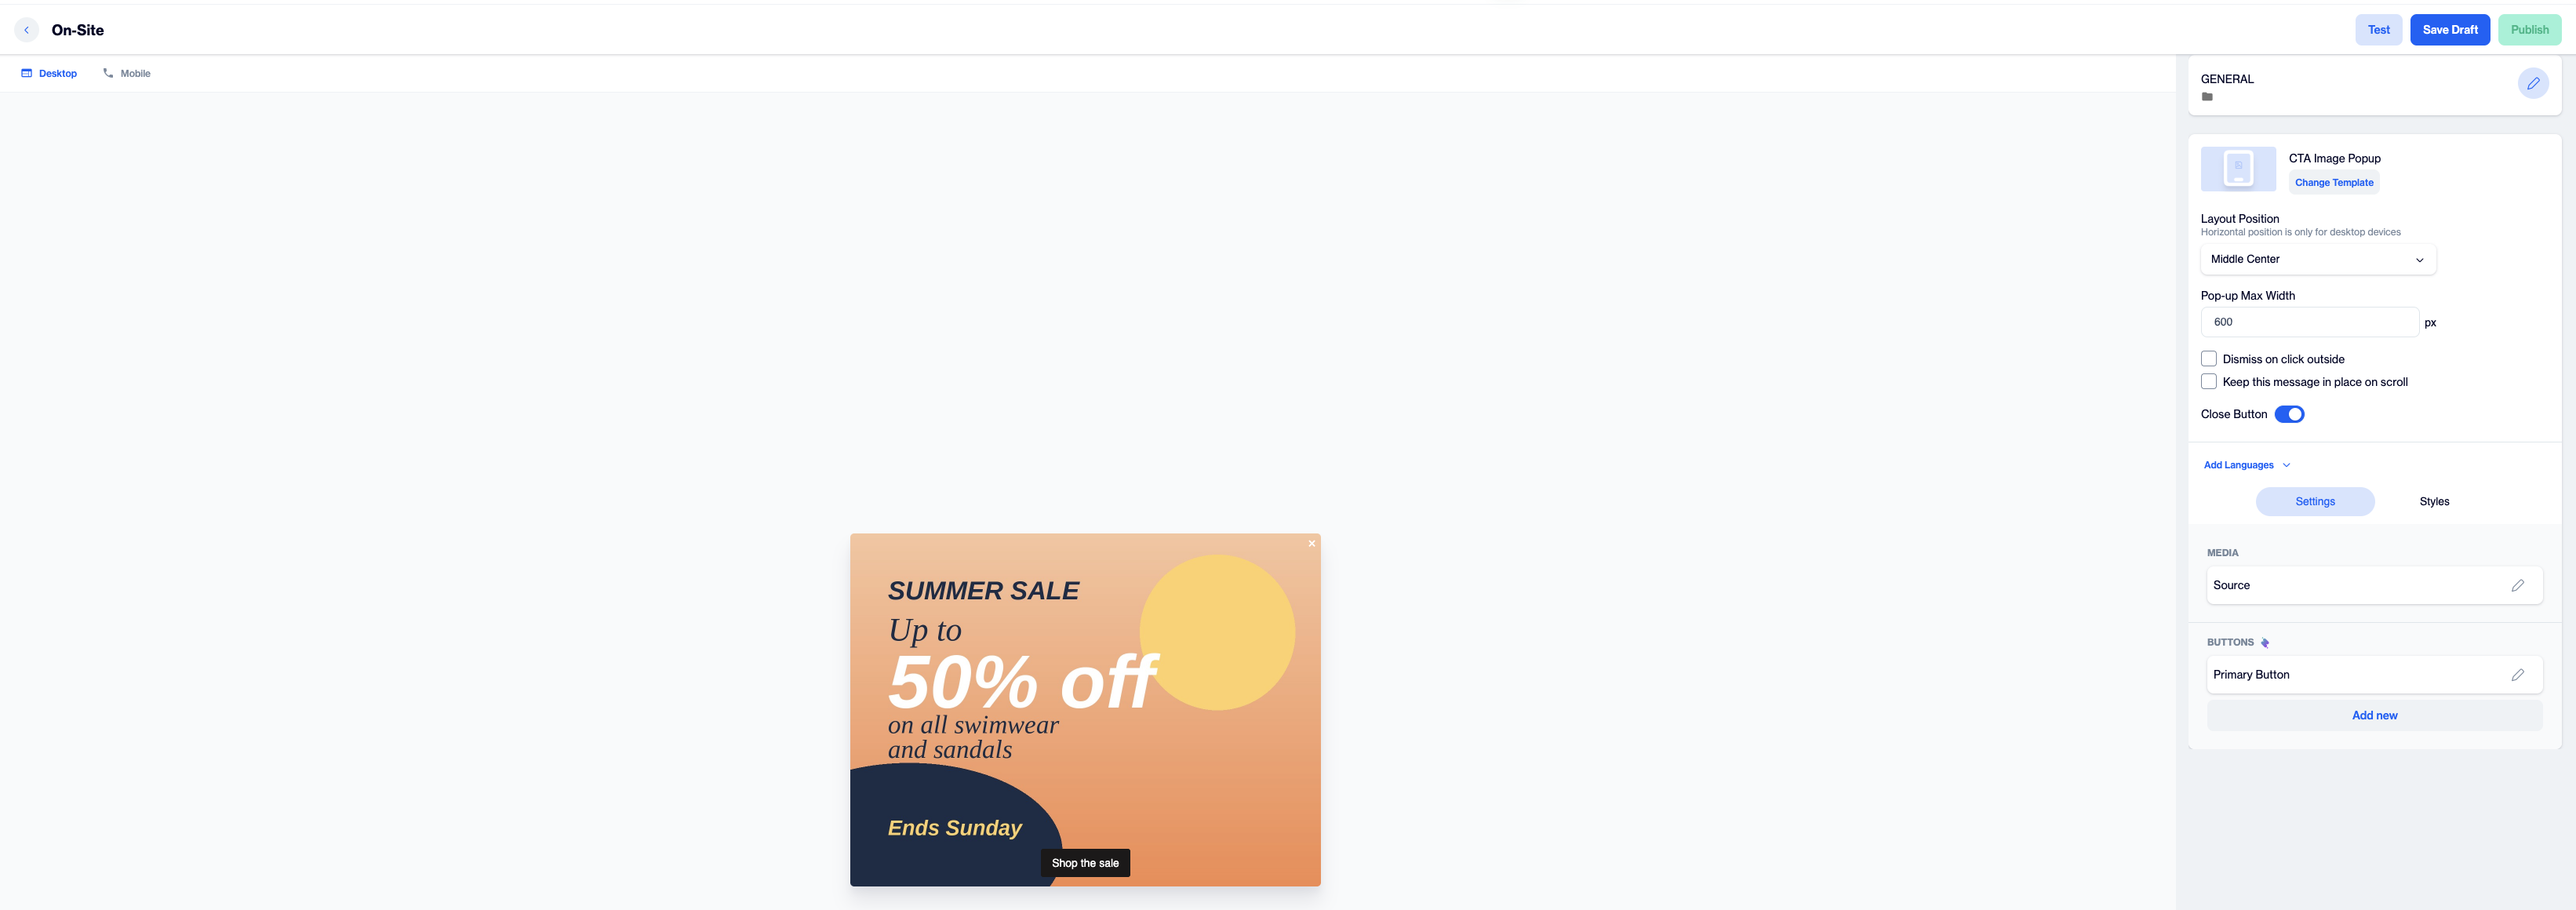
The CTA Image Popup editor. The preview on the left updates as you change settings on the right.
Before You Start
- Prepare the image you want to show. Upload it to the Image Selector or keep its URL ready.
- Decide where the button should send visitors and prepare that URL.
Create a CTA Image Popup
- Go to Content > On-Site.
- On the Template Gallery tab, select CTA Image Popup under Blank Layout.

The CTA Image Popup card in the Blank Layout row of the Template Gallery.
The editor opens with a preview on the left and a settings panel on the right. Use the Desktop and Mobile buttons above the preview to check how the popup looks on each device.
Step 1: Fill in the General Section
- Enter a Name for the popup.
- Optionally, add a Description.
- Select a Folder. To pick a different folder, click Change Folder.
- Click Next.
The Content section opens.
Step 2: Set the Layout
| Setting | What it does |
|---|---|
| Change Template | Switches this content to another On-Site template. |
| Layout Position | Sets where the popup appears on the page. Select a position for Desktop (top, middle, or bottom, combined with left, center, or right) and for Mobile (top, middle, or bottom). Horizontal positions apply to desktop only. The default is Middle Center. |
| Pop-up Max Width | Sets the widest size of the popup in pixels. Enter a value between 250 and 1000. The default is 400 px. On smaller screens, the popup shrinks to fit. |
| Dismiss on click outside | Lets visitors close the popup by clicking anywhere outside it. Off by default. |
| Keep this message in place on scroll | Keeps the popup fixed on the screen while the visitor scrolls. Off by default. |
| Close Button | Shows an X button on the popup so visitors can close it. On by default. Keep it on so that visitors who do not click outside the popup, including keyboard users, can still close it. |
Step 3: Add Languages (Optional)
To show the popup in more than one language, click Add Languages and choose one of the following:
- Copy from Content copies the current content into the new language so you only translate the text.
- Create Blank Content starts the new language from an empty template.
Step 4: Add the Image and Buttons
Open the Settings tab.
Media
- Click the pencil icon next to Source.
- Do one of the following:
- Enter the image URL in the Source field.
- Click the image icon to open the Image Selector, select an image from your folders, and click Add.
- Click the customization icon to open the Customization Selector and insert a dynamic value. The Flow tab lists values for Flow campaigns, and the Targeting tab lists values for Real-time Targeting campaigns.
- Click Save & Back.
Use an image that still reads clearly at the width you set in Pop-up Max Width. Keep any text inside the image large and high-contrast so that visitors can read it on mobile screens.
Buttons
- Click the pencil icon next to Primary Button.
- Enter the Button Text. Write what happens when visitors click, for example "Shop the sale" or "Sign up". The default text is "Primary".
- Enter the Button URL that the button opens.
- Keep Open a new tab on if you want the page to open in a new browser tab, or turn it off to open the page in the same tab.
- Click Save & Back.
To add a second button, click Add new and repeat the steps. The second button uses the Secondary Button styles.
The customization icon next to Button Text and Button URL opens the Customization Selector, so you can personalize the text or the link with dynamic values.
Step 5: Style the Popup
Open the Styles tab. The preview updates as you change each value.
General
| Setting | What it does |
|---|---|
| Font Family | Selects the font for the button text. The default is Helvetica, Arial, Tahoma. |
| Font URL | Loads a custom web font from a URL, for example a Google Fonts link. |
| Card Radius | Rounds the corners of the popup. The default is 5. |
| Card Padding | Sets the space between the popup edge and its content. The default is 12. |
| Background | Sets the background color of the popup. |
| Close Button Color | Sets the color of the X button. |
| Close Button Size | Sets the size of the X button. The default is 16. |
Primary Button and Secondary Button
| Setting | What it does |
|---|---|
| Text | Sets the text color of the button. |
| Text Align | Aligns the button text left, center, or right. The default is Center. |
| Font Weight | Sets the text weight, for example Normal or Bold. |
| Font Size | Sets the text size. The default is 14. |
| Background | Sets the button color. |
| Border | Sets the border color. |
| Border Radius | Rounds the button corners. The default is 5. |
| Border Width | Sets the border thickness. The default is 0, which hides the border. |
| Fit Content | Shrinks the button to the width of its text instead of the full popup width. |
Choose button and background colors with enough contrast so that the button text stays readable for all visitors.
Step 6: Test, Save, or Publish
Use the buttons in the top right corner of the editor:
- Test opens the Test On-Site Template window. Choose See On Your WebSite to view the popup on your own site or Send Test Onsite Message to send a test message.
- Save Draft saves the popup without making it available to campaigns.
- Publish makes the popup available to use in your campaigns.
Updated about 1 month ago