
Full Screen
The Full Screen template covers the whole device screen with one image, a title, and a message. Use it when you want a single announcement, offer, or permission request to hold the user's full attention.
This page explains how to build a Full Screen in the Visual Editor, what each setting does, and how to test it before you publish.
Before You Start
- Open Content > In-App, select New, choose Visual Editor, and select the Full Screen template under Blank Layout.
- Prepare your image in advance. The editor suggests a 6:5 aspect ratio, and the image fills the top of the screen on every device.
- Decide what the user should do next: open a link, dismiss the message, or grant push notification permission. This decision shapes the Actions section.
Creating a Full Screen
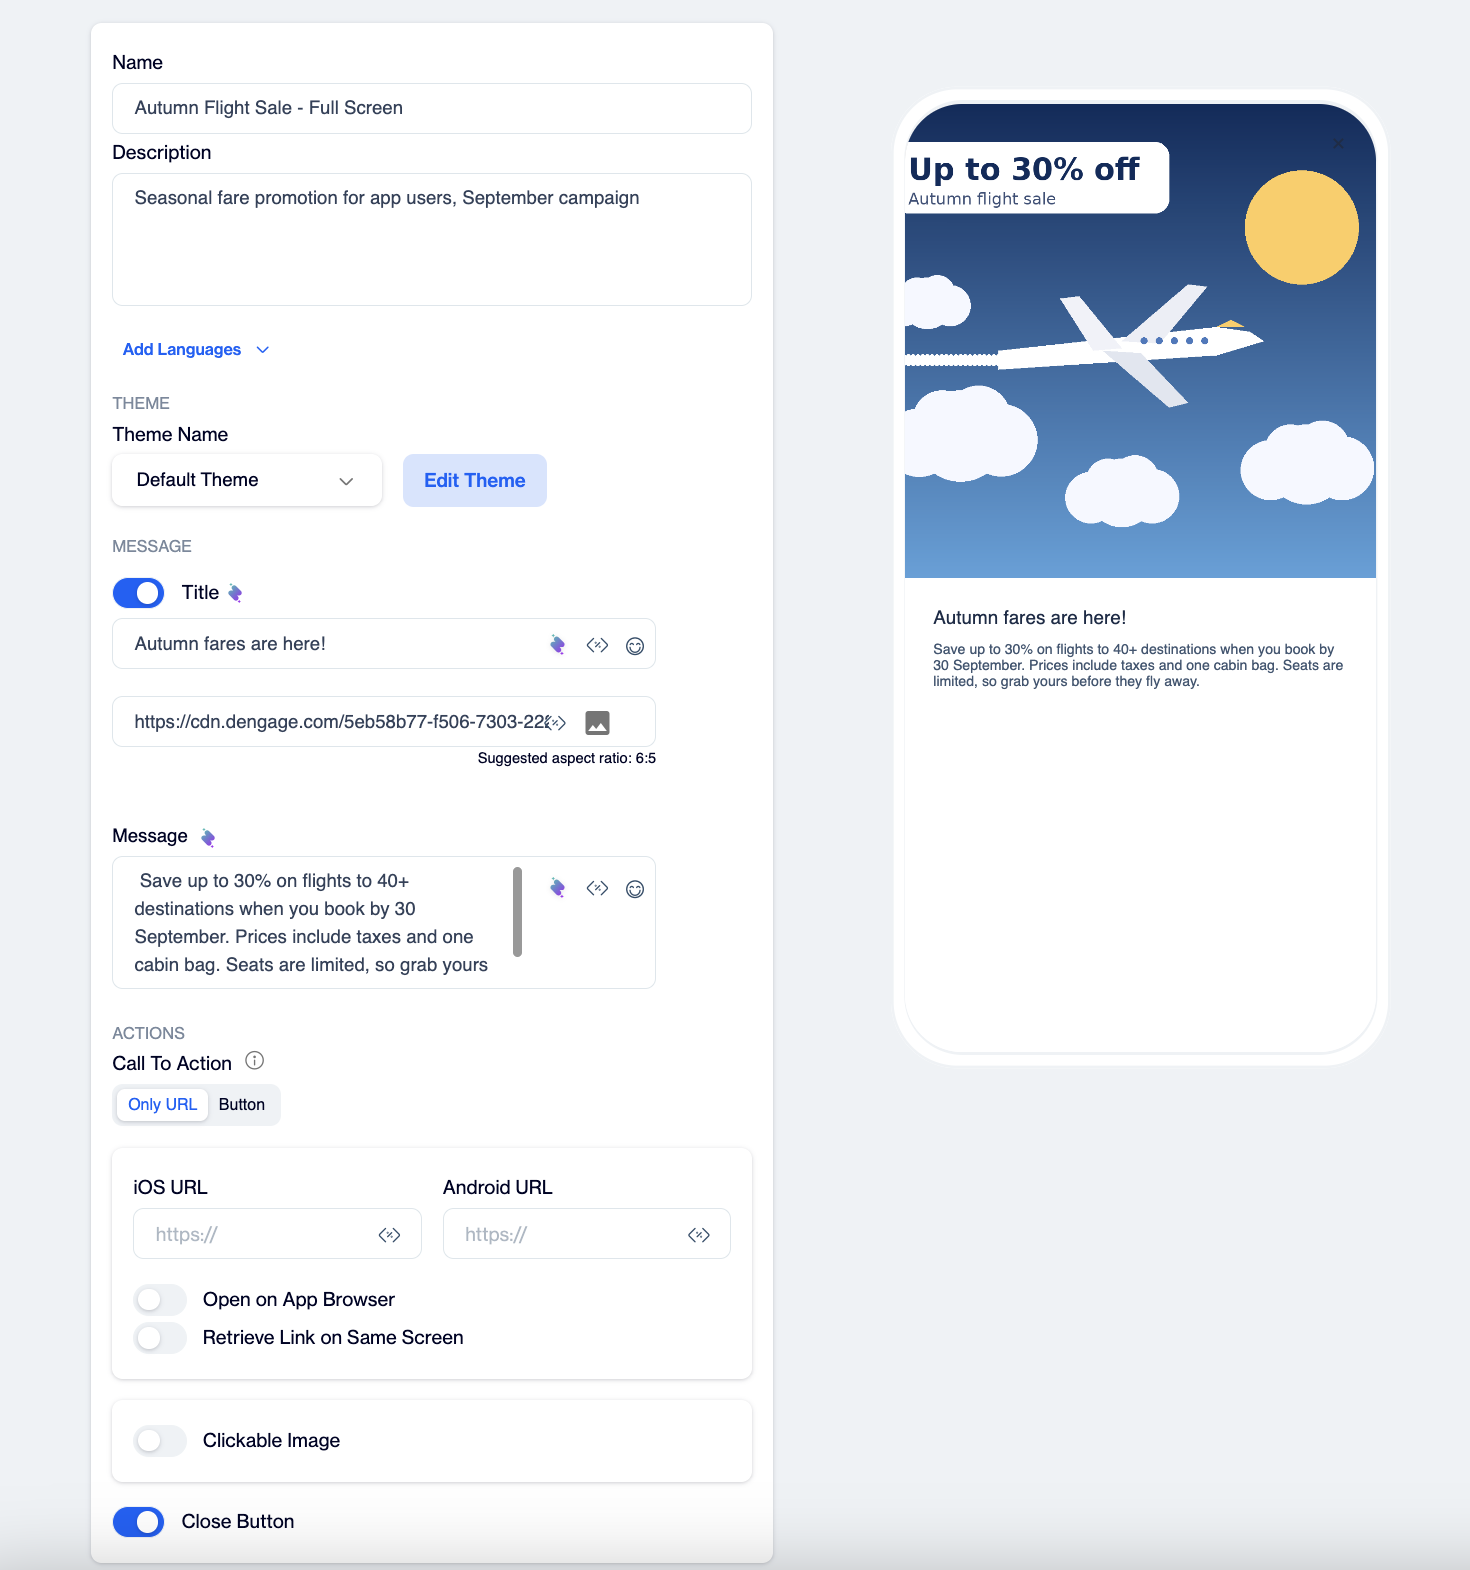
The settings panel on the left and the live mobile preview on the right.
The editor has two areas. The settings panel on the left holds every option described on this page. The mobile preview on the right updates as you type, so you can check spacing, colors, and button labels without leaving the editor.
Start with the basics at the top of the panel:
- Name: Enter a name that helps you find this Full Screen later in your content list.
- Description: Add an optional note for your team, for example the campaign or audience this content belongs to.
- Add Languages: Add a language version for each audience you serve. For every language you can either select Copy from Content to start from the existing text and translate it, or Create Blank Content to write it from scratch. Users see the version that matches their device language.
Theme
The theme controls how the Full Screen looks. Select a saved theme from the Theme Name list, or select Edit Theme to adjust the current one. The Edit Theme panel has the following groups.
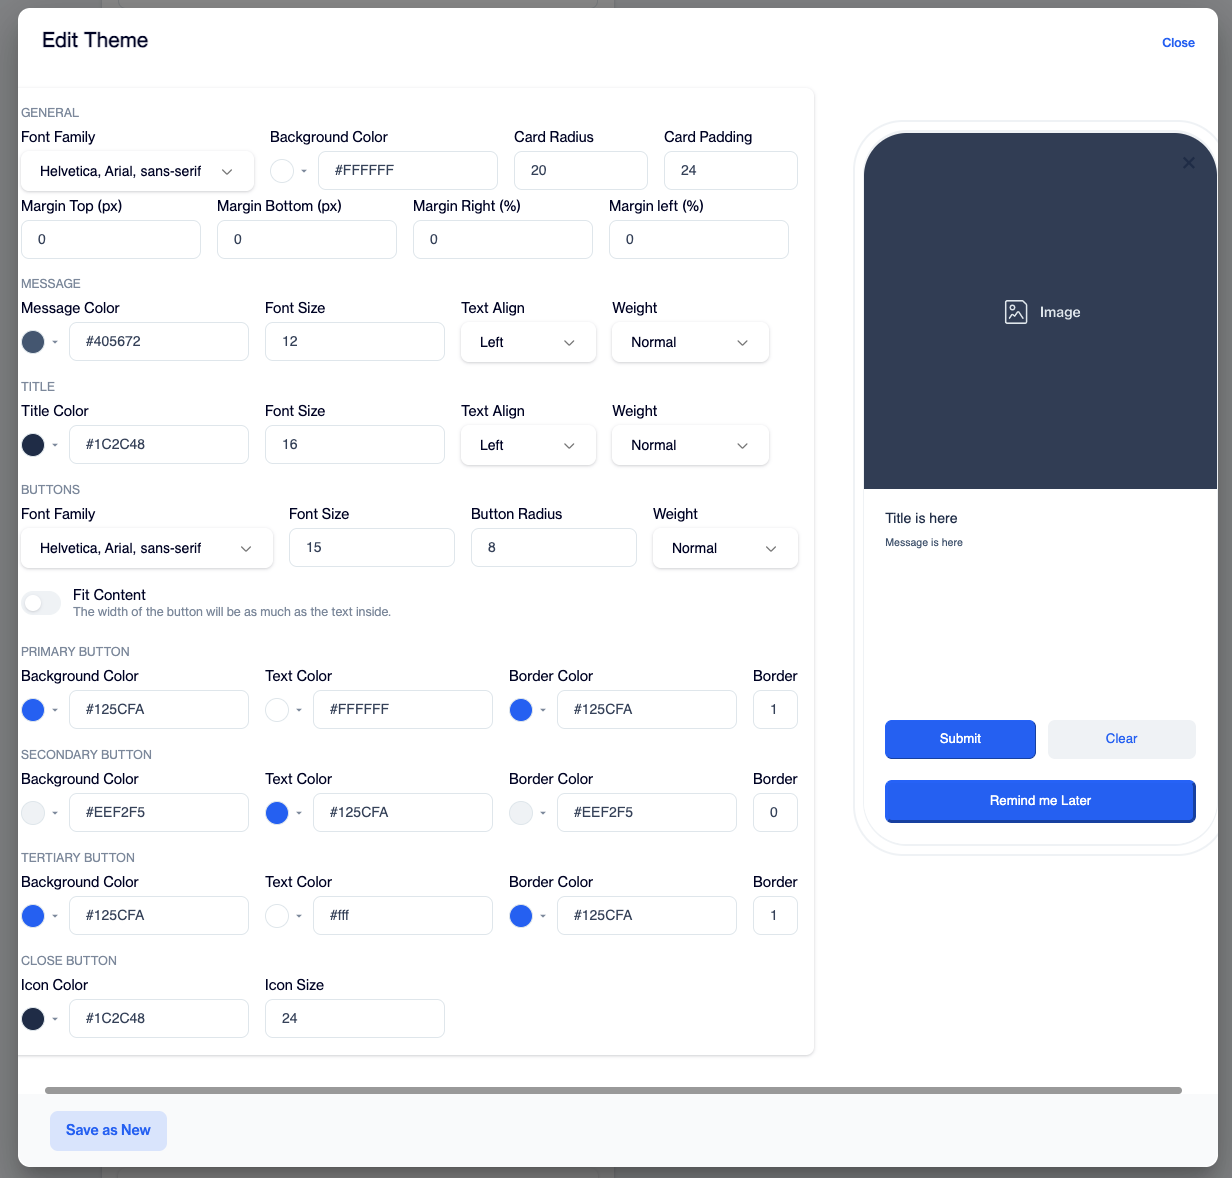
The Edit Theme panel. Adjust colors, fonts, spacing, and button styles here, then select Save as New to reuse the theme in other templates.
General
- Font Family: Select a font for the message text. The list includes Courier New, Georgia, Helvetica, Roboto, Tahoma, Times New Roman, Trebuchet MS, and Verdana.
- Background Color: Set the color behind the content.
- Card Radius: Round the corners of the content card.
- Card Padding: Set the space between the card edge and the content inside it.
- Margin Top (px) and Margin Bottom (px): Set the space above and below the card in pixels.
- Margin Right (%) and Margin Left (%): Set the space on each side of the card as a percentage of the screen width.
Title
- Title Color: Set the text color of the title.
- Font Size: Set the title size.
- Text Align: Align the title to the left, center, or right.
- Weight: Choose normal or bold text.
Message
- Message Color: Set the text color of the message.
- Font Size: Set the message size.
- Text Align: Align the message to the left, center, or right.
- Weight: Choose normal or bold text.
Buttons
These settings apply to all three buttons.
- Font Family: Select a font for the button labels.
- Font Size: Set the label size.
- Button Radius: Round the corners of the buttons.
- Weight: Choose normal or bold labels.
- Fit Content: Turn this on to make each button only as wide as its label. Turn it off to stretch the buttons across the card.
Primary, Secondary, and Tertiary Button
Each button has its own color group, so you can give the main action a strong color and keep the other two subtle.
- Background Color: Set the fill color of the button.
- Text Color: Set the label color.
- Border Color: Set the outline color.
- Border: Set the outline thickness.
Close Button
- Icon Color: Set the color of the X icon.
- Icon Size: Set the size of the X icon.
Saving a Theme
Select Save as New to keep your changes as a reusable theme. A dialog asks for a theme name. Enter a unique name and select OK. The new theme then appears in the Theme Name list for every in-app template in your account.
Accessibility tipKeep strong contrast between text and background colors, and keep the font size large enough to read on a small screen. Users who rely on larger system text sizes benefit from generous card padding and short messages.
Message
The Message section holds the content users read.
- Title: Turn on the Title toggle to show a headline above the message. Use the icons next to the field to insert a personalization field (for example the user's first name), a dynamic value, or an emoji.
- Image: Select an image from your image library or enter an image URL. The editor suggests a 6:5 aspect ratio. Choose an image that still makes sense if the user cannot see it, because the title and message must carry the meaning on their own.
- Message: Enter the main text. The same personalization, dynamic value, and emoji icons are available here.
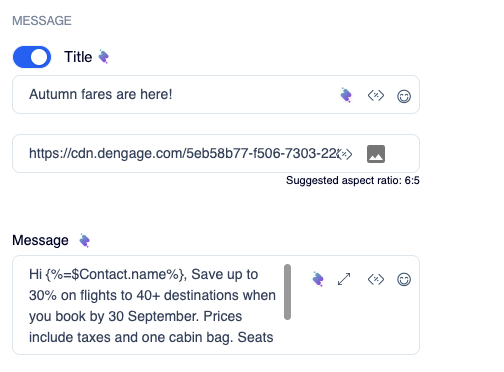
The Message section with a title, the campaign image, and the message text. The personalization, dynamic value, and emoji icons sit to the right of each field.
Write for the smallest screen you support. One clear sentence in the title and two or three short sentences in the message usually work better than a long paragraph.
Actions
The Actions section defines what happens when the user interacts with the Full Screen.
Call to Action
Choose one of two modes:
- Only URL: The whole Full Screen is one tap target. When the user taps anywhere on it, the app opens the URL you enter. Use this mode for a quick redirect that does not need buttons.
- Button: The user takes action only by tapping a button. Use this mode when you want to offer a choice, for example one button that opens a page and another that dismisses the message.
Only URL Settings
- iOS URL and Android URL: Enter the destination for each platform. You can use a web address or a deep link. A deep link is an address that opens a specific screen inside your app instead of a web page.
- Open on App Browser: Turn this on to open the link in a browser view inside your app, so the user stays in the app. Turn it off to open the device's default browser.
- Retrieve Link on Same Screen: Turn this on to load the link on the current screen instead of opening a new one.
Button Settings
In Button mode the Full Screen always shows a primary button. Turn on Secondary Button and Tertiary Button to add up to two more. Each button has the same set of settings.
- Button Action Type: Select what the button does. The table below explains each option.
- Primary Button Text, Secondary Button Text, or Tertiary Button Text: Enter the label. Use a short verb phrase that states the result, such as "Get Started", "Allow Notifications", or "Remind Me Later". The default labels are Submit, Clear, and Remind me Later.
- iOS Button URL and Android Button URL: Enter the destination for each platform. These fields matter only when the action type is Open URL.
- Open on App Browser: Open the link in a browser view inside your app.
- Retrieve Link on Same Screen: Load the link on the current screen instead of opening a new one.
- Show Rating After Click: Show a rating prompt after the user taps the button, so you can collect feedback on the message.
| Button Action Type | What happens when the user taps the button |
|---|---|
| Open URL | Opens the iOS or Android URL you entered. Use it to send users to a product page, landing page, or a screen in your app. |
| Dismiss | Closes the Full Screen without any other action. Use it for a "Not now" or "Remind me later" button. |
| Copy to Clipboard | Copies a value, such as a promo code, to the device clipboard. |
| Close | Closes the Full Screen. Use it when the message is informational and needs no follow-up. |
| Permission Prompt | Starts the push notification permission flow described in the next section. |
| Open Settings | Opens the app's page in the device settings, where the user can change notification and other app permissions. |
Clickable Image
By default, only buttons trigger actions in Button mode. Turn on the Clickable Image toggle to make the image a tap target with its own destination.
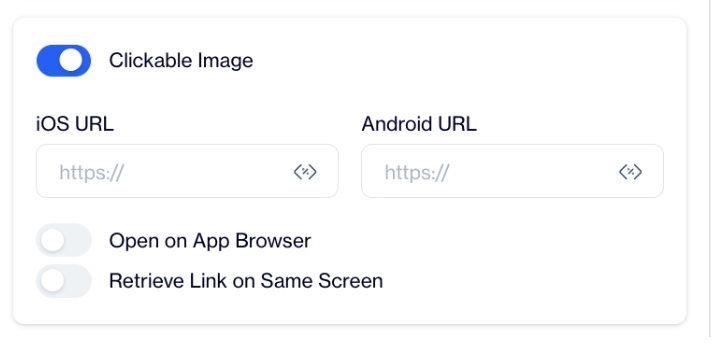
Turning on Clickable Image adds a separate destination for the image. Button settings are not affected.
When the toggle is on, extra fields appear for the image:
- iOS URL and Android URL: Enter the destination for each platform. Web addresses, deep links, and custom actions all work here. A custom action is a value your app's developers handle in code, for example to open a specific tab.
- Open on App Browser and Retrieve Link on Same Screen: These work the same way as the button toggles above.
These settings apply only to the image. The buttons keep their own destinations. You can send the image tap and each button to different places, or point them all at the same destination to enlarge the tap area.
Example: the image opens the product detail page, the primary button adds the product to the cart, and the secondary button dismisses the message.
Close Button
Turn on Close Button to show an X icon in the corner. Users who do not want to engage can leave immediately. Keep this on unless the message is one the user must respond to, because a message with no exit is a common source of complaints and uninstalls.
Permission Prompt
Many users install an app but never enable push notifications. The Permission Prompt action lets you ask for permission with your own message first, then hand over to the operating system.
The flow has two steps. The Full Screen explains why notifications are useful. When the user taps the button with the Permission Prompt action, the Dengage SDK (the software development kit your developers added to the app) checks the current permission status. If permission is not granted, the SDK takes the user to the device's notification settings for your app. Users who see a reason before the system prompt are more likely to say yes, and users who tap "Not now" on your message keep the option open for later.
Set Up a Permission Prompt
- In the Message section, explain what the user gains. Name the kind of notifications you send and the value they bring.
- Shopping app example: "Enable notifications to hear about exclusive deals and new arrivals first."
- Travel app example: "Enable notifications to get flight alerts and trip updates on your device."
- In Actions, select Button.
- For the primary button, set Button Action Type to Permission Prompt and enter a clear label such as "Allow Notifications".
- Turn on Secondary Button, set its Button Action Type to Dismiss, and enter a label such as "Not Now". This gives the user a polite way out.
- Save as draft and test the content on a device before you publish.
How the Permission Prompt Behaves
- If the user has already granted permission, the SDK takes no action.
- If the user has not granted permission, the SDK opens the device's notification settings for your app on both Android and iOS. The user turns on notifications there.
- If the user taps the Dismiss button, the Full Screen closes and nothing else happens.
Test the Permission Prompt
- In the Dengage sample app, create an In-App message with this template and add a button with the Permission Prompt action.
- Tap the button. The device opens the notification settings screen for the app.
- Turn on notifications. The app now has permission to send push notifications.
Save, Test, and Publish
- Save Draft keeps your work without making it available to campaigns. Return to it any time from Content > In-App.
- Test sends the Full Screen to a test device so you can check the layout, links, and button actions on a real screen.
- Publish makes the content available for in-app campaigns. Publish only after you have tested every language version and every button.
Updated about 1 month ago