
Onsite Campaign Redesign
The Onsite Campaign Redesign updates the campaign creation experience with a clearer, more logical 4-step flow. Previously, multiple settings like targeting, audience, triggers, and display rules were grouped in a single step, and content selection was separate, making the process confusing.
The redesign improves usability by:
- Separating steps into Content, Targeting, Audience & Delivery, and Summary
- Improving A/B testing setup
- Offering smarter delivery controls
This means campaigns can now be created faster, with fewer errors and less confusion.
Step 1: Content
In this step, you set up the basic details of your campaign and choose the content your users will see. You can also enable A/B testing to try different content versions and see which performs best.
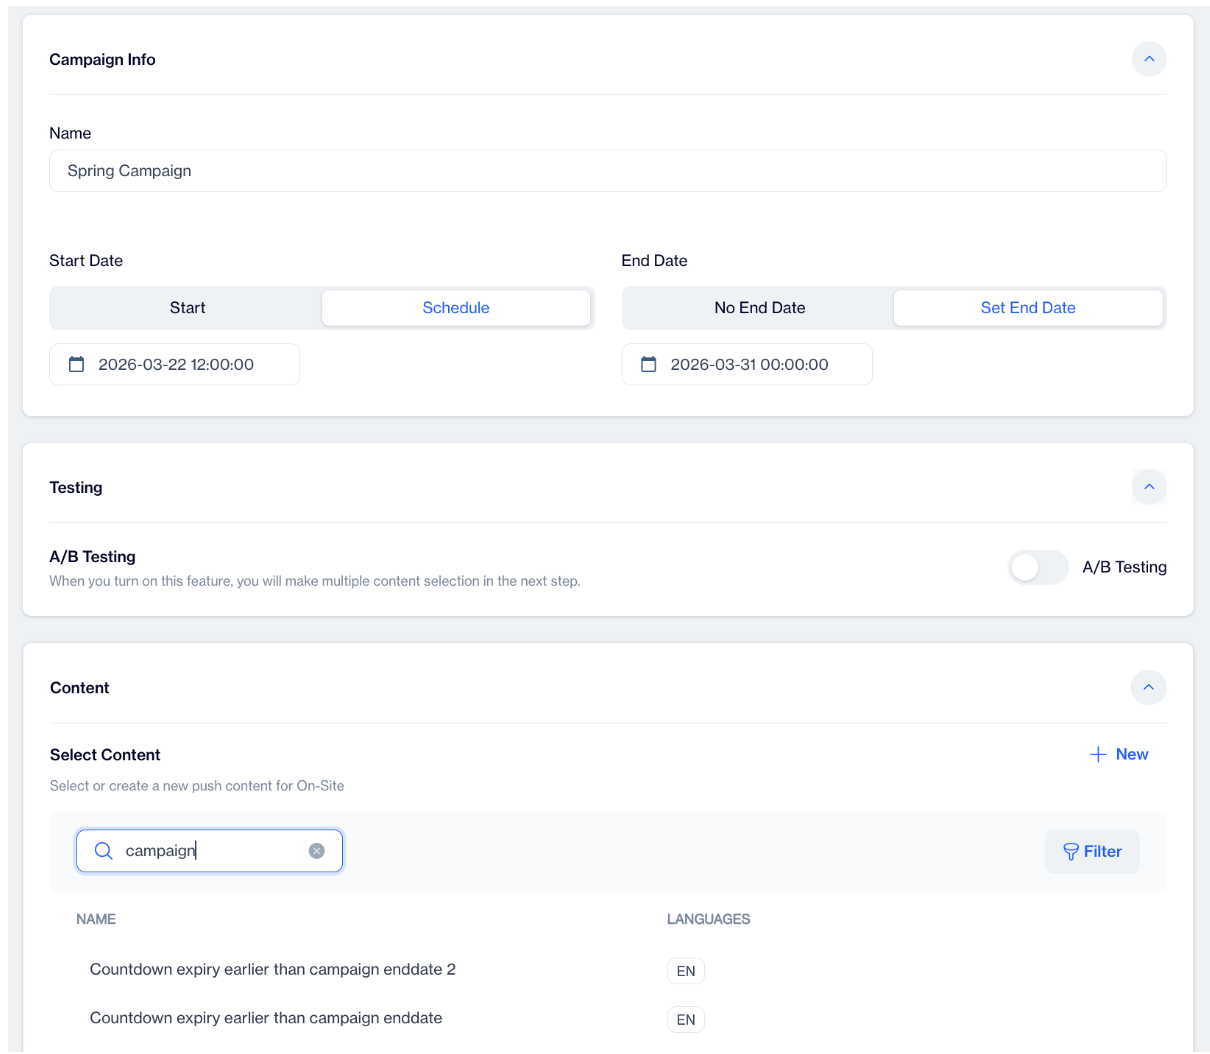
Onsite Campaign
Campaign Info
In the redesigned screen, Campaign Info is now grouped with content selection instead of being mixed with other settings. You can give your campaign a name and set the start and end dates all in one place. Choosing a start date or scheduling a specific time is now more visible, and selecting an end date or leaving it open is clearer, so you can easily control when your campaign runs. Having all this information together saves time and reduces confusion compared to the old layout.
Testing
The Testing section has been moved directly into the Content step. When you turn on A/B Testing, you can now see all your content variants on the same screen. You can select or create multiple content versions, assign audience percentages, and set a winner rule without switching steps. This makes testing simpler and faster, helping you find the best-performing content more efficiently.
Content
The Content section is now part of the first step, so you don’t need to go to a separate screen to select what users will see. You can pick existing content or create new content immediately, and search or filter by name or language to find it quickly. This change makes it clear which content is being used and speeds up the campaign setup.
Step 2: Targeting
The Targeting step has been redesigned to separate all campaign-level targeting options into a dedicated screen. This makes it easier to understand and configure where and how your campaign will appear. The step is now clearly labeled as Step 2: Targeting, so you always know which part of the campaign setup you are in.
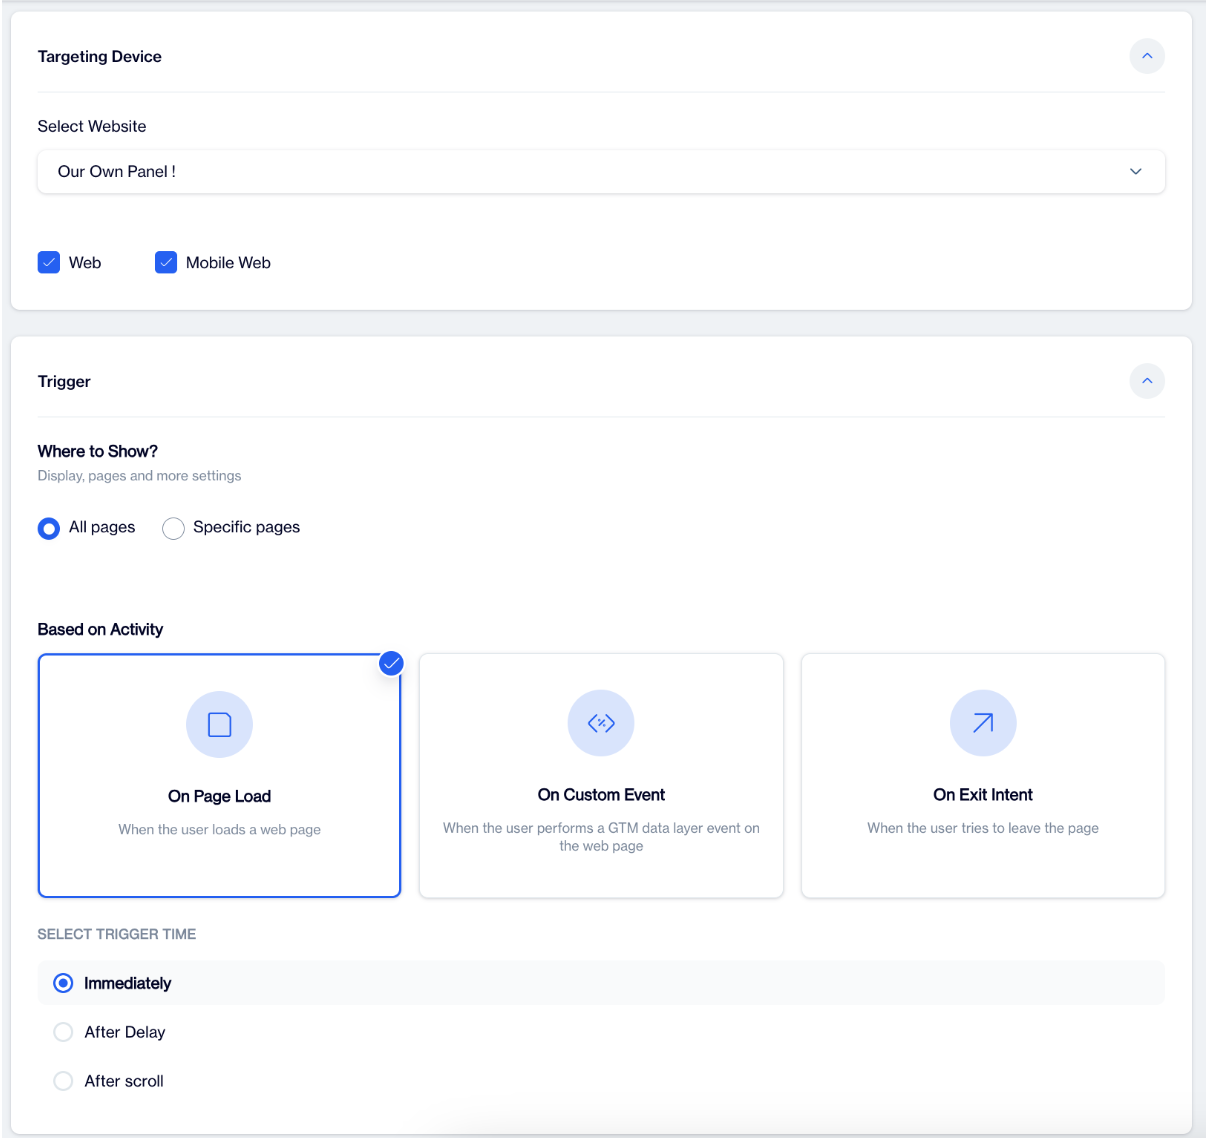
Targeting
Targeting Device
The Device section lets you choose which platform your campaign will appear on. You can select a website from the list and use the search function to find it quickly. You can now clearly see options for Web and Mobile Web, making it easier to target the right device without confusion.
Trigger
Where to Show
The Where to Show section lets you decide which pages or areas of your site the campaign should appear on. You can choose All Pages, Specific Pages, or target pages Based on Activity. This is now easier to see and adjust in the redesigned UI, giving you more precise control over campaign placement.
The Trigger section also defines when your campaign will show to users. You can now choose from multiple trigger types directly on this screen:
- On Page Load: Show the campaign when a user loads a web page. You can also set Trigger Time here, deciding whether it appears immediately, after a delay, or after the user scrolls.
- On Custom Event:Show the campaign when a specific event occurs
- On Exit Intent: Show the campaign when the user tries to leave the page
With this new layout, all targeting options are grouped logically, making it faster to configure, easier to understand.
Step 3: Audience & Delivery
The Audience & Delivery step has been redesigned to make it easier to choose who sees your campaign and control how it is delivered. Separating this step from content and targeting gives a clear view of all audience and delivery settings in one place.
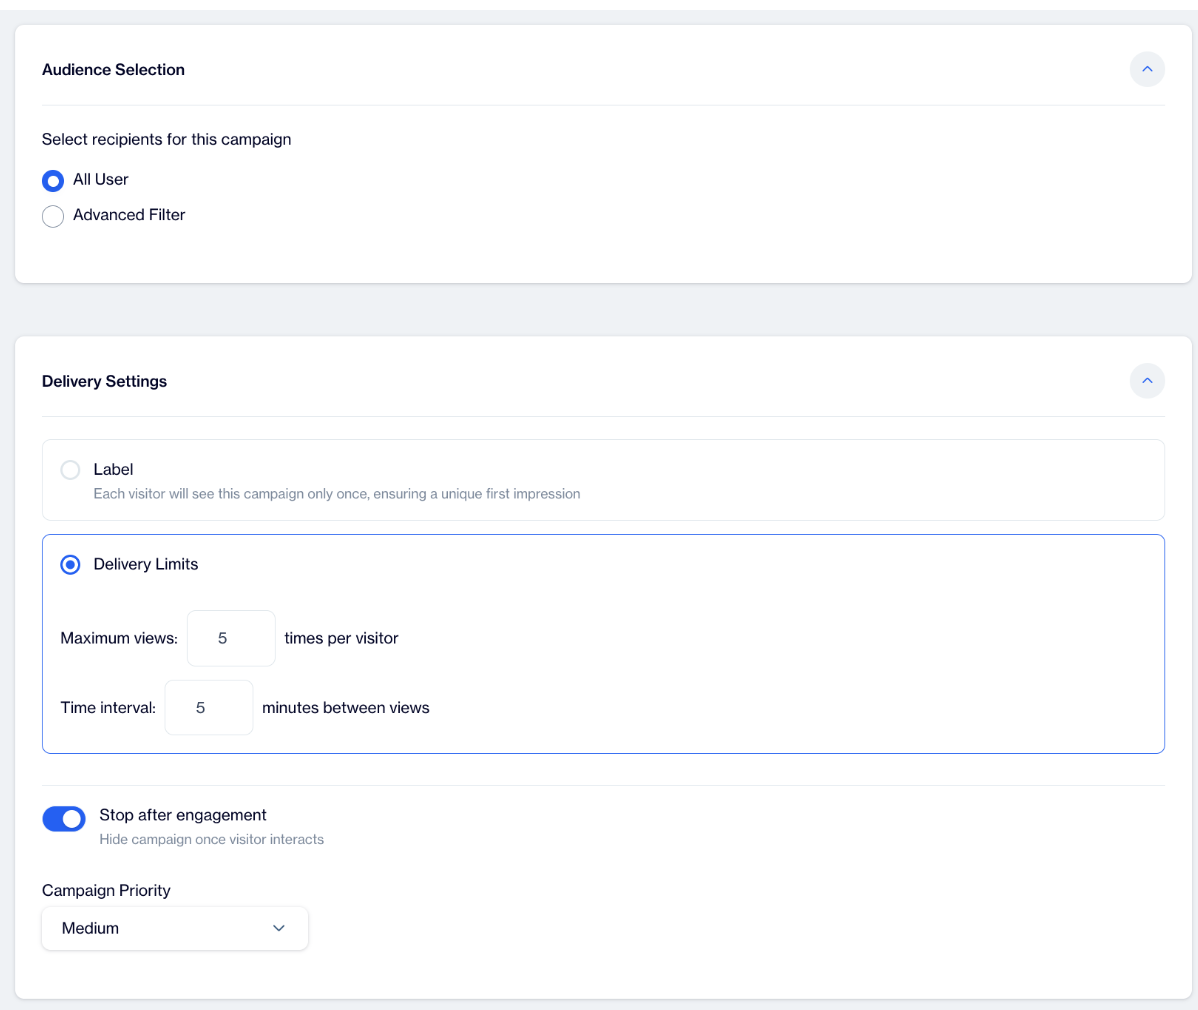
Audience & Delivery
Audience Selection
In the Audience Selection section, you decide who will see your campaign. You can choose All Users or use Advanced Filter to create more specific groups. You can also Add Filter or Add Group to define the audience further. This new layout makes it easier to understand and configure exactly who should receive your campaign.
Delivery Settings
In the Delivery Settings section, you decide how the campaign is shown to visitors. You have two options:
- Label – Only Once: Each visitor will see this campaign only once, ensuring a unique first impression.
- Delivery Limits: Set custom rules such as maximum views per visitor, time interval between views, and whether to stop after engagement, hiding the campaign once the visitor interacts.
You can also set Campaign Priority to control which campaigns appear first if multiple campaigns are active.
By grouping audience and delivery controls in one place, this redesign makes it faster to set up the right targeting and ensures your campaign behaves exactly as you intend.
Step 4: Summary
The Summary step gives you a complete overview of your campaign before it goes live. All important settings are displayed in one screen, so you can quickly review and make changes if needed.
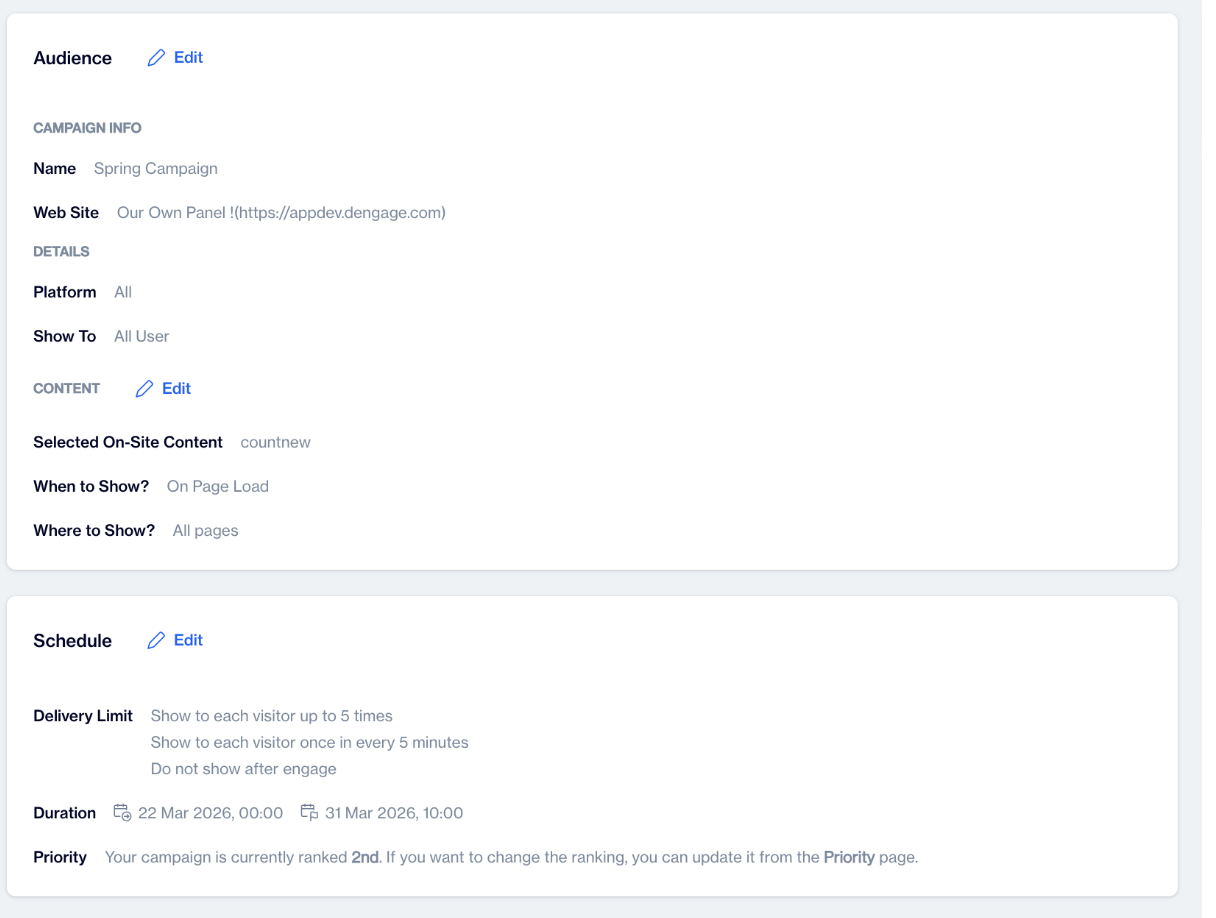
Summary
Audience
The Audience section shows who will receive your campaign. You can edit this section if you need to change your selected user segments.
Campaign Info and Details sections display the key information about your campaign, including the Name, Website, Platform, and Target Audience. You can also make edits directly if any of these details need adjustment. Seeing all campaign info in one place ensures that nothing is overlooked before launch.
Content
The Content section shows the selected On-Site content for your campaign. It also shows when and where the campaign will appear, so you can quickly verify placement settings.
Schedule
The Schedule section summarizes how often visitors will see the campaign, any time intervals between views, whether the campaign stops after engagement, and the overall campaign duration. This gives you confidence that your campaign will behave as intended.
You can also see the Priority ranking of your campaign. If multiple campaigns are active, this helps you understand the order in which campaigns are displayed and make adjustments if needed.
The new 4-step wizard makes creating Onsite Campaigns clear and straightforward. You can easily set up your campaign, choose who sees it, and launch it with confidence.
Updated 1 day ago