
Flow Components
The campaign workflow screen provides a robust and interactive canvas where users can create and visualize the journey flow for their marketing campaigns. This intuitive interface allows for the dragging and dropping of various flow nodes to design complex customer interactions.
Navigating the Journey Builder: An Overview
In this part of our guide, we will introduce you to the fundamental aspects of the Journey Builder, a powerful tool designed to streamline and optimize your campaign workflows. This section is dedicated to providing you with a comprehensive understanding of the layout and basic functionalities of the Journey Builder. We will explore the various components and how they interact to create effective marketing campaigns. For detailed instructions on configuring the individual elements within your campaign flow, such as Actions, Decisions, and AI nodes, please refer to the subsequent section, "Configuring Node Elements." Here, you'll find step-by-step guidance to tailor each node to your specific campaign requirements.
Campaign Flow
1. Top Section:
- Campaign Name: This editable field displays the name of the current campaign.
- Campaign Workflow Tabs: Two tabs are present, indicating different stages or aspects of the campaign creation process.
- Delivery Settings: A button that opens the configurations for how and when the campaign messages are delivered.
- Publish: Finalize and activate the campaign on Scheduled Time.
- Save As Draft: Save the current campaign's progress to be completed or edited later.
2. Left Sidebar | Actions & Decisions:
Actions
- Email: This node is used to design a step in the journey where an email will be sent to the contacts. It can be configured with specific email templates and timings.
- SMS: Dragging this node into your flow allows you to incorporate an SMS message. You can customize the message content and determine when the SMS should be sent in the journey.
- Push Notification: Use this node to schedule a push notification as part of the journey. You'll be able to set up the notification's content, timing, and targeting criteria.
- In-App: This node is for campaigns that involve in-app messages. When placed in the journey, it prompts the setup of messages that appear within your application.
- On-Site: Select this node to create on-site messages or actions, like pop-ups or banners, that display on your website as part of the user's journey.
- A/B Split: The A/B Split node allows you to test different paths or messages within the journey to see which performs better. It distributes contacts randomly between the different paths you define.
- Export: This action node enables the exporting of data at a specific point in the journey, such as contact information or interaction history.
- Update Tag: Use this node to update or assign tags to contacts based on their journey interactions, helping in segmenting and targeting for future campaigns.
- Update Contact: This node allows you to update contact attributes based on their behavior in the journey, such as marking them as engaged or interested.
- WhatsApp: Incorporate a WhatsApp messaging step in the journey with this node. It lets you send messages through the WhatsApp platform as part of the campaign.
Comprehensive Guide for WhatsApp Marketing MessageFor a step-by-step walkthrough on dispatching WhatsApp Marketing Messages, refer to our end-to-end documentation. This resource provides you with detailed instructions to ensure a smooth and effective messaging campaign via WhatsApp.
Decisions
- Engagement Split: This decision node routes contacts based on their engagement level with previous steps in the journey, such as whether they opened an email or clicked a link.
- Random Split: Use the Random Split node to divide contacts randomly into different paths, which is useful for unbiased testing of journey variations.
- Decision Split: The Decision Split node directs contacts down different paths based on specific criteria or behaviors, such as demographics or past purchases.
- Wait: Insert a delay in the journey with the Wait node. This can be used to pause the flow for a set amount of time before proceeding to the next action.
- **Join: **This node is used to merge multiple paths back into a single journey flow, often after a split has occurred.
- End: The End node signifies the conclusion of a journey path. Once contacts reach this node, no further actions are taken within this flow.
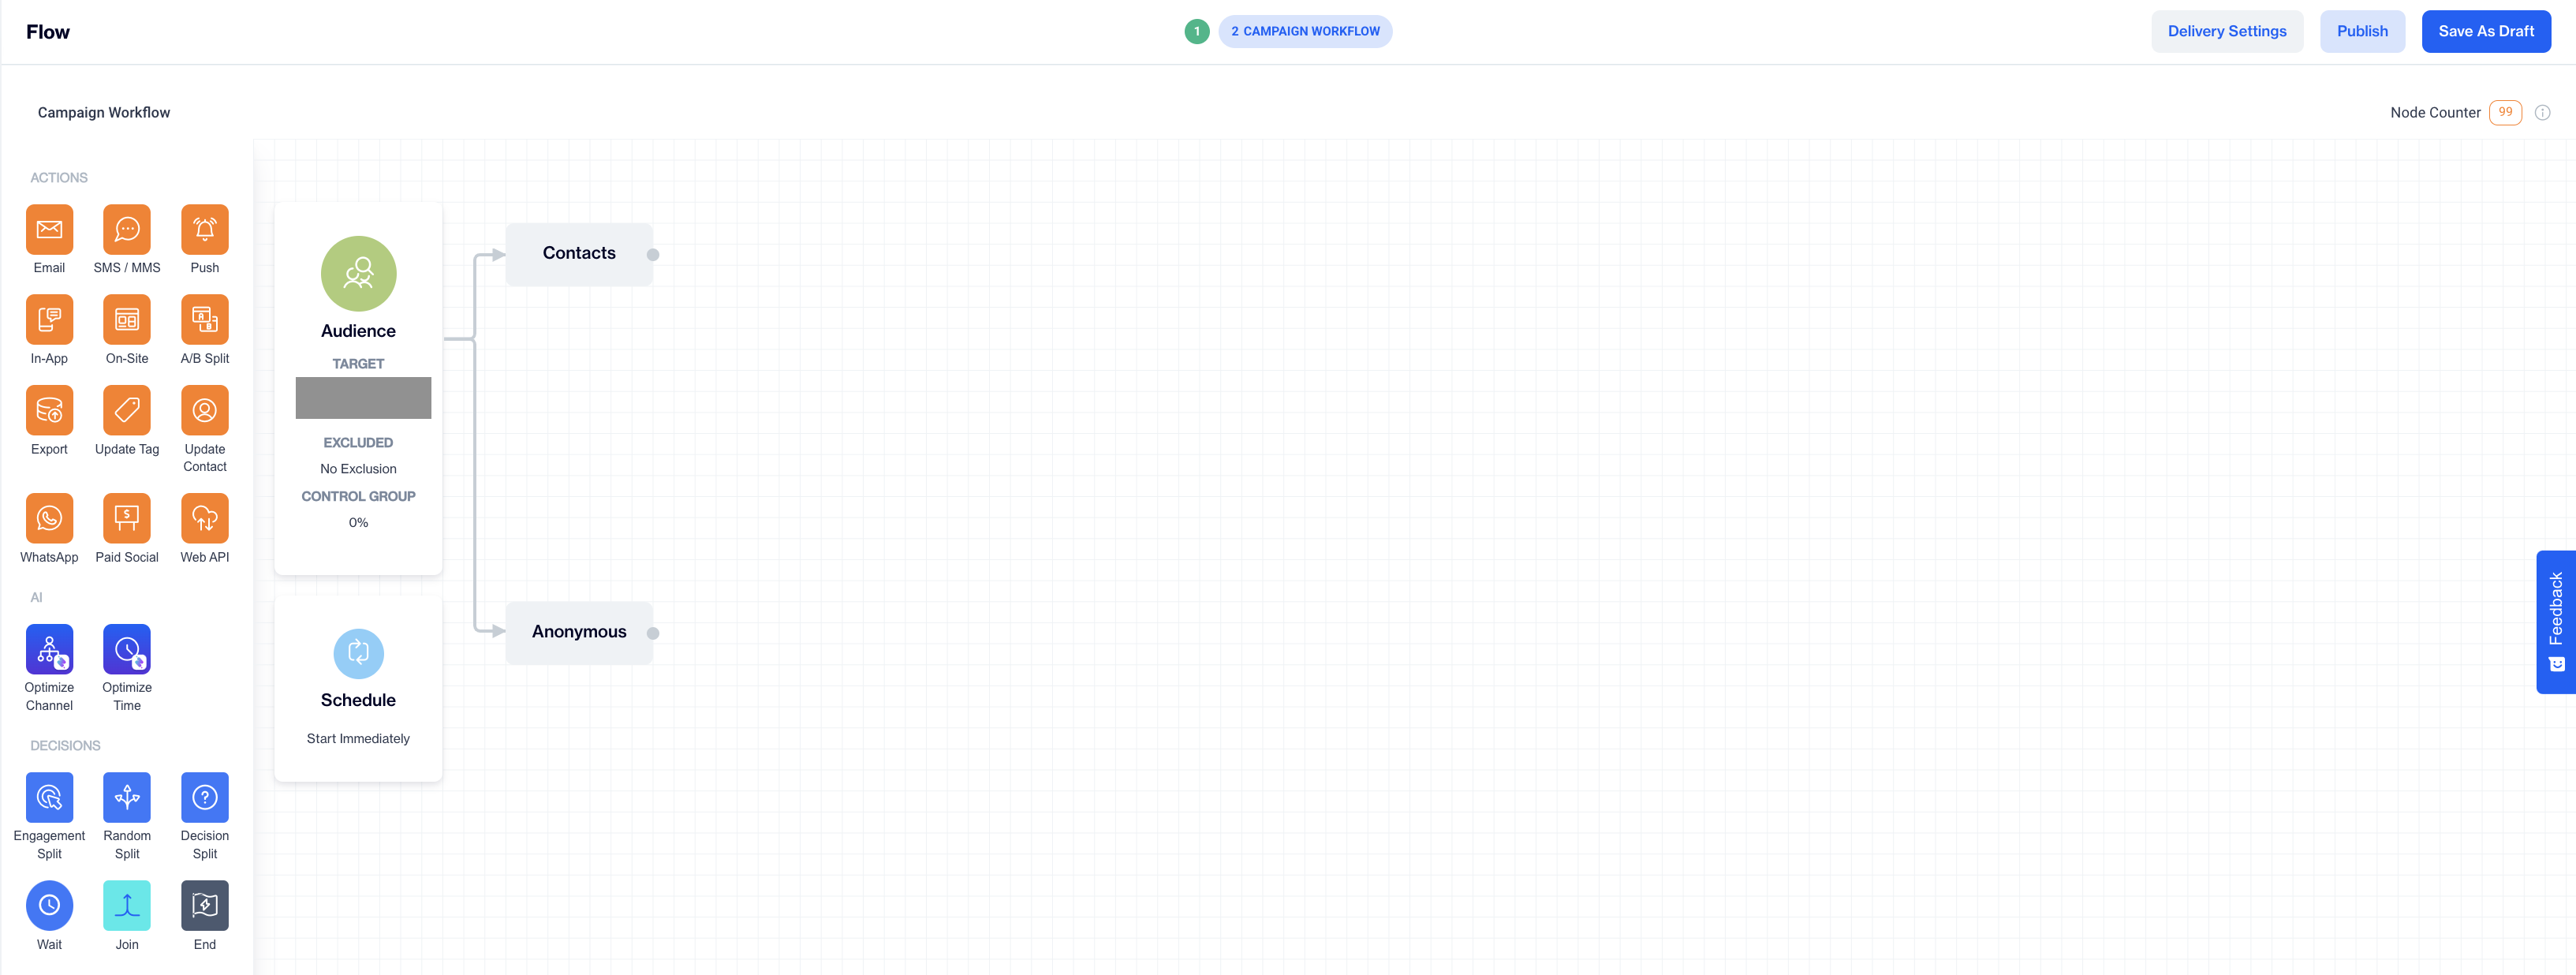
3. Central Canvas:
- **Grid Layout: **The central area where the campaign flow is created. Users can place nodes onto the grid and connect them to map out the customer's journey.
- Audience Node: This central node is pre-placed and serves as the starting point for the campaign. It includes details such as the target segment, any excluded contacts, and the control group percentage.
- Contacts Node: Represents the inclusion of contacts in the campaign.
- Anonymous Node: Allows for actions targeting anonymous users.
- Schedule Node: Indicates when the campaign will begin, with options for immediate start or scheduling for a later time.
Audience Section Details:
- Target Segment: Describes the specific segment of the audience that the campaign targets, for example, "Young Professionals Who Lives in New York."
- Exclusion: Lists any groups or segments that are excluded from the campaign.
- **Control Group: **Specifies the percentage of the audience that will be excluded from the campaign actions to measure the campaign's impact effectively.
Configuring Action Flow Elements
Welcome to the "Actions Node" section, a guide dedicated to the dynamic components that prompt direct engagement within your campaign's journey flow. Actions are the building blocks that trigger email sends, SMS, push notifications, and more, directly influencing your audience's experience. This part of the guide offers a thorough walkthrough on how to configure these actionable elements to ensure they resonate with your campaign goals and drive the desired interaction. Learn to customize each action with precision, setting the stage for a successful and high-performing campaign.
Audience
Target Audience
- Search Bar: Allows you to quickly find specific segments by entering a keyword related to the segment's name.
- Filter: Allows you to filter the lists below by last update & creation date. The dropdown box allows you navigate between the date types.
Listing the Data by Tabs
- Segment: Lists the various segments that can be targeted in a campaign. Each entry corresponds to a different audience segment you can select for the campaign.
- Predefined Segment: This allows you to list and select segments that are predefined within the system, based on common criteria & behaviors.
- Table: Allows you to select and list the previously created tables. You can select Master Contact and Master Device table as campaign audience. Additional Filter may apply to the current selection.
- Remote Segment: This allows you to list and select the segments that are defined outside of the local system(previously created Remote Segments).
- Tag:This allows you to list and select the previously created Audience Tags as campaign audience.
Exclusions and Control
- Exclude Section: Here, you can specify if there are any segments , campaigns or send lists you wish to exclude from the target audience of your campaign. To incorporate exclusions into your audience segmentation, please follow the steps outlined in the figure below. Note that you have the flexibility to add multiple exclusions to refine your audience more precisely.
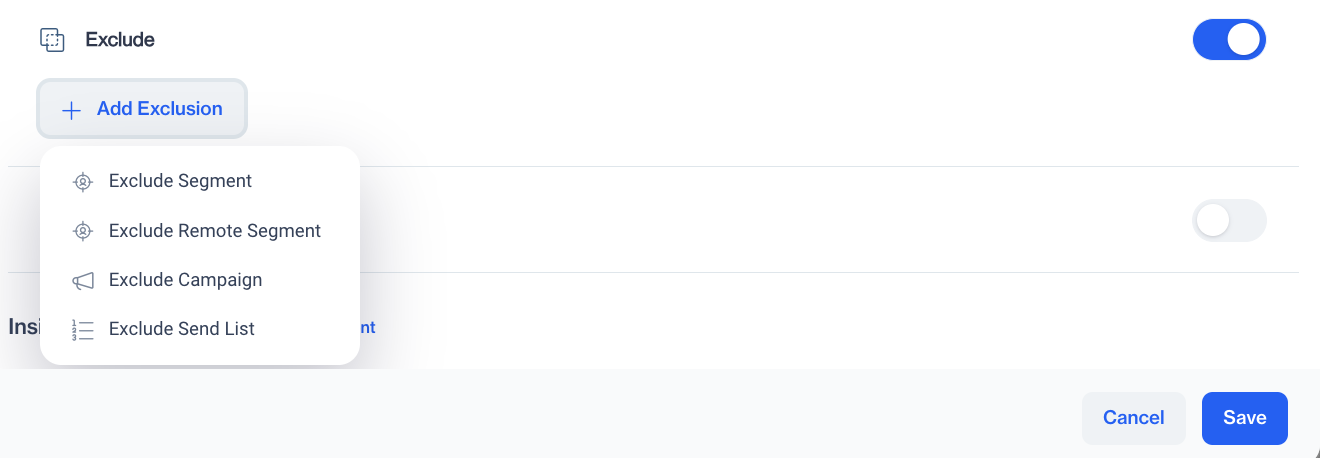
Exclude
- Control Group: Offers the option to include a control group in your campaign by toggling it on. A control group is a subset of your audience that won't receive the campaign, allowing you to measure the campaign's impact against this group.

Control Group
- Cancel Button: Discards any changes made and exits the Target Audience panel.
- Save Button: Saves the selected segments and any exclusions, then closes the Target Audience panel.
Insights
Once you have successfully defined your Audience segment, the platform offers valuable insights into your targeted group. By clicking the Calculate button, you will gain access to data showing the number of individuals within your audience who are reachable through each specific communication channel. This feature provides a clearer understanding of your potential reach, enabling you to tailor your campaign strategies more effectively.
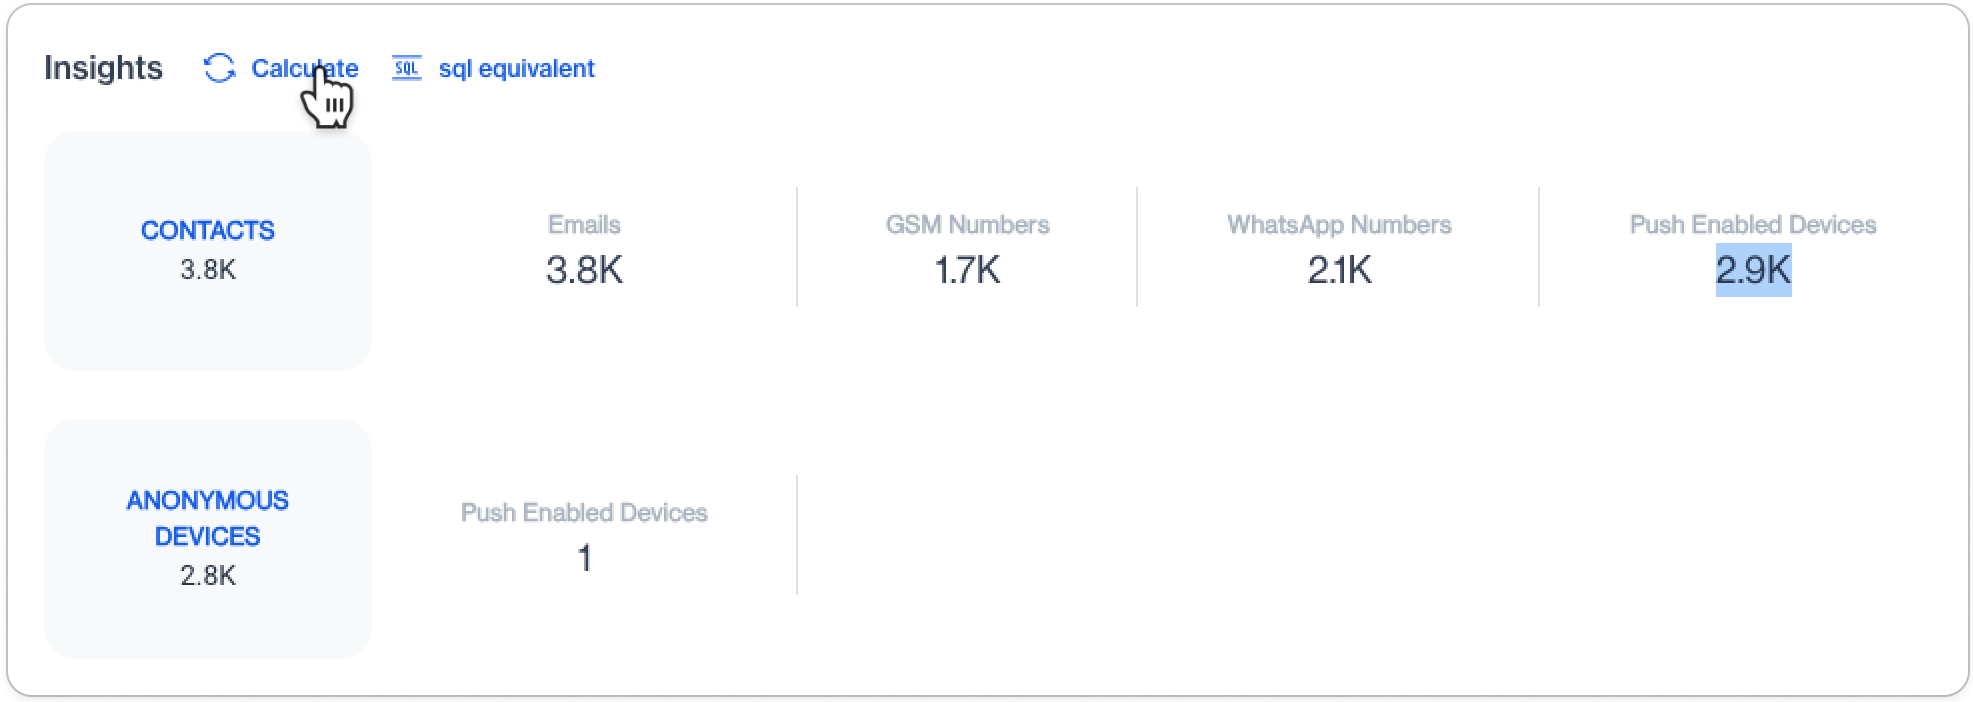
Insights
Tips:
You can choose only one segment as your audience. If you need to target multiple segments, consider creating a new segment that encompasses your desired criteria. To include more than one segment in your audience, refer to the Segments > Filters section. This allows for the combination of two existing segments as filter criteria.
When you have selected either the Master Contact or Master Device tables as your audience, you can refine your targeting with additional filters by following these steps:
Click on the Manage Filters button.

Example
In the modal that appears:
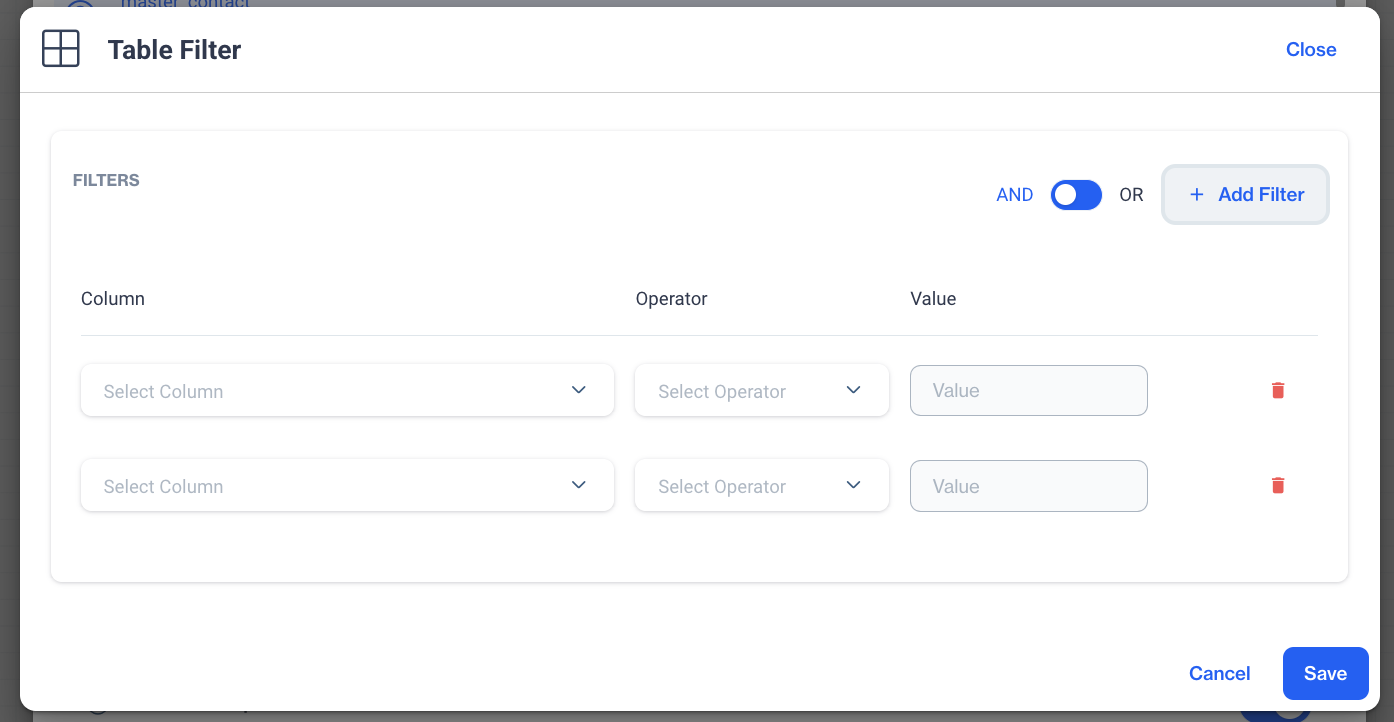
Add Filter
- Click the Add Filter button.
- Select a Column, choose the appropriate Operator, and then input your Value.
- To add more than one condition, repeat the first two sub-steps and establish the logic for combining the filters.
- Click Save to finalize your filtering settings.
These tips are designed to help you effectively tailor your audience segmentation for more targeted and efficient campaign results.
Schedule
This feature enables you to set the activation time for your campaign. By default, the campaign is configured to activate immediately (Now) upon clicking Publish. This means the campaign will go live as soon as you publish it.
If you prefer to schedule the campaign for a later time, you can easily do so by following** the steps detailed in the schema provided below.**

Schedule
A/B Split
This powerful tool is designed to optimize your email, push, and on-site messaging by allowing you to test two variants of content against each other. By directing a small percentage of traffic to each version, you can gather actionable data on engagement and conversion rates. The system then automatically allocates the majority of the traffic to the winning variant, ensuring that the most effective content reaches the widest audience. Whether you're fine-tuning your emails, personalizing push notifications, or enhancing on-site interactions, A/B Split helps you make data-driven decisions to elevate your campaign's success.
Configuration begins by choosing the appropriate channel. Depending on the channel selected, the configuration settings may vary slightly to accommodate specific channel requirements.
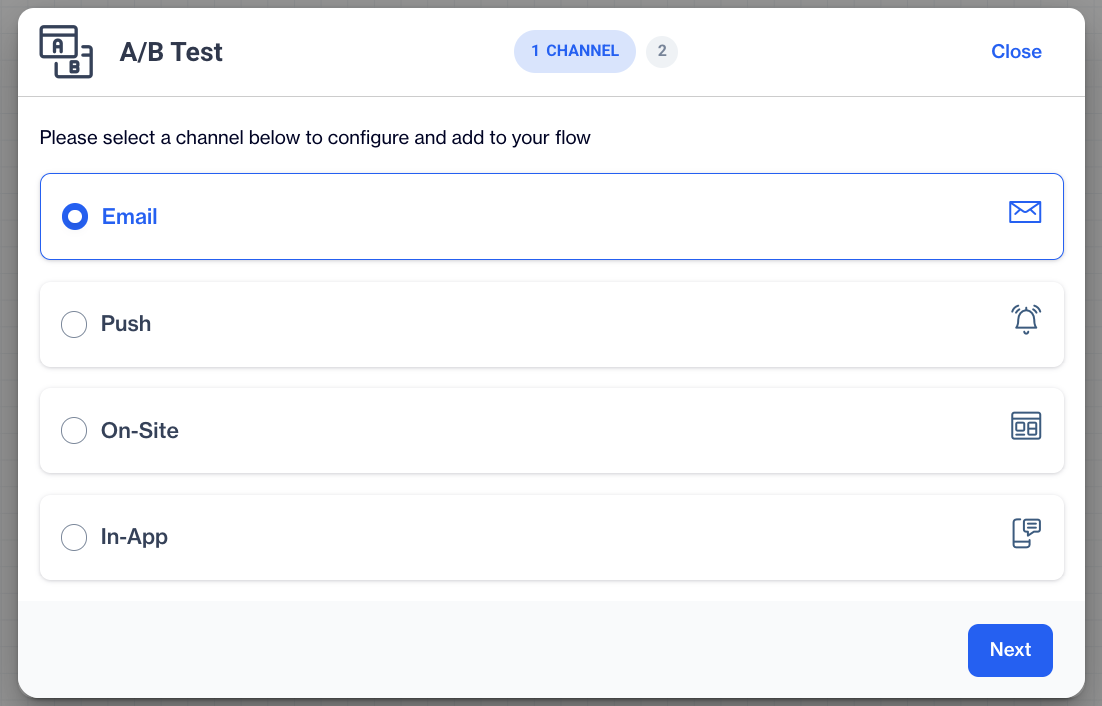
A/B Split
Configuring A/B Test Variants
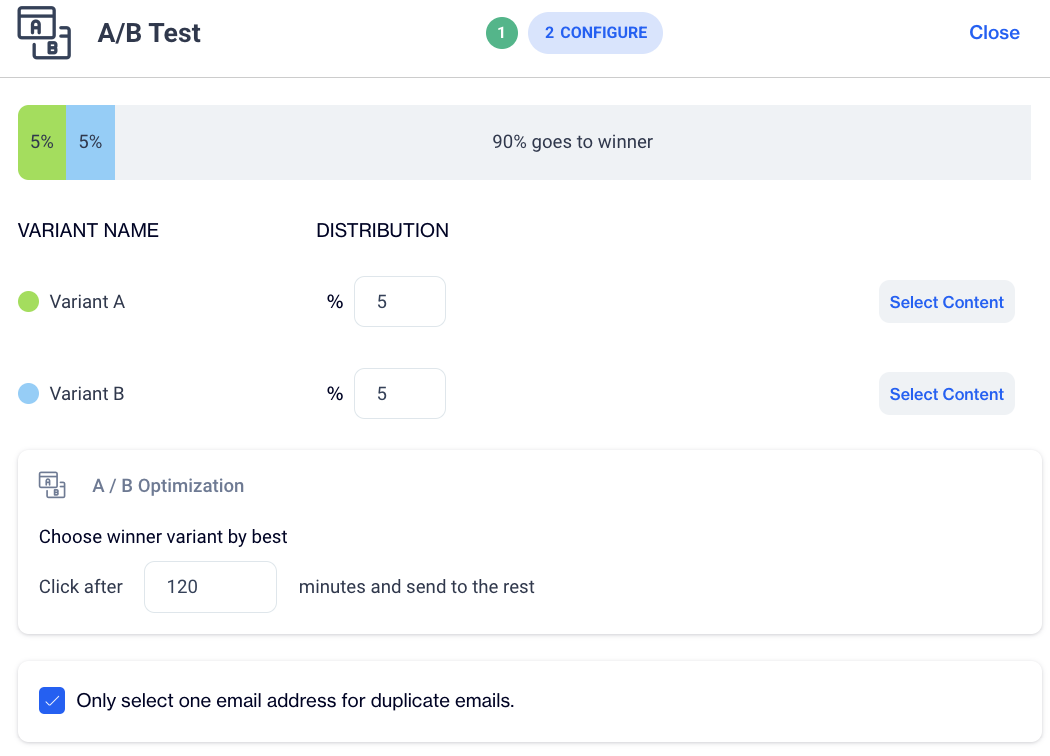
A/B Test Variants
Distribution Allocation
- At the top, you'll see green 🟩 and blue 🟦 bars indicating the percentage of your audience that will receive each variant of the contents (Variant A and Variant B). Adjust the percentages as needed, keeping in mind that the remaining percentage (as indicated by "90% goes to winner") will be allocated to the variant that performs the best.
Selecting Content and Setting Distribution for Each Variant
- Identify Variant A 🟩 and Variant B 🟦 , use **Select Content button to assign a content **for each variant.
- The percentage field allows you to specify what portion of your test audience will receive this variant.
- To preview the Selected Content ; click on eye 👁️ icon next to it.
- Use the Change Content button if you wish to select a different content for this variant.
A/B Test Optimization
In this section, you define how the winning variant will be determined.
- Enter the time (e.g., 120 minutes) in the provided field, after which the system will evaluate the performance and automatically send the winning variant to the rest of the audience.
Data Export
During your journey flow, you can export data seamlessly to a Remote Target.
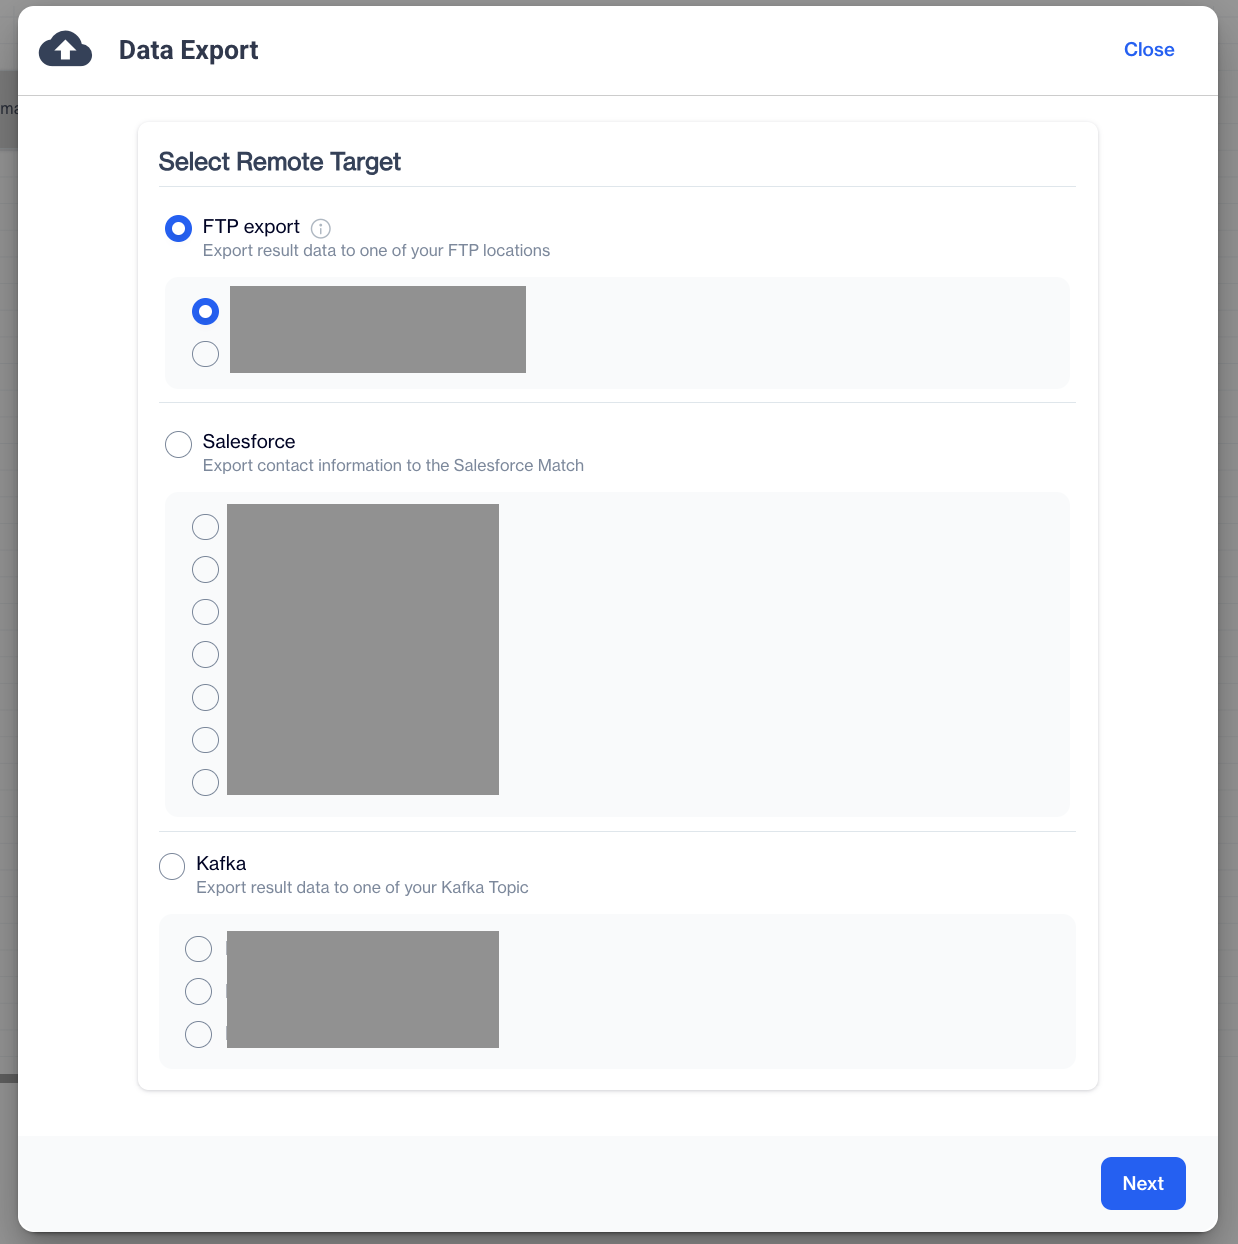
Data Export
NotesIt's essential to predefine your Remote Targets to take advantage of this feature, which allows for the systematic channeling of data to specified endpoints for enhanced utilization and analysis.
To define a Remote Target , please follow:
- Navigate to Settings > Integrations > Remote Targets
- Click on Add button to start configuring your Remote Target.
- Select the Platform and corresponding Remote Target.
- Click on Next to proceed to export settings.
Diverse Requirements for Different Platforms/ProductsPlease be aware that data export requirements can differ depending on the platform or product you have selected. It's crucial to understand these variations to ensure successful data transfer. Below, we provide a comprehensive list of platforms along with the specific requirements needed to define each as a Remote Target.
| Platform/Protocol | Requirements | Available Options |
|---|---|---|
| FTP | Host , port, User Name, Password, Remote Directory | ZIP Compression, Use Passive Mode |
| SFTP | Host , port, User Name, Password, Remote Directory, SSH Key | ZIP Compression |
| FTPS | Host , port, User Name, Password, Remote Directory | ZIP Compression |
| Google BigQuery | Key Json File | |
| Microsoft SQL | Server, port, Database Name ,User Name, Password | |
| Facebook Custom Audience | User Id, Account Id | |
| Google Customer Match | Ad Account Id , User | |
| SalesForce | SalesForce Client Id, SalesForce Client Secret Key. ⚠️ A column name from Master Contact table should be selected | |
| Turkticaret.net | Api Key, Segment Api Key | |
| Turk Telekom | User Name, Password, Segment Api Key | |
| Web API | Base URL, Endpoint, Authentication Type | Enable HTTP/2 (Default 1.1) , Enable compression (gzip) |
| AWS S3 | Bucket Name, Region, Access Key, Secret Key | |
| Oracle | Server IP, port, Database Name, User Name, Password | |
| TikTok | Advertiser Id, Advertiser Name | |
| Amazon Redshift | Server, port, Database Name ,User Name, Password |
Ready to Initiate Data Export
Having meticulously completed the configurations detailed previously, you are now fully prepared to Data Export to desired platform within the journey flow.
Update Tag

Update Tag
This element is designed to manage tags within your audience during the journey flow. You can add or remove tags, as well as update key-value paired tags, to better segment and target your audience.
- Add these tags to audiences**: Enter the tags you wish to add to your audience. After typing each tag, press Enter to separate and confirm it.
- Remove these tags from audiences: Type the tags you want to remove from your audience. Press Enter after each tag to ensure it's correctly separated and marked for removal.
- Update Key Value tags: To update a tag's value, first select the tag from the dropdown list. Then, enter the new value you want to associate with the tag's key for the audience in the flow.
- Create New Tag: Should you need to create a new tag specifically for this journey, click on the **Create New Tag **button. This feature allows for the customization and expansion of your tagging capabilities within the journey.
Ready to Update Tags
Having meticulously completed the configurations detailed previously, you are now fully prepared to Update Tags for the Audience within the journey flow.
Update Contact
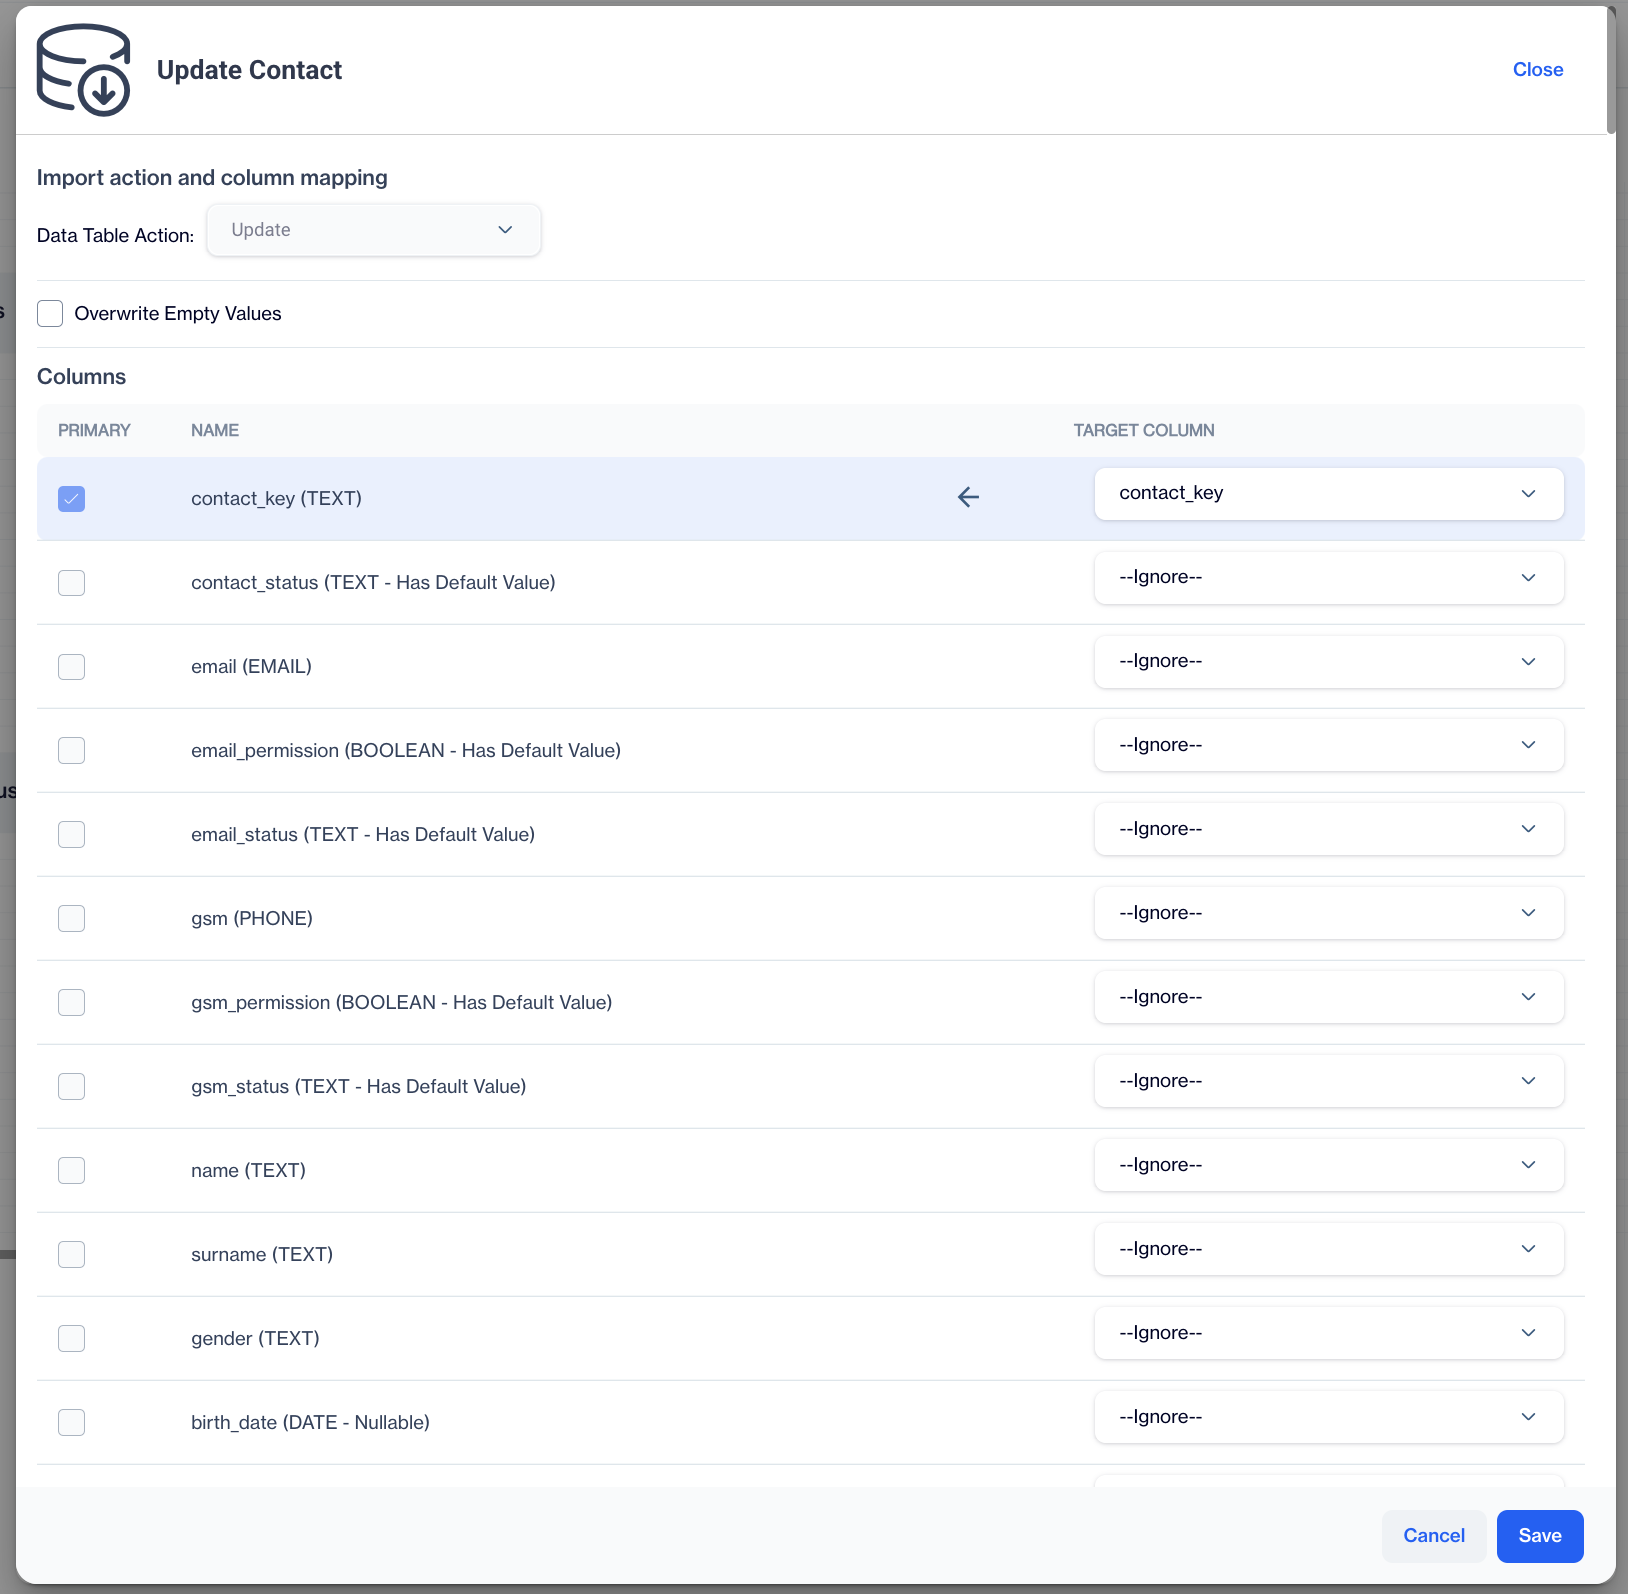
Update Contact
This feature enables you to update specific fields in the master_contact table with a constant value during the journey flow.
- Selecting the Target Column: Click on the column you wish to update and choose** Constant Value** as the update type.
- Inputting or Selecting the Value: Enter or select the value that you want to assign to the chosen column.
- Click Save to confirm and apply the changes.
Important Note on Contact Information UpdateMultiple Column Updates:
This feature supports updating** more than one column** in the
master_contacttable.Setting Values by Data Type:
Depending on the data type of the target column, you will need to input the value accordingly. Here are some common scenarios:
TEXTType: Options include:
- Null Value
- Empty Value
- Specific Text: Enter the text you wish to update the contacts with.
All contacts in the node will be updated with the chosen text value._
DATEType: Options include:
- Current Date: Automatically updates the column to the current date.
- Specific Date: Enter a specific date for the update.
All contacts in the node will be updated with the chosen date._
BOOLEANType:
- Choose either
TRUEorFALSEto update the contact..All contacts in the node will be updated with the selected Boolean value._
Ready to Update Contact
Having meticulously completed the configurations detailed previously, you are now fully prepared to Update Contacts within the journey flow.
WhatsApp
Get Started with WhatsApp Marketing MessagesFor a comprehensive understanding of how to configure and launch your WhatsApp marketing campaigns, please visit our dedicated Sending WhatsApp Marketing Messages page. This resource provides detailed steps, tips, and insights on effectively utilizing the WhatsApp channel for your marketing initiatives.
Configuring Decisions Flow Elements
In this section, we explore the decision-making mechanisms that dictate the path of your campaign's journey flow. Decisions nodes are critical as they determine the subsequent steps a contact will take, based on data and behaviors. This guide will provide you with detailed instructions on setting up decision nodes that can intelligently route your audience, based on engagement and more.
Engagement Split
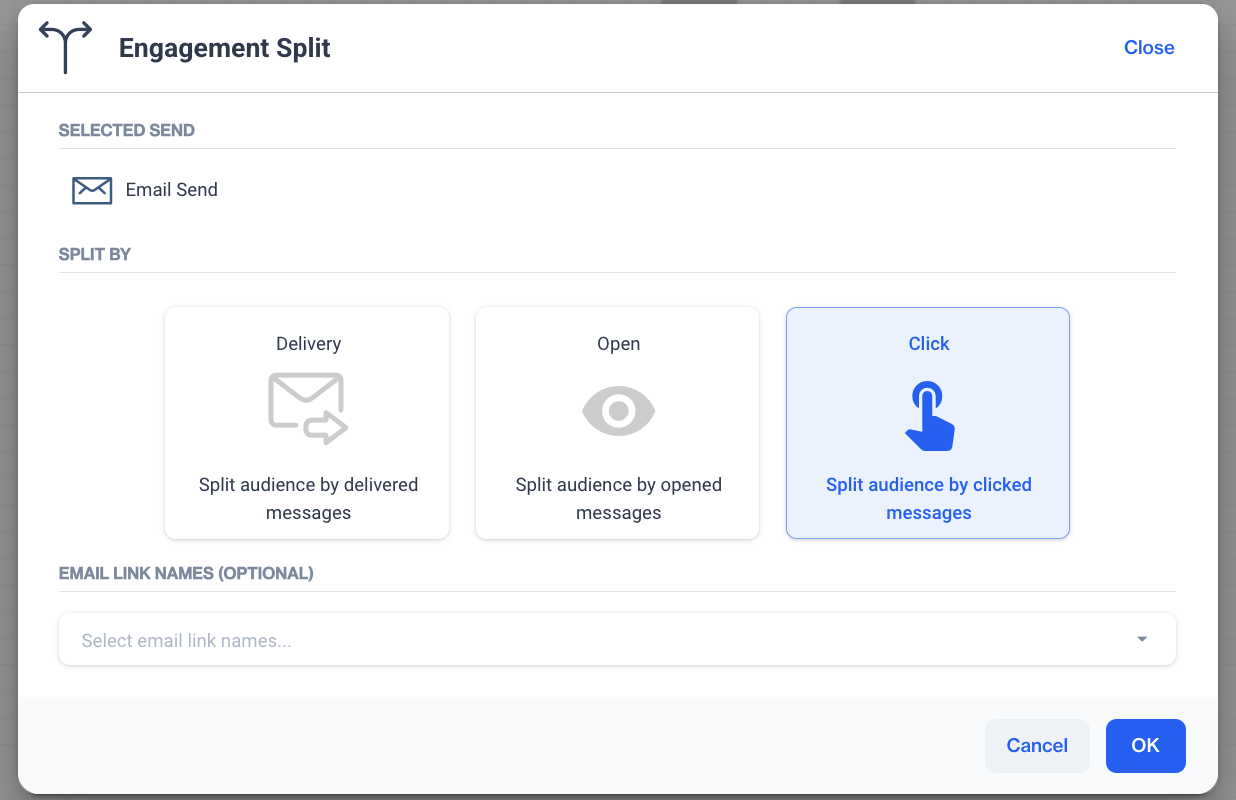
Engagement Split
The Engagement Split feature allows you to segment your audience based on their interaction with different types of engagements. This tool is particularly useful for tailoring your follow-up strategies according to how contacts have interacted with your previous sends._
- Connection to a Send: An Engagement Split should be connected after a Send action. The types of engagements available for splitting will vary depending on the connected send.
- **Configuration Modal: **The configuration interface for an Engagement Split typically includes the following elements:
- Two output nodes for segmenting the audience:
- 🟢** Green Wire**: Represents contacts who have engaged with the selected type.
- ⚪ Gray Wire: Represents contacts who have not engaged with the selected type.
- Two output nodes for segmenting the audience:
- Engagement Types by Send Types: The table below outlines the available engagement types based on different send types:
| Send Type | Available Engagement Types |
|---|---|
| Delivery, Open, Click | |
| SMS | Delivery, Click |
| Push | Delivery, Open, Click |
| In-App | Display, Dismiss, Click |
| On-Site | Display, Dismiss, Click |
| A/B Split | ℹ️ Varies by the selected channel (Email, Push, On-Site) |
Random Split
Random Split is an essential feature that enables you to divide your audience into up to three distinct paths for varied campaign experiences.
- Initiating Random Split: To begin, connect the Random Split node to any available audience segment. This connection is typically made following an action node, allowing you to distribute the campaign audience at the onset of their journey.
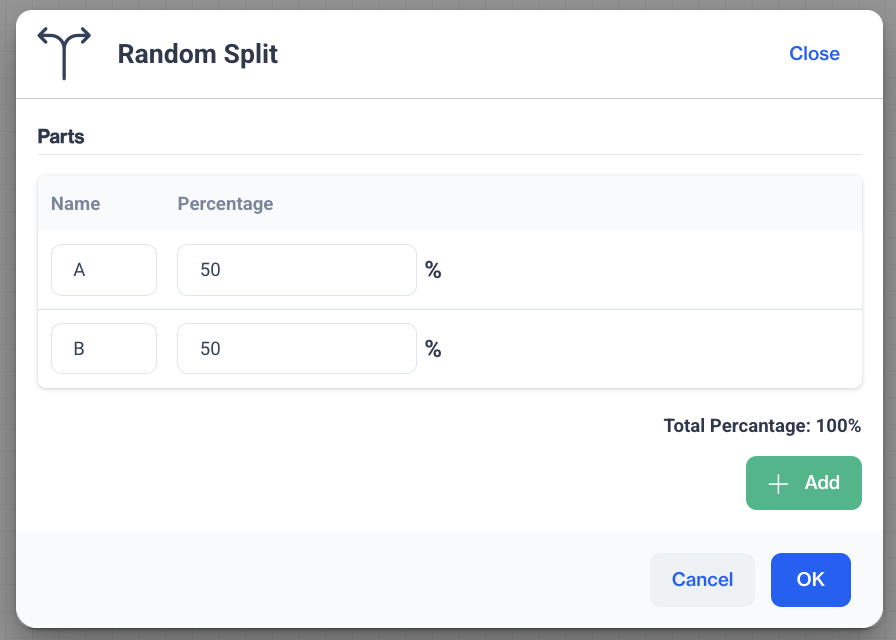
Random Split
- Determining Path Percentages: By default, the Random Split is configured to bifurcate your audience into two paths. You can adjust the distribution percentages between these paths as needed. Confirm your settings by clicking OK.
- Adding Additional Path: Should your strategy require more granularity, select the Add button to introduce a third path. Allocate the desired percentage to this new path and click OK to save your configuration.
- Mapping Out the Journey: With your random splits defined, proceed to link each path to the appropriate send nodes or action nodes. This ensures each segment of your audience embarks on a tailored journey within your campaign.

Decision Split
The Decision Split feature is a powerful tool that segments your audience based on predefined criteria such as specific segments or SQL queries.** It enables you to direct your campaign flow with precision by segmenting the audience according to behaviors or other defined parameters, ensuring that only the most relevant contacts continue down a particular path.**
- Initiate a Decision Split: To incorporate a Decision Split into your campaign, place a Decision Split node directly following any Action Node within the flow.
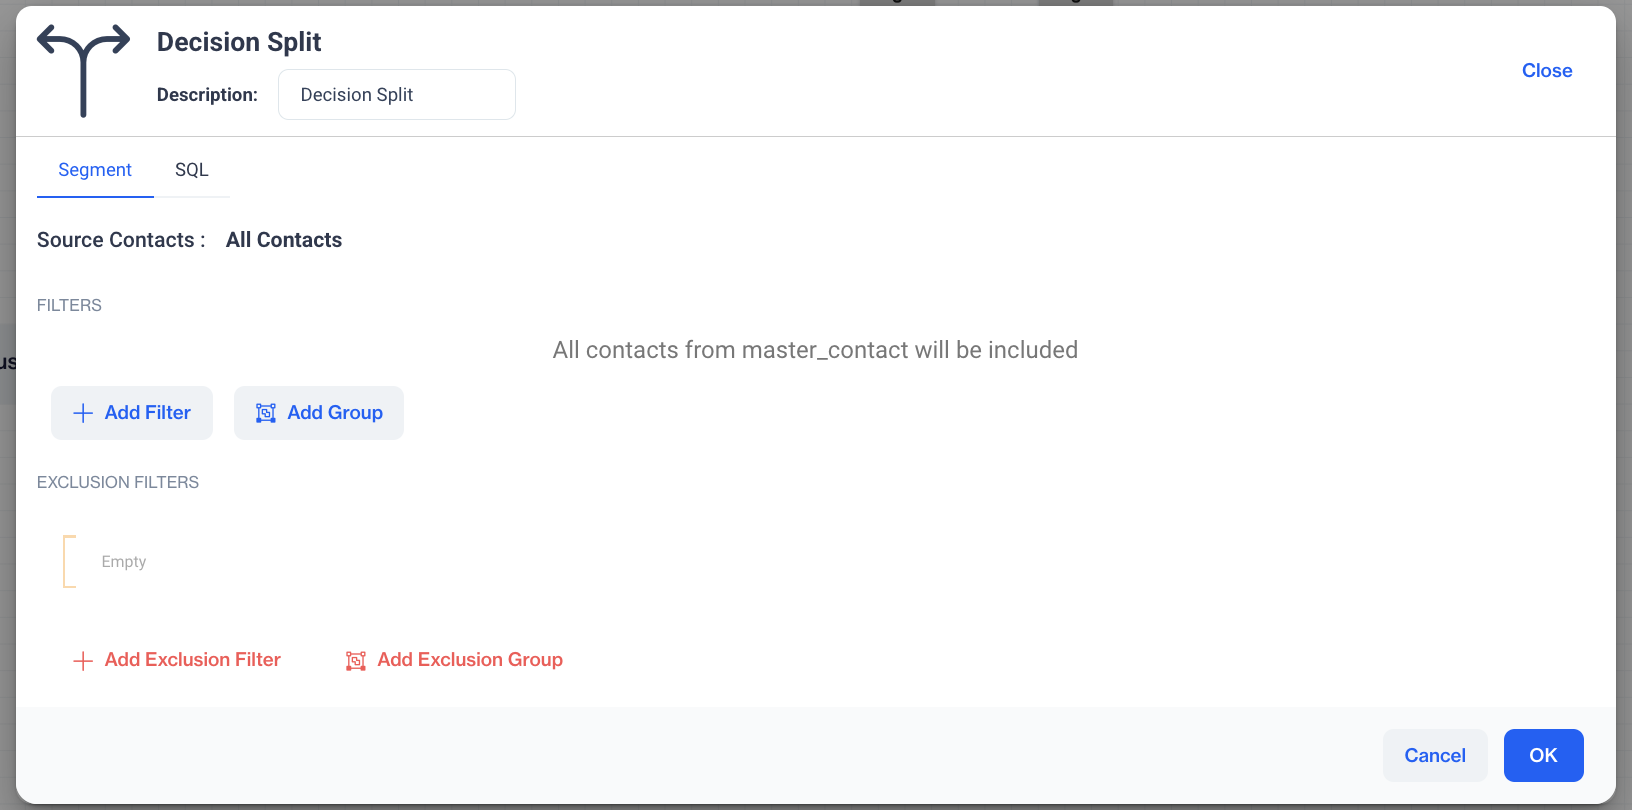
Decision Split
- Configuring Criteria with Filters: Set up your decision-making criteria by adding filters. Confirm your configurations by clicking OK. For instance, in the illustration provided, the segment is defined to include users who have made a purchase in the last two days.
- Utilizing Exclusion Filters: You can further refine your segment by applying exclusion filters if necessary.
- Establishing Pathways Post-Split: Once your Decision Split criteria are in place, you need to connect the resulting pathways to subsequent nodes:
- 🟢** Green Wire**: This indicates the path for contacts who meet
your segment criteria. - ⚪ Gray Wire: This path is for contacts who do not meet the segment criteria.
- 🟢** Green Wire**: This indicates the path for contacts who meet
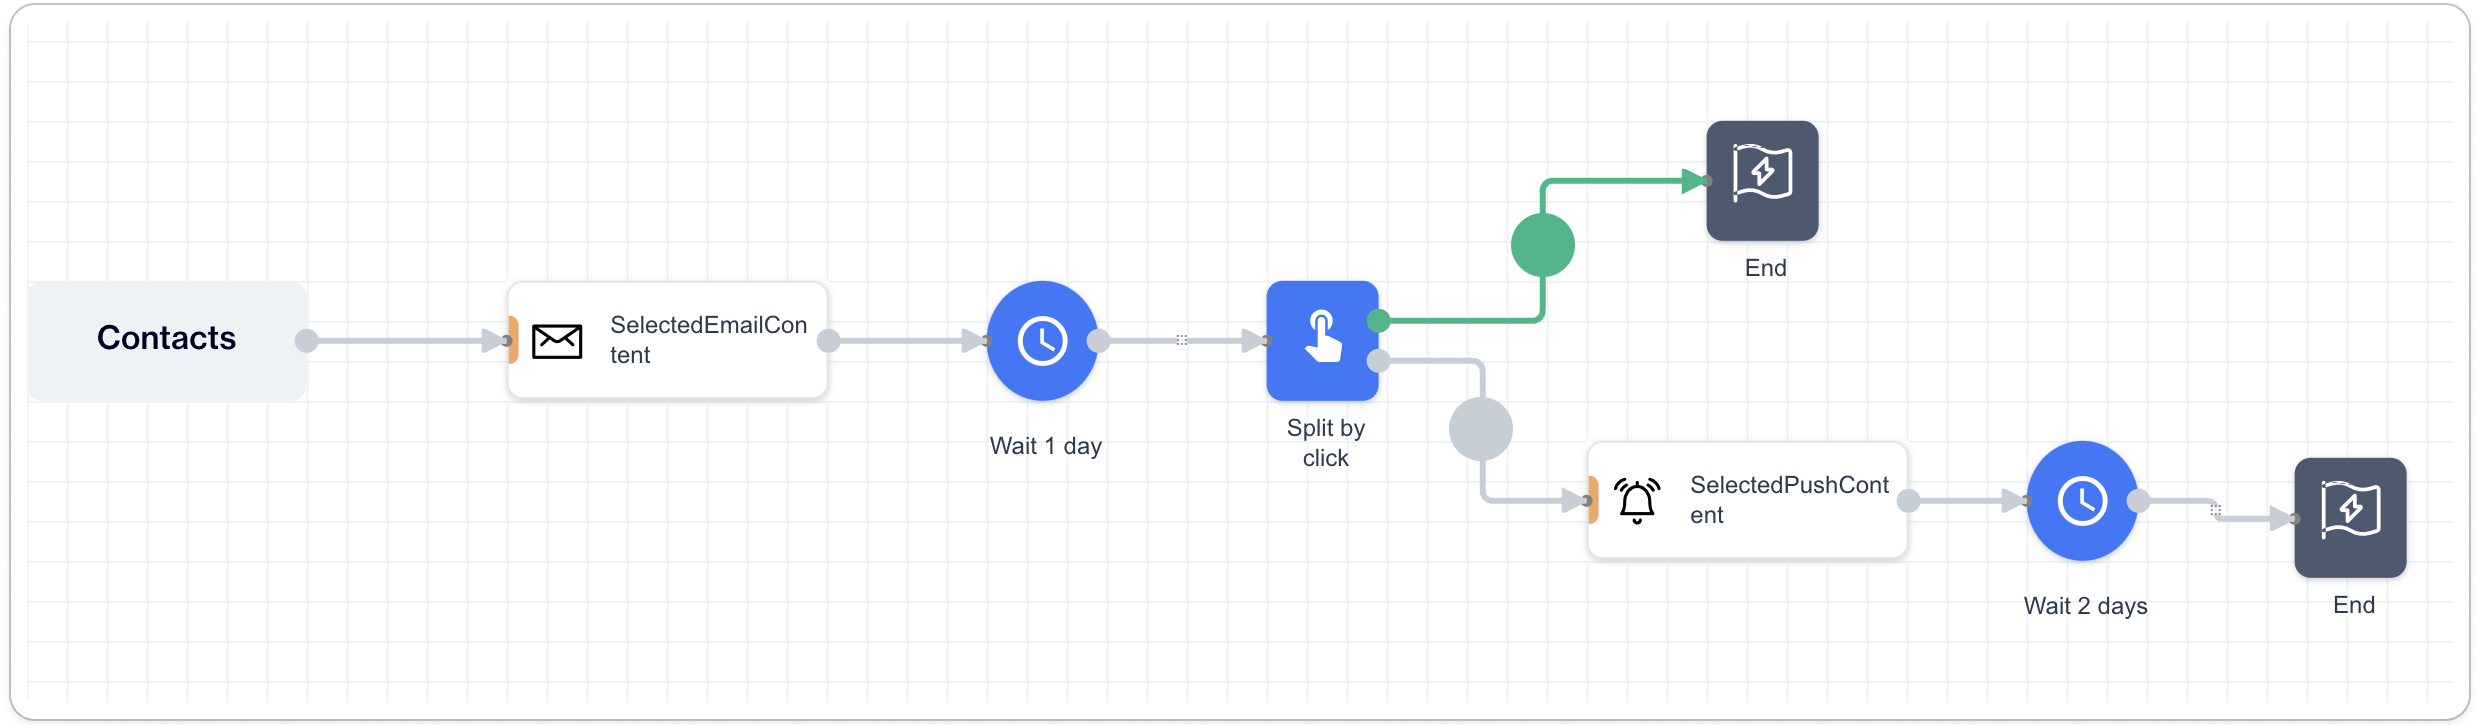
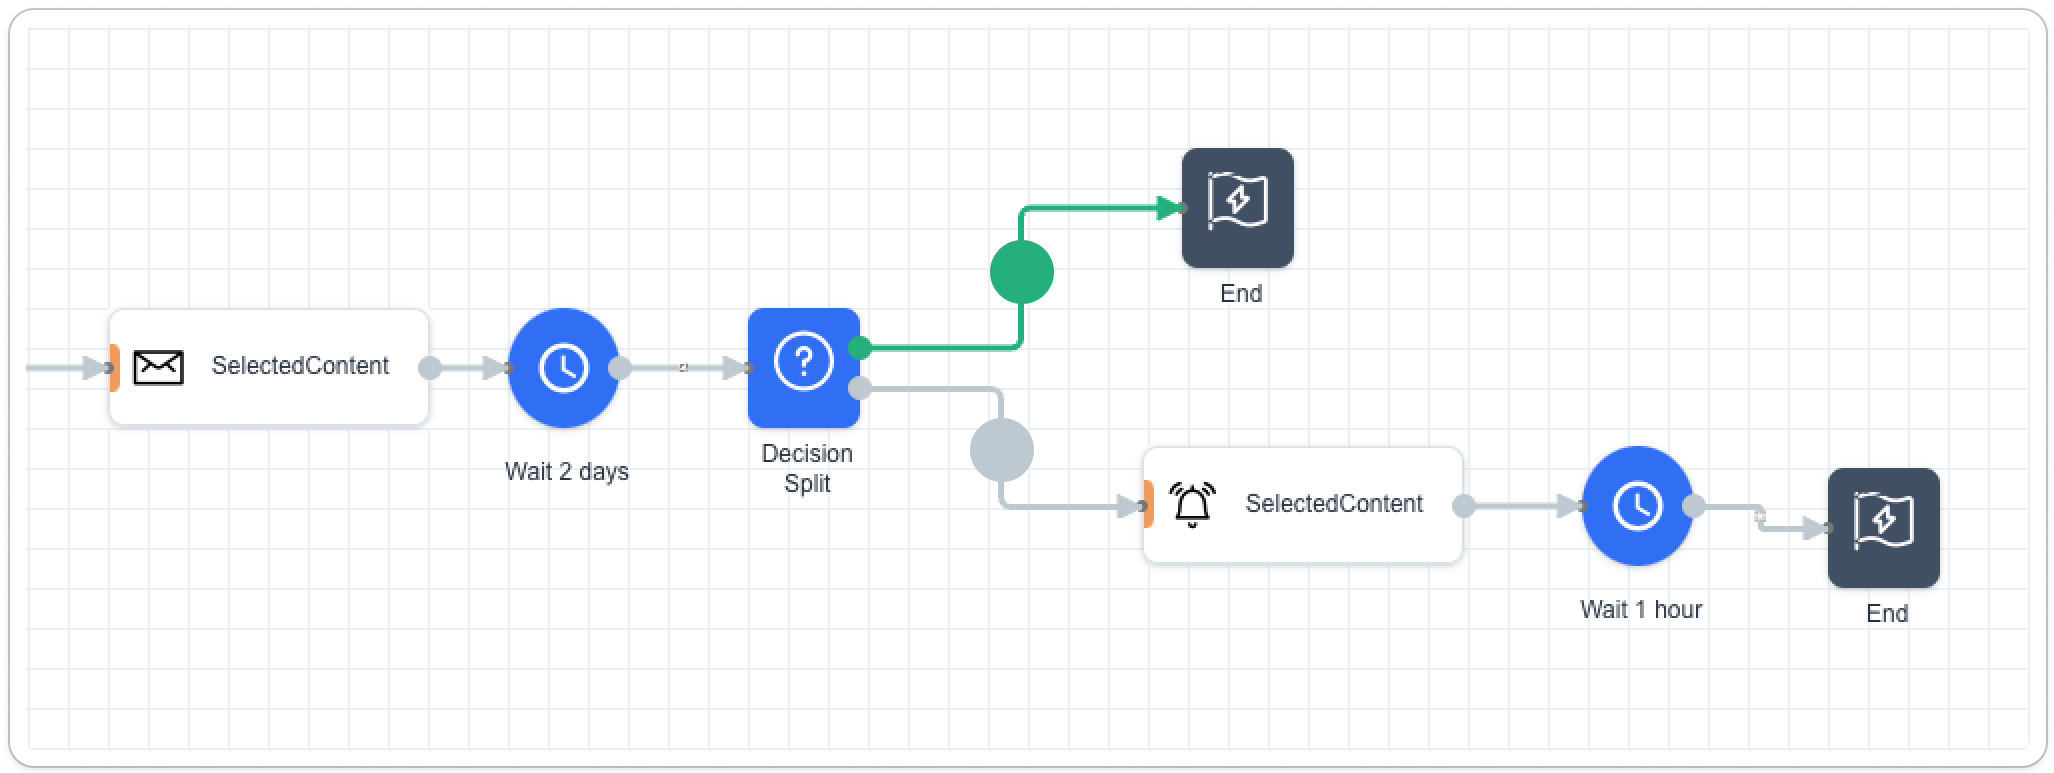
In the example shown below, the Decision Split(mentioned on above illustration) is applied as follows:
- Users who did not complete an order after receiving the Email Campaign are** directed to receive a Push Notification**.
- Conversely, users who did complete an order as a result of the Email Campaign are not routed to receive any additional messages.
Wait
Maximize the effectiveness of your campaign by introducing deliberate pauses between actions with the Wait feature. This function is particularly useful when you want to create a specific time delay between campaign nodes, such as after a send action, to ensure your messages are timed perfectly to enhance engagement.
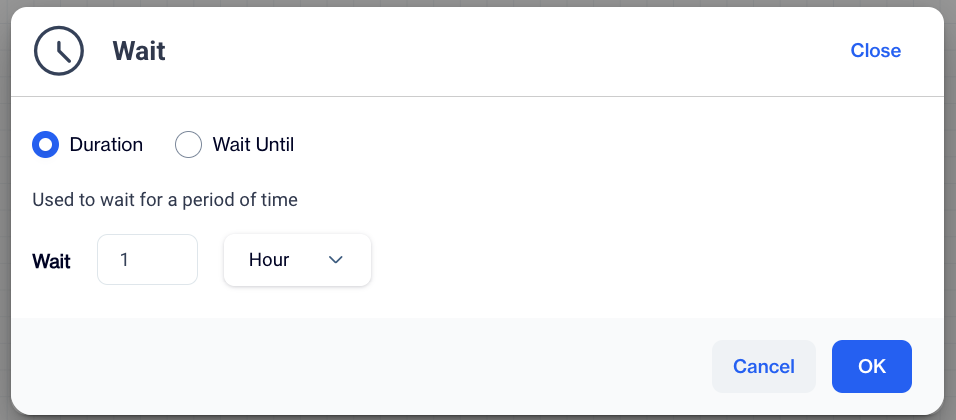
The Wait node comes with two configuration options:
- Duration: This setting allows you to specify a wait period. Use the dropdown menu to select the unit of time—minutes, hours, or days— and** input the duration of the wait**. This creates a controlled pause within the journey flow, giving your audience time to interact with the initial message before proceeding to the next step.
- **Wait Until: **For more precise scheduling, you can choose to wait until a specific calendar date. This ensures that the next step in your campaign aligns with particular events or milestones.
NotesIt's advisable to incorporate a waiting period of at least 1-2 days when planning consecutive messages across different channels in a single flow. This helps prevent message fatigue and gives recipients ample time to engage with each communication before receiving the next.
Configuring AI Flow Elements
Dive into the realm of strategic automation with this section, where you'll learn to leverage artificial intelligence to maximize the impact of your campaign's journey flow. The AI encompasses a suite of tools designed to optimize timing and channel selection, as well as to conduct A/B testing for ongoing campaigns.
Optimize Time
Optimize Time is an advanced feature that determines the most effective time to reach each individual in your audience. By leveraging historical interaction data, this feature schedules campaign actions—such as email, mobile push, web push, or SMS—at times when users are most likely to engage. Please note that Optimize Time is exclusively available for One-Time Campaigns.
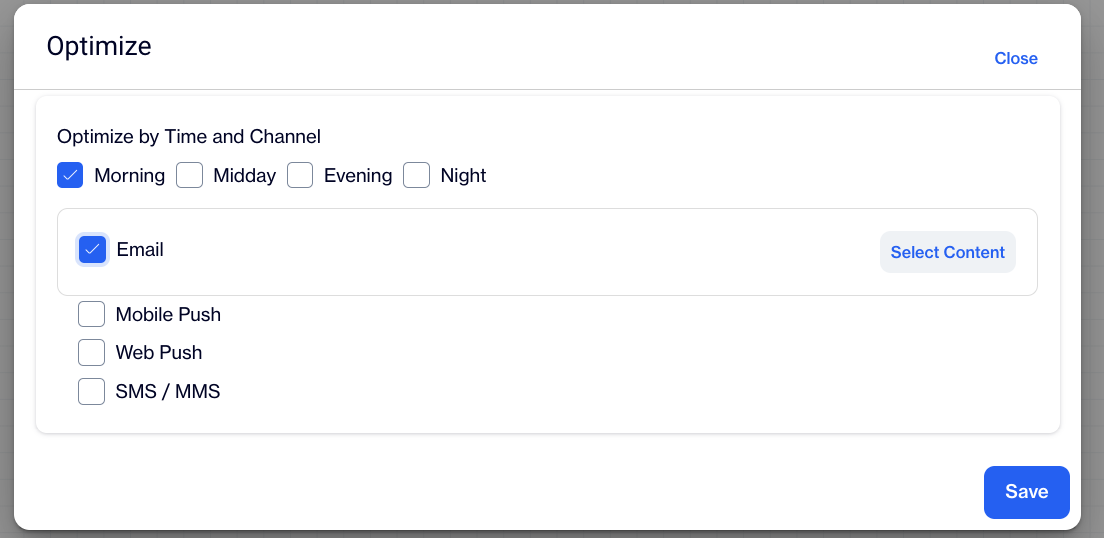
Optimize Time
- Select time: Choose the time frames you wish to target for optimized sends. This could be morning, midday, evening, or night..
Important ConsiderationThe time frames for this feature can be fine-tuned in the Settings under Optimize Time and Channel. Here you can establish specific intervals that define each time slot throughout the day.
- Add Channel(s): Include the channels you want to use for time optimization within your one-time campaign.
- Select Content: Assign specific content for each channel that has been added to the optimization strategy.
- Confirm Settings: Click Save to lock in your configuration.
Upon approval, the system will generate output nodes corresponding to each Selected Time multiplied by the Selected Channels.
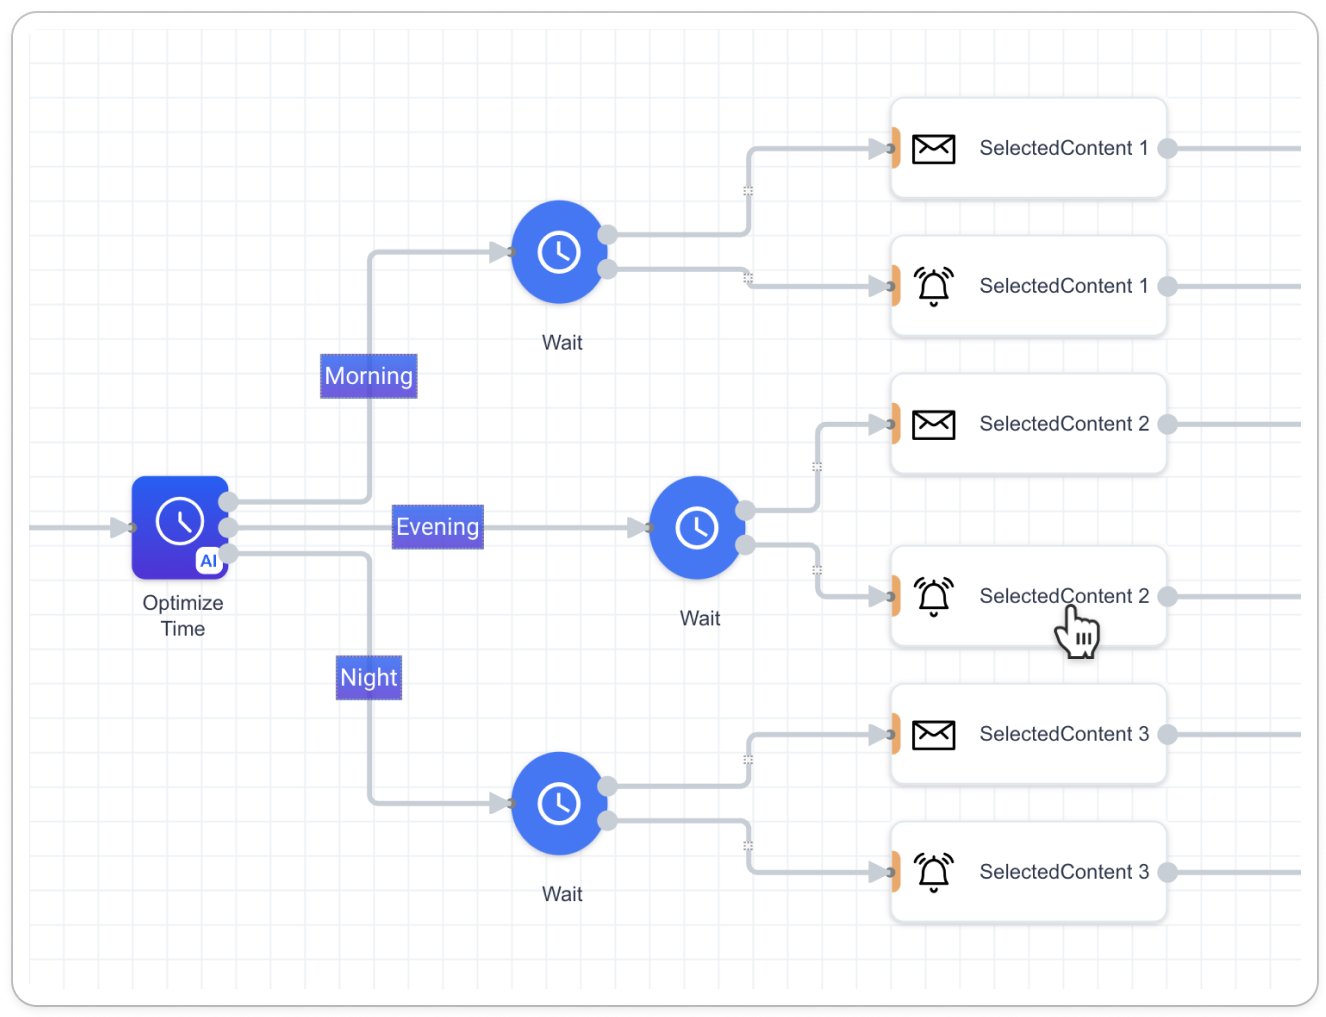
Tips:
- Each piece of content will be automatically duplicated and labeled with incremental numbers (1, 2, 3, etc.) at the end of the content name to indicate different time slots.
- You can edit the contents by double-clicking on them if modifications are necessary.
- Wait nodes within this context are not editable since Optimize Time automatically configures the wait durations.
- Should you need to revisit your time optimization choices, you can re-enter the configuration by double-clicking on the Optimize Time node.
Practical Use Case Example
Imagine scheduling a campaign to launch at 14:00 with a preference for midday and morning times. The system will first send communications to users identified as midday-active at the appointed campaign start time. Then, the following morning, it will reach out to those users identified as morning-active.
This strategic timing is customizable in the Settings under Channel and Time Optimization, providing a tailored approach to your one-time campaign engagements.
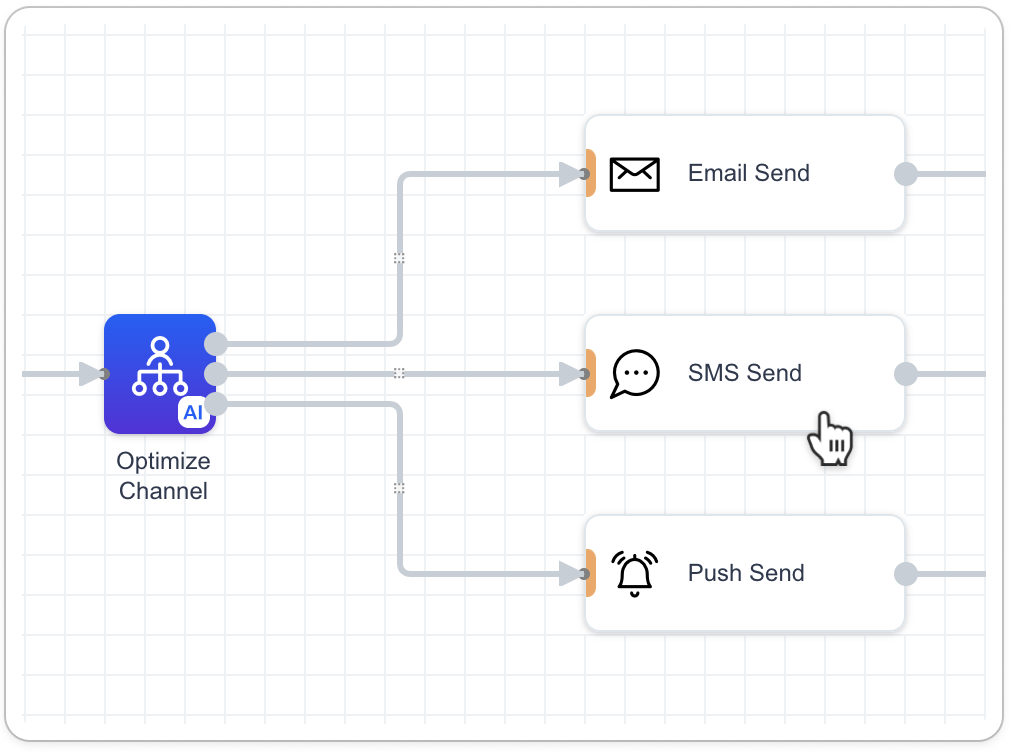
Channel Optimize
Channel Optimization utilizes historical engagement data to intelligently determine the most responsive communication channel for each individual contact. This feature enhances engagement opportunities by selecting the most effective channel—be it email, SMS, or push notifications. For contacts lacking interaction history, the system will default to a predefined channel, ensuring comprehensive reach. Please note that Optimize Channel is exclusively available for One-Time Campaigns.
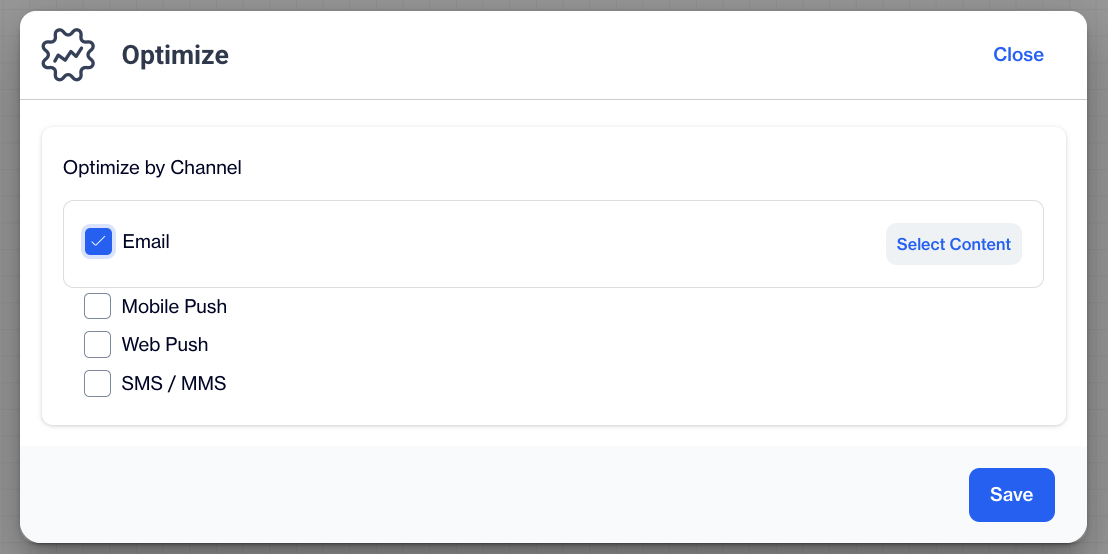
Channel Optimize
- Select Channel(s): Choose the channel(s) you wish to optimize for your communication. This could include any combination of email, SMS, push & web push notifications.
- Select Content: Assign the appropriate content for each chosen channel. This ensures that each message is tailored to the strengths of its respective medium.
- Confirm Settings: Finalize your setup by clicking Save. This action confirms your selections and prepares your campaign for execution.
Upon approval, the system will create output nodes for each of the selected channels, ready to send out your content.
Tips:
- Content adjustments can be made easily by double-clicking on the content names, allowing you to enter edit mode and make the necessary changes.
- Should you need to revisit your channel optimization choices, you can re-enter the configuration by double-clicking on the Optimize Channel node.
AI Split
The AI Split node is an innovative tool specifically designed for enhancing recurring campaigns. It allows you to conduct a controlled experiment by evenly distributing your audience into two distinct paths and evaluating their performance based on selected metrics.
- Initiate the AI Split: Add the AI Split node to your campaign flow to begin the setup.
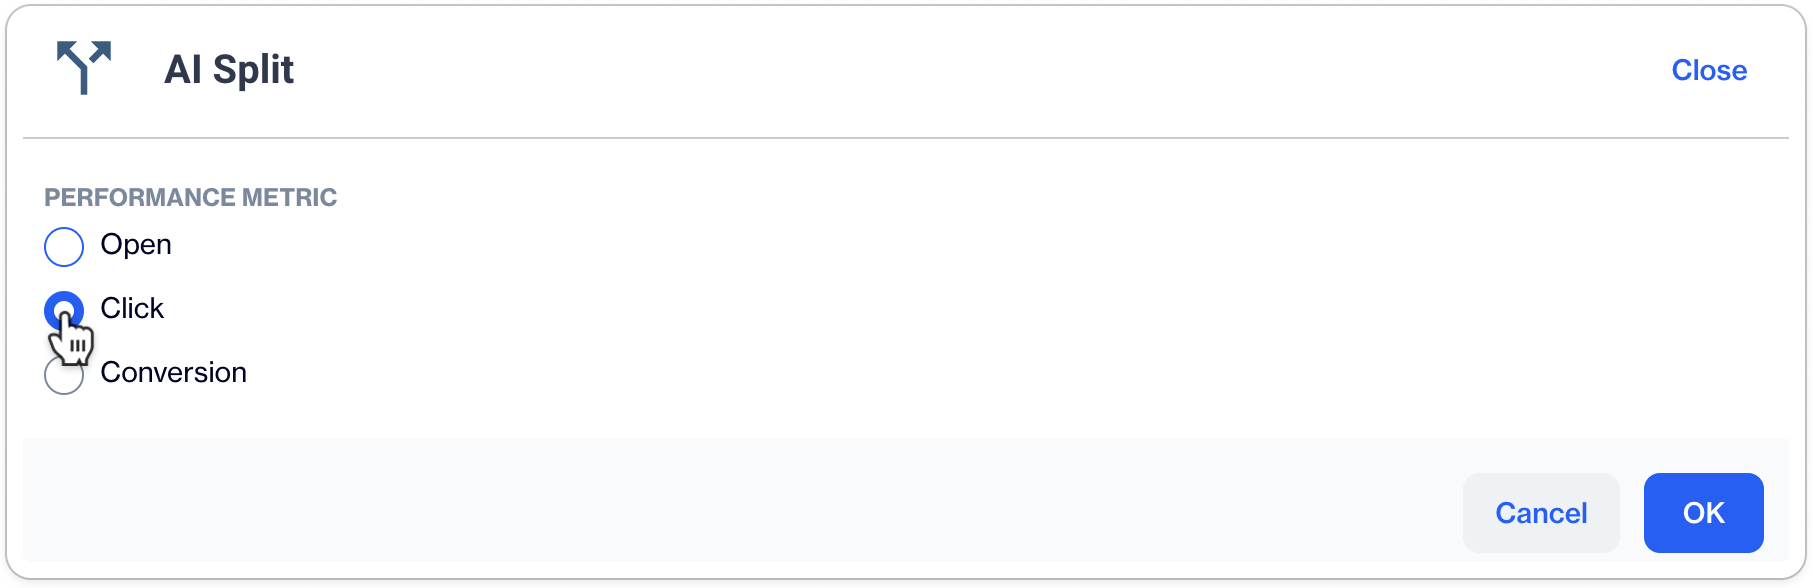
- Select Performance Metric: Choose a performance metric that will serve as the basis for comparing the two paths. This could be conversion rates, open rates, or click-through rates.
- Confirm Metric Selection: After selecting the metric, click OK to save your choice and proceed with the experiment.
Note on Conversion MetricTo gain a deeper understanding of how conversion metrics are calculated and their impact on your campaign's success, please refer to the Decoding Conversion Metrics in Reporting section of our documentation.
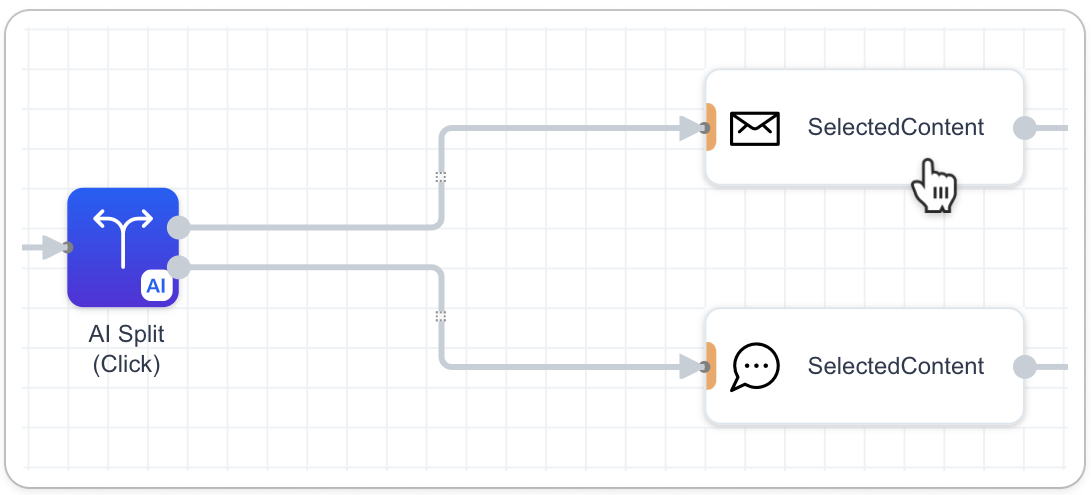
- Link Output Nodes: Once your AI Split is configured, connect the two output nodes to the respective send nodes of your choice.
- Launch Campaign: With the send nodes connected, your campaign is ready to launch. The AI Split evaluation will occur automatically, guiding the flow of your campaign based on data-driven decisions.
The Evaluation Process in AI Split
Understanding the AI Split evaluation mechanism is key to leveraging its capabilities effectively. Here's how the process unfolds:
- Monitoring Performance: The AI Split node begins by tracking the selected performance metric over a predetermined duration, typically spanning 7 days. This period is essential for accumulating relevant data to inform the analysis.
- Evaluating the Results: After the monitoring phase concludes, the system automatically processes the gathered data to discern the performance of each path. This analysis is based on the predefined metric, providing a data-driven approach to understanding campaign effectiveness.
- Identifying the Winning Path: The branch that demonstrates superior performance, as indicated by the metrics, is identified as the 'winning' path. This designation is based on objective analysis, ensuring a bias-free selection.
- Directing Future Communications: Subsequent campaign actions are then aligned with this winning path. By doing so, the AI Split ensures that your audience is engaged through the most effective means, as determined by the evaluation process.
WEB API Call
A Web API (Application Programming Interface) allows different software systems to communicate with each other over the web. It defines a set of rules and protocols for building and interacting with software applications.
In this context, the Web Api Call feature enables you to transfer data from D-Engage to your own systems or third-party services via a defined API endpoint.
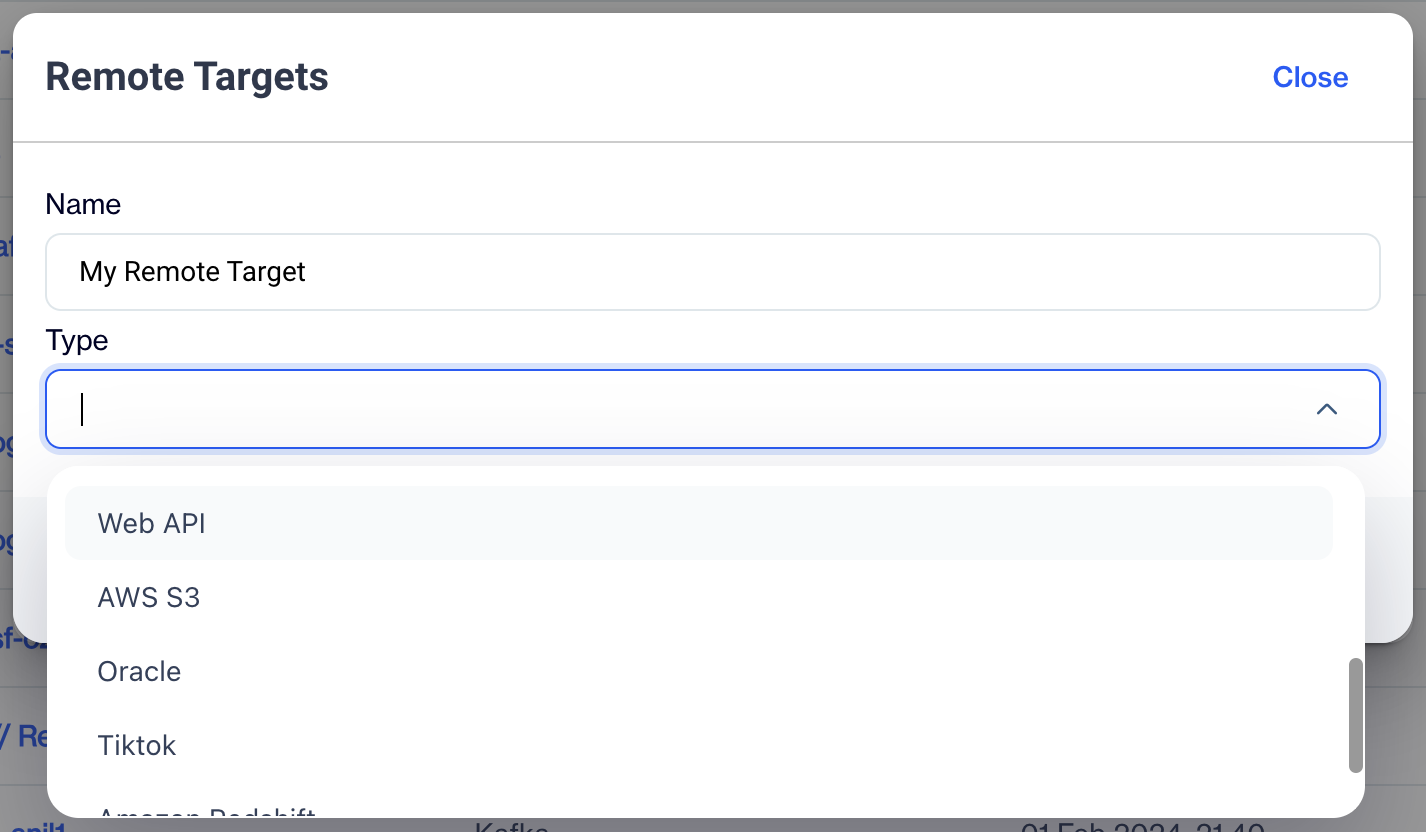
Step 1: Define Remote Target
Define a Remote Target
- Go to Settings > Remote Targets in the Dengage interface.
- Click on Add New Remote Target. Enter a name for the remote target and choose Web API connection type from the dropdown list.
Remote Targets
Please fill required fields like below:
- Name: When selecting the Web API, please assign a unique name to your Remote Target. This name will be used when calling your web API through Campaign Flow.
- Type: The type of your remote target must be set to 'Web API'.
- Base URL: Enter the full URL of your web API, such as <https://api.mywebsite.com/apis>
- Endpoint: Specify the endpoint address of your web API, e.g., /bulkupsert.
- Authentication Type: Choose your authentication type. By default, no authentication is used.
- Save your Remote Target to make it available for selection in the Web Api Call node.
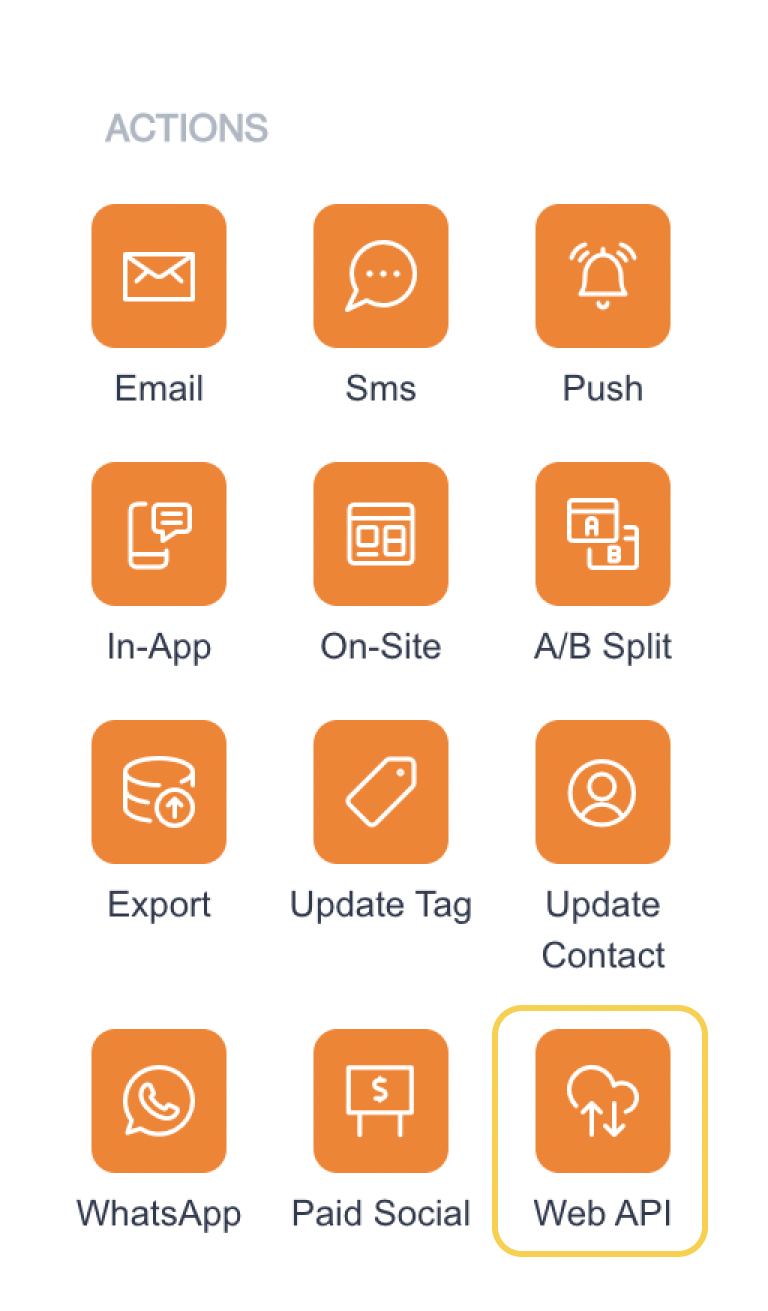
Step 2: Configure the Campaign Flow
- Create a New Campaign Flow
- Go to Campaigns > Flow.
- Create a new one-time or recurring campaign.
- Add the Web API Node
- In the Campaign Flow, locate and add the Web API node from the actions list on the left.
Web API
- Configure the Node
- Drag and drop the Web API node to the flow.
- Double-click on the node to open the configuration modal.
- Choose your remote target from the list.
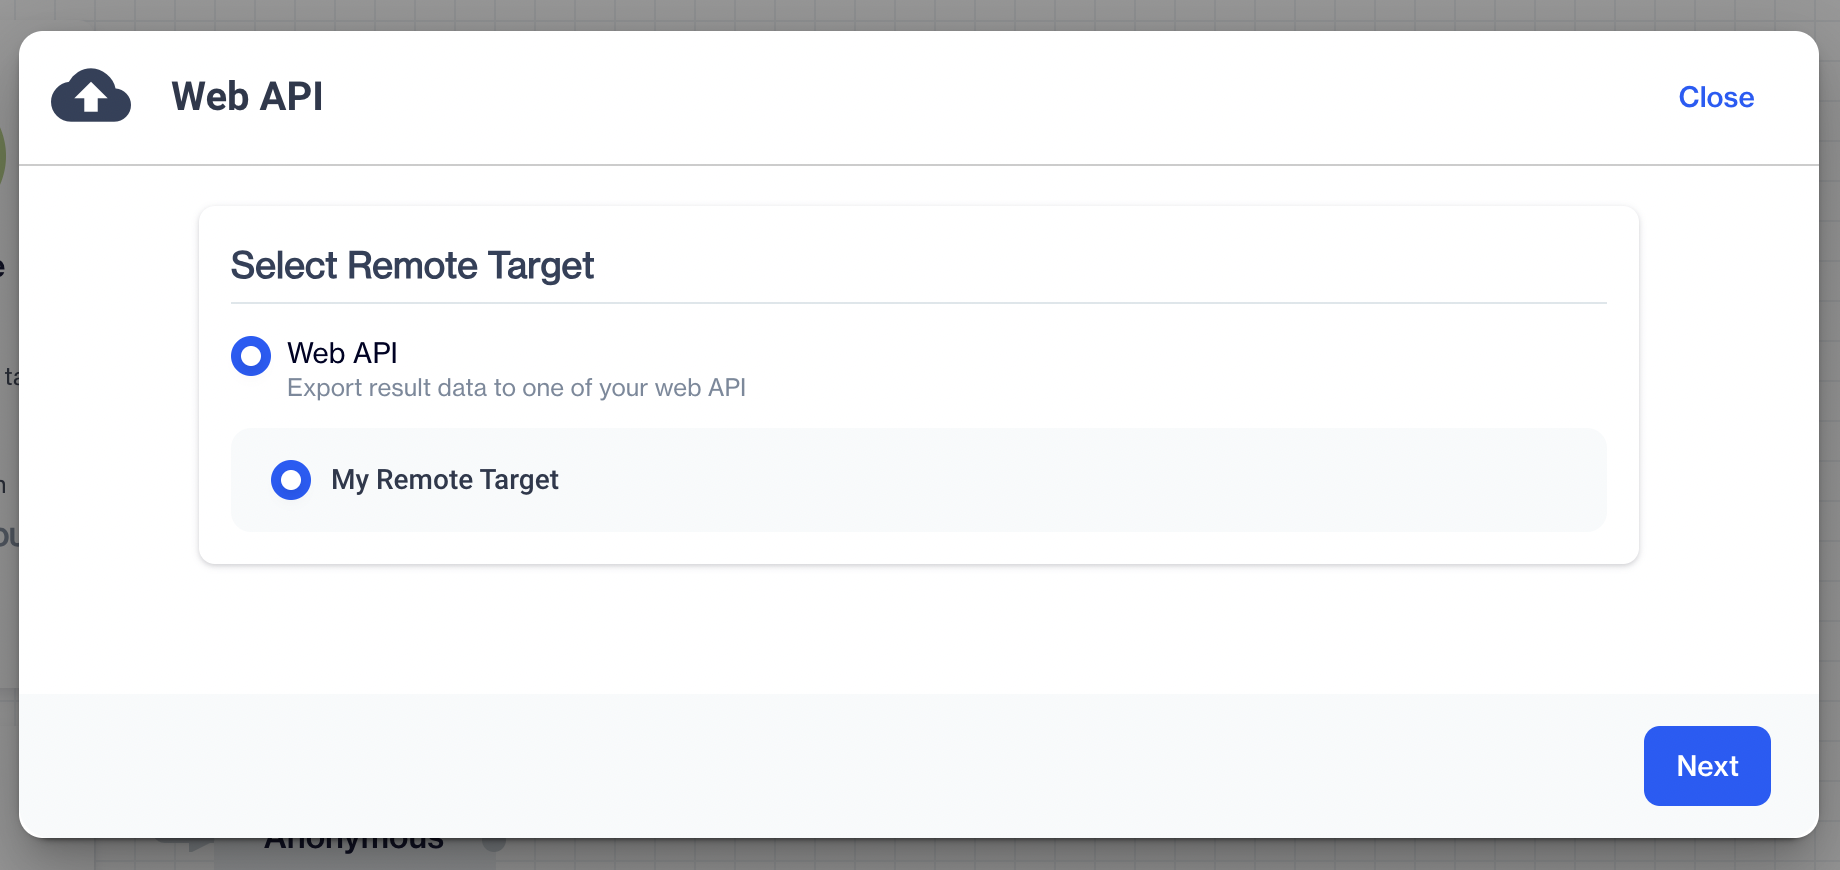
Select Remote Target
- Give your export any name you want.
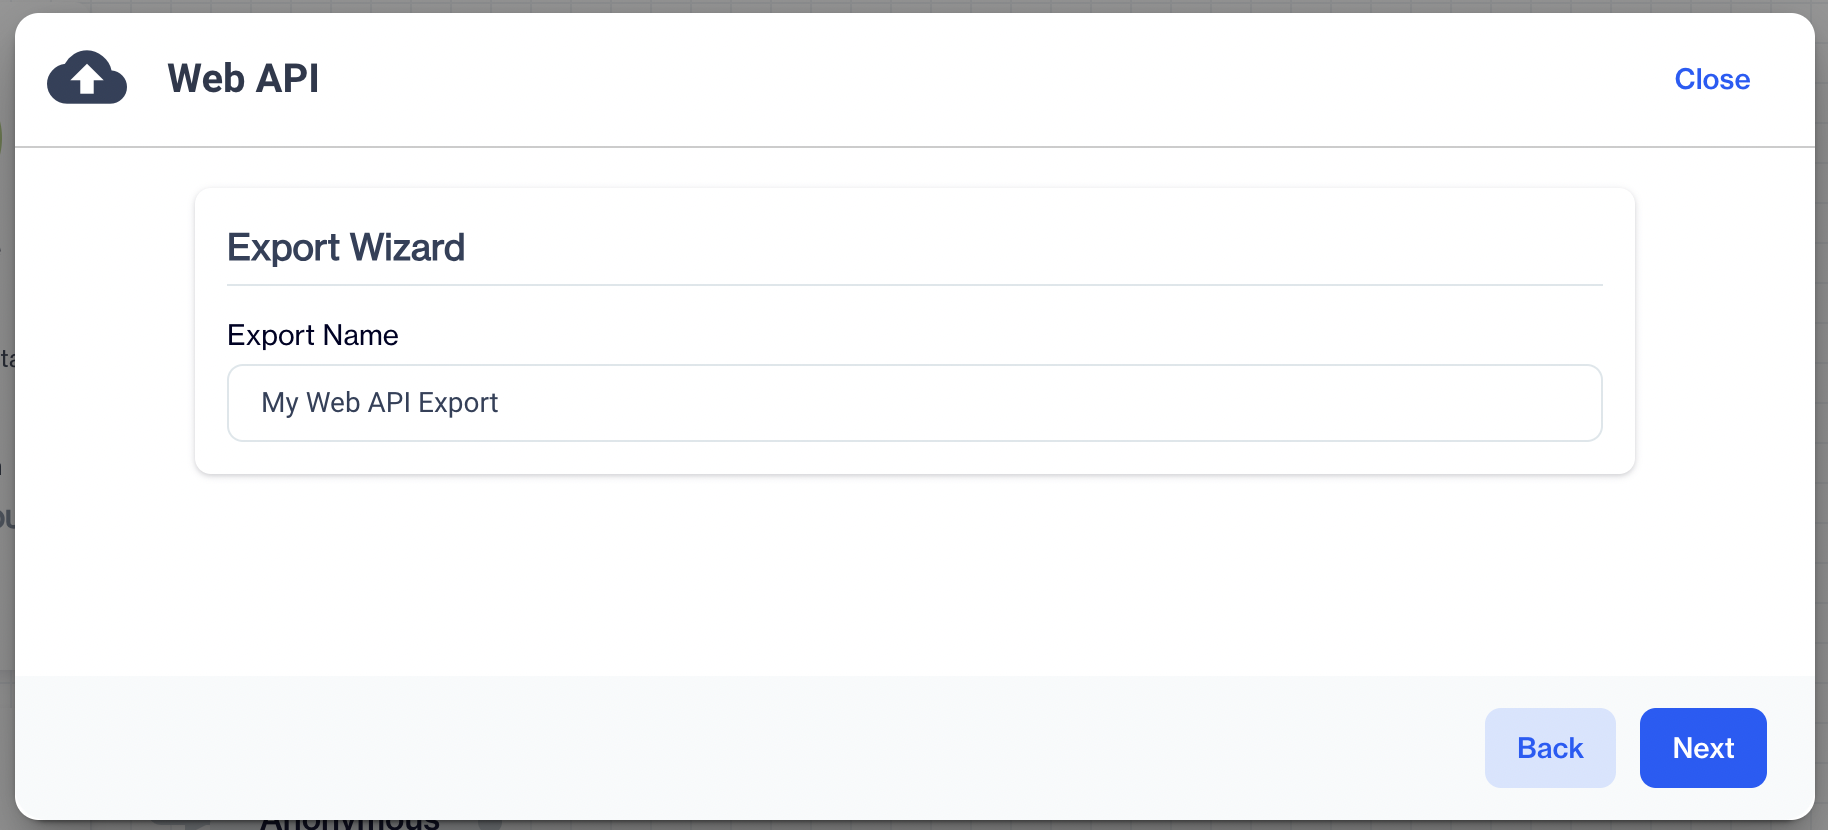
Web API Export Wizard
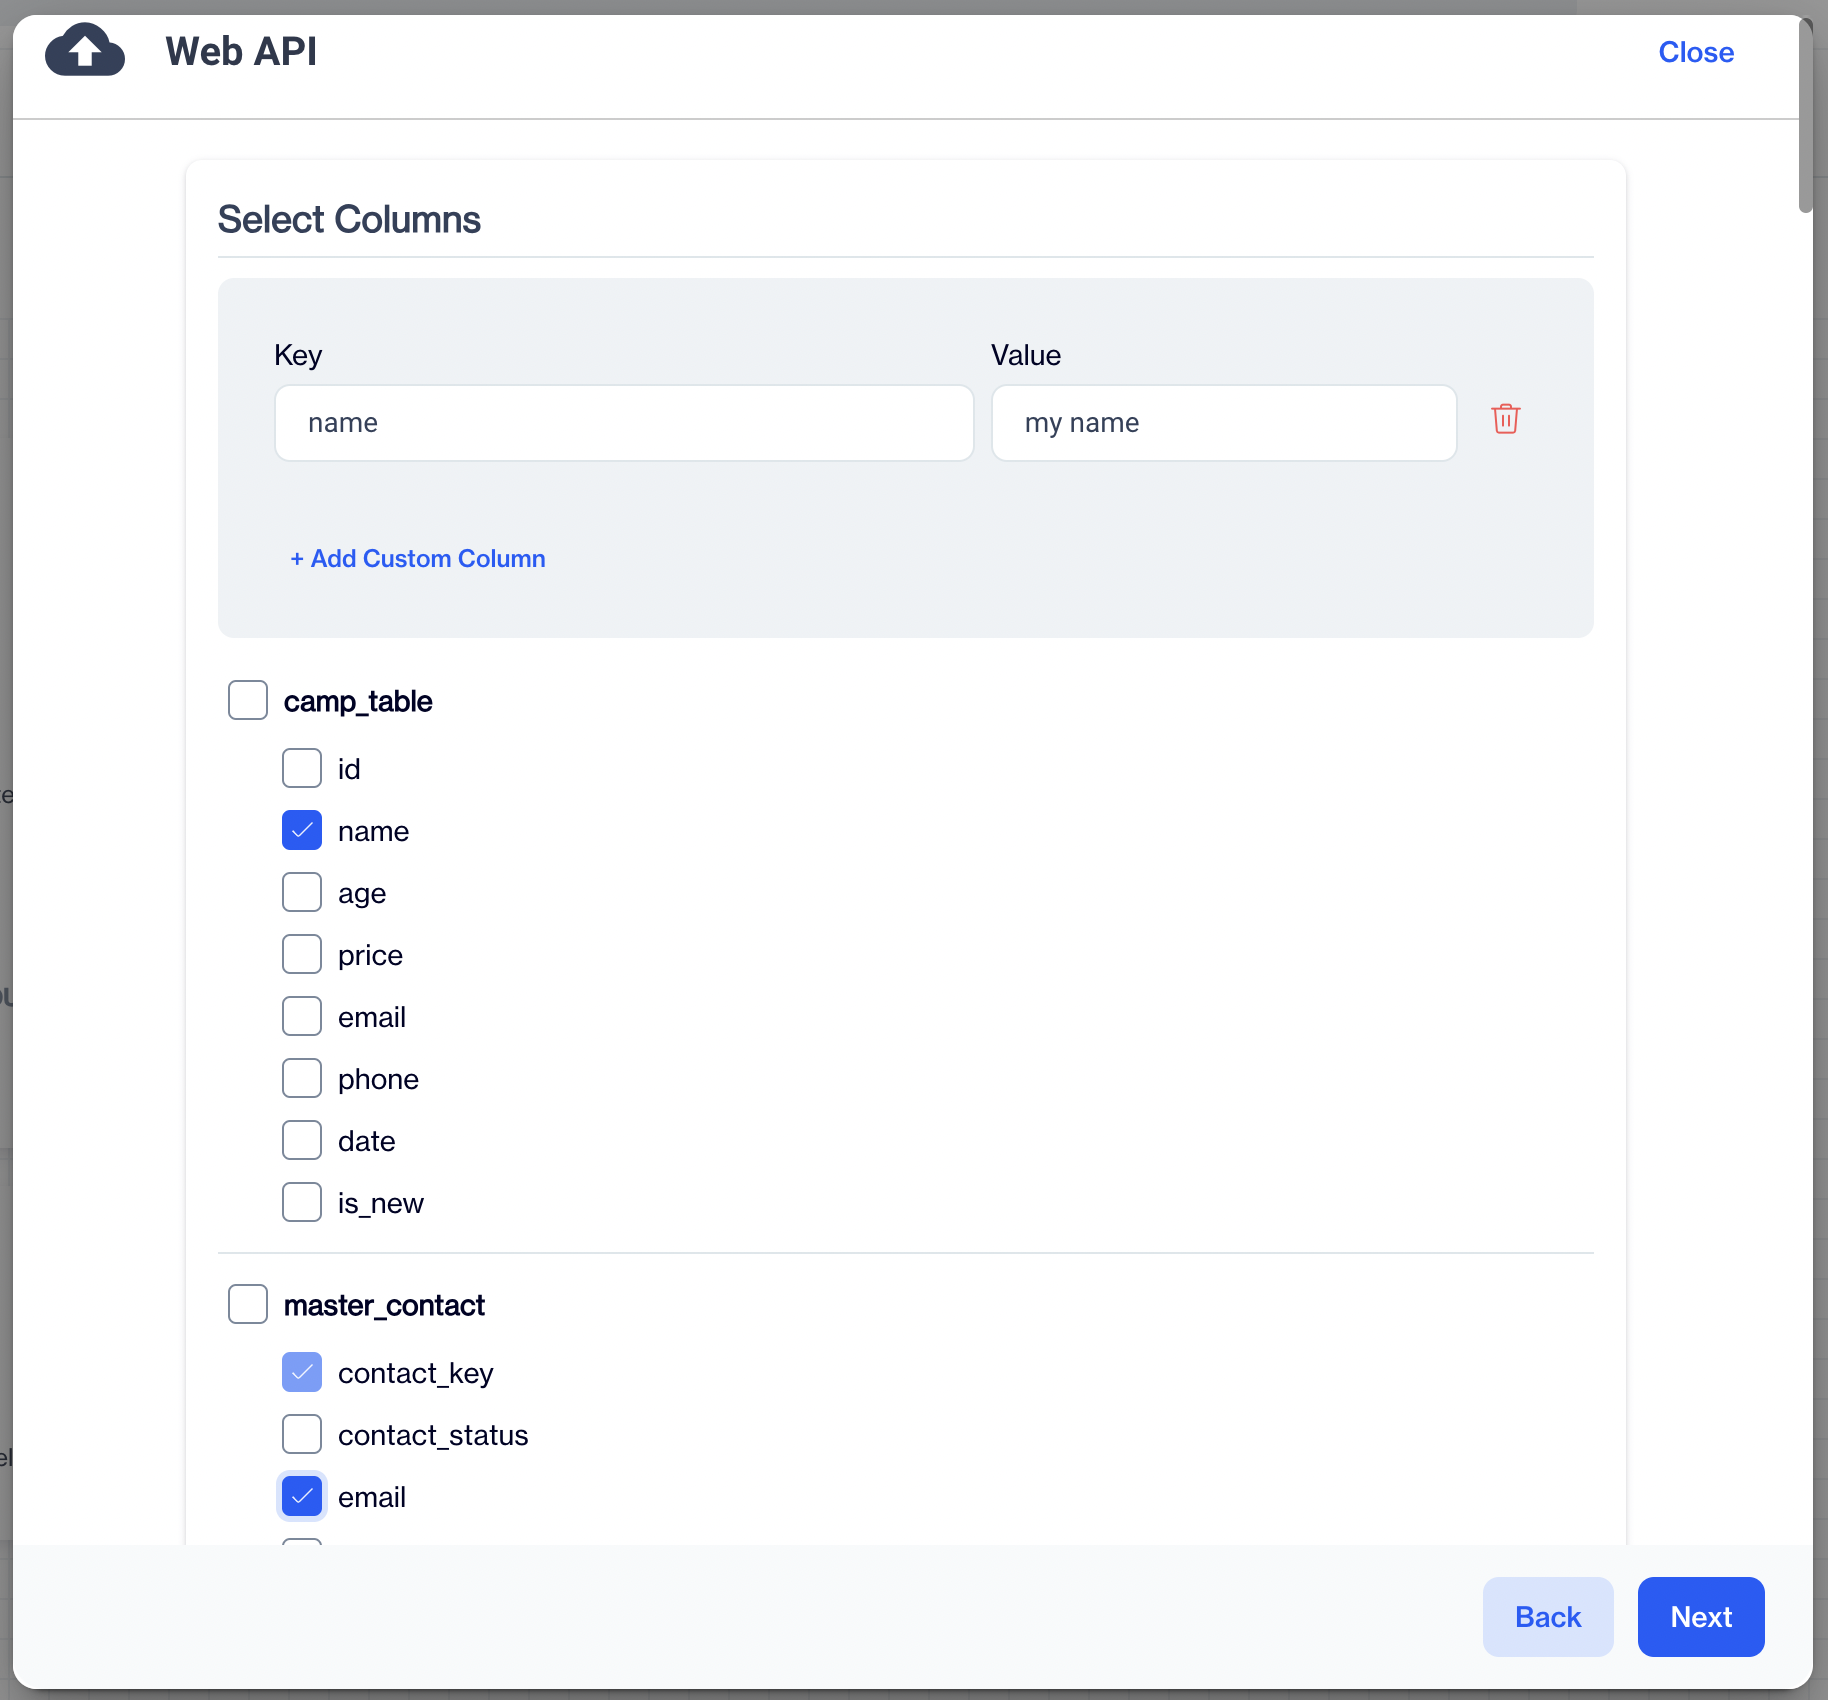
- On the next screen, choose the columns you want to send to your Remote Target.
- On the screen below, you can add Custom Columns, columns from the table you want to send, and columns from your master_contact or master_device table.
- contact_key for master_contacts table and device_id for master_device table are required and checked by default, and can not be unchecked.
- If your custom columns, camp_table columns have the same name as your master_contact or master_device tables the system will automatically change the name.
- After the selections are done, on the next screen there will be a summary and sample curl.
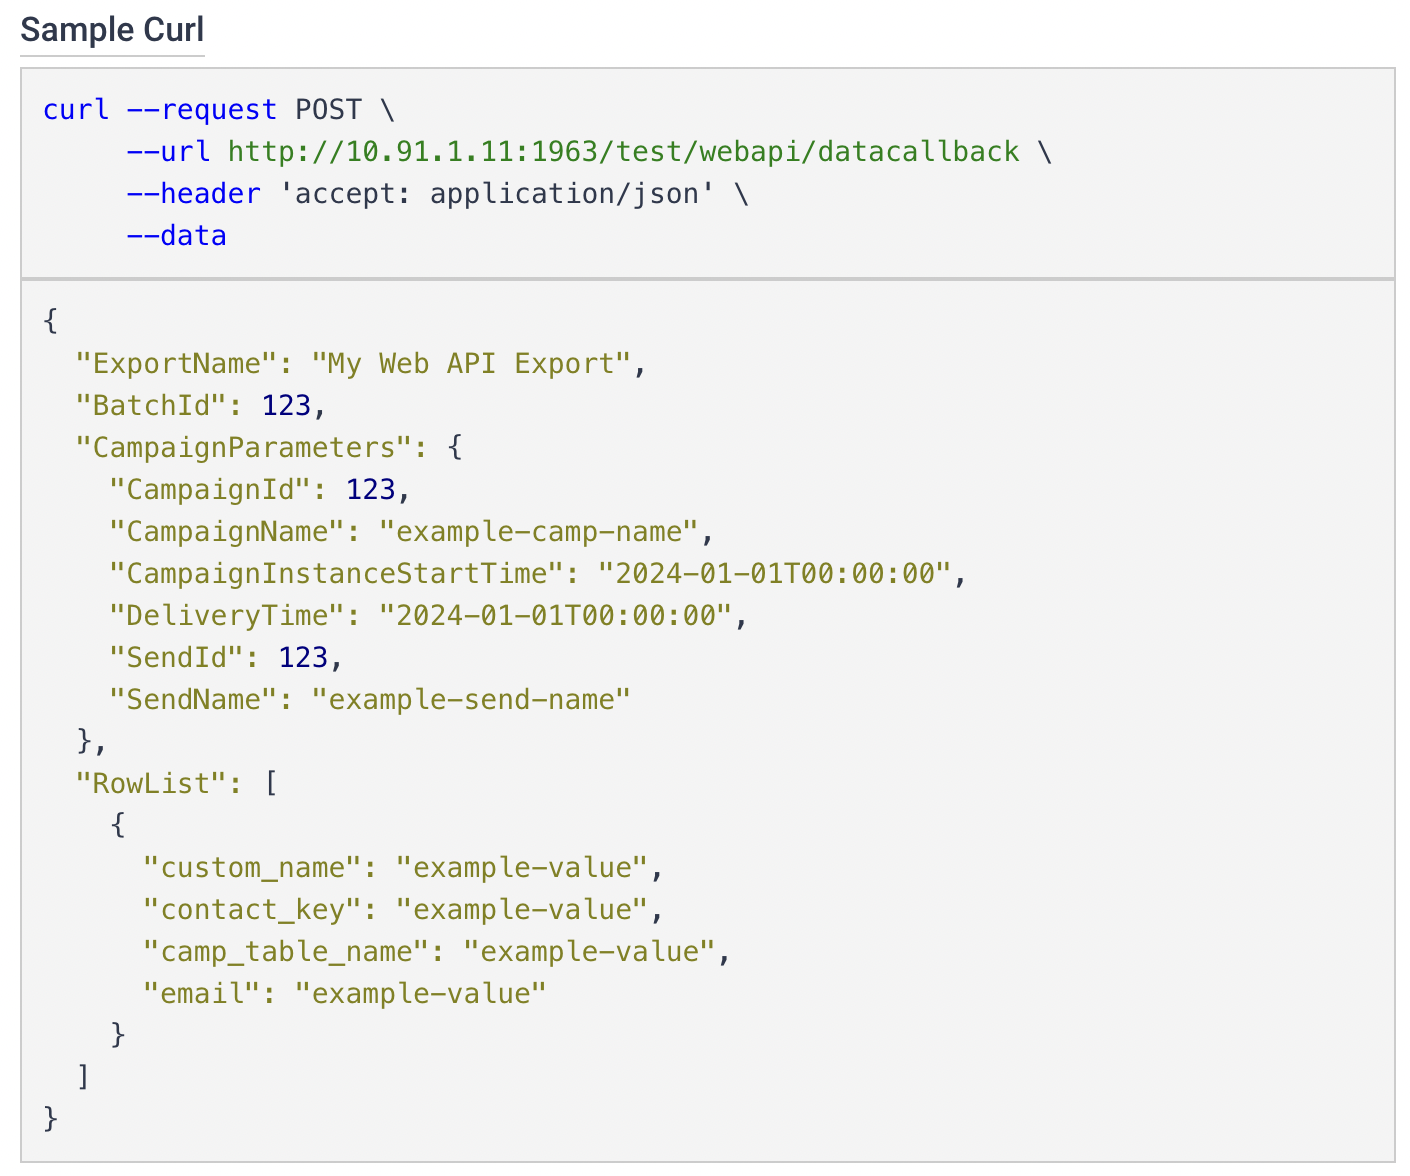
The JSON output will be generated in two parts:
i. CampaignParameters
- Mandatory Fields: Automatically included fields such CampaignId, CampaignName, CampaignInstanceStartTime, DeliveryTime, SendId, and SendName.
ii. RowList
- Custom Parameters: User-defined key-value pairs. Will be repetitive for every row.
- Campaign Table(if sendable table chosen as audience)
- Master Contact or Mater Device Data: Selected data from the master_contact table, including the contact_key which is mandatory and unchangeable.
- Save and Finalize
- Save your configuration. The node in the workflow will update to regarding the configured Web API.
Tips and Best Practices
- Ensure your endpoint is properly configured to receive data in the specified JSON format.
- Regularly update your API endpoint to accommodate any changes in data structure or requirements.
- Use descriptive names for your custom parameters to maintain clarity and ease of use.
How We Will Call Your WEB API
- You will receive one request at a time in your web API. In other words, you won't receive concurrent requests on your end.
- Each request can contain up to 1000 messages in the body.
Updated 2 months ago