
Directly on Content
Once your SMS content is successfully generated, you can make any necessary changes and save it as a draft for later use. If you’re ready to launch, publish the content to prepare it for your SMS campaigns.
To create a campaign directly on content, click on the Create Campaign button located at the top right corner of the screen. From there, you can select the type of campaign you wish to create: One-Time or Recurring.
Creating SMS - Directly on Content
1:Target
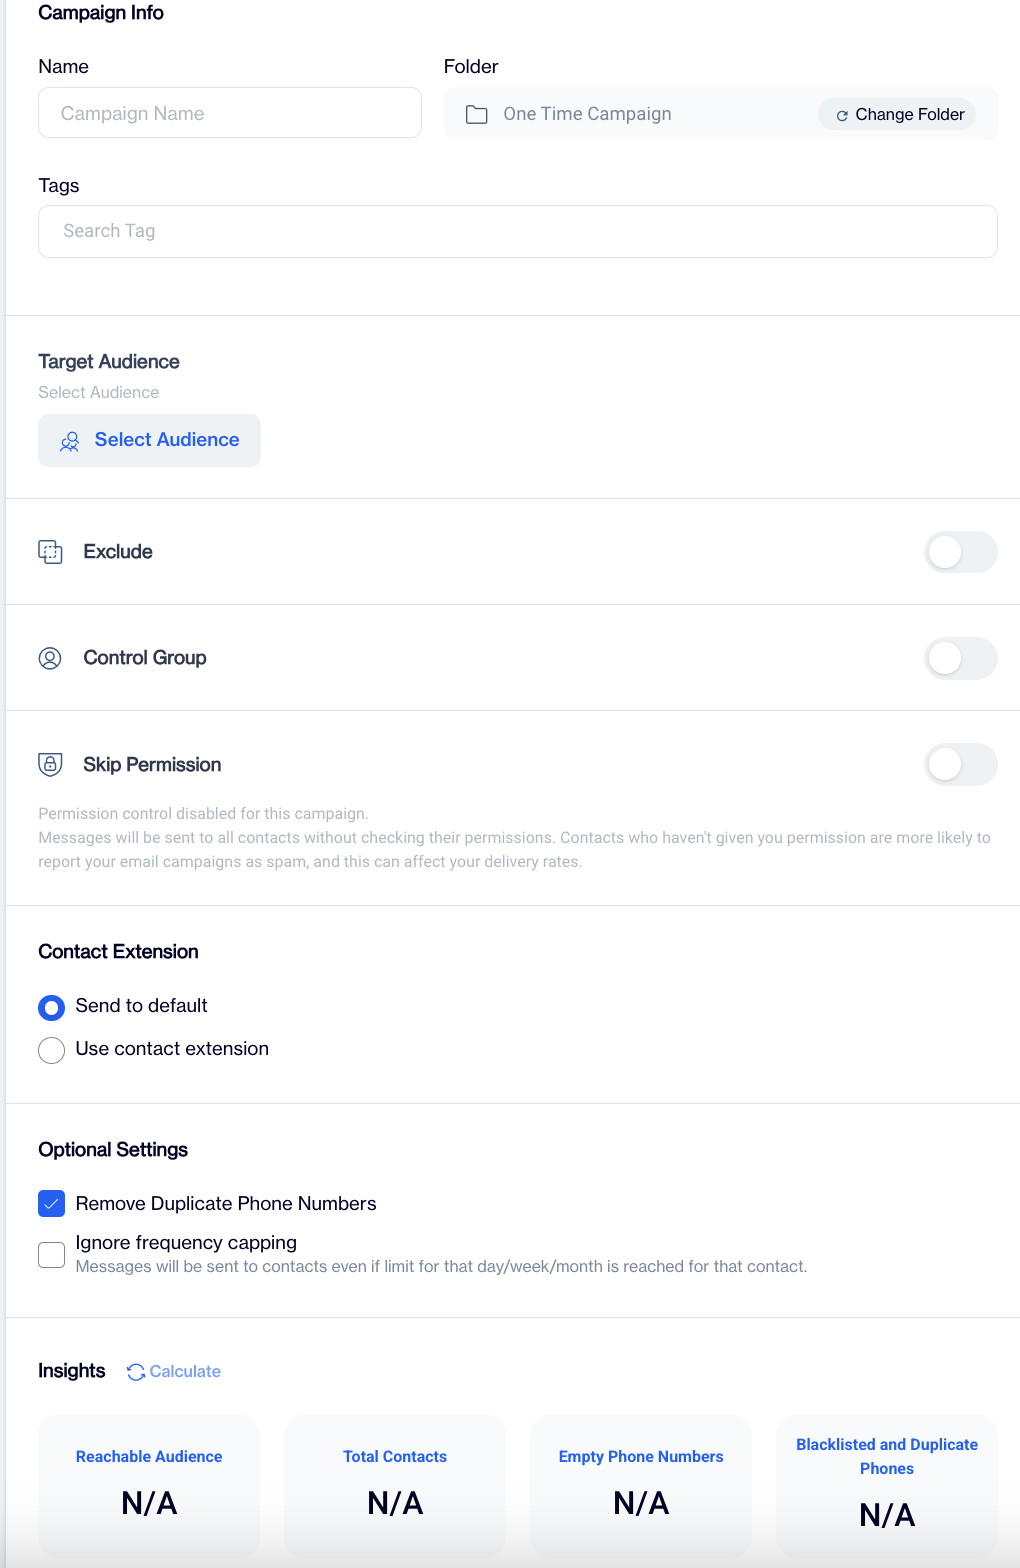
Campaign Info
In this section, you’ll provide essential details for your SMS campaign:
- Name: Enter a unique name for your campaign. This name will help you easily identify the campaign in your folders and reports.
- Folder: Select a folder to organize your campaign by clicking the "Change Folder" button. Using folders helps streamline organization and makes it easier to find your campaign later.
- Tags: Add relevant tags to categorize your campaign. Tags make it easier to filter and search for specific campaigns based on the labels you assign.
Target Audience
After filling out your campaign info, the next step is to choose your target audience in the Select Audience section. You can define who will receive your SMS campaign by selecting from various audience options:
Segment
- Select a custom segment of your audience based on specific criteria, such as behavior or user data. These segments help you target specific users.
Predefined Segment
- Choose from a variety of Predefined Segments, which are already configured based on common scenarios and criteria. These segments allow for quick and efficient audience targeting. Below are the available predefined SMS segments:
SMS
-
- Contacts not sent any SMS (30 days)
- Contacts not sent any SMS (All time)
- SMS Reachable Contacts
- SMS Unreachable Contacts
Table
- Select your audience from a specific table in the database, containing audience details like gsm or additional contact information.
Here, you can select your audience from various available tables in the system. Two tables, master_contact and master_device, are pinned for easy access as they contain critical audience data:
- master_contact:
- This table includes audience-related information, such as contact details, preferences, and associated attributes.
- master_device:
- This table stores device-related data, such as mobile devices or browsers associated with your audience.
While these two tables are pinned for quick selection, you can also choose other tables based on your needs.
To filter your target audience within any table, after choosing your table click on the "Manage Filters" button. This filtering tool allows you to refine your audience by:
- Column: Choose the data column you wish to filter.
- Operator: Define the condition using operators (e.g., equals, contains, greater than).
- Value: Enter the value to complete your filter criteria.
This functionality enables precise targeting based on your specific filter conditions.
Remote Segment
- Choose a remote segment if your audience data is stored externally, integrating with external databases or platforms to retrieve the target audience.
Tag
- Use tags to select your audience. Select the appropriate tags to filter your target audience.
Exclude
In the Exclude section, you can define which audience groups should be excluded from receiving the SMS campaign. This ensures that certain contacts do not receive the message. The following options are available:
- Exclude Segment
- Select a specific segment of your audience that you want to exclude from the campaign.
- Exclude Remote Segment
- Exclude a segment that is stored externally. This option allows you to connect to and exclude audience data from an external database or system.
- Exclude Campaign
- Choose to exclude recipients who have already received or been targeted in a previous campaign. This ensures that users who were part of another SMS or marketing campaign don’t receive duplicate messages.
- Exclude Send List
- Select a predefined send list that you want to exclude from your current campaign.
Control Group
In the Control Group section, you can set aside a portion of your audience to exclude from receiving the SMS campaign. This group will be used for later evaluation, allowing you to measure the effectiveness of the campaign.
- Choose percentage (X%):Enter the percentage of your audience you want to assign to the control group. For example, if you choose 5%, a randomly selected 5% of your audience will be excluded from receiving the SMS.
- This random selection ensures that the control group represents a fair cross-section of your audience, providing reliable data for later analysis and comparison against the recipients of the campaign.
By creating a control group, you can evaluate the campaign’s impact by comparing the behavior of the control group (who did not receive the SMS) with the campaign group.
It's important to note that this feature is specific to one-time campaigns only and cannot be used for recurring campaigns.
Skip Permission
The Skip Permission option allows you to bypass the standard permission checks for this campaign. When enabled, SMS messages will be sent to all selected contacts, regardless of whether they have provided explicit permission to receive messages.
- If this option is selected, the system will not check whether contacts have opted in to receive SMS messages. Messages will be delivered to all contacts in the target audience, including those who have not granted permission.
Important Note:It is recommended to use this option carefully, sending messages to contacts who haven’t given explicit permission can lead to higher spam reports, which may negatively affect your overall delivery rates.
Contact Extension
In the Contact Extension section, you can choose how the system will manage the contact data for sending the SMS campaign. There are two options:
- Send to default
- This option uses the default contact information stored for each recipient, such as the primary phone number. The campaign will be sent using the default contact details without any modifications.
- Use contact extension
- If you select this option, the system will utilize additional or extended contact data, such as alternative phone numbers. This enables more flexibility in targeting contacts who have multiple phone numbers associated with their records.
Optional Settings
In the Optional Settings section, you can customize how the SMS campaign will be sent to your audience. There are two key options available:
- Remove Duplicate Phone Numbers: When enabled, the system will automatically filter out any duplicate phone numbers from your contact list. This ensures that each recipient receives the SMS only once, preventing multiple messages from being sent to the same contact.
- Ignore Frequency Capping: Enabling this option allows messages to be sent to contacts even if they have reached their messaging limit for the day, week, or month. This means that the system will not restrict the number of messages sent to any contact based on previous sending limits.
Insights
In the Insights section, you can view key metrics that provide valuable insights into your SMS campaign's audience. Before proceeding, you must click the Calculate button to generate these metrics; otherwise, you won't be able to continue to the next page. The following metrics are displayed:
- Reachable Audience: Number of contacts eligible to receive the SMS based on your selected criteria.
- Total Contacts: Total number of contacts in your list, including those filtered out.
- Empty Phone Numbers: Number of contacts missing phone numbers.
- Blacklisted or Duplicated Numbers: The count of contacts whose phone numbers are either blacklisted or duplicated, preventing them from receiving SMS messages.
2: Content
On this page, there are three key areas:
Content: Here, you can change your SMSl content if needed before proceeding.
Test SMS: In this section, you can visually preview how your SMS will appear without sending any test messages. By clicking on Send Test SMS you can send a test message to a specific phone number before launching the full campaign. It's a useful way to preview the SMS content and ensure everything is correct.
3: Schedule & Goals
Scheduling Options
For One Time Campaign
In the Scheduling Options section, you determine when your one-time campaign will be sent. You have two choices:
- Now: Select this option to send the campaign immediately after finalizing the setup.
- Scheduled: If you prefer to send the campaign at a specific time, choose the Scheduled option. You will then be prompted to select a date and time using the calendar and time picker below. Simply choose the desired start date and hour for your SMS campaign.
This allows for flexibility in timing your SMS delivery, either immediately or at a future date.
For Recurring Campaign
In the Scheduling Options section for a recurring campaign, you can choose how to initiate your campaign with the following options:
- Trigger Periodically:
Start Date: You can set the start date for the campaign as:
- Now: This option starts the campaign immediately.
- Select: Choose this option to specify a custom start date and time.
End Date: You have two options for the end date:
- Never: Select this option if you want the campaign to run indefinitely.
- Select: Use this option to specify a custom end date and time.
Recurring Periods: Click the Add button to define the recurring periods for this trigger. You will see the message "Please add a recurring period."
When you click on Add, you will be directed to the Recurring Settings screen where you can define the recurrence period for this trigger:
Frequency: Select from the dropdown options (daily, weekly, monthly, yearly).
Daily Frequency: Here, you can define how often the campaign occurs:
-
-
- Occurs once at: Specify a single occurrence.
- Occurs every: Define the interval for the recurring campaign.
- Occurs once at: Specify a single occurrence.
-
- Trigger Externally:
This campaign can be triggered from automation by using the "Fire Campaign" action.
Hourly Capping
In the Hourly Capping section, you can control the speed at which SMS messages are sent. Options include Max Speed or specific rates, such as 1,000 SMS/hour or 100,000 SMS/hour. The system will adjust the number of SMS messages sent per hour based on the selected capping value, allowing you to manage the delivery rate of your campaign.
Conversion Tracking
In the Conversion Tracking section for SMS campaigns, there are two toggle options:
- Conversion Goal: When you enable this option, a dropdown will appear for selecting a conversion event segment.
Important Note: Ensure that the target audience does not include contacts from the conversion goal segment. Contacts already in the goal segment will be considered converted immediately, which may lead to inconsistencies in reporting. - You will also need to set a Conversion Deadline, which defines how long after the SMS is delivered that conversions will be tracked. For example, if you set the deadline to "3 days," any conversions within 3 days of the SMS delivery will be counted.
- Visit Tracking: This tracks visits resulting from your SMS campaign.
Drop Condition
In this section, you can define conditions under which contacts will be dropped from the SMS campaign. There are three ways to set up drop conditions: Segments, SQL and Drop Audience When Not in the Starting Audience Anymore.
1. Segments
If you choose Segments, you will be able to set up filters based on specific criteria. To configure the drop conditions:
- Drop Condition Filters: Select filters to narrow down the audience for the drop condition.
- Click the +Add Filter button to see a dropdown with options such as:
- User Data
- Behavior
- Existing Segments
- Relational DB
- You can also use the Add Group option to combine multiple filters.
- Click the +Add Filter button to see a dropdown with options such as:
2. SQL
Alternatively, you can configure drop conditions using SQL. To do this, you need to Select a Variable from the available options:
- Campaign Name
- Campaign ID
- Campaign Start Time
- Campaign Instance Start Time
These variables help you create more advanced conditions using SQL queries to target specific contacts to drop from the campaign.
3. OR Drop Audience When Not in the Starting Audience Anymore: Enabling this option means that contacts will be dropped from the campaign if they no longer belong to the starting audience. Keep in mind that this may result in a longer sending preparation time, as the system will need to continuously check the audience status before sending.
Google Analytics
In the Google Analytics section, you can enhance your campaign insights by enabling tracking for each campaign flow.
Enable Google Analytics:Toggle the switch to activate Google Analytics tracking for your campaign.
Apply UTM Parameters
-
- Defined UTM Parameters: Choose from the Defined UTM Parameters dropdown to apply any predefined UTM settings to your current campaign.
- UTM-source: Specify the source of your traffic, such as dengage or another relevant source.
- UTM-medium: Indicate the delivery method, like email or SMS. Use {{channel}} to auto-fill based on the campaign channel.
- UTM-campaign: Use {{campaignName}} to dynamically insert your campaign's name for identification.
- UTM-term (Optional): Define a specific term related to your campaign for targeted keyword tracking.
- UTM-content (Optional): Customize this field to differentiate similar content within the same campaign.
- Defined UTM Parameters: Choose from the Defined UTM Parameters dropdown to apply any predefined UTM settings to your current campaign.
Save UTM Settings: After defining your UTM parameters, click Save as UTM Parameters to apply these settings for future campaigns.
Confirm and Save: Review your UTM settings for accuracy, then click Save to complete the Google Analytics configuration for your campaign.
Updated 20 days ago