
Email Delivery Settings
In the Delivery Settings section, located in the upper-right corner of the Campaign Workflow page, you can configure several options for your campaign. These include Google Analytics integration, setting an Hourly Capping limit, enabling Conversion Tracking, defining a Drop Condition, and choosing to Skip Permission for a one-time campaign. Additionally, for recurring campaigns, there is a Blackout section where you can specify periods during which the campaign should not be sent, ensuring it doesn't interfere with specific times or dates.
Email Delivery Settings
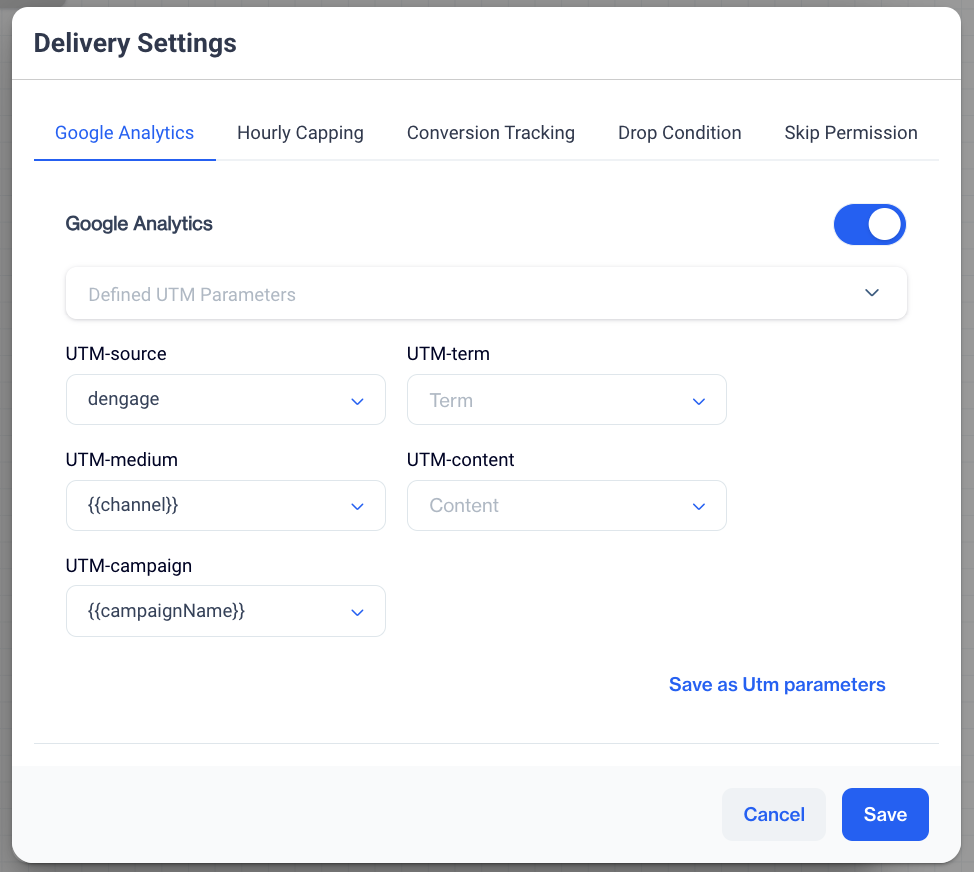
Google Analytics
In the Google Analytics section, you can enhance your campaign insights by enabling tracking for each campaign flow.
Enable Google Analytics:Toggle the switch to activate Google Analytics tracking for your campaign.
Apply UTM Parameters
- Defined UTM Parameters: Choose from the Defined UTM Parameters dropdown to apply any predefined UTM settings to your current campaign.
- UTM-source: Specify the source of your traffic, such as dengage or another relevant source.
- UTM-medium: Indicate the delivery method, like email or SMS. Use {{channel}} to auto-fill based on the campaign channel.
- UTM-campaign: Use {{campaignName}} to dynamically insert your campaign's name for identification.
- UTM-term (Optional): Define a specific term related to your campaign for targeted keyword tracking.
- UTM-content (Optional): Customize this field to differentiate similar content within the same campaign.
Save UTM Settings: After defining your UTM parameters, click Save as UTM Parameters to apply these settings for future campaigns.
Hourly Capping
In the Hourly Capping section, you can control the speed at which emails are sent. Options include Max Speed or specific rates like 1,000 emails/hour or 30,000,000 emails/hour. The system will adjust the number of messages sent per hour based on the selected capping value.
Conversion Tracking
In the Conversion Tracking section, there are two toggle options:
Conversion Goal: When you enable this option, a dropdown will appear for selecting a conversion event segment.
Important Notes:Make sure that the target audience doesn't include people from the conversion goal segment. Contacts who are already included in the goal segment will be considered as converted right away, thus resulting in inconsistencies in reporting.
You will also need to set a Conversion Deadline, which determines how long after the email is delivered that conversions will be tracked. For example, if you set the deadline to "3 days," any conversions that occur within 3 days of the email being delivered to a contact will be counted.
Visit Tracking: This tracks visits that result from your email campaign.
Drop Condition
In this section, you can define conditions under which contacts will be dropped from the email campaign. There are three ways to set up drop conditions: Segments, SQL and Drop Audience When Not in the Starting Audience Anymore.
1. Segments
If you choose Segments, you will be able to set up filters based on specific criteria. To configure the drop conditions:
- Drop Condition Filters: Select filters to narrow down the audience for the drop condition.
- Click the +Add Filter button to see a dropdown with options such as:
- User Data
- Behavior
- Existing Segments
- Relational DB
- You can also use the Add Group option to combine multiple filters.
- Click the +Add Filter button to see a dropdown with options such as:
2. SQL
Alternatively, you can configure drop conditions using SQL. To do this, you need to Select a Variable from the available options:
- Campaign Name
- Campaign ID
- Campaign Start Time
- Campaign Instance Start Time
These variables help you create more advanced conditions using SQL queries to target specific contacts to drop from the campaign.
3. OR Drop Audience When Not in the Starting Audience Anymore: Enabling this option means that contacts will be dropped from the campaign if they no longer belong to the starting audience. Keep in mind that this may result in a longer sending preparation time, as the system will need to continuously check the audience status before sending.
Skip Permission
The Skip Permission option allows you to bypass the usual permission checks for this email campaign. When enabled, emails will be sent to all selected contacts, regardless of whether they have explicitly opted in to receive emails.
If this option is selected, the system will not verify whether contacts have opted in to your email list. Emails will be delivered to all contacts in the target audience, including those who have not provided explicit consent.
Important Note:Sending emails to contacts without explicit permission can increase the likelihood of spam complaints, which may negatively affect your email deliverability. It is recommended to use this option with caution.
Blackout
In the Blackout section, there are two toggles:
- Blackout: If you enable this option, any audience within the blackout interval, based on their time zone, will have their messages delayed until the allowed hours for message delivery. You can configure the Blackout Interval through the Settings > Campaign Configurations > Blackout Interval page.
- Exclude Channels: If you enable this option, specific channels (such as email, SMS, push notifications, in-app messages, onsite messages, or What-asap) will not be affected by the blackout interval.
Updated 20 days ago