
Users
Users are individuals who can log in to the platform and carry out specific tasks, such as managing your data, creating marketing journeys, and sending messages to your contact and device database.
In this section, you can list the users who are authorized to log in to the admin panel and perform activities according to the permissions assigned in the Role and Permission section.
Always Follow the Minimum Permission RuleAdhering to this principle is crucial for maintaining the security and integrity of our system. Granting users only the permissions they need to perform their tasks minimizes the risk of unauthorized access and potential misuse of sensitive data. By restricting access to essential functions, we can better protect your data and ensure a safer environment for all users. Remember, the minimum permission rule is a fundamental aspect of our security policy, and its consistent application is vital for safeguarding our operations.
Roles And Permissions
If a suitable permission set does not exist, please refer to the Roles And Permissions section to create the appropriate roles and permissions. Once created, assign these to the new users.
Please navigate to Settings > Identity & Access Management > Users page.
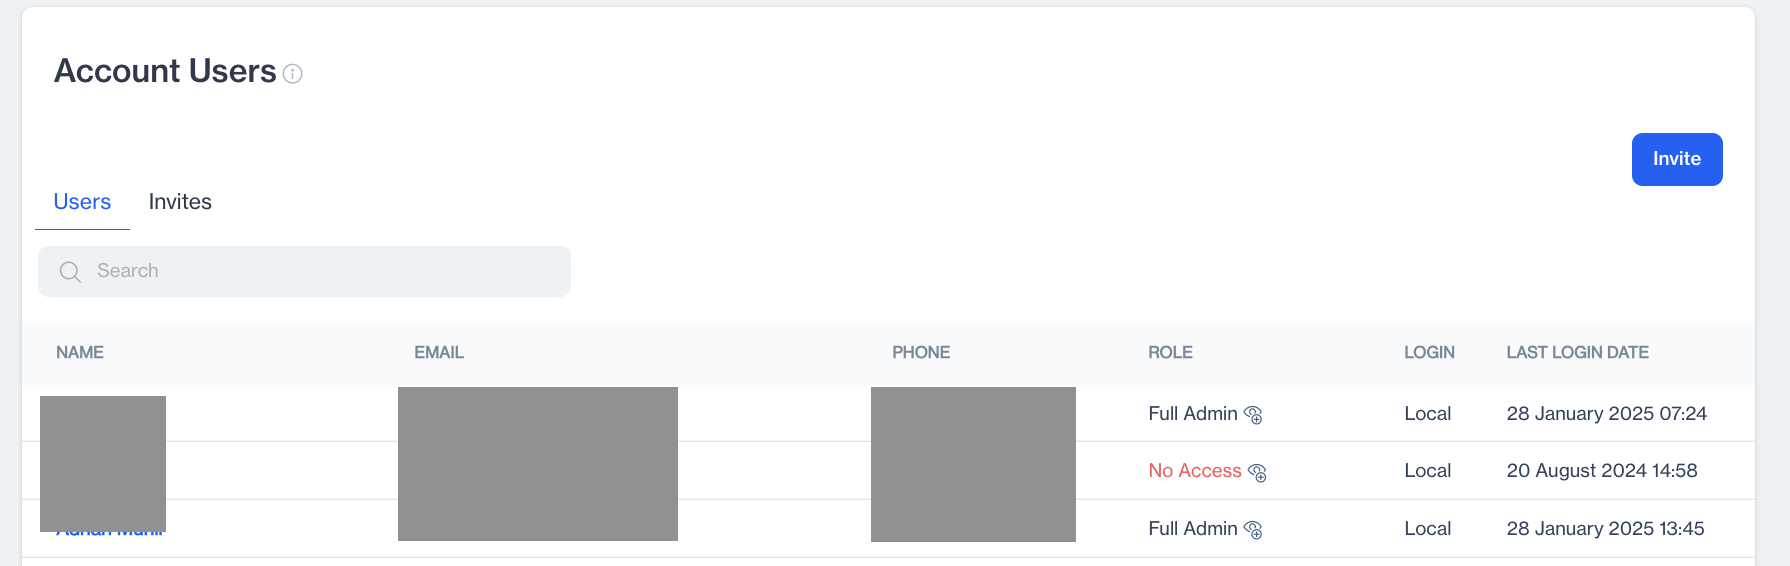
The Users page consists of two tabs:
- Users Tab: Manage existing users.
- Invites Tab: Track and manage invitations.
Users
The Users tab allows you to view and manage existing users in the account. Below is an overview of the features available:
Users
Features
- Search Bar: Quickly find a user by entering their name, email, or other details.
- User Table: Displays details of all existing users.
User Table Columns
- Name: Displays the full name of the user.
- Email: Shows the email address associated with the user.
- Phone: Lists the phone number of the user.
- Role: Displays the user's role in the account.
- Login: Indicates whether the user logs in using Dengage credentials or a local account.
- Last Login Date: Displays the last login date of the user.
User Details
Clicking on a user’s name opens a pop-up with additional information:
- Login Type: Modify the user’s login type using the dropdown menu.
- User Role: Update the user’s role by selecting from the available options.
Once changes are made, click Save to confirm.
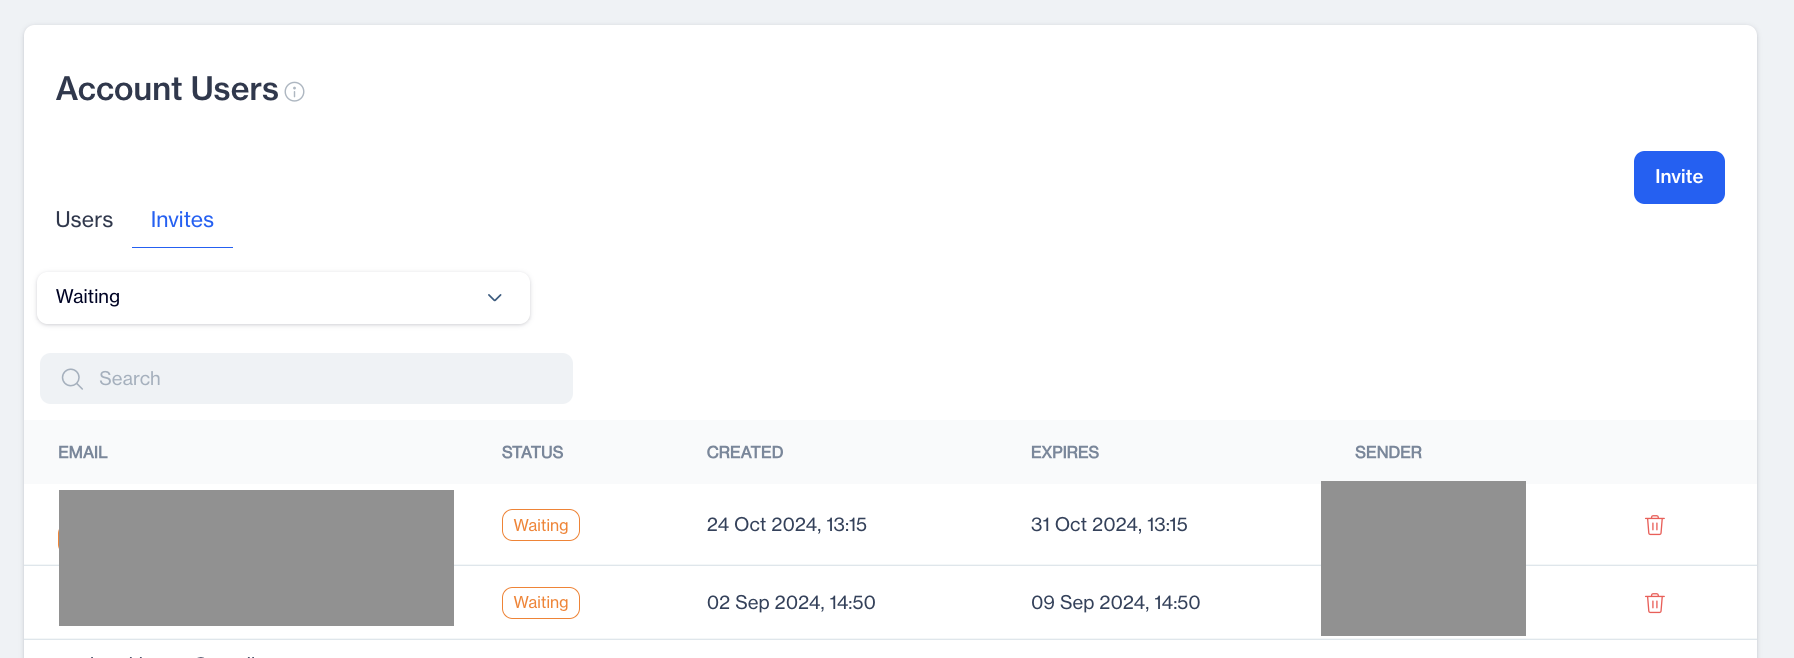
Invites
The Invites tab displays a list of users who have been invited to the account but have not yet fully joined.
Invites
Filtering Invites
You can filter invites based on their status:
- Waiting: Displays users who have been invited but have not yet responded.
- Completed: Displays users who have accepted the invitation and have login access to the system.
Invite Details for "Waiting" Status
The following columns are displayed for invites in the "Waiting" filter:
- Email: The email address associated with the user.
- Status: The current status of the invitation.
- Created: The date and time the invitation was sent.
- Expires: The time remaining before the invitation expires.
- Sender: The name of the person who sent the invitation.
Invite Details for "Completed" Status
The following columns are displayed for invites in the "Completed" filter:
- Email: The email address associated with the user.
- Status: The current status of the invitation.
- Created: The date and time the invitation was sent.
- Responded: The date and time the invitation was accepted.
- Sender: The name of the person who sent the invitation.
Note on "Expires" Field
When the filter is set to "Waiting," the "Expires" field replaces the "Responded" field. This helps you track the duration for which an invitation remains active before it expires.
How to Invite a New User
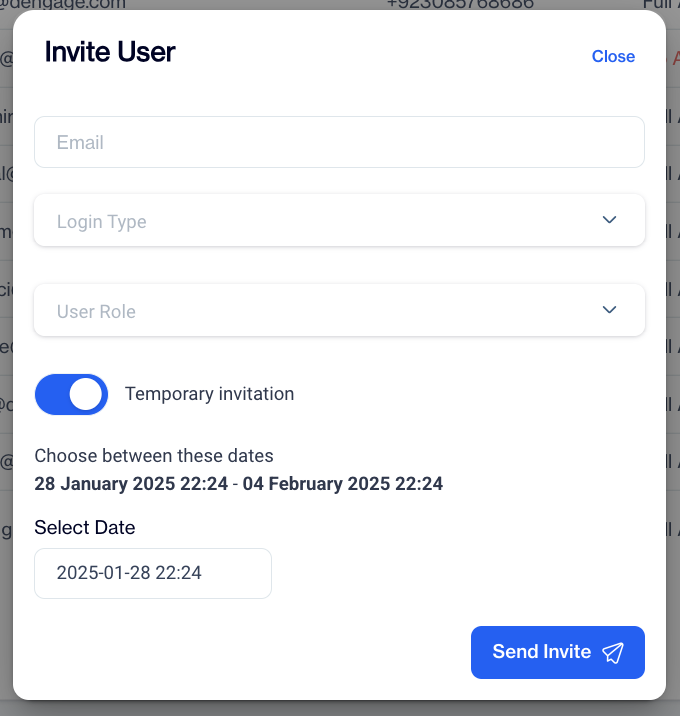
Invite New User
- Click the Invite Button: On the main page, click the Invite button. A pop-up window will appear.
- Enter User Details:
- Email: Specify the email address of the new user.
- Login Type: Select the type of login for the user:
- Local: The user will log in using local account credentials. (Recommended: Always use Local login type.)
- Dengage: The user will log in through Dengage's authentication system.
- User Role: Assign the appropriate role to the user, such as Full Admin or Restricted Access, based on their access requirements.
- Set Invitation Type:
- Temporary Invitation: If the invitation should be temporary, toggle on the Temporary Invitation option.
- Select Expiry Date: Specify the expiration date for the temporary invitation.
- Send Invitation: After entering the details and setting the preferences, click the Send Invite button to finalize and send the invitation.
Security ConcernFor security reasons, you should always enable Temporary Invitation time for users whom you need temporarily in your account.
Updated 27 days ago