
Segments
Welcome to our comprehensive guide on interactive segmentation! This resource is designed to empower you with the tools and knowledge to create precise and effective audience segments. With advanced filters, logic gates, and grouping options at your fingertips, you'll be able to tailor your campaigns like never before. Explore the examples and step-by-step instructions below to harness the full potential of interactive segmentation for successful audience targeting.
About SegmentsSegments are a powerful feature of our platform, designed to offer users the flexibility to create dynamic queries that automatically update over time. Unlike static lists commonly found on other platforms, segments ensure that your targeted audience is always current, reflecting changes in user behavior, preferences, and other criteria as they occur. This real-time adaptability makes segments a vital tool for businesses and marketers aiming to stay relevant and responsive to their audience's evolving needs.
Key Features of Segments:
Dynamic Queries: Segments operate through dynamic queries, automatically updating the list of users based on predefined criteria.
Real-Time Updates: The composition of a segment is continually changing, reflecting real-time data on the platform. This ensures that the target audience within a segment is always up-to-date.
Moment of Need Creation: Segments are created at the moment of need anywhere on the platform, ensuring that the audience list is immediately relevant and tailored to specific requirements.
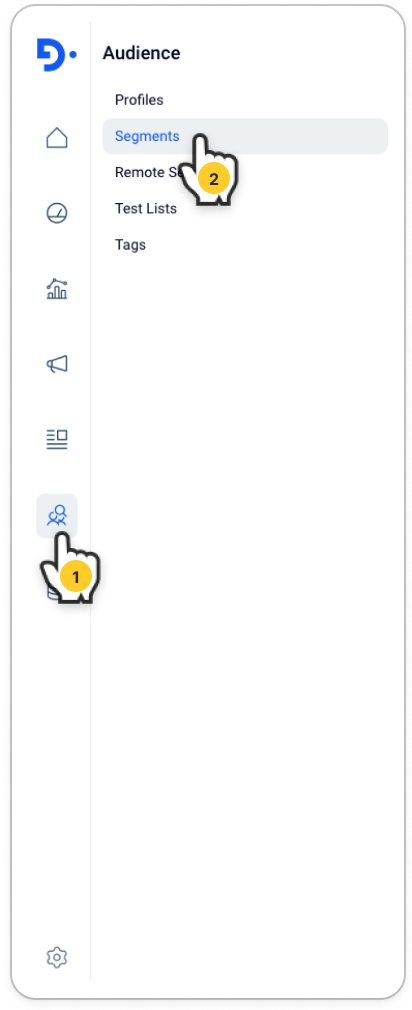
To reach out to the segments main page please navigate to Audience > Segments
List of Segments
When you dropped in the Segment Main Page you will see list of segments having enabled actions alongside with foldering and filtering options . Let's dive into those section together.
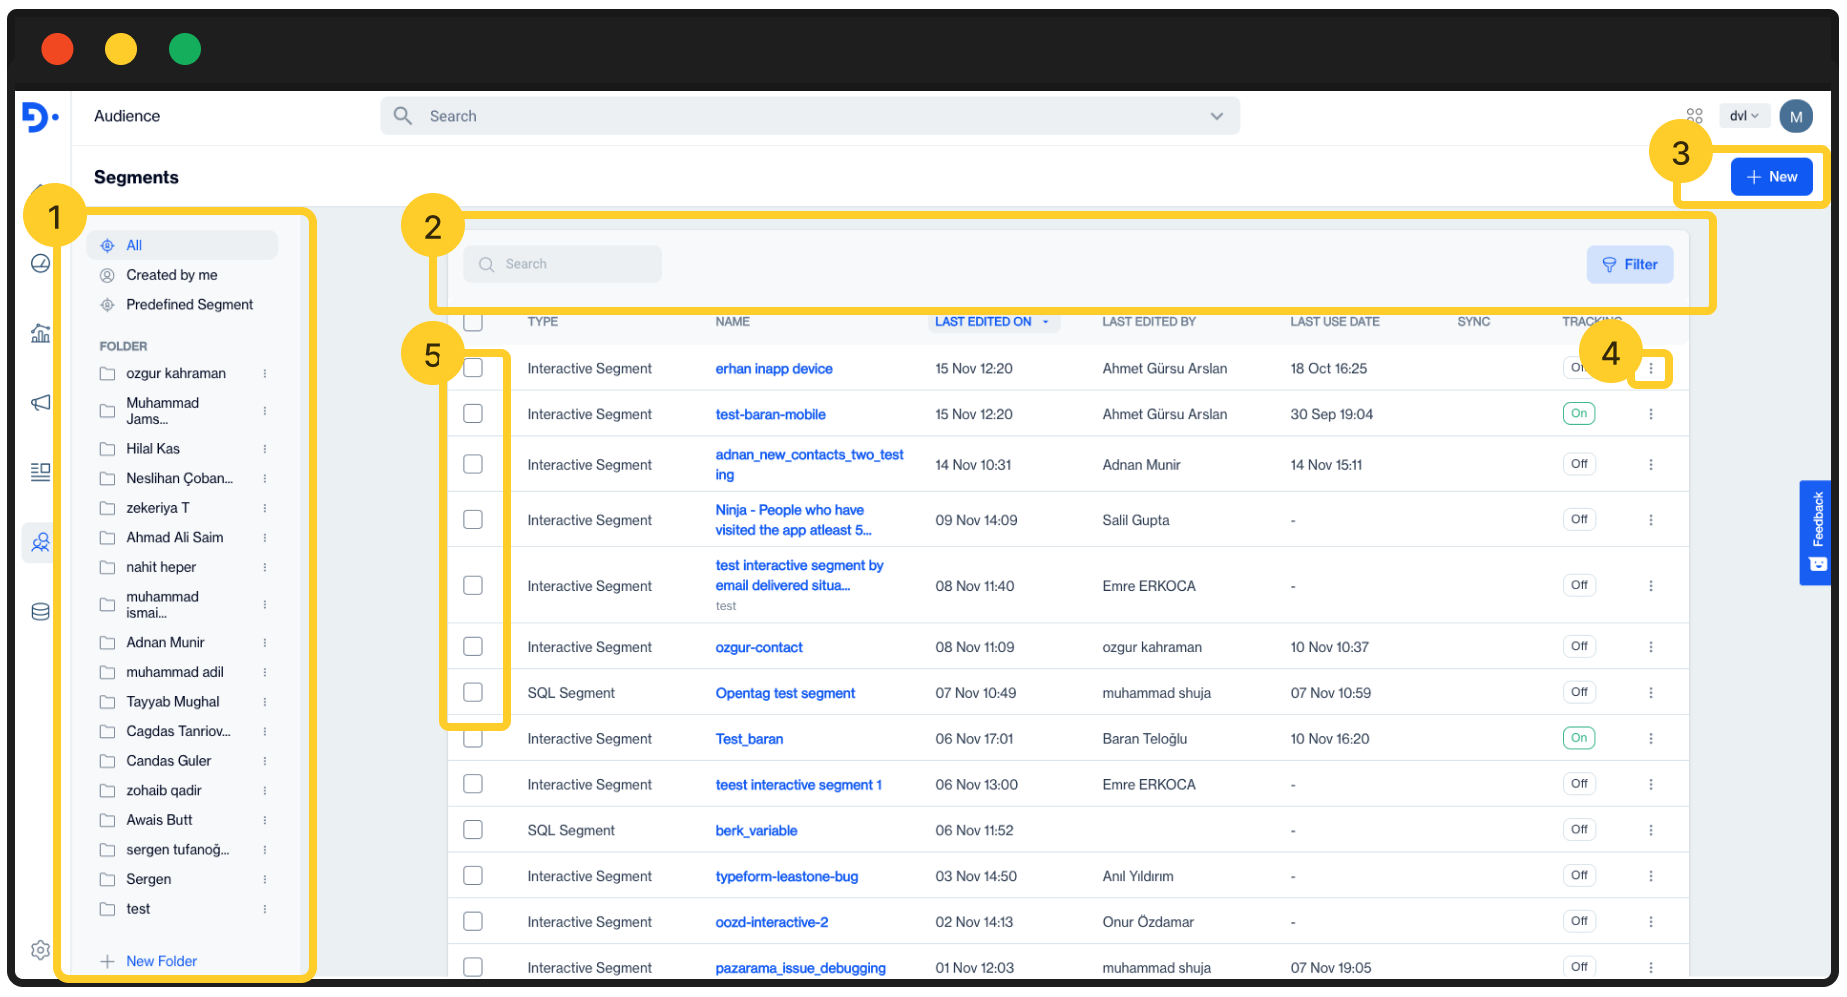
1️⃣ Folder Pane: This field allows you manage segments based on foldering structure .
- Created By Me: Allows you to quick filter the list of segments that have been created by your user.
- Predefined Segments : This menu includes pre-defined audience segments created based on predetermined conditions or characteristics. These segments are designed to target user groups with specific attributes quickly and easily.
- New Folder : Click on New Folder button to add a new folder on your structure.

2️⃣ Search and Filter
- Search Box: Search box allows you to instantly search created segments by given names.
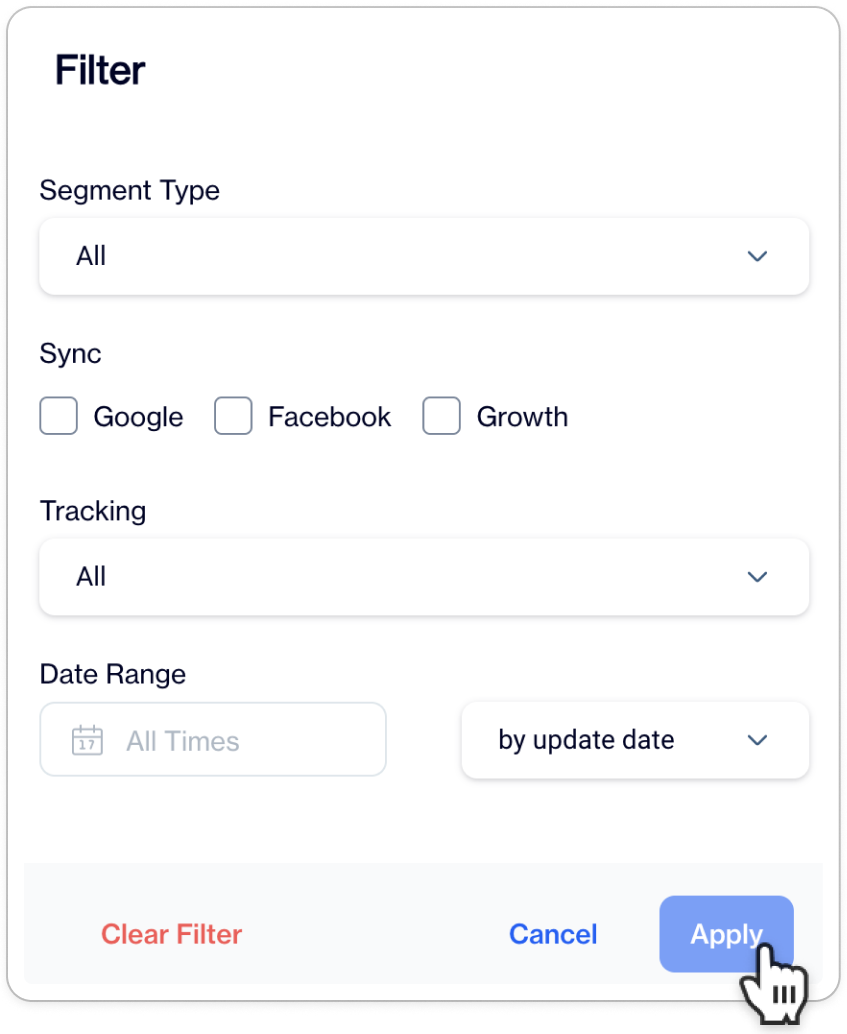
- Filter: Filter allows you to filter the list of segments by following parameters:
- Segment Type: Allows you to select Interactive or SQL segments to be listed.
- Sync: Any sync available segments for the selected AD networks like Google and Facebook and Real-Time segments like Growth platform will be listed.
- Tracking: Allows you yo filter list based on Tracking enabled or not .
- Date Range: Allows you to filter list based on given date range and given update or creation dates.
3️⃣ New: Allows you to start creating new Segment.
4️⃣ Actions:
- View Details: Allows you to view segment details. Investigating which filters or exclusions has been added harmonized with the given logic operands will be available with this action. 💡 Alternatively you can click on Email to view its details.
- Create Campaign: Allows you to set audience for the selected segment to create campaign
- Duplicate: Duplicates the selected email. This can be useful if you need to create similar segments with a couple of changes.
- Move: Allows you to move selected segment to another folder.
- Copy Public Id: Public Id is for using REST API updates for the selected segment. This public Id will be use to updating segment audience via REST API.
- List Contacts: Allows you to navigate list of contacts belongs to selected segment
- List Devices: Allows you to navigate list of devices belongs to selected segment
- Delete: Removes selected segment.
5️⃣ Bulk Management: When you checked the boxes , this will allows you to take following actions;
- Remove selected segments.
- Move selected segments to another folder.
How to create a new segment
When you click 3️⃣ New: you will start createing a new segment.
All type of Segments have a General first step to give a name and description(optional) alongside with selecting folder to be located.
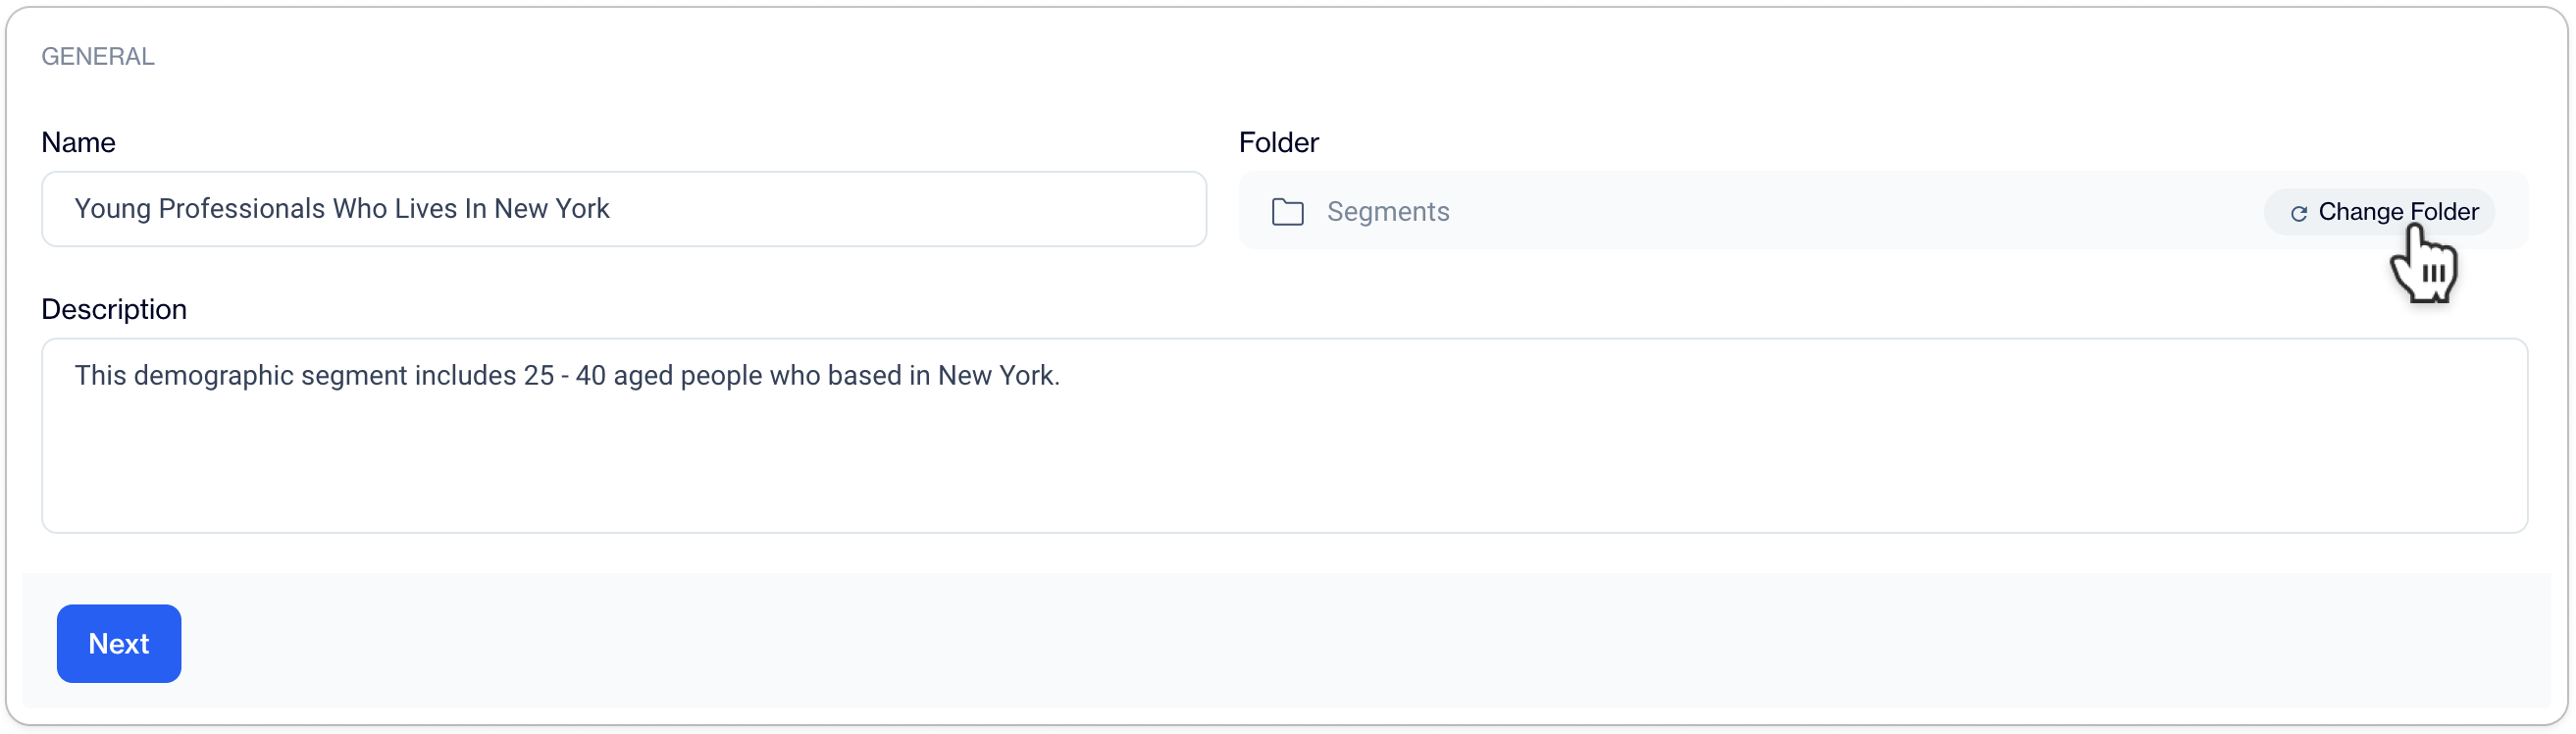
By default Segment Root Folder has been selected to preserve its location to be saved. To change the location you need to click on Change Folder .If you need to create a new folder , you can use the button on bottom right corner.

Interactive Segment Builder
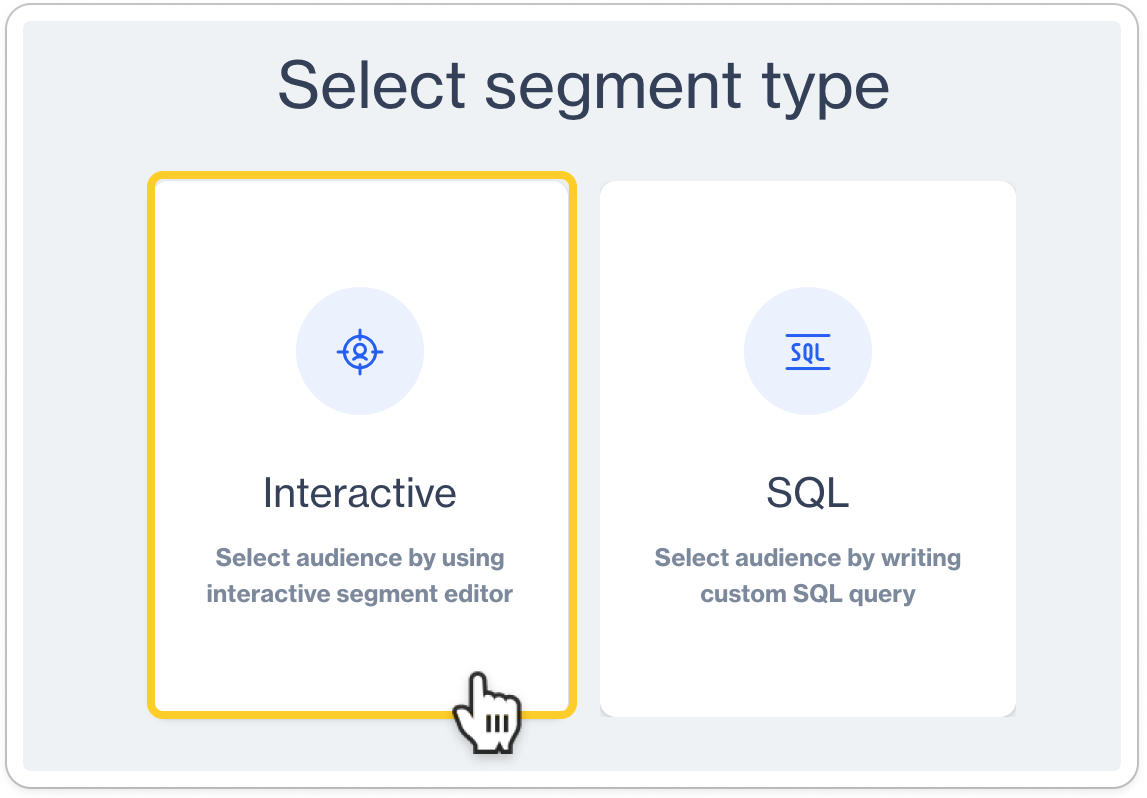
To reach out to Interactive Segment Builder , you need to select segment type as Interactive , after clicked on the New button.
Interactive Segment Builder Consist of three layers such as ;
- Filters
- Exclusion Filters
- Insights
Before deep dive into these layers , Let's talk about the fundamental components.
Fundamental Components of Filter
While using filters , you need to understand their fundamental components and how to work with them. On this section we will discuss what are those components and how you should use them.
Natural Language Filter Builder
Introducing the Natural Language Filter Builder, a user-centric tool designed to revolutionize the way you interact with data. By enabling the creation of filters through intuitive, sentence-structured commands, this builder simplifies complex data queries into easily understandable language. Ideal for users of all skill levels, it bridges the gap between sophisticated data analysis and straightforward, conversational input, ensuring a seamless and efficient data filtering experience.

Filter builder components may vary by selected filter type . A filter builder can have following components;
- Semantic Selector: This identifies the context and intent behind a query, allowing the filter builder to accurately match user requests with the correct data fields or operations.
- Parameter Selector: This assists users in selecting specific parameters or data fields for their filters. The Parameter Selector simplifies the process of narrowing down data points, helping users choose from various available options like dates, names, values, etc. It's designed to intuitively guide users through the selection of relevant data parameters for their query.
- Arithmetic & Text Comparison Operands: These operands provide the functional backbone for constructing complex filters. They allow users to perform arithmetic operations (like addition, subtraction, multiplication, division) and text comparisons (like matching, containing, or starting with specific text) within their filters. This component is essential for creating more nuanced and specific data queries.
- Input Field: The Input Field is where users enter their filter criteria. It's a user-friendly interface that captures the user's specific requirements for data filtering. This field is designed to be flexible and accommodating, allowing for a wide range of filter expressions and terms
- Data Type Selector: The Data Type Selector is a crucial component that allows users to specify the nature of the data they wish to filter. This tool provides options to choose from various data types, such as numerical, textual, date, boolean, or custom types like time periods. This selector is instrumental in guiding the filter builder to process data in a manner that aligns with its inherent properties.
Logic Operands
In data filtering, there are times when you need to refine your search by considering more than one condition simultaneously. To do this, you can use 'AND' and 'OR' logic operands.
- AND ensures that all specified conditions must be met for a match
- OR only requires one of them to be true
These operators are essential for precision when dealing with multiple criteria, helping you tailor your searches to your exact needs.
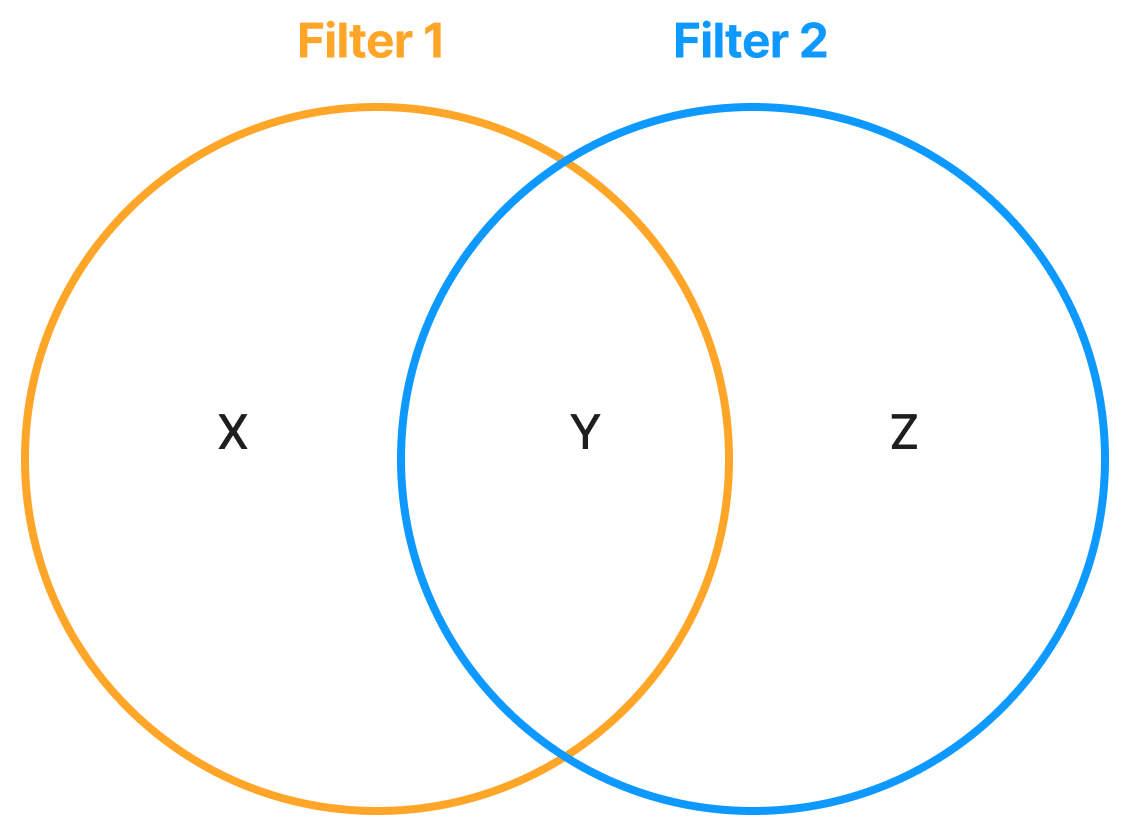
Let's explore the use of AND and OR logic operands with the schema presented above.
Based on the schema:
- Total Audience count for Filter 1 : X + Y
- Total Audience count for Filter 2: Y + Z
Applying AND Logic:
- When combining Filter 1 AND Filter 2, the total count will be the overlap, which is: Y
Applying OR Logic:
- When combining Filter 1 OR Filter 2, the total count will include all unique elements, which is: X + Y + Z
👉 When two filters are added, the default operation is AND logic. To toggle between AND and OR logic operands, simply click on the desired operand
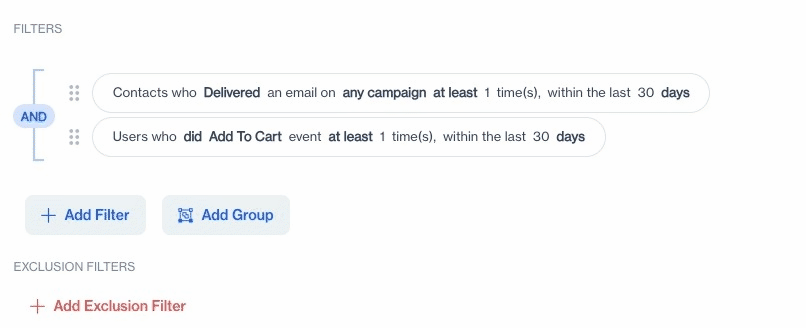
Filters
In this section, you'll find detailed descriptions for each filter type, organized by specific topics to enhance your understanding and usage. Whether you're looking to refine search results, segment data, or apply complex criteria, these descriptions will provide the insights and instructions you need to effectively utilize each filter for your specific needs.
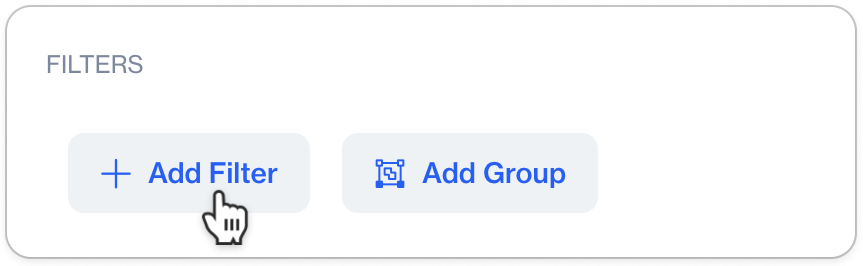
- Click on Add Filterbutton to start adding filters to define your segment.
Add GroupUse Add Group button to effectively organize your filters into cohesive units. This feature is essential when you need to group multiple filters together, creating a structured hierarchy in your segmentation. Grouping filters is not just about organization; it's a strategic approach to data analysis that allows for complex comparisons and nuanced insights. By combining these groups with other individual filters or additional filter groups, you can create layered, multi-dimensional data views. This method is particularly useful in scenarios where data needs to be micro segmented or categorized for more detailed examination and decision-making.
User Data
| Name | Description |
|---|---|
| User Type | Allows you to filter database based on Anonymous or Contact |
| Contact Fields | Allows you to add filter for columns that exists in master_contact and any related table. |
| Device Fields | Allows you to add filter any device column that exists in your database . Also you can narrow down your filter items Anonymous or Contact devices. |
| Reachability | Allows you to add filter based on channel reachability both for Anoynmous devices and contacts. |
| Predictive Analytics | Allows you to add filter users by Likelihood to buy/uninstall/churn and Customer Lifetime Value ratings (High/Medium/Low) . Also you can narrow down the filtering by Categories and Brands |
| List Tag | Allows you to add filter by selected Tags that previously created by as List type tags. You can involve any or all given tags as filter criteria |
| Key-Value Tag | Allows you to add filter by selected Key-Value pairs. You need to give value by the arithmetic/text operands per added keys. |
Behaviour
| Name | Description |
|---|---|
| User Event | Allows you to add filter that a specific user event has been accomplished or not accomplished by given occurrence and time period. ⚠️ This feature has add attribute filter option |
| User Events Aggregated | Allows you to add User Event filter by aggregated arithmetic operands ( sum/avg/min/max) by given time period . ⚠️ This feature has add attribute filter option |
| Allows you to add filter for any behavioral event taken or not taken on Email channel by given occurrence amount. Also you can narrow down your audience by selected one-time/recurring campaigns. | |
| SMS | Allows you to add filter for any behavioral event taken or not taken on SMS channel by given occurrence and time period. Also you can narrow down your audience by selected one-time/recurring campaigns. |
| Web/Mobile Push | Allows you to add filter for any behavioral event taken or not taken on Web/Mobile Push channel by given occurrence and time period. Also you can narrow down your audience by selected one-time/recurring campaigns. |
| In-App | Allows you to add filter for any behavioral event taken or not taken on In-App channel by given occurrence and time period. Also you can narrow down your audience by selected one-time/recurring campaigns. |
| On-Site | Allows you to add filter for any behavioral event taken or not taken on On-Site channel by given occurrence and time period. Also you can narrow down your audience by selected one-time/recurring campaigns. |
| Realtime In-App | Allows you to add filter for any behavioral event taken or not taken on Realtime In-App channel by given occurrence and time period. Also you can narrow down your audience by selected one-time/recurring campaigns. |
| Realtime On-Site | Allows you to add filter for any behavioral event taken or not taken on Realtime On-Site channel by given occurrence and time period. Also you can narrow down your audience by selected one-time/recurring campaigns. |
| Campaign Audience | Allows you to add filter for the previously created Audiences or Control Groups that belongs to given campaigns and time period |
| Survey | Allows you to add filter users who submitted the previously created Typeform Surveys by given occurrence and time period. You can narrow the audience by selected surveys or for a specific surve. 👉 When you select a specific survey , you can also add filter by included questions on the selected survey. |
Existing Segments
| Name | Description |
|---|---|
| Segment | Allows you to add users from a previously created specific segment as filter. |
| Pre-defined Segments | Allows you to add users from a specific Pre-defined segment as filter. ⚠️ Some Pre-defined segments needed to limit by time period , after you've decided to add those pre-defined segments you need to declare the time period . |
| Remote Segment | Allows you to add users from a previously created specific Remote Segment as filter. |
| Microsoft Dynamics CRM | Allows you to add users from MS Dynamics Static and Dynamic lists . ⭐ Integration with MS Dynamics should be established. |
| Shopify Segment | Allows you to add users from Shopify Segments . ⭐ Integration with Shopify should be established. Click to review details about integration |
Relational DB
| Name | Description |
|---|---|
| Table Filter | Allows you to add filter based on Relational DB Tables. Table filters starts with master_contact table and it allows you add relational tables in order to that. You need to understand how to add other relational tables based on which foreign key links tables each other. |
| Send List Table | Allows you to add selected Send Lists as filter . |
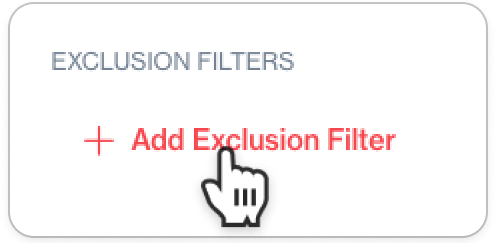
Exclusion Filters
Exclusion Filters allow you to refine your queries and segmentation by excluding specific criteria or subsets of data. Whether you want to narrow down your audience, refine your reports, or enhance your targeting precision, Exclusion Filters provide you with the means to do so.
- To start building exclusion filters Click on Exclusion Filters button .
Note on Exclusion Filters FunctionalityExclusion Filters share the same features and instructions with regular filters. The key distinction is that Exclusion Filters are used to exclude specific criteria from your queries or segmentation. So, when working with Exclusion Filters, you can follow the same guidelines and steps as you would with standard filters.
Insights
Important Note for Realtime Segment SyncSince real-time segmentation is a performance-intensive feature, a customer can use up to a maximum of 10 segments in real-time.
The "Insights" section equips you with the essential information to make data-driven decisions. This section serves providing detailed statistics about your segments. Discover the number of contacts and devices that meet your segment criteria, and understand how many are reachable through various communication channels.
- Click the Calculate button to analyze your created segment.

- You will see the results after calculation process completed.
The calculation time may vary depending on the complexity of your created segment.
- Alternatively, you can click on List Contacts or List Anonymous Devices to view contacts or anonymous devices that match your segment criteria.
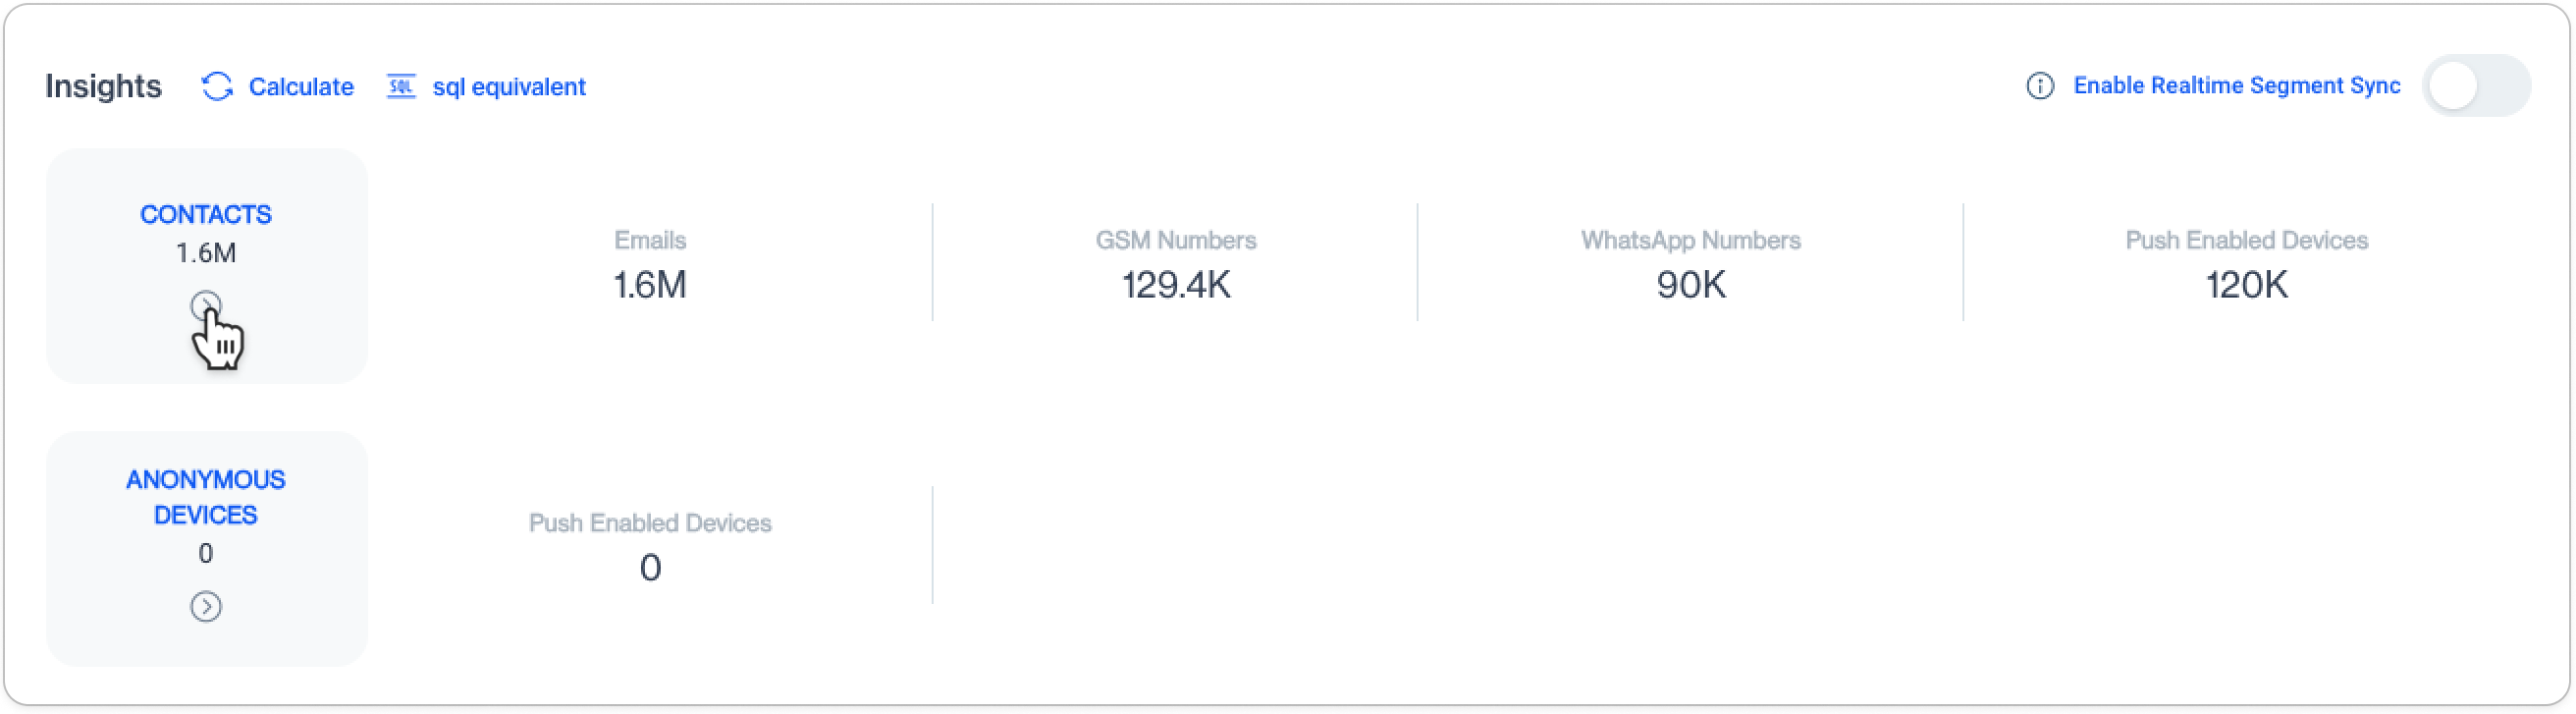
Additionally, gain transparency by viewing the SQL equivalent of your filter, helping you comprehend the inner workings of your segment.
- Click the sql equivalentbutton to view the SQL queries generated by the defined segment criteria.

⭐ Moreover, this section allows you to enable real-time synchronization, making your segment instantly accessible for On-Site and In-App targeting campaigns.
- Toggle on the Enable Real-time Segment Sync button for the segments that you would like to use in On-Site and In-App Campaigns.

Your segment is definedNow that you've completed the steps above, you're ready to save your segment for use in your data-driven marketing campaigns.
- Click on Save button to make your segment ready for use in your campaigns .

Updated 20 days ago