
Mastering On-Site Targeting & Personalization Campaigns
In this section, we delve into the art of delivering tailored messages directly to your website visitors. Whether you're looking to boost conversions, engage specific user segments, or create personalized experiences, this guide will walk you through the powerful tools and strategies available to help you maximize the impact of your on-site campaigns. Get ready to unlock the full potential of your digital presence and leave a lasting impression on your audience.
Glossary of TermsAs you navigate through this guide, you may encounter specific terms and concepts that are essential for understanding our platform. To ensure you have a comprehensive grasp of these terms, we recommend referring to the Glossary of Terms & Working Principlessection before you begin. This section is designed to provide clear definitions and explanations, aiding you in getting the most out of the guide and effectively utilizing our platform.
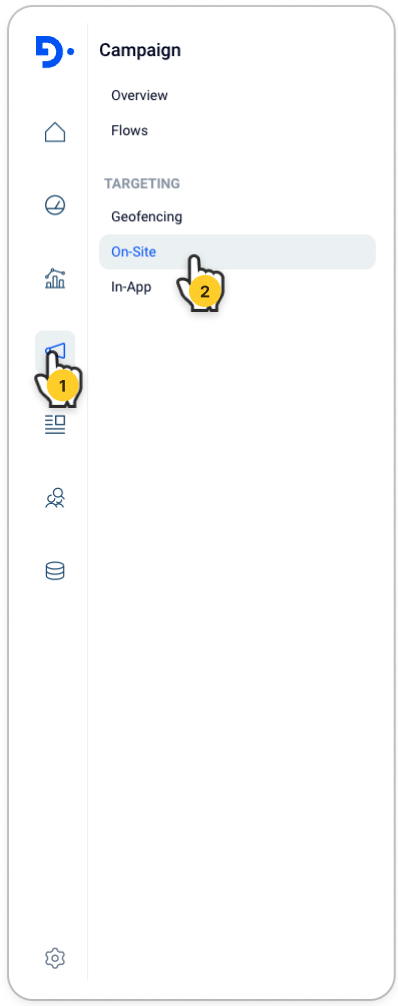
To reach out to On-Site Campaign please navigate to Campaign > On-Site
List of On-Site Campaigns
When you dropped in the On-Site Campaigns Main Page you will see list of on-site campaigns having enabled actions alongside with foldering and filtering options . Let's dive into those section together.
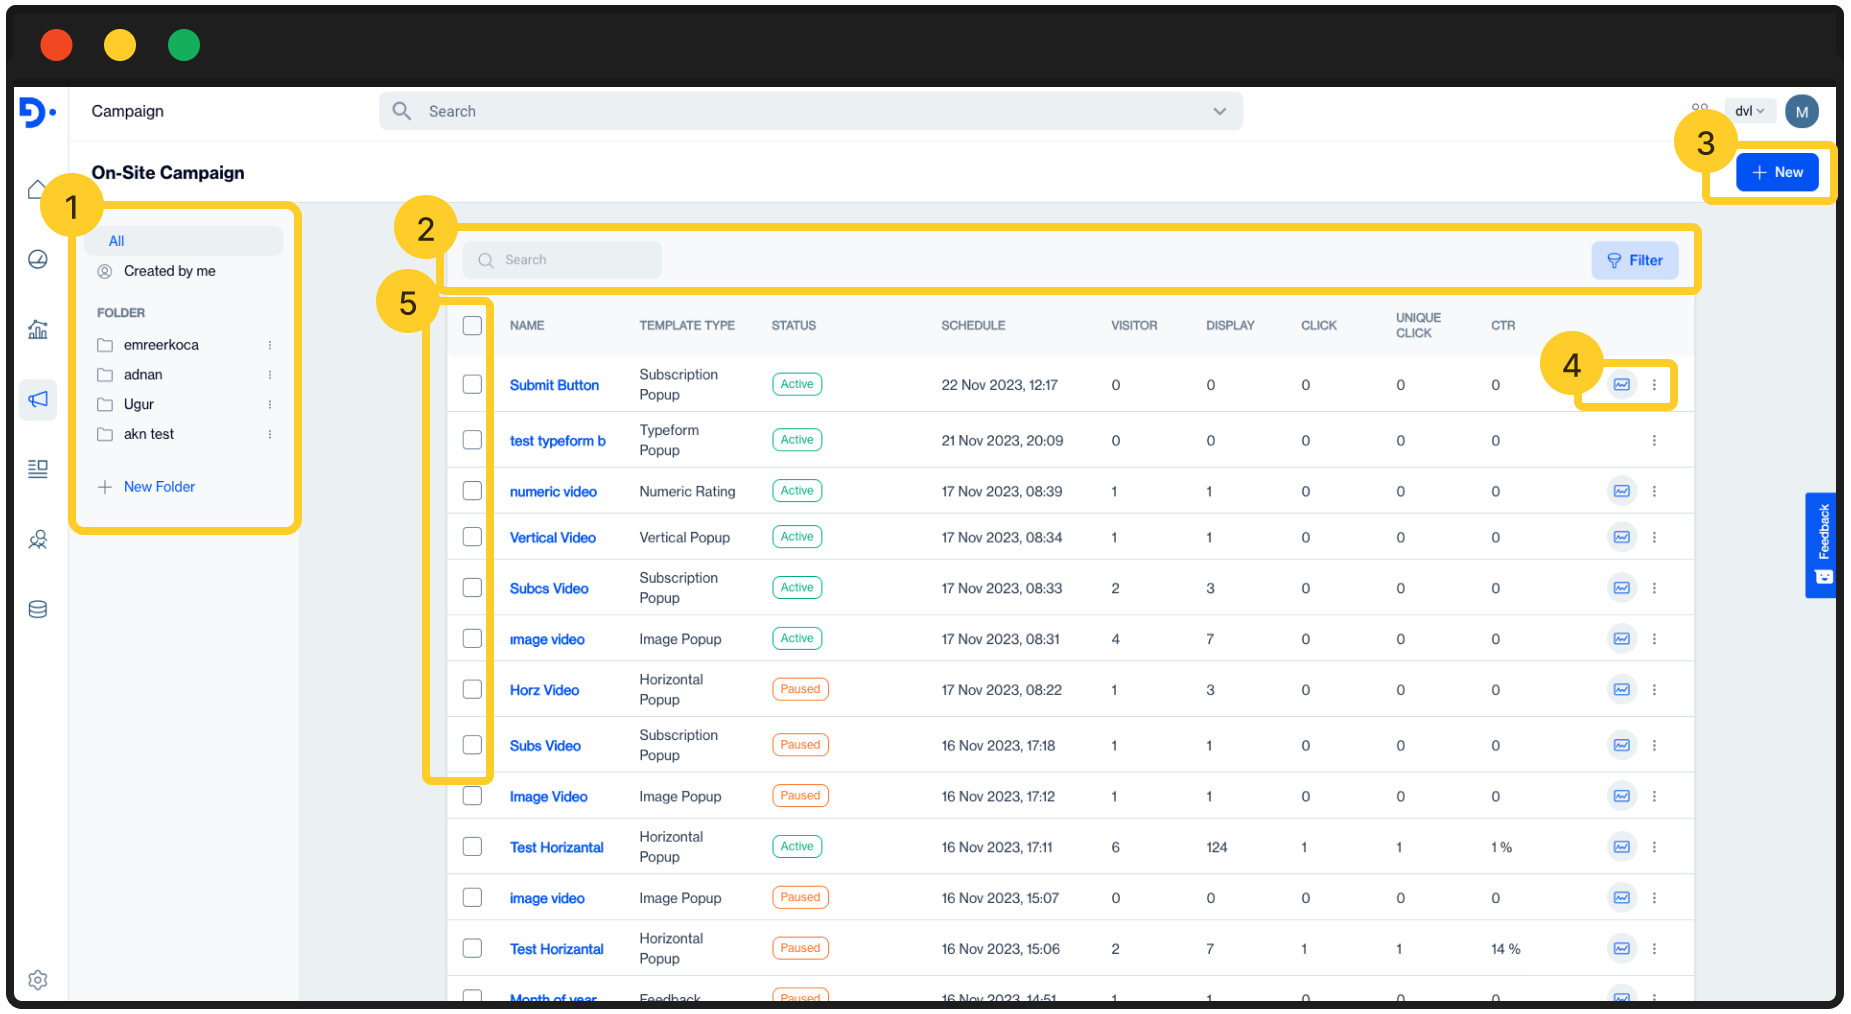
1️⃣ Folder Pane: This field allows you manage created on-site campaigns based on foldering structure .
- Created By Me: Allows you to quick filter the list of on-site campaigns that have been created by your user.
- New Folder : Click on New Folder button to add a new folder on your structure.

2️⃣ Search and Filter
- Search Box: Search box allows you to instantly search created On-Site campaigns by given names.
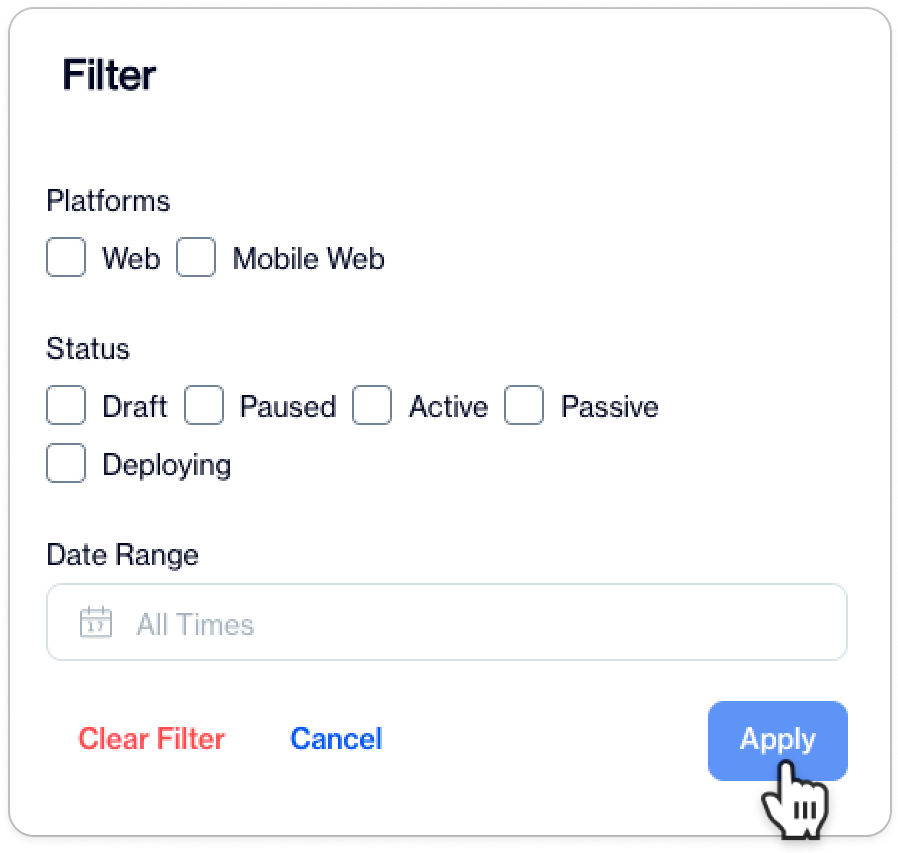
- Filter: Filter allows you to filter the list of On-Site by following parameters:
- Platforms: Allows you to filter data grid by selected platforms.
- Status: Allows you to filter the list by selected statuses.
- Date Range: Allows you to filter the list by given time period. This time period applies on Created Date.
3️⃣ New: Allows you to start creating new On-Site campaign.
4️⃣ Actions:
- View Details: Allows you to view selected On-Site Campaign Details . Click on the Name of the campaign to view details.

- Duplicate: Duplicates the selected On-Site Campaign. This can be useful if you need to create similar On-Site CAmpaigns with a couple of changes.
- Move: Allows you to move selected On-Site Campaign to another folder.
- Pause: Pauses Active On-Site Campaigns
- Copy Public Id: Public Id is for using REST API updates for the selected On-site campaign. This public Id will be use to updating On-Site campaign details via REST API.
- Delete: Removes selected on-site campaign.
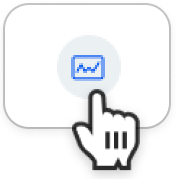
- View Report: Allows you to view On-Site campaign performance. Click on the icon as seen below , you will navigated to report page
5️⃣Bulk Actions:
- Move Selected: Allows you to move selected On-Site Campaigns to another folder.
- Pause Selected: Instantly pause multiple campaigns at once with this convenient bulk action. 💡 Ideal for quickly halting campaign activities without the need to individually manage each one.
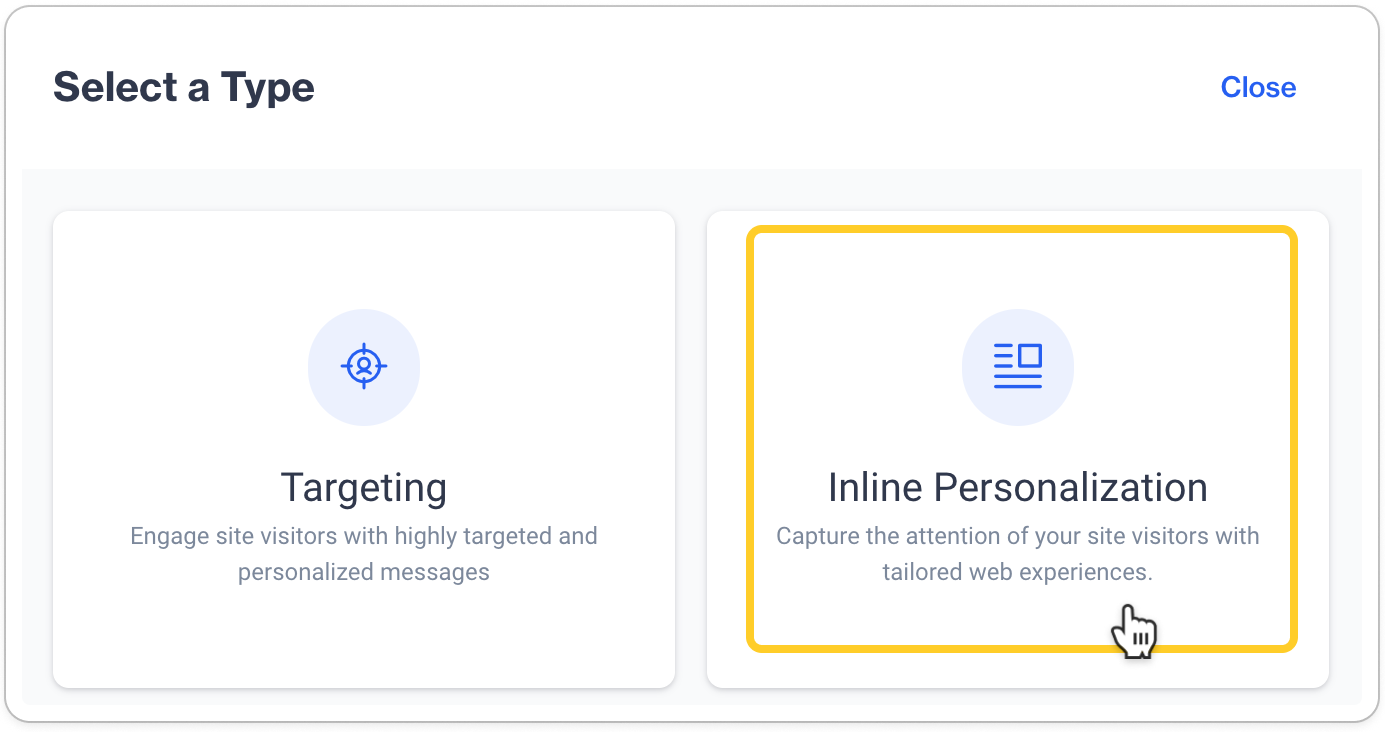
Creating On-Site Targeting Campaigns
Discover the power of On-Site Targeting Campaigns, a feature that empowers you to create engaging popup campaigns within your selected web applications. Whether you want to reach specific user segments or your entire audience, On-Site Targeting allows you to tailor your messages effectively. These pop-ups can be triggered in various ways, such as when a page loads, specific events occur, or when users show exit intent. In this section, we'll guide you through the process of creating these engaging campaigns, helping you connect with your users in a more personalized and impactful way.
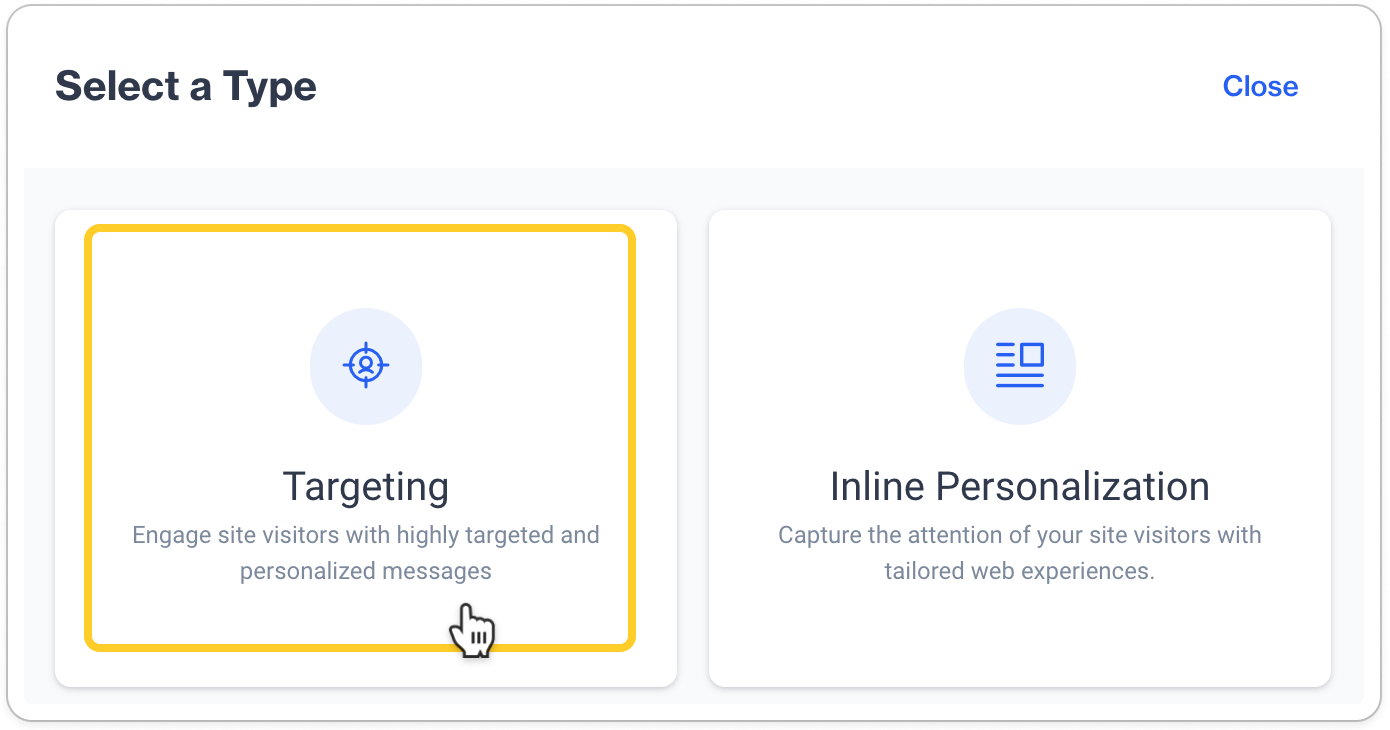
Creating On-Site Targeting Campaigns based on following steps :
- Settings
- Content
- Delivery
- Summary
Let's deep dive into those steps together.
Settings
On this step when or whom to show this campaign alongside with general settings will be covered .
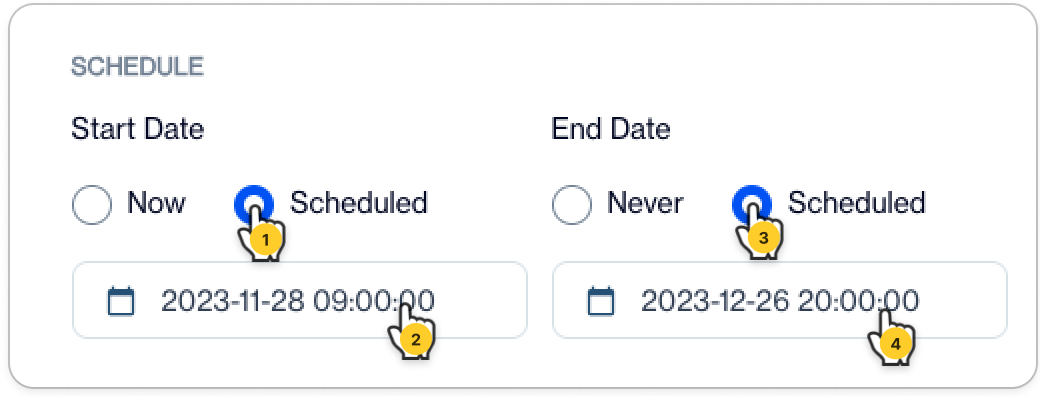
Schedule
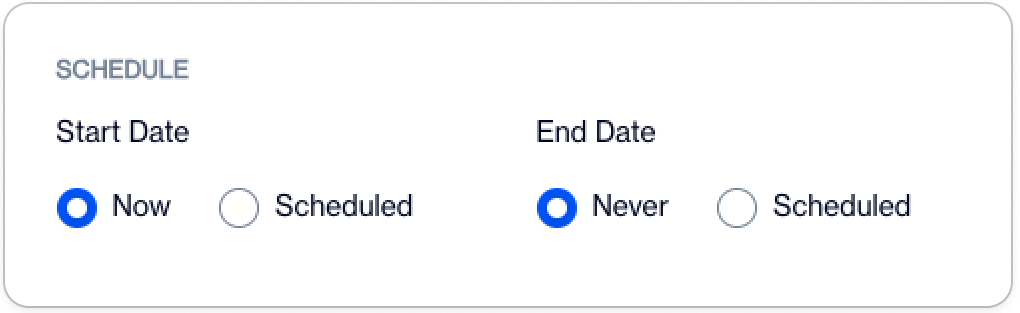
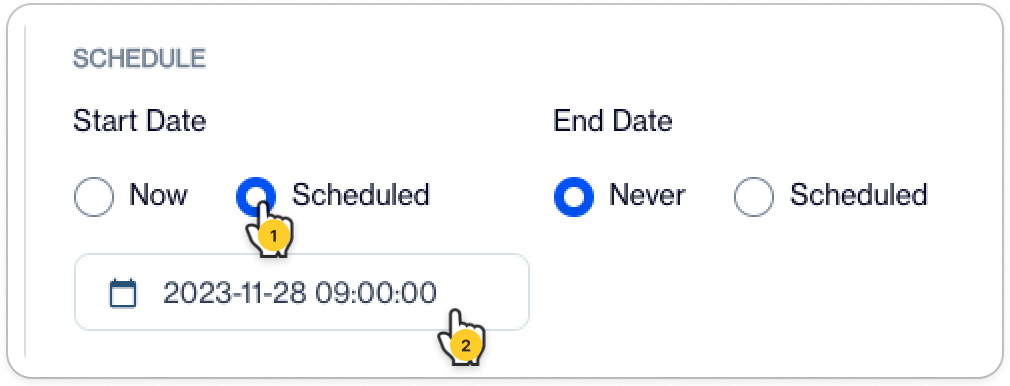
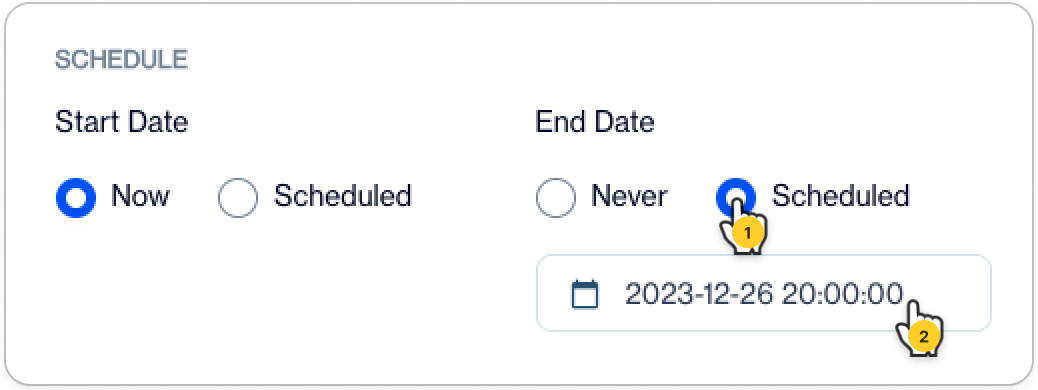
By Default, On-Site Campaign will be activated immediately and will not be terminated . Alternatively you can set following time periods.
- Schedule Start Date without Expiration
Select the Start Date as Scheduled and set a Start Date and Time
- Start Immediately and Schedule Termination
Select End Date as Scheduled and Set an End Date and Time
- Schedule a Time Interval
Select both Dates as Scheduled then Set Start/End Date and Time
Web Site & Platform
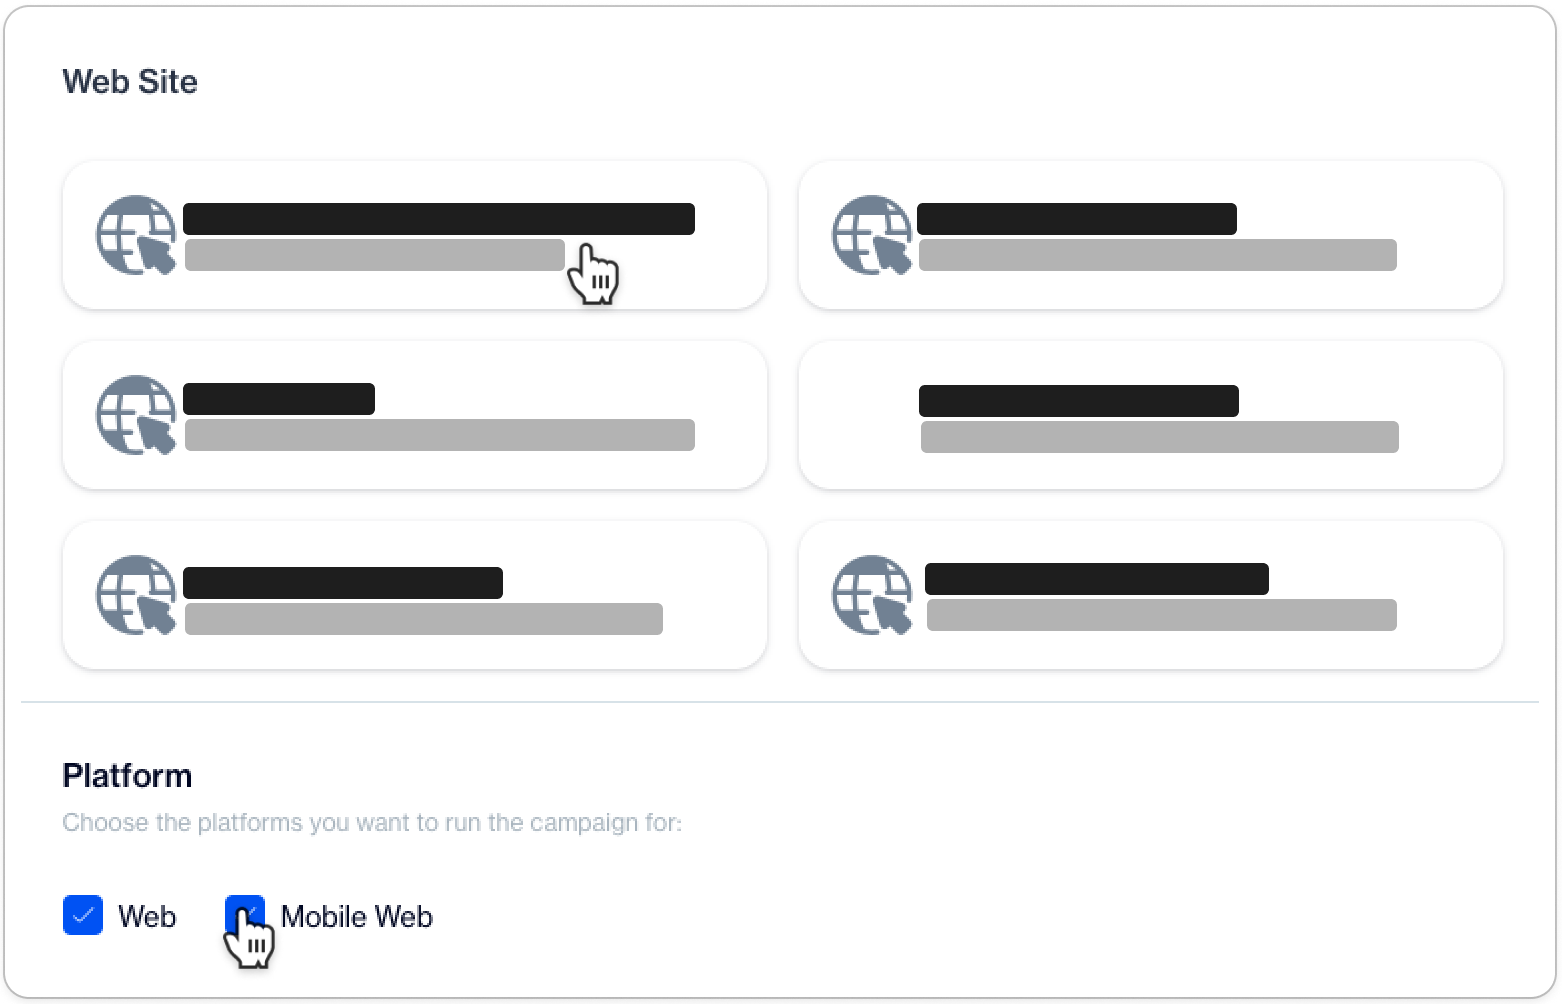
- Select a Web Site to be published this On-Site Targeting Campaign
To select a web site , a Website should be configured previously via Applications menu under Settings. Please keep in mind that only one web site can be selected for publishing this On-Site Targeting Campaign.
- Select platforms as Web , Mobile Web or both to be published this On-Site Targeting Campaign.
This conditioning is used to diverse end-users by detecting they have entered the website from a smartphone browser or a desktop/tablet browser. If the end-user’s browser type cannot be detected by D·Engage Web SDK, detection is done by checking the screen width of the device they’re using.
Whom To Show?
In this section, you can configure the audience for your On-Site campaign with the following options:
- All Visitors: This option enables the on-site campaign to be displayed to all visitors, with no specific conditions applied.
- Visitors that Satisfy the Filters: Select this to show the on-site campaign only to visitors who meet the criteria set by your custom filtering options. This allows for a targeted approach, reaching specific audience segments based on your defined parameters.
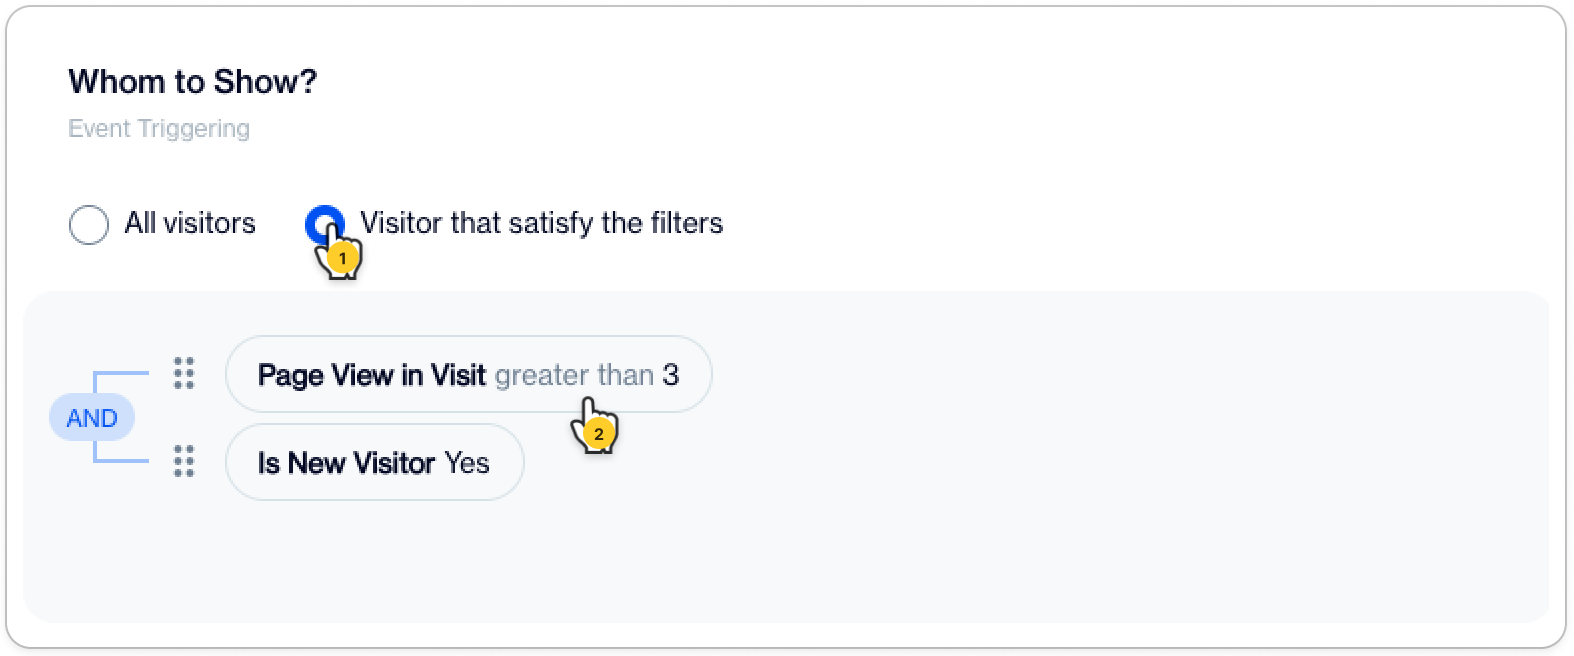
- To create filter for the Audience , select Visitor that satisy the filters and start building your filter.
For detailed instructions on how to use filters, please visit the Fundamental Components of Filter section. This resource provides step-by-step guidance and essential insights to help you effectively utilize filter components in your segmentation strategies.
Default Parameter List for Filters
In this section, you will find a comprehensive list of default parameters along with their descriptions, which are used as the basis for filtering options. This information will assist you in understanding and utilizing these parameters effectively in your filtering processes.
Technology
| Name | Description |
|---|---|
| Device Category | There are 3 categories of devices (Desktop, Mobile, Tablet). This category value is parsed from the user agent string. |
| Device Name* | Name of device. (iPhone, Samsung, Huawei, Mac, etc.) |
| Browser Name* | Name of web browser. (Chrome, Safari, Edge, etc.) |
| Browser Version* | Version of web browser. |
| Operating System* | Name of operating system. (iOS, Android, Windows, etc.) |
| Operating System Version* | Version of operating system. |
| Web Push Supported* | Represents whether devices and browsers support web push notifications or not. |
| Current Web Push Permission | Indicates the current permission granted by the user to display web push notifications. Value can be Granted, Denied or Default. |
| Screen Height | Web browser window's height. |
| Screen Width | Web browser window's width. |
| Language | Current language of web browser. |
| Time Zone | Current time zone of web browser. |
| Is Mobile | Represents if the browser is running on a mobile device. |
| Ad Blocker | Represents if any known adblock extension is enabled. |
*Value is derived from the user agent string.
Visit
| Name | Description |
|---|---|
| Is New Visitor | Represents if the user is visiting the website for the first time. |
| Duration | Time in minutes elapsed between a user's first and last action on a website during a visit. |
| Visit Count In Past X Days | Number of visits by the user in the past selected day period |
| Is Anonymous | Represents whether the user is anonymous(not authenticated or not signed in) or not. |
| Page View in Visit | Number of pages the user viewed during the current visit to the website. |
| Cart Amount | Total amount of the user's cart. |
| Number Of Cart Items | Total number of items in the user's cart. |
| Category Path | Name of the last category page visited on the site. |
| Hour Of Day | Hour of day according to device clock. |
| Day Of Week | Day of week according to device date. |
| Month Of Year | Month of year according to device date. |
| Last Visit From Now | Number of days since last visit to current day. |
Traffic Source
| Name | Description |
|---|---|
| Source | There are 6 sources of the website's traffic originating from (Direct, Organic Search, Paid Search, Referral, Campaign, Social). |
| Referrer URL | The webpage that sends visitors to your site using a link. |
| Landing Page URL | URL of the first visited page on the current visit/session. |
| utm_campaign | Identifies a specific product promotion or strategic campaign. Additional parameter that essentially tells you why traffic is streaming through for the website. Used for keyword analysis. |
| utm_medium | Identifies a medium such as email or cost-per-click. Primarily identifies how or through which channel users access your website. For example, Social, Email, Print etc. could all be used as potential media. |
| utm_source | Identifies a search engine, newsletter name, or other source. Primarily identifying where your traffic originates from. For example, Facebook, Newsletter, QRcode etc. can all be potential sources. |
| utm_content | Differentiates ads or links that point to the same URL. Used for A/B testing and content-targeted ads. |
| utm_term | Identifies noted keywords for the ads or links. Used for paid search. For example, running+shoes. |
Filtering limitations
- Filter set must contain a minimum of 1 and a maximum of 10 filter in total
Data Space
Data Space enables you to add filters based on master_contact-related data, such as email permissions, gender, birthdate, name, and more. Additionally, you have the option to include Segments and Tags as part of your filtering criteria, further enhancing the specificity and effectiveness of your data selection process.
Real-time Segmentation and TaggingDue to the performance-intensive nature of real-time segmentation and tagging, a customer is limited to using a maximum of 10 Segments and 10 Tags in real-time. To incorporate a Segment or a Tag in the Rule Builder, it's essential to enable Real-time Synchronization for those specific Segments or Tags. You may check how to enable for the Segments here.
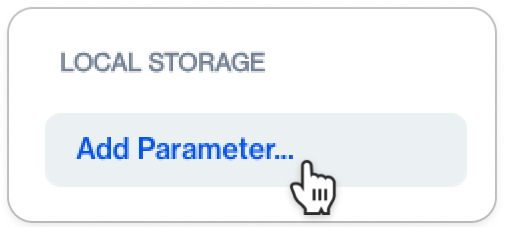
Custom Parameters
Custom parameters come in three types:
- Query String: This searches for the parameter name among the current URL's Query String keys. If the key is present, its value is used for conditioning.
- Local Storage: The search for the parameter name occurs among the page's Local Storage keys. If found, the corresponding key's value is used for conditioning.
- Cookie: This involves searching for the parameter name among the page's Cookie keys. If the key exists, its value is applied in conditioning.
- Custom parameters can be added to any custom parameter group in the parameter selection dropdown. Simply click the Add Parameter button to do so.
Important Notes
- The name of the added parameter must match the key of the desired parameter for use. You can manage the data type and operators. For instance, if the parameter value is numerical, using the INT(number) data type and including mathematical operators can be beneficial.
- Custom parameters are add-only; there is no option to edit or delete them, so exercise caution when adding new ones.
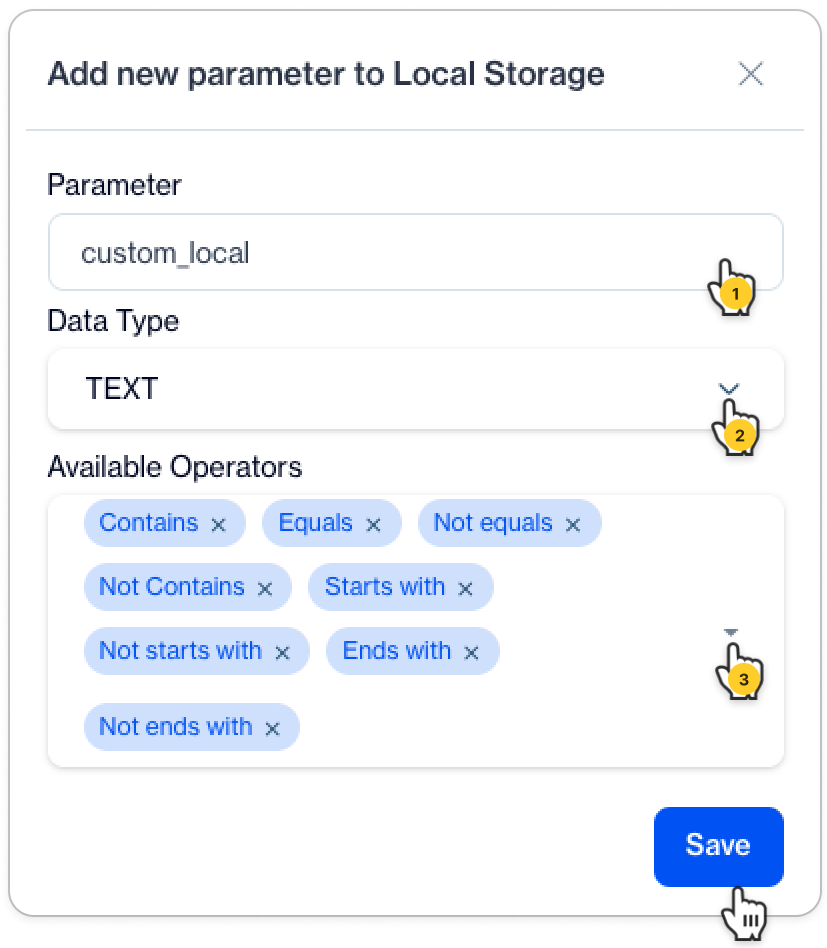
- Assign a name to your custom parameter.
- Select Data Type ⚠️ See below this section for Data Type descriptions and corresponding operators
- Choose Available operators for this custom parameter.
Custom Parameter ready to useAfter clicking the Save button, your custom parameter will be ready for use as a filter.
Table of Data Types and Their Corresponding Operators
| Data Type | Description | Operators |
|---|---|---|
| TEXT | Accepts any free text value. | Equals, Not equals, Starts with, Not starts with, Ends with, Not ends with, Contains, Not contains |
| TEXTLIST | Supports multiple predefined text values. | Is one of, Is not one of |
| INT | Designed for number/integer values. | Equals, Not equals, Greater than, Greater than or equals, Lesser than, Lesser than or equals, Between |
| BOOL | Restricted to boolean (true/false) values. | No operator |
When To Show?
This section outlines the configuration for triggering the display of an On-Site Campaign. The On-Site Message will be shown when all specified conditions (such as 'Whom to Show', 'When to Show', etc.) are met, and the selected trigger action occurs, or when the trigger action happens following the fulfillment of all conditions.
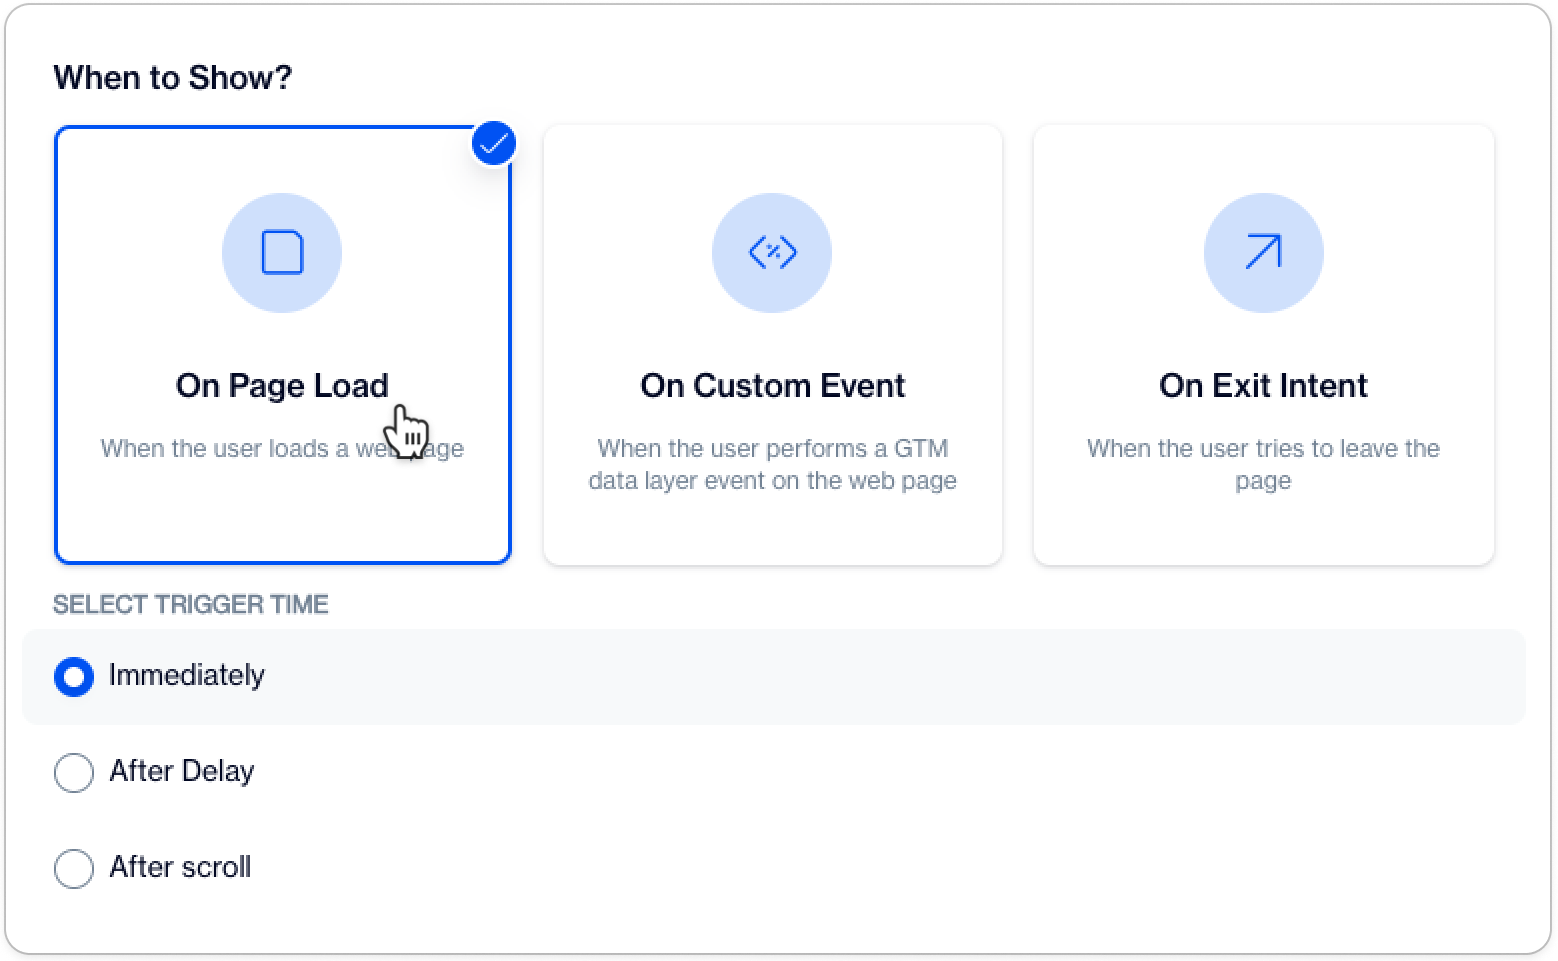
There are three types of triggers:
1️⃣ On Page Load
This trigger has 3 options:
- Immediately: The trigger activates as soon as the page loads.
- After Delay: The trigger activates after a specified number of seconds (X seconds).
- After Scroll: The trigger activates after the user scrolls through a specified percentage (X%) of the page.
2️⃣ On Custom Event
- This trigger activates when a specific event occurs in the Google Tag Manager (GTM) Data Layer. You must enter the event name in the input field, such as ‘gtm.dom’ or ‘gtm.historyChange’.
3️⃣ On Exit Intent:
- This trigger activates when the user's mouse cursor moves outside the top boundary of the webpage (such as the Address Bar, Bookmarks Bar, Tabs, Window buttons, etc.). ⚠️ It does not trigger if the cursor moves slowly.
This trigger is only applicable for users with a mouse.
Where To Show?
This section guides you through setting up conditions based on URL paths to determine where your On-Site Message will be displayed.
All Pages
- When selected, the On-Site Message can be displayed on any page of the website.
Specific Pages
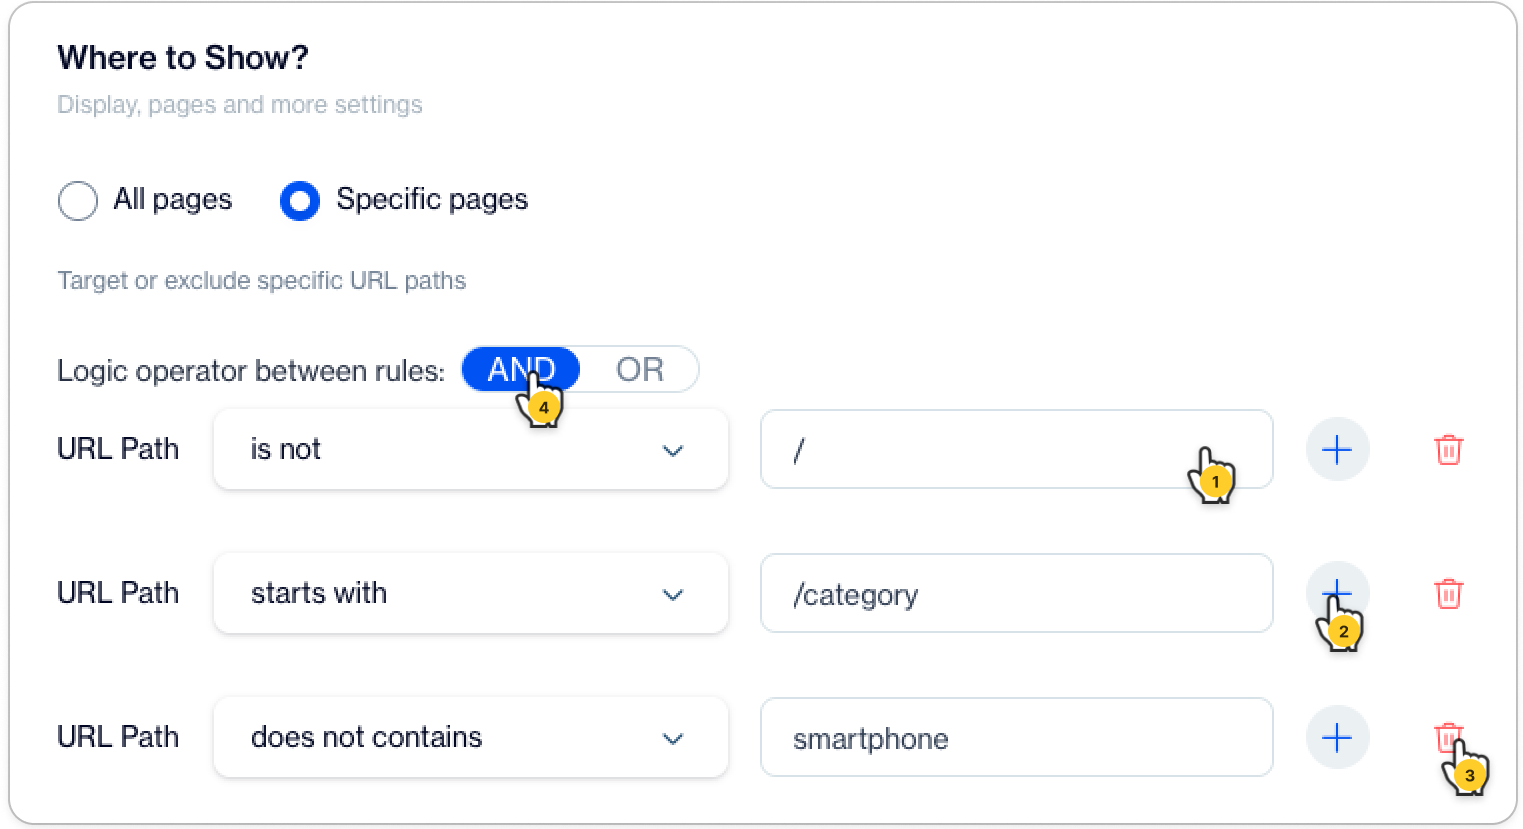
This option allows you to include or exclude specific pages of the website. You can do this using URL path conditions. Follow these steps to apply the modal on specific page(s)
- Select an Operator and input a Value for the URL Path. ( ℹ️ See below for operators and their descriptions.)
- Add a new URL Path condition
- Remove an existing URL Path condition.
- Apply the desired logic to the specified URL Paths.
| Operator | Description |
|---|---|
| Is | The path exactly matches the input text. |
| Is not | The path does not exactly match the input text. |
| Contains | The path contains the input text. |
| Does not contain | The path does not contain the input text. |
| Starts with | The path starts with the input text. |
| Does not start with | The path does not start with the input text. |
| Ends with | The path ends with the input text. |
| Does not end with | The path does not end with the input text. |
| Matches regular expression | The path matches the JavaScript Regular Expression entered as input text. ℹ️ For more information on Regular Expressions, refer to resources like What is a Regular Expression?, Regular Expression web tool |
Content
This step provides content selection , preview and creation for the On-Site Campaign.
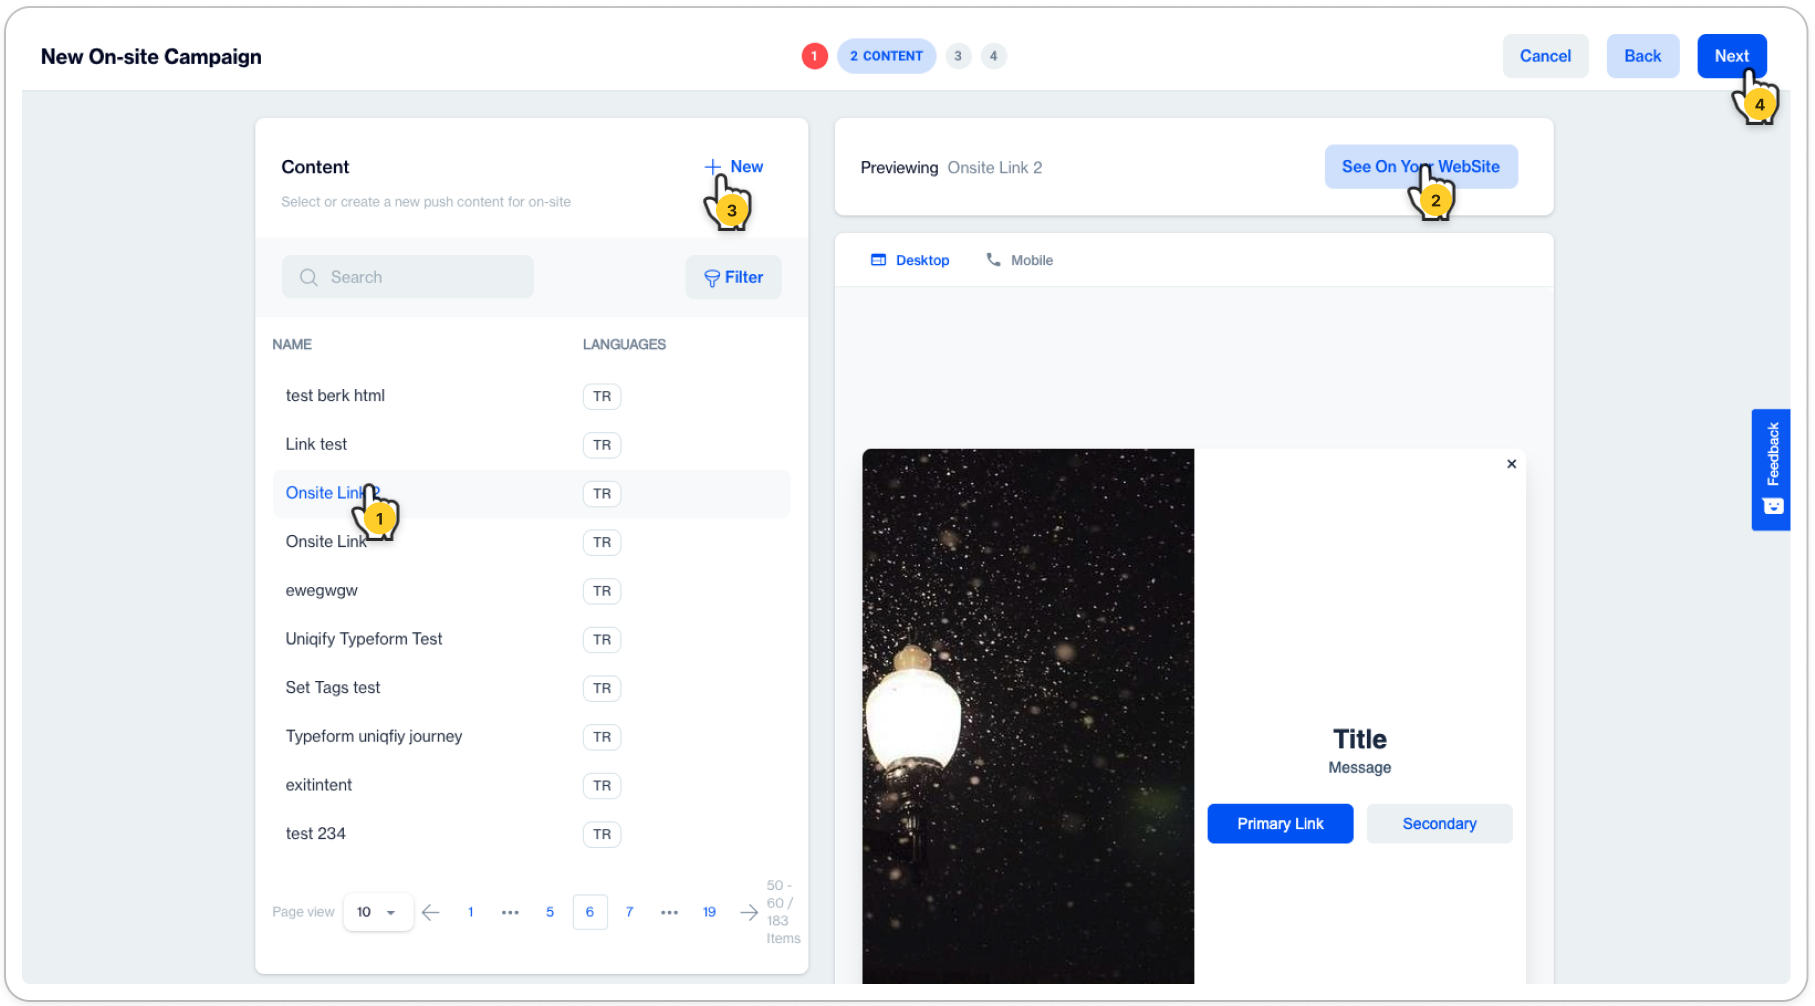
- Select the previously created On-Site Content
- Preview the selected content on your selected web application for this on-site campaign.
- Alternatively you can create a New Content
- Click on Next to proceed to next step
Delivery
This step provides configurations for the On-Site Campaign limitations.
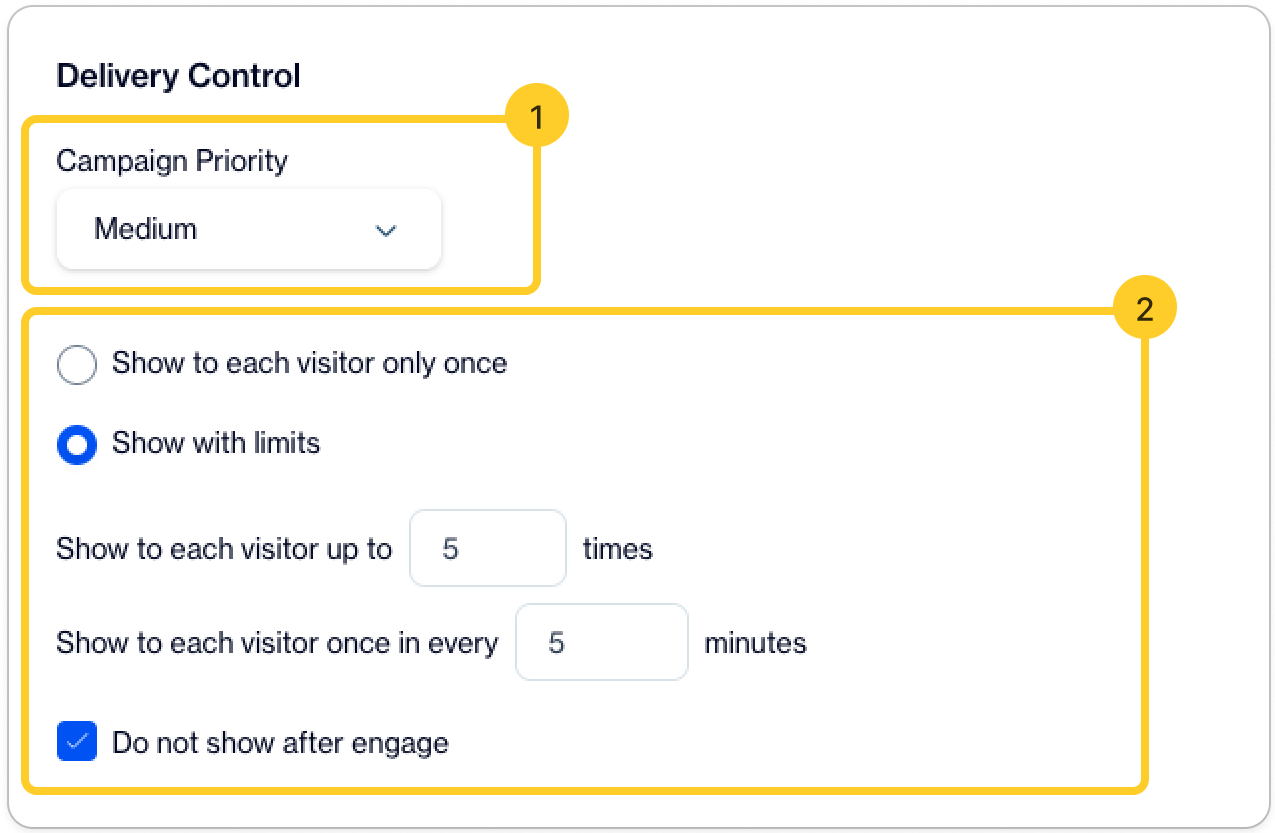
1️⃣ Campaign Priority
This setting determines the priority of the On-Site Campaign, with options including High, Medium, and Low. When a visitor meets the conditions for multiple On-Site messages, the message with the highest priority will be displayed first. For further details, see the section below.
2️⃣ Visitor Based Limitation
This section allows you to configure how often a visitor sees the On-Site Campaign.
Limitation Options:
- Show to each visitor only once: Selecting this option means the On-Site Campaign will be displayed to each visitor only once.
- Show with limits: Selecting this option provides two further limitation settings:
- Show to each visitor up to X times: Define the maximum number of times an On-Site Message is shown to a visitor. For instance, setting this to 5 means a visitor will see the message a maximum of 5 times. After 5 displays, the message won't be shown again, even if the conditions are met.
- Show to each visitor once in every X minutes: Specify the minimum time interval (in minutes) before the On-Site Message can be shown again to the same visitor. For example, setting this to 3 minutes means the message can be displayed again only after a 3-minute interval from the last display.
- Do not show after engage: If selected, visitors who have engaged with the message will not see it again. This helps to avoid repetitive messaging to users who have already interacted with the campaign.
Summary & Approval
This section provides a summary of your On-Site Campaign settings.
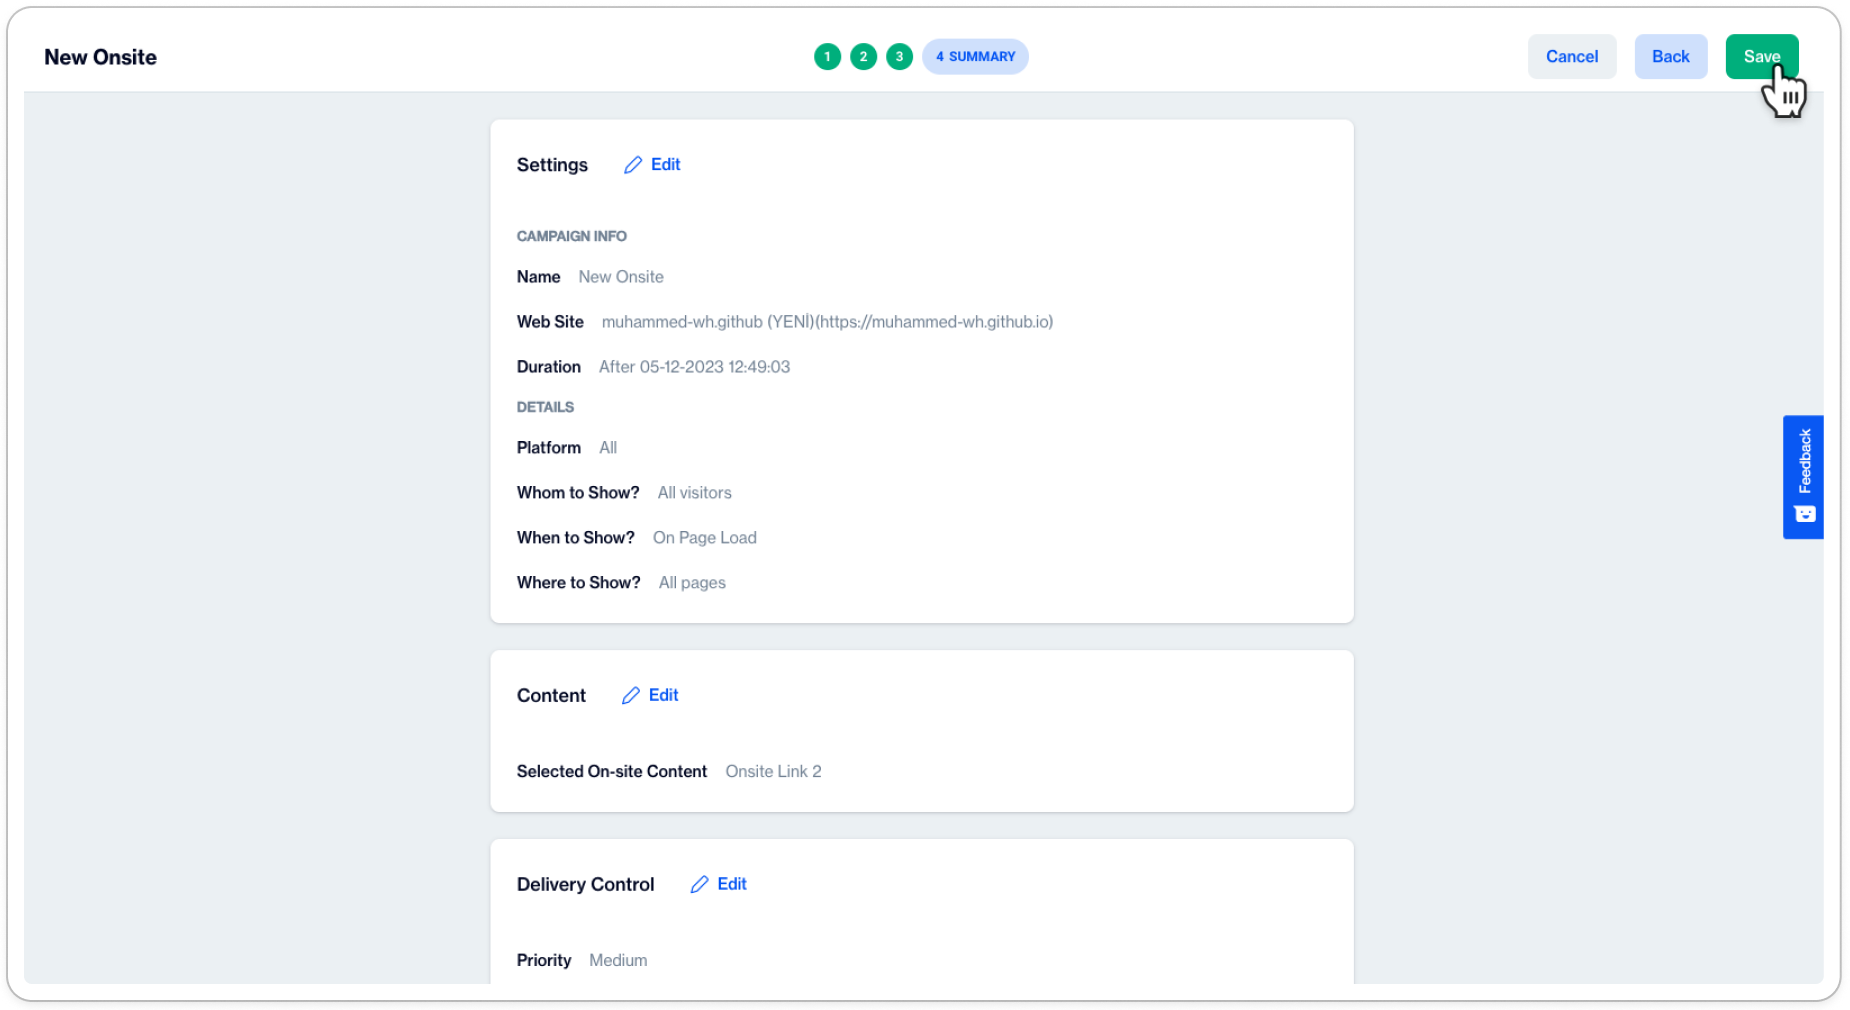
- Review and Edit: You have the option to return to previous steps if you need to modify any settings.
- Save: Click 'Save' to either activate your campaign immediately or save it as a draft.
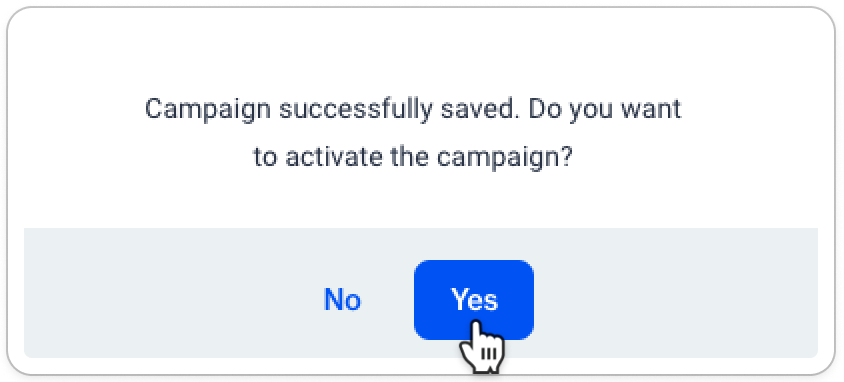
Campaign Approval
- Activation: Upon clicking the 'Save' button, you will be prompted to activate your On-Site Campaign.
- Publishing: Selecting 'Yes' will activate your campaign, and it will go live according to the schedule settings you've established.
Creating On-Site Inline Personalization Campaigns
In this section, you will discover the art of crafting personalized content and story campaigns specifically tailored for your web applications. This segment of the guide is dedicated to empowering users with the knowledge and tools needed to create engaging, individualized experiences directly within their web interfaces. Whether you're looking to enhance user engagement, deliver targeted messages, or weave unique narratives, this section will provide step-by-step instructions and best practices for integrating seamless and impactful inline personalization into your digital strategy
Creating On-Site Inline Personalization Campaigns involves a straightforward process, structured into four key steps:
- Settings
- Content
- Delivery
- Summary
Note on Process SimilarityThe steps for Content, Delivery, and Summary in Inline Personalization Campaigns follow the same procedures as those in Targeting Campaigns. For detailed guidance on these steps, please refer to the respective sections: Content, Delivery and Summary
Settings
Reference to Previous SectionsThe Settings step involves configuring aspects such as Schedule, Web Site & Platform, Whom To Show, When To Show and Where To Show. These sections have been comprehensively covered in previous parts of this guide. For more detailed instructions or clarification, please refer back to those respective sections.
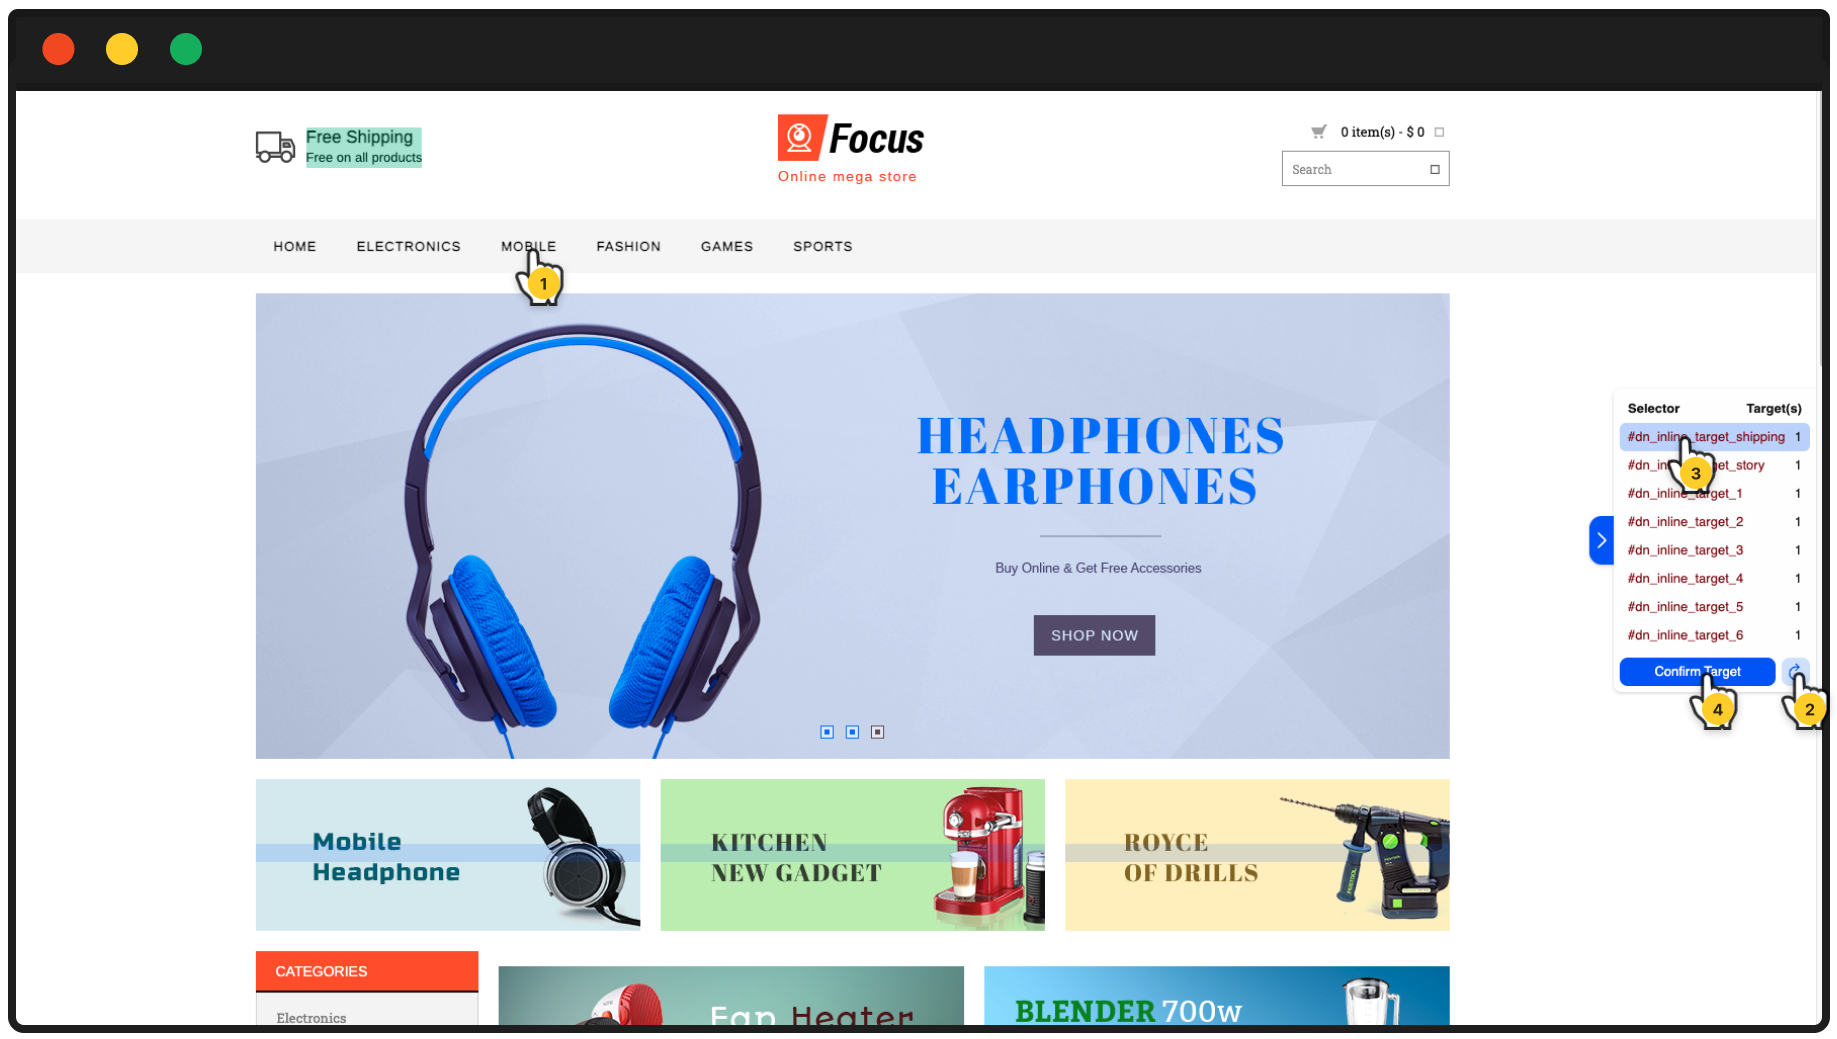
Target Selector
The Target Selector is an integral tool in the creation of Inline Personalization campaigns, designed to empower you with direct control over modifying div components on your website. This distinctive feature sets Inline Personalization apart, offering you the ability to precisely target and customize specific sections of your web pages. To effectively utilize the Target Selector, start by selecting the desired div component on your site. You can then apply various personalization elements directly to this component, enhancing the user experience with tailored content and design. For detailed guidance on how to make the most of the Target Selector in your campaign, please follow the instructions provided below.
Important Notice: Usage of#dn-inline-targetPrefix for Inline Onsite ElementsTo ensure a seamless workflow for inline onsite elements, we advise our customers to use the
#dn-inline-targetprefix for the elements they plan to utilize. When selecting targets in the campaign screen, elements containing this prefix will be highlighted and listed in the overlay for easy identification and access. This practice not only streamlines the campaign setup process but also guarantees consistency and efficiency in your inline onsite campaign execution.


- You can enter the target
divor class name directly if you know it.
or
- open your website in Inspect Mode to identify and select the
divor class name.
Open Website on Inspect Mode
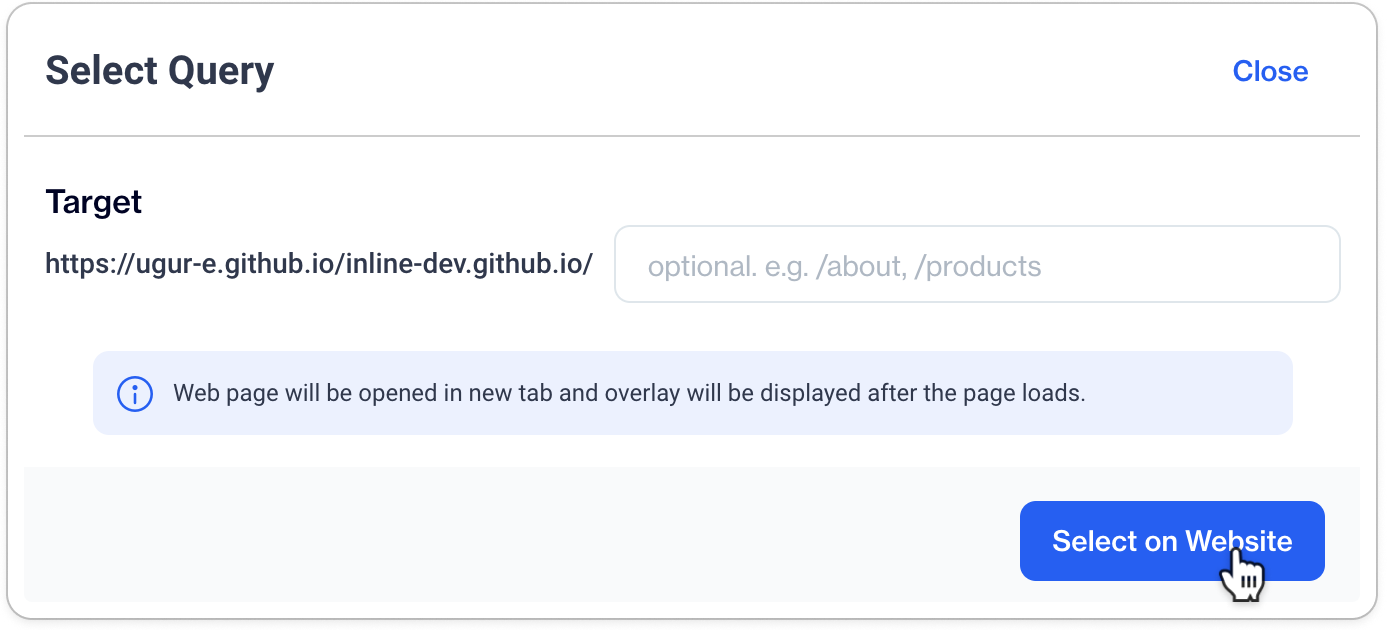
- Select the homepage or provide an optional path to a specific page where you want to apply the Inline Personalization campaign.
- Click on Select on Website to navigate to the chosen page.

- You can navigate between different pages on your website to find the target.
- ⚠️ Remember to click the Refresh button each time you navigate to a different page.
- Click on the desired
divto select it as your target. ℹ️ The selected area will be highlighted upon selection. - After selecting, click the Confirm Target button to finalize your choice of target
div.
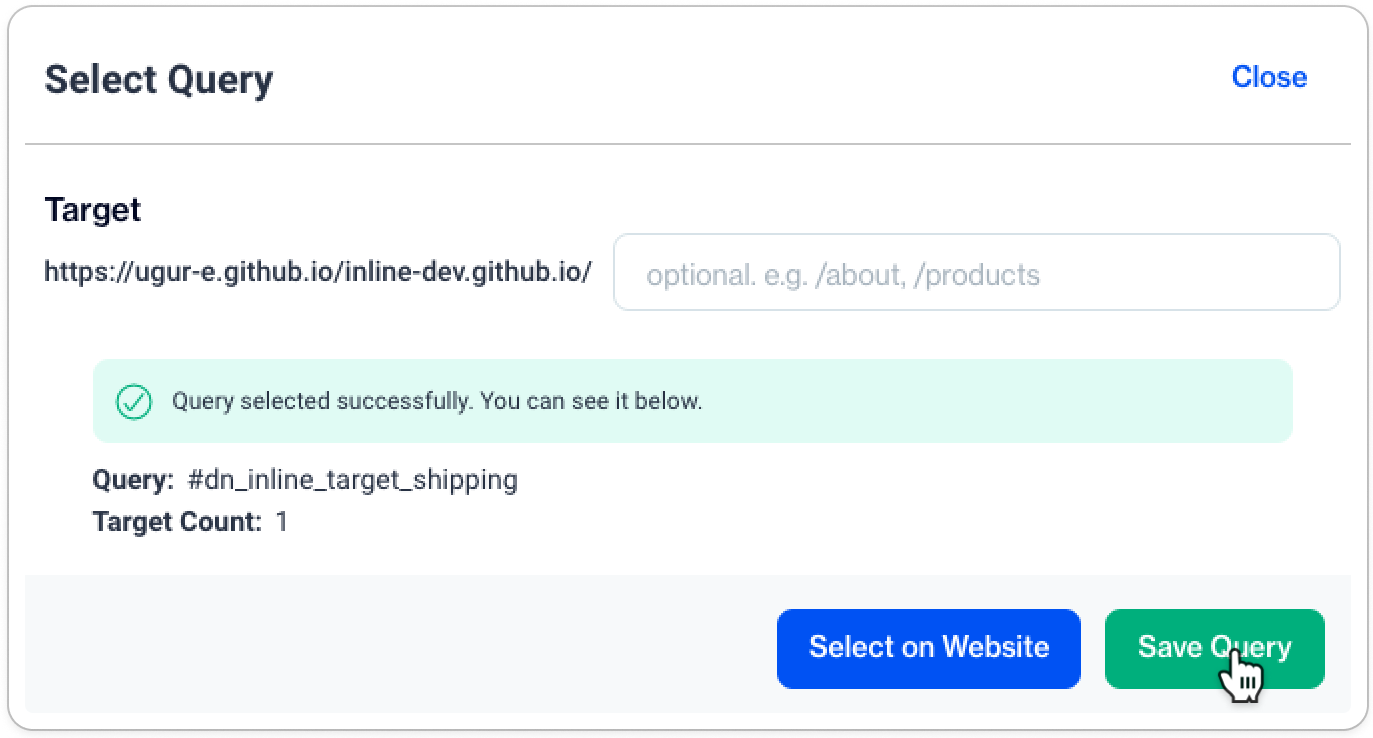
- Once you have validated your target
div, click on Save Query to save your selection and proceed with the campaign.
Glossary of Terms & Working Principles
Performance & CachingReal-time On-Site Campaigns are performance-intensive features. To enhance performance, caching mechanisms are implemented. While these mechanisms generally do not affect customers, it's important to be mindful during the creation and updating of campaigns.
Campaign Creation & Update
- Process: Campaigns are created and updated via the Real-time On-Site Campaign pages on the D-Engage Admin Panel. Detailed instructions are provided in the Features section of this document.
- Caching & Latency: Both creation and updating actions involve caching. While changes are immediately visible on the Admin Panel, they may take 2 to 10 minutes (average 5 minutes) to reflect on the website due to caching.
- Timely Campaigns: For time-sensitive campaigns, ensure to create or update them at least 10 minutes before the scheduled start time.
Statuses & Approval
Main Campaign Statuses
- Draft: Non-displayable on the website. Set to Draft when 'No' is clicked in the activation dialog box. Activate via the Campaign List Page or after updating on the Campaign Edit Page.
- Active: Displayable on the website. Can be paused from the Campaign List Page.
- Paused: Non-displayable on the website. Reactivate as with Draft campaigns.
- Expired: Active campaigns whose end date has passed. Reactivate by updating the end date.
Approval Process
- Non-publisher users' campaigns need approval from users with campaign publishing authority.
- Campaigns created or updated by publisher users pass without approval.
- Non-publisher users see 'Send for Approval' instead of 'Save'. Approval requests are sent via email.
Approval Statuses:
- Waiting for Approval: For campaigns created/updated by non-publisher users, visible to publisher users for approval/denial.
- Denied: Non-displayable on the website.
- Approved: For campaigns approved by publisher users or created/updated by them directly. Invisible approval status on the Admin Panel.
Conditions & Triggers Logic
- Display Requirements: All conditions must be met, and the trigger action must be fired for an On-Site Message to display.
- Types of Conditions: Include Start & End Date, Application, Whom to Show, Where to Show, Priority, and Visitor-Based Limitation.
- Condition Check & Trigger Event: The On-Site message displays after both the condition check is completed and the trigger event is fired.
Visit & Visitor Model
Visit
- Definition: A visit is a specific time period that begins when the website is first opened. It is set to expire 30 minutes after the last user interaction on the website.
- Extension of Visit: Each new user action (like navigation or page refresh) extends the visit's expiration by an additional 30 minutes from the time of that action.
- Data Handling: Data from each visit is stored in the browser and sent to the server when the visit ends. A new visit starts upon the next website opening.
NoteUnderstanding the visit concept is crucial for correctly interpreting user behavior and campaign interaction. Misinterpretation can lead to incorrect campaign targeting.
Visitor
- Unique Identification: Visitors are uniquely identified by a Device ID, which is stored in the D-Engage Master Device Data Table.
- First-Time Visit: A new Device ID is assigned to first-time visitors or those who clear their browser's website data.
- Login Association: Upon login, visitors are associated with a Contact Key. This key links the visitor's pre-login actions with their identified contact profile in the D-Engage Master Contact Data Table.
ImportantThis distinction between Device ID and Contact Key is essential for tracking both authenticated and anonymous user behavior accurately.
Tracking Non-Authenticated Users
- One of the most powerful features of Real-Time On-Site Campaigns is the ability to track the behavior of non-authenticated (anonymous) visitors.
- This tracking allows for delivering On-Site Messages to both authenticated and non-authenticated users under specific behavioral and situational conditions.
Priorities Among Multiple Campaigns
Single Message Display Rule
- Key Principle: Real-Time On-Site Messaging is designed to display only one On-Site Message to a visitor at any given time.
Determining Campaign Priority
- Priority Setting: Each campaign's priority value can be set during the Delivery Control step.
- Equal Priority Handling: If multiple campaigns share the same priority level, additional properties are used to determine which campaign takes precedence.
ImportantUnderstanding how priorities are determined is crucial for ensuring the right message reaches the visitor, especially when multiple campaigns are active simultaneously.
Properties Affecting Prioritization:
Listed in order of their influence on priority:
- Higher Priority Value: Campaigns with a higher set priority.
- Segment or Tag Criteria: Campaigns containing at least one Segment or Tag criterion.
- Additional Criteria:Campaigns with more specific rules in their rule set.
- Earlier End Date: Campaigns with an earlier scheduled end date.
- Later Creation Date: More recently created campaigns.
NoteIn cases where campaigns have identical values for these properties, the decision on priority moves to the next property in the list. Due to the precision in recording creation dates (down to milliseconds), it is almost certain that each campaign will have a distinct priority.
Impression and Click Signals
Impression
- Definition: An 'Impression' is counted each time an On-Site Message is displayed to a visitor.
- Counting Mechanism: Every individual display of the message to a visitor adds to the total impression count.
ImportantAccurate tracking of impressions is critical for understanding the reach and frequency of your campaign’s visibility to users.
Click
- Definition: A 'Click' is considered a meaningful interaction, typically defined as a link click within the On-Site Message.
- Non-Link Interactions: Clicks on non-link parts of the message (including close buttons) are not counted towards the campaign's click metrics.
NoteDifferentiating between link clicks and other interactions is essential for accurately measuring user engagement and the effectiveness of the message's call-to-action.
Click Rate (Click-through Rate)
- Calculation: The Click Rate is calculated as the ratio of Clicks to Impressions.
Utility: This metric provides insights into how compelling your message is and how effectively it drives user action.
Reporting
- Visibility: Both Impressions and Click Rates are visible on the On-Site Campaign List Page.
- Use in Analysis: These metrics are integral for evaluating campaign performance and making data-driven decisions for future campaign optimizations.
Key MetricMonitoring Impressions and Click Rates is essential for gauging the success of your campaign and understanding user interaction patterns.
Updated 7 months ago