
Create a table
This section outlines the process for creating a new table structure within our Customer Data Platform (CDP) to enhance and extend your data relationships. This capability allows for a more comprehensive and flexible data management approach, enabling you to tailor the data architecture to meet specific needs and objectives, thereby maximizing the utility and efficiency of your data strategy.
How to create a new table
Within the Tables section, users have the option to create a new table by clicking on the "+ New" button. When creating a new table, users can choose from the following options:
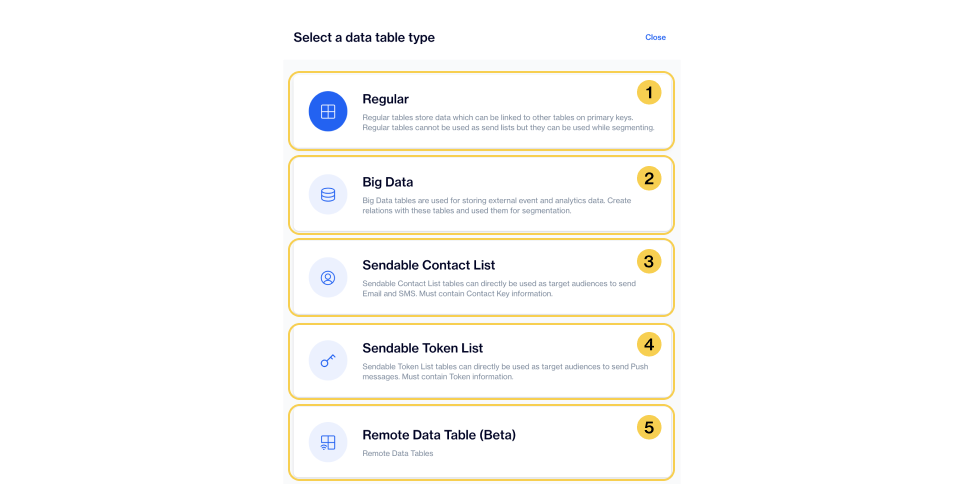
Table types to create within Dengage CDP
1️⃣ Regular Table:
This option allows users to create a standard database table, representing typical relational data structures.
Upon selection of the desired table creation option, users are directed to a dedicated page providing further guidance and steps to proceed with creating the chosen table type. Please see How to create a regular table to create a regular table process.
2️⃣ Big Data Table
Users can opt for a Big Data Table when dealing with large quantities of data, often used for event tracking purposes.
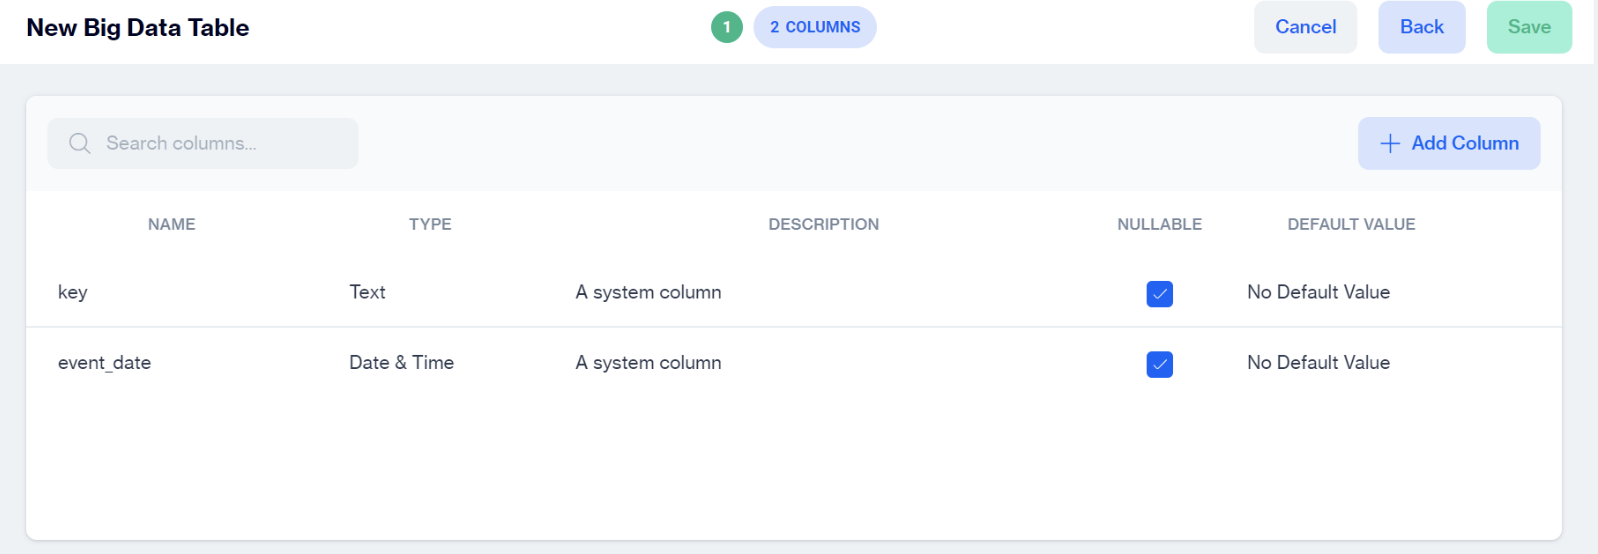
Points To RememberBig Data Tables come preconfigured with key and event_time columns by default, providing essential structure for event data storage.
Note that the structure of Big Data Tables, including the key and event_time columns, cannot be altered
Upon selection of the desired table creation option, users are directed to a dedicated page providing further guidance and steps to proceed with creating the chosen table type. Please see How to create a big data table to see the difference between big data and regular table.
3️⃣ Sendable Contact List Table
Sendable Contact List Tables are specifically designed to serve as target audiences for email and SMS campaigns to a specific list.
Key To SuccessThese tables must include contact_key column to be directly utilized as target audiences for sending email and SMS messages.
Upon selection of the desired table creation option, users are directed to a dedicated page providing further guidance and steps to proceed with creating the chosen table type. Please see How to create a sendable contact table to learn how to create a sendable contact table.
4️⃣ Sendable Token List Table
Sendable Token List Tables are are specifically designed to serve as target audiences for sending push messages to a specific list.
Key To SuccessThese tables must contain token column to serve as target audiences for push message campaigns.
Upon selection of the desired table creation option, users are directed to a dedicated page providing further guidance and steps to proceed with creating the chosen table type. Please see How to create a sendable token table to learn how to create a sendable token list table.
5️⃣ Remote Data Table
One of the standout features of Dengage CDP is its capability not just to create segments using the local tables within its own database but also to formulate segments based on remote tables located in other databases. This functionality enables clients to leverage their existing data tables without transferring any data out of their systems. Essentially, this process involves the creation of a virtual table within Dengage CDP.
This virtual table can then be integrated into the Star Schema, facilitating its use in crafting Interactive Segments. This innovative approach allows for seamless and efficient data management, enhancing the utility and flexibility of the platform in executing targeted marketing strategies.
How to create a regular table
This section guides you through the process of creating a regular table in Dengage Customer Data Platform (CDP). The initial step in table creation involves assigning a name and a folder to the table, along with an optional but recommended description. The use of a Retention Policy is a common practice for most tables, helping to manage the lifecycle of the data by defining how long the data should be retained before being automatically purged. This setup ensures that your data remains organized, relevant, and compliant with data management best practices.
Creating a Regular table in Dengage CDP
1️⃣ General
Name: This section allows you to assign a name to your table.
Folder: This section allows you to specify a folder location for the table. By default, the table will be saved in the "Tables" folder.
Change Folder: It will allow you to select a different folder. Please see Changing Folder to learn how to change a folder to organize better.
Description: This section allows you to add a description for the table. Please try to fill these descriptions which will be very useful later when creating segments.
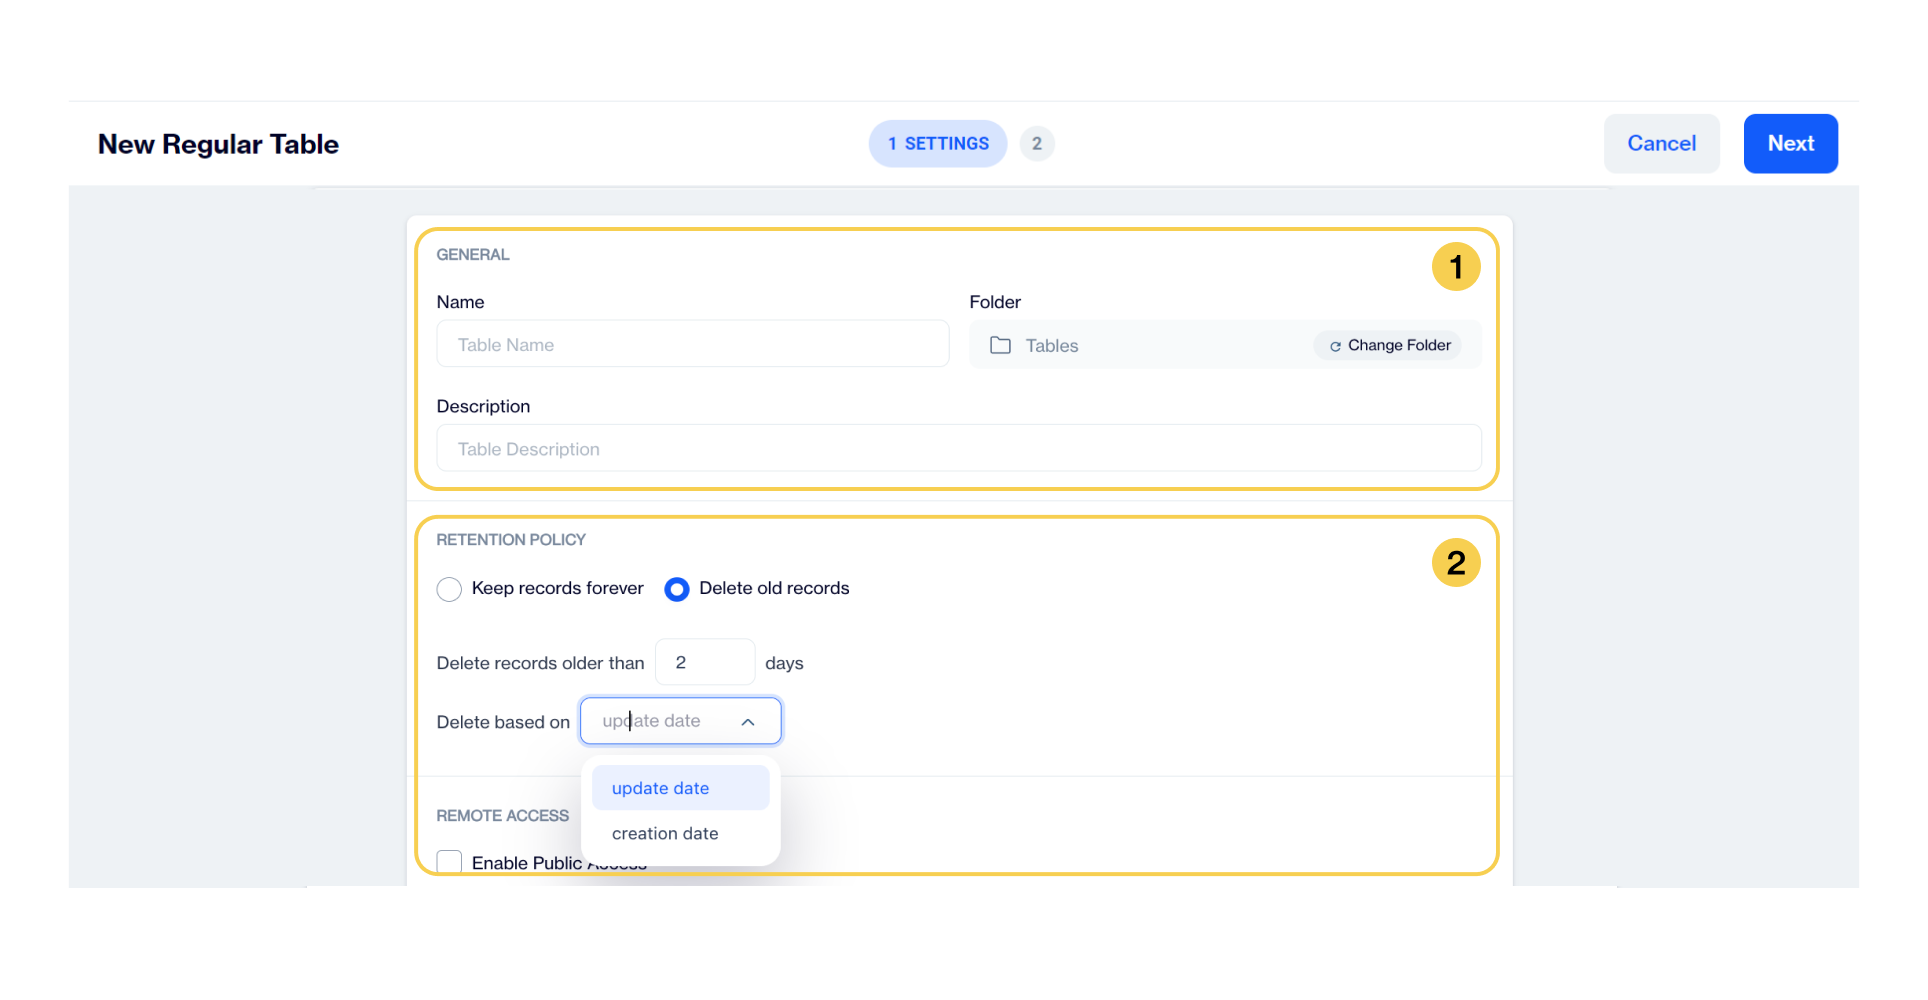
2️⃣. Retention Policy
Keep records forever: This option instructs the system to retain all records in the table indefinitely.
Delete old records: This option allows you to set a policy for deleting old records.
Delete records older than a specified number of days: In this section, you can define a threshold for record deletion based on the number of days elapsed since their creation or last update
Delete Records based on Update Date and Creation Date: This section allows you to specify criteria for deleting records based on their creation or update dates. You have the flexibility to tailor the deletion policy according to your specific requirements related to these dates
Record Deletion ConfigurationIn the "Delete records older than a specified number of days" section, users can set a threshold for record deletion based on the duration since their creation or last update.The "Delete based on Update Date or Creation Date" section offers users to delete records based on their last update or creation date.
Remote access for a new regular table
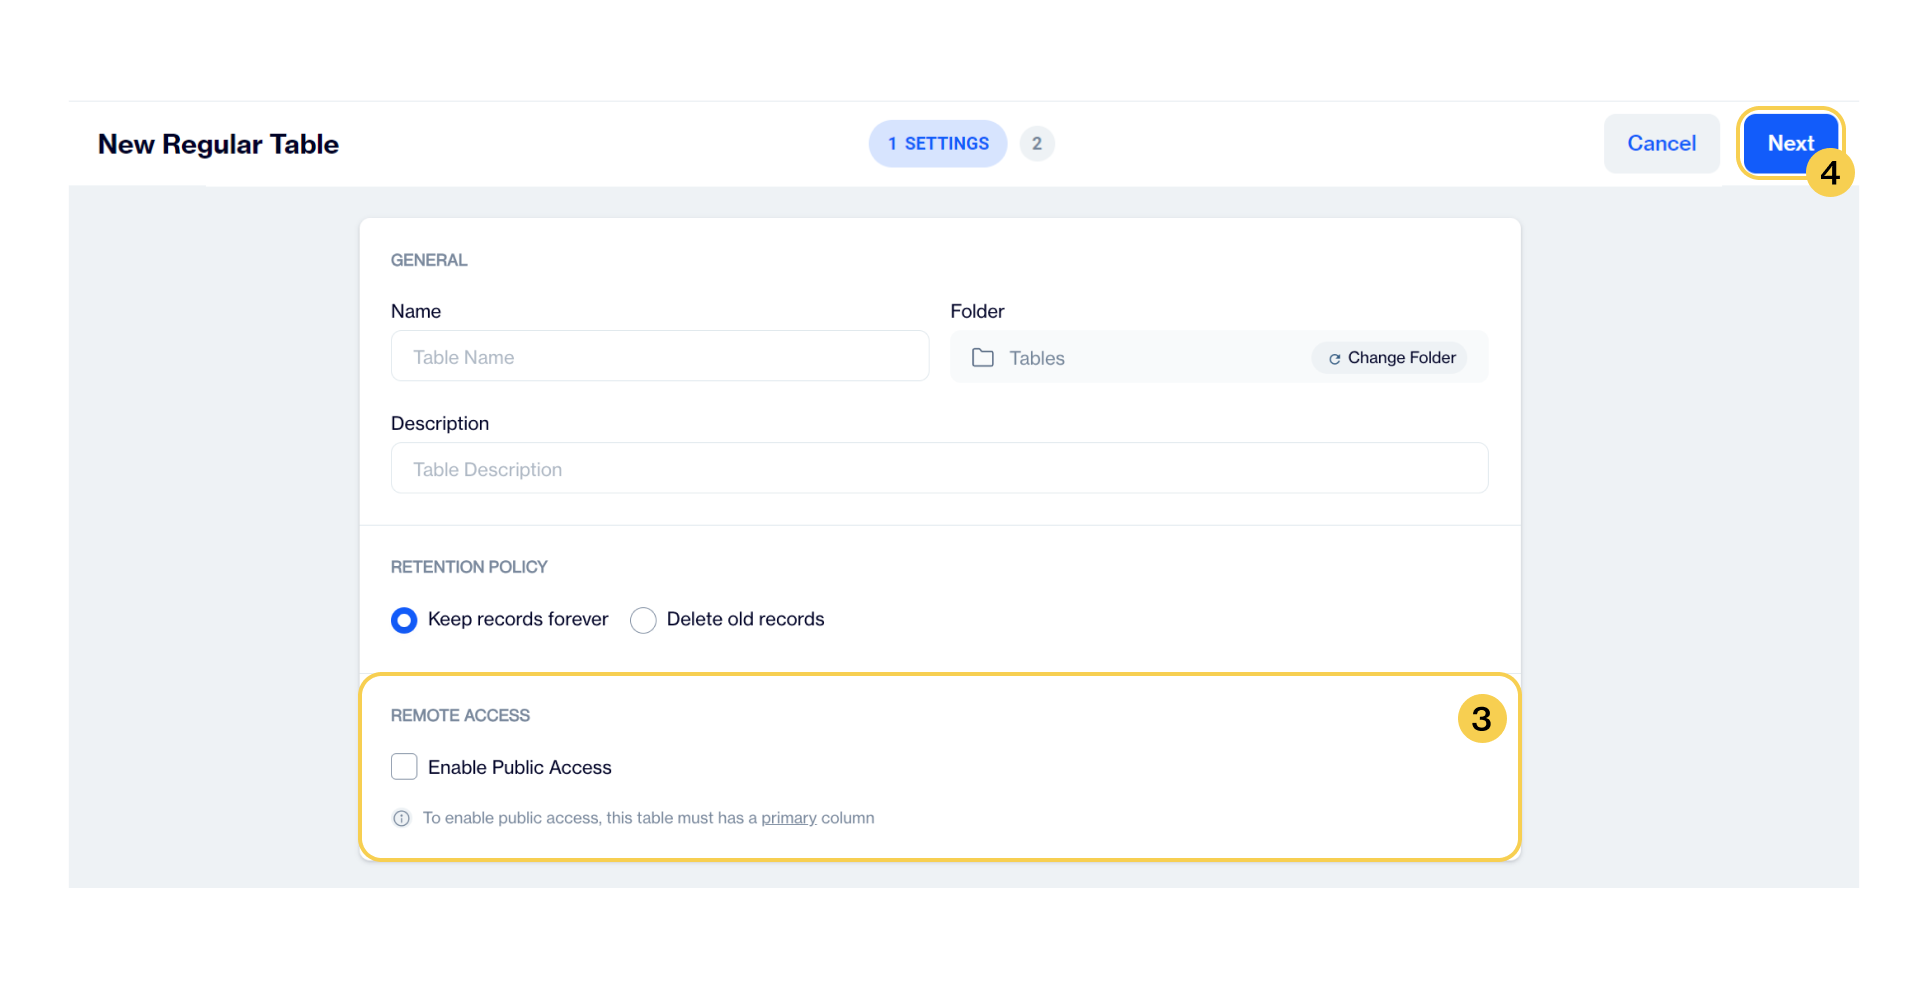
3️⃣ Remote Access
Enable Public Access: This option allows you to enable public access to the table. This option must be enabled by Dengage Support first to use it. Please be careful using this function which may expose data to the internet via API calls.
Primary Column must be definedIn order to enable public access, the table must have a primary column defined.
4️⃣ Next Button
Next: This button will navigate to the next step. Please see Add column to understand how to build a table structure by adding columns.
How to create a big data table
Create a big data table
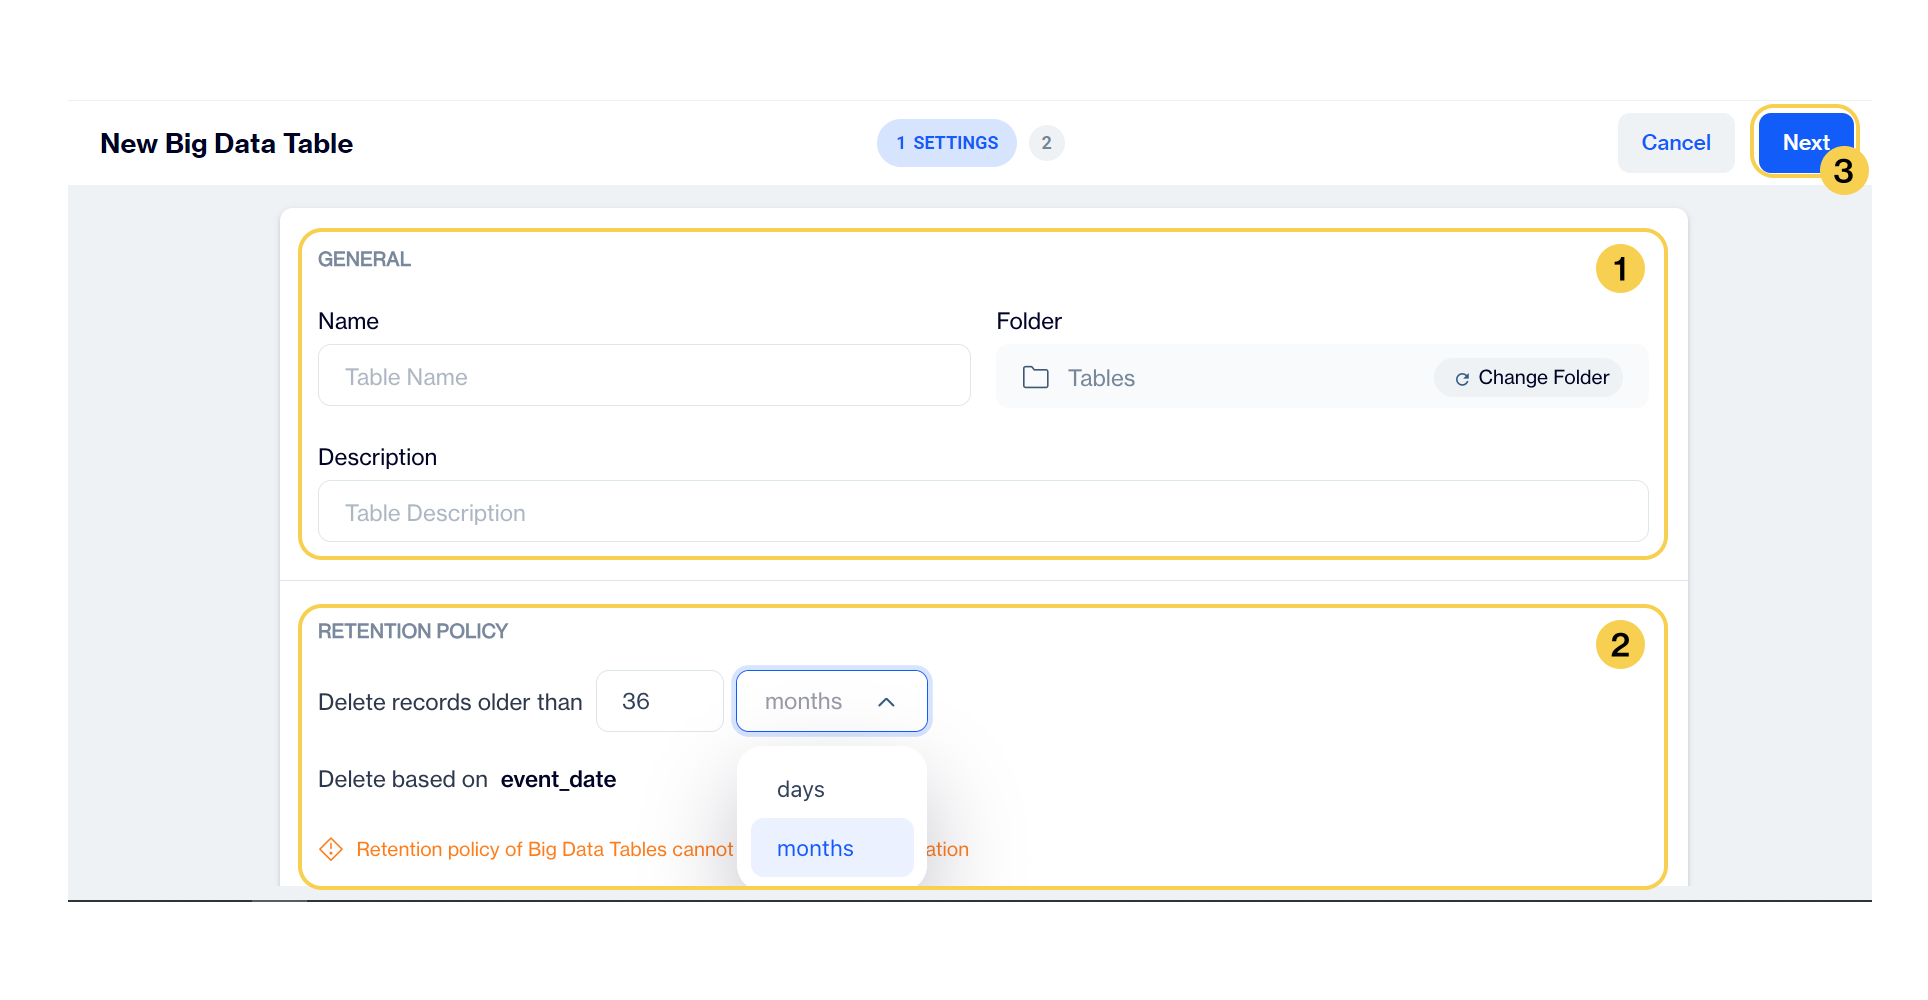
1️⃣ General
Name: This section allows you to assign a name to your table.
Folder: This section allows you to specify a folder location for the table. By default, the table will be saved in the "Tables" folder.
Change Folder: It will allow you to select a different folder. Please see Changing Folder to learn how to change a folder to organize better.
Description: This section allows you to add a description for the table.
2️⃣. Retention Policy
Delete Records by Time Correlation:
This feature allows users to select a numerical value (for days or months) to establish a correlation with time.
Users can specify a numeric threshold to determine the period for deleting previous records based on the selected correlation (e.g., delete records older than X days or X months)
When utilizing the feature to delete records based on a selected numerical value, it's important to note that this deletion process will be correlated with the event_date. This ensures that records older than the specified duration relative to the event date will be automatically removed from the database.
Retention Policy Lock for Big Data TablesPlease note that the retention policy set for Big Data tables cannot be changed after creation. Once established, the retention period for deleting old records based on specified criteria will remain in effect for the duration of the table's existence. Therefore, it's essential to carefully consider and finalize the retention policy during the initial creation process to align with your data management requirements effectively
3️⃣ Next Button
Next: This button will navigate to the next step. Please see Add column to understand how to build a table structure by adding columns.# How to create a sendable contact table.
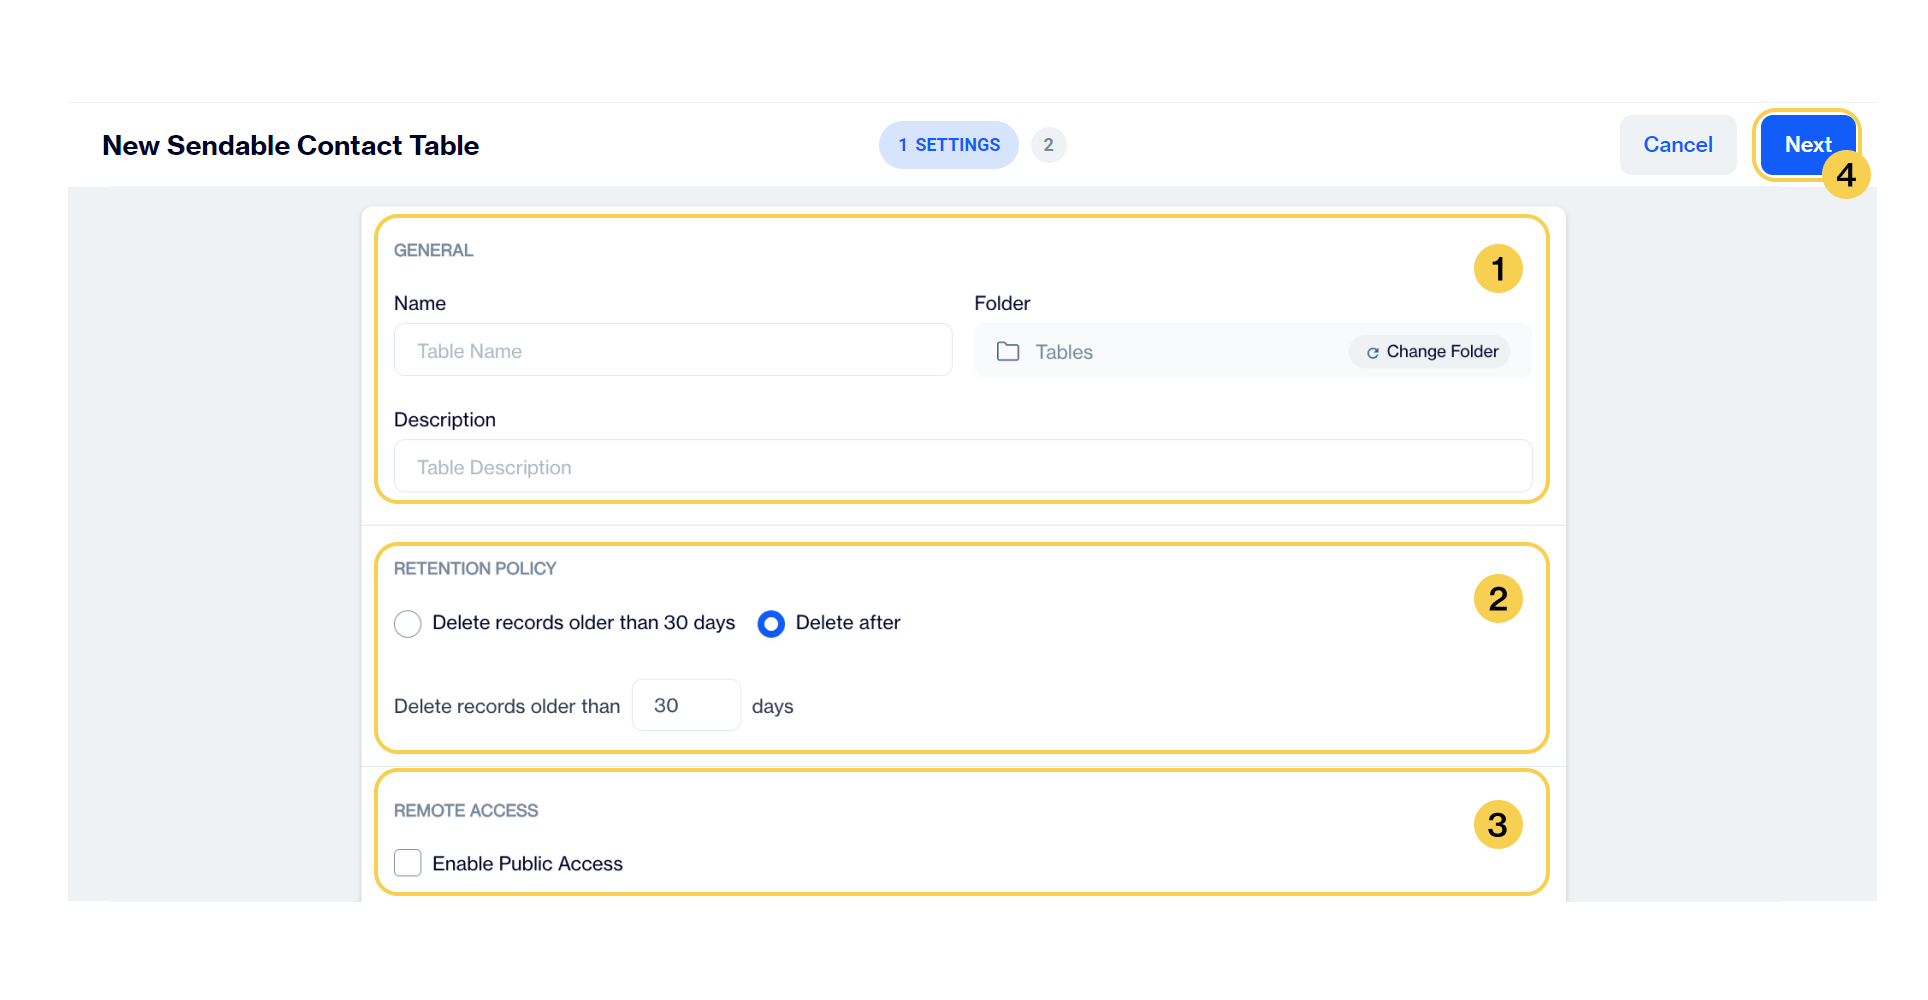
How to create a sendable contact table
Sendable contact tables are imported into the platform to facilitate the dispatch of email/SMS campaigns targeted at specific lists, typically generated from the clients' own CRM systems. This process ensures that campaigns are directed accurately towards segments of interest, leveraging the rich customer data curated within a client's CRM. By integrating these tailored lists into the platform, businesses can execute highly personalized and effective communication strategies, enhancing engagement and fostering stronger connections with their audience. These tables may have any number of columns.
Create a sendable contact table
1️⃣ General
Name: This section allows you to assign a name to your table.
Folder: This section allows you to specify a folder location for the table. By default, the table will be saved in the "Tables" folder.
Change Folder: It will allow you to select a different folder. Please see Changing Folder to learn how to change a folder to organize better.
Description: This section allows you to add a description for the table.
2️⃣. Retention Policy
Delete Records Older Than 30 Days: Specify a rule to automatically delete records older than 30 days
Delete After: Define a custom timeframe after which records will be automatically deleted.
Delete records older than a specified number of days: In this section, you can define a threshold for record deletion based on the number of days.
Automated Record Deletion ProcessPlease note that records meeting the deletion criteria will be automatically removed from the table as per the specified number of days finalized in the corresponding column. This automated process helps streamline data management and ensures the table remains optimized for efficient operations
3️⃣ Remote Access
Enable Public Access: This option allows you to enable public access to the table. This option must be enabled by Dengage Support first to use it. Please be careful using this function which may expose data to the internet via API calls.
Primary Column must be definedIn order to enable public access, the table must have a primary column defined.
4️⃣ Next Button
- Next: This button will navigate to the next step. Please see Add column to understand how to build a table structure by adding columns.# How to create a sendable contact table.
How to create a sendable token table
Sendable token tables are imported into the platform to facilitate the dispatch of mobile push campaigns targeted at specific lists, typically generated from the clients' own CRM systems. This process ensures that campaigns are directed accurately towards segments of interest, leveraging the rich customer data curated within a client's CRM. By integrating these tailored lists into the platform, businesses can execute highly personalized and effective communication strategies, enhancing engagement and fostering stronger connections with their audience. These tables may have any number of columns.
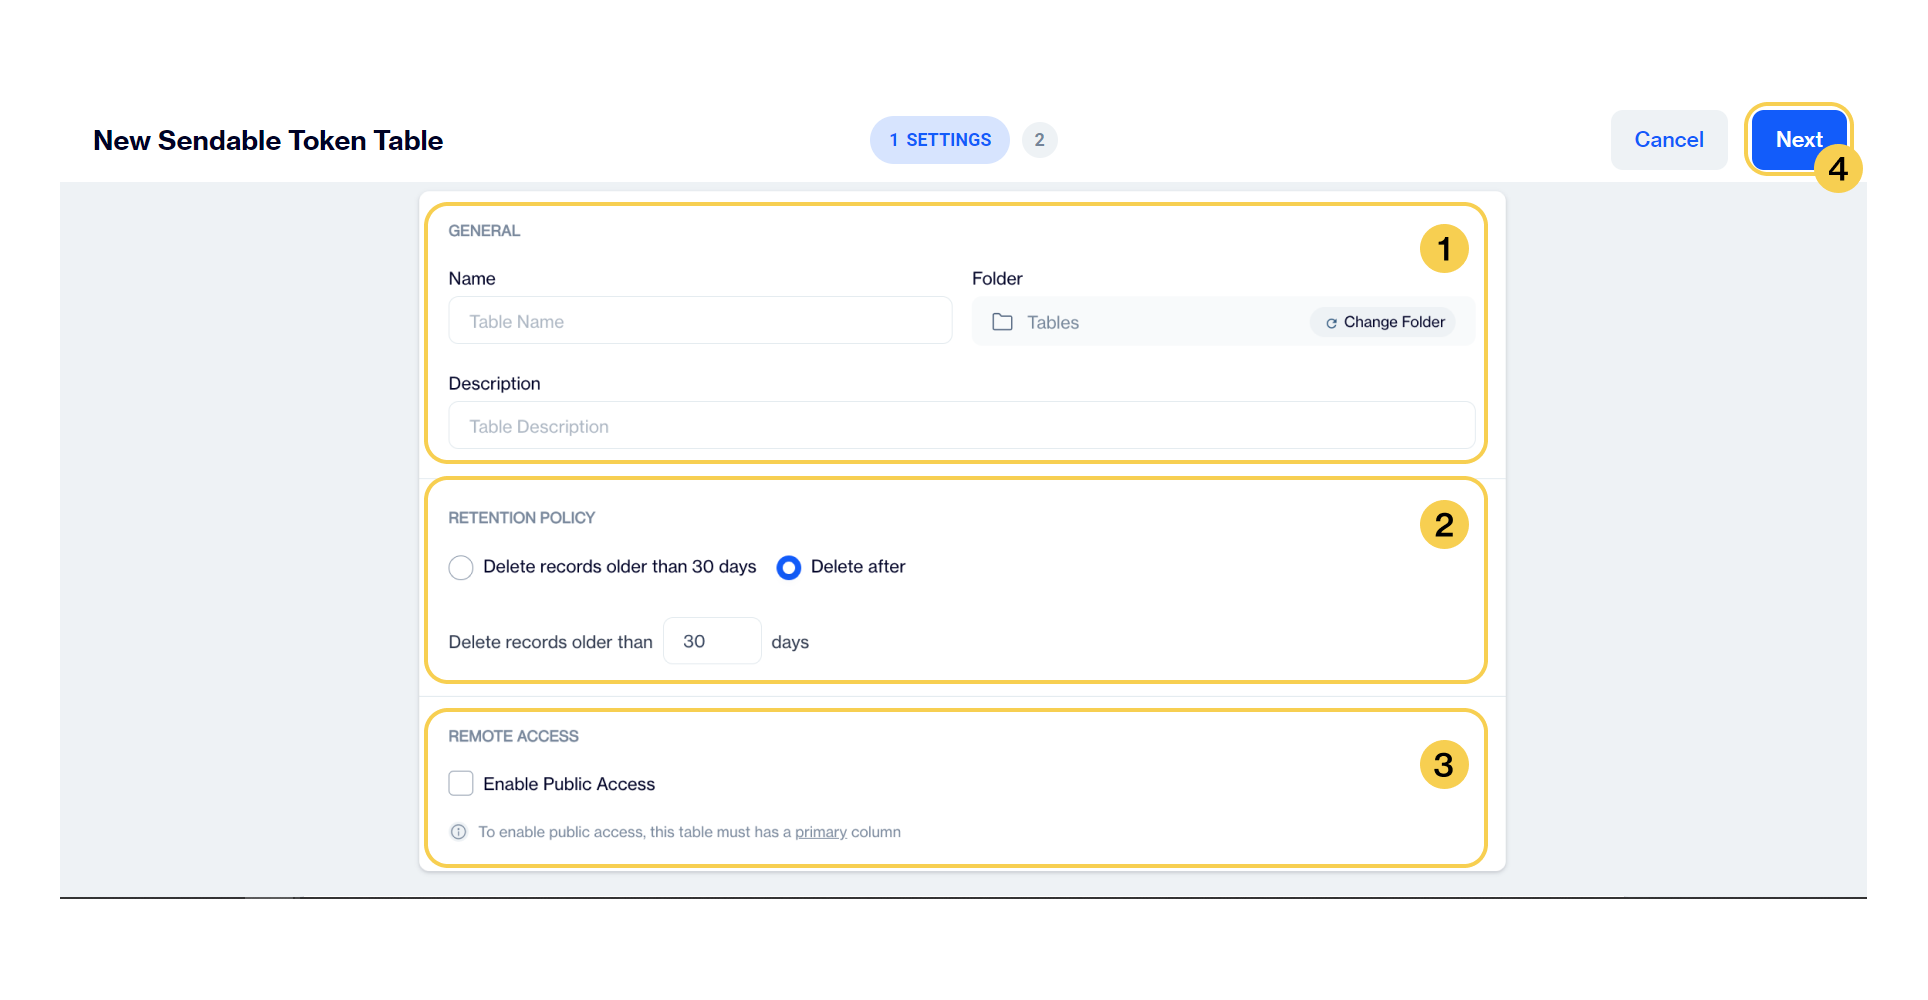
Create a sendable token table
1️⃣ General
Name: This section allows you to assign a name to your table.
Folder: This section allows you to specify a folder location for the table. By default, the table will be saved in the "Tables" folder.
Change Folder: It will allow you to select a different folder. Changing Folder
Description: This section allows you to add a description for the table.
2️⃣. Retention Policy
Delete Records Older Than 30 Days: Specify a rule to automatically delete records older than 30 days
Delete After: Define a custom timeframe after which records will be automatically deleted.
Delete records older than a specified number of days: In this section, you can define a threshold for record deletion based on the number of days.
Automated Record Deletion ProcessPlease note that records meeting the deletion criteria will be automatically removed from the table as per the specified number of days finalized in the corresponding column. This automated process helps streamline data management and ensures the table remains optimized for efficient operations
3️⃣ Remote Access
Enable Public Access: This option allows you to enable public access to the table. This option must be enabled by Dengage Support first to use it. Please be careful using this function which may expose data to the internet via API calls.
Primary column must be definedIn order to enable public access, the table must have a primary column defined.
4️⃣ Next Button
- Next: This button will navigate to the next step. Please see Add column to understand how to build a table structure by adding columns.# How to create a sendable contact table.
How to add a column to a table
Adding a column to a table, with minor variations depending on the table types, is a straightforward process in Dengage CDP, mirroring the simplicity of adding a column to any database table. This procedure ensures that users can easily extend and customize their data structures to accommodate evolving data requirements and insights, facilitating the enhancement of data-driven strategies with minimal complexity.
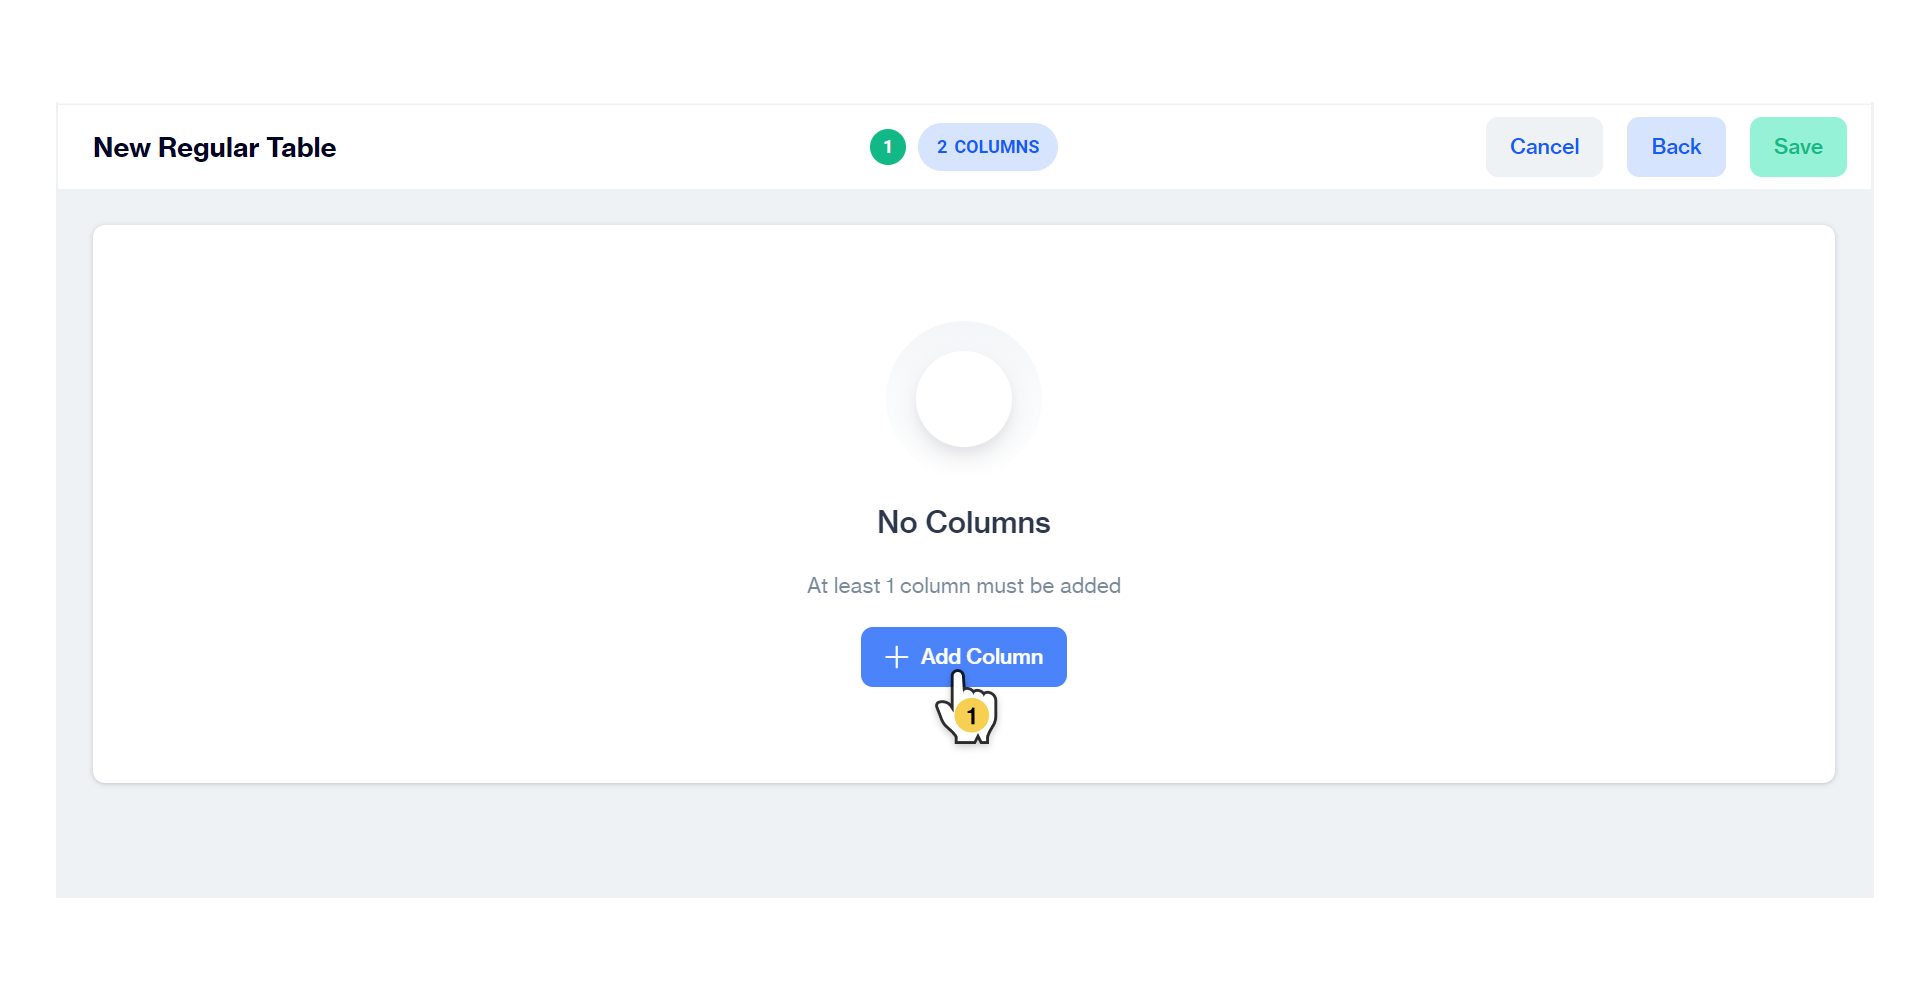
Adding a column to a table
1️⃣ Click on + Add Column :
Upon navigating to the section, users encounter the "+Add New Column" option prominently displayed in the middle of the screen. It will open the control panel to add columns.
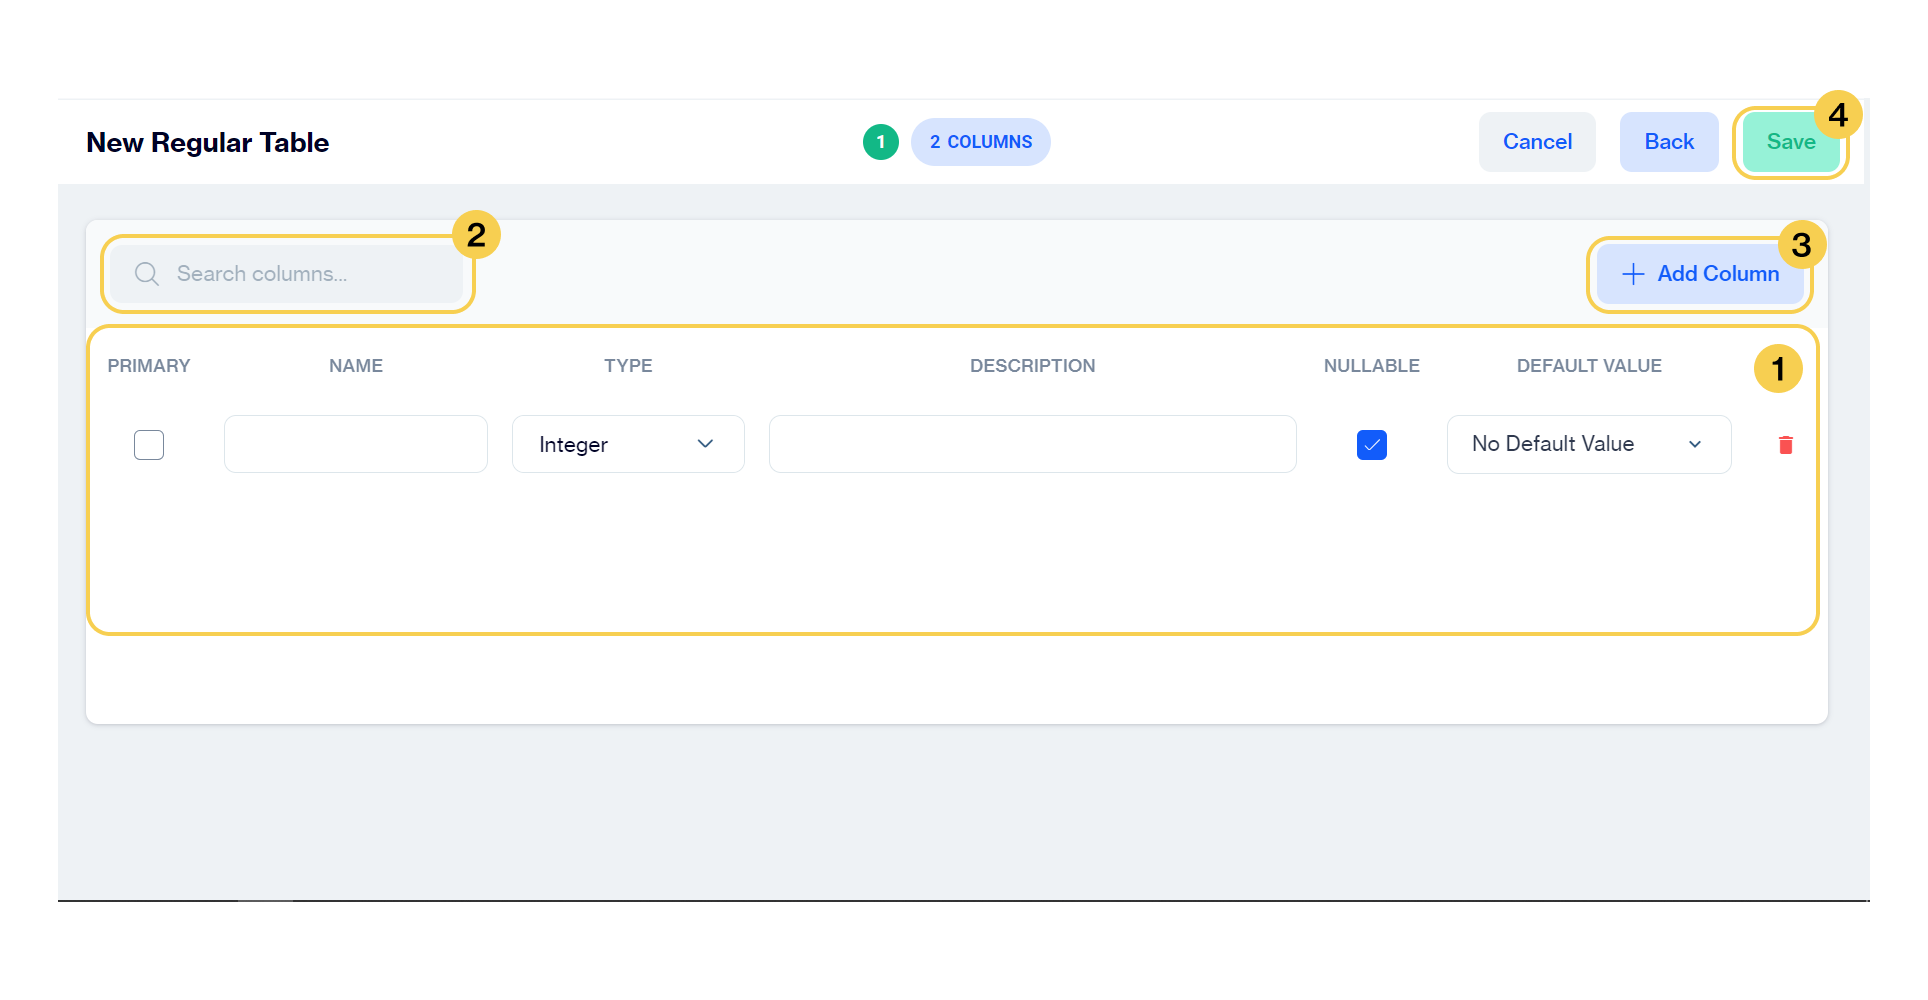
Column creation control panel
1️⃣ Fill in Table Data Fields:
Users are required to fill in the following data fields for adding a new column:
Primary Checkbox:Indicates whether the column serves as the primary key, uniquely identifying each row in the table.
Name (Text):Specifies the name or label for the column, providing a descriptive identifier.
Type:Defines the data type of the column, determining the kind of information it can store.
Integer: Represents whole numbers without decimal points.
Decimal: Represents numbers with decimal points for precise values.
Date: Represents calendar dates.
Date & Time: Represents dates and times together, including hours and minutes.
Boolean: Represents true or false values, useful for binary logic.
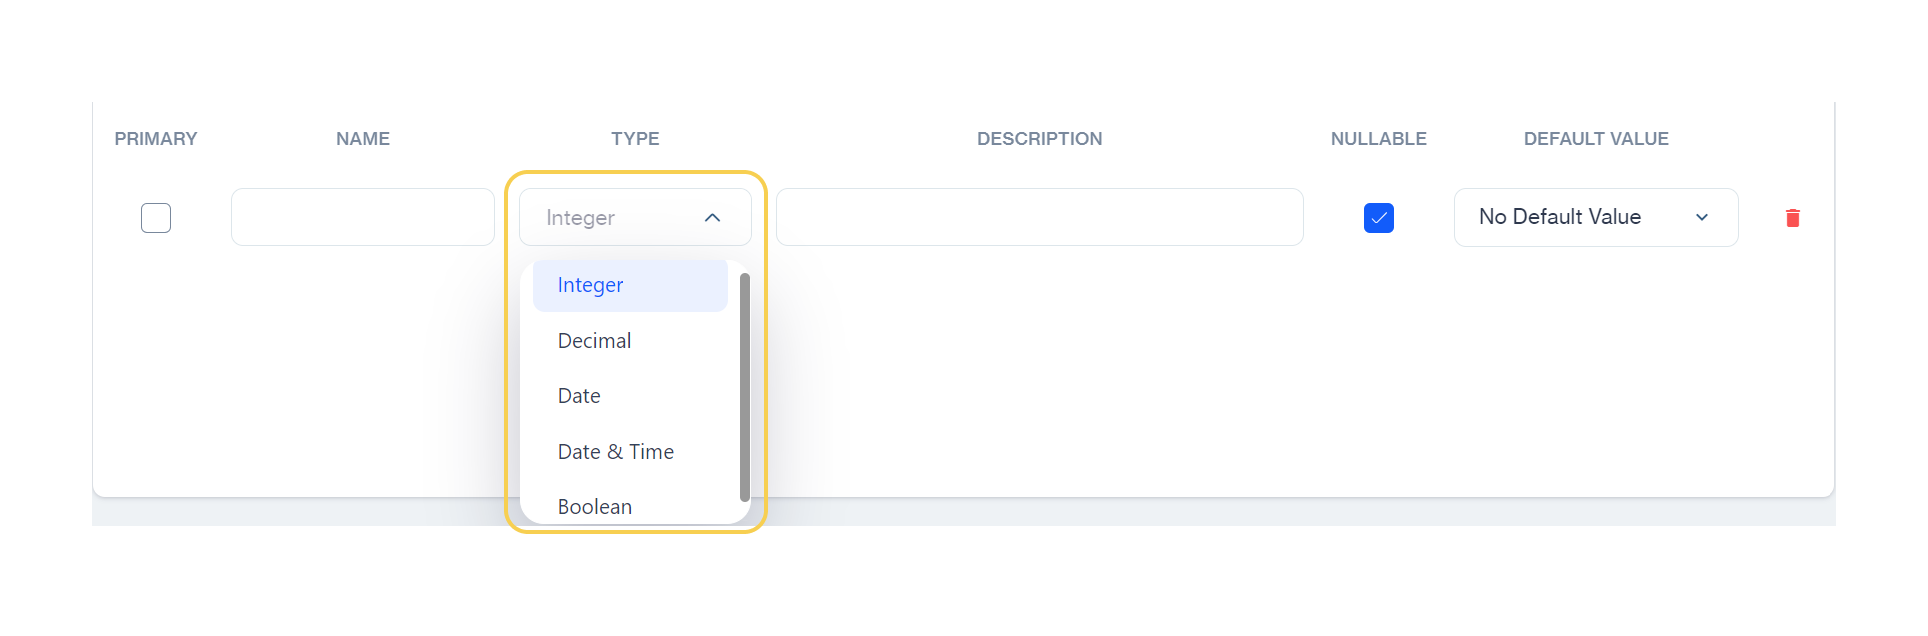
Data Type Selection
Description: Offers an optional field for providing additional information or context about the column's purpose or content. Please fill this column. It will greatly help marketier to understand which columns are used for which purposes.
Nullable Checkbox: Specifies whether the column allows NULL values, indicating whether the field can be left empty.
Default Value: Allows users to set a default value for the column according to the type you select.
- No Default Value: Indicates that the column will not have a default value assigned to it.
- Specific Decimal/Integer/Date/DateTime/Boolean: Opens an input box where users can enter a specific value to be set as the default. When a new row is added to this table, if a value is not provided for this column, this value will be assigned automatically.
Delete:Users can delete the corresponding column from the table by clicking on the delete icon.
2️⃣ Search Columns:
This helps searching columns in a very crowded table.
3️⃣ +Add New Column:
Clicking on this option initiates the process of adding a new column.
4️⃣ Save:
- After completing the table data fields and adding new columns, users can save their changes by clicking the "Save" button.
Complete all mandatory fields before hit SaveTo ensure the process is saved correctly, it is essential that users complete the initial form successfully. All required fields must be filled out before proceeding with the save action to prevent any data loss or incomplete table creation. This step serves as a crucial checkpoint, guaranteeing that all necessary information is provided, thereby maintaining the integrity and completeness of the table structure within the system
Primary Column is mandatory in Sendable Contact and Sendtable TokenWhen creating a sendable token or contact table, it's mandatory to designate a specific column to define the token or contact_key columns, respectively. This requirement ensures that each table has a primary column that uniquely identifies each record, facilitating targeted communications.
As highlighted in the guidance:
For a sendable token table, the system mandates the selection of a token column from among those added to the table. This acts as a unique identifier for each token within the table, crucial for the execution of token-based campaigns.
Similarly, for a contact table, a contact_key (any text column which defines contact_key) or email type or phone number type column must be chosen from the added columns. This contact_key serves as a unique identifier for each contact, enabling personalized and precise communication efforts.
To comply with these requirements, ensure that you add and select the necessary primary columns before attempting to save a new table. The system enforces this rule to prevent the creation of a sendable token/contact table without these essential primary columns, thereby maintaining the integrity and functionality of the database schema.


Big data tables requires contact_key and event_date columns by defaultBig data tables, designed to store substantial volumes of data, come with a specific structure to manage and optimize the handling of large datasets efficiently. As part of their default configuration, these tables include two columns that cannot be removed. This design choice ensures essential metadata is consistently available to support data management practices.
Furthermore, the system automatically partitions these tables based on the event_date. This partitioning strategy plays a crucial role in enhancing the performance of the database by facilitating quicker data retrieval and more efficient storage management. By organizing data into partitions, the system can more easily manage, access, and query large datasets, leading to improved scalability and performance for operations that involve significant amounts of data.
Primary key change on new column creationWhen a column is designated as the primary key within a table, a specific restriction comes into play: the default value option for this column is automatically set to 'No Default Value.' This measure is implemented to safeguard data integrity and consistency across the database. It prevents the assignment of unintended default values to primary key columns, which play a pivotal role in uniquely identifying each row within the table. This restriction is a fundamental data management practice, ensuring that primary keys fulfill their essential function of maintaining unique and accurate records in the database.
Change folder of a table
The Dengage platform offers a structured approach to managing digital assets through the use of folders, allowing different departments within an organization to neatly categorize their objects. This organizational strategy ensures that objects are easily accessible and manageable over time.
The "Change Folder" feature on the Dengage platform facilitates this by enabling users to allocate their tables to specific folders effectively. To utilize this feature, users simply need to name their table and then select 'Change Folder'.
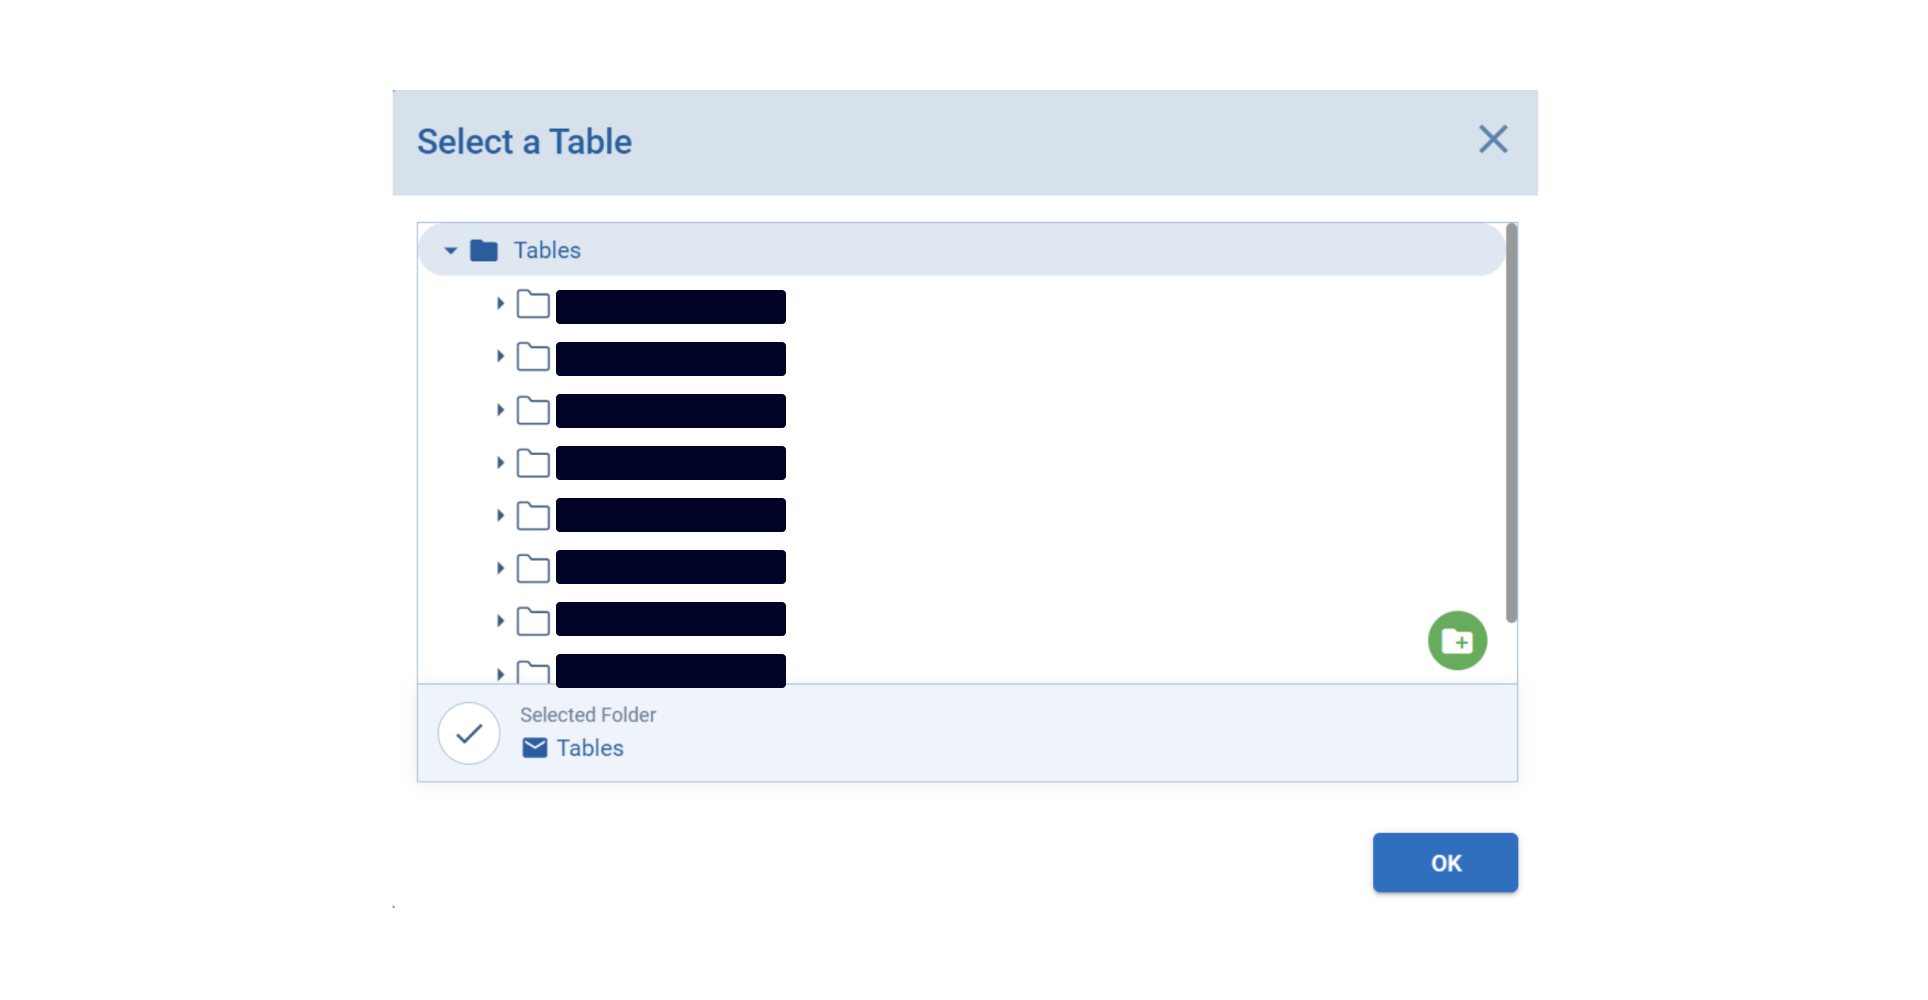
Change folder of a table or create a new folder
This interface allows users the flexibility to either create a new folder by clicking the green button or to assign their table to an existing folder, streamlining the organization process and enhancing usability. This feature is instrumental in maintaining an orderly and efficient database structure, contributing to the platform's overall user-friendly experience.
Updated 10 months ago